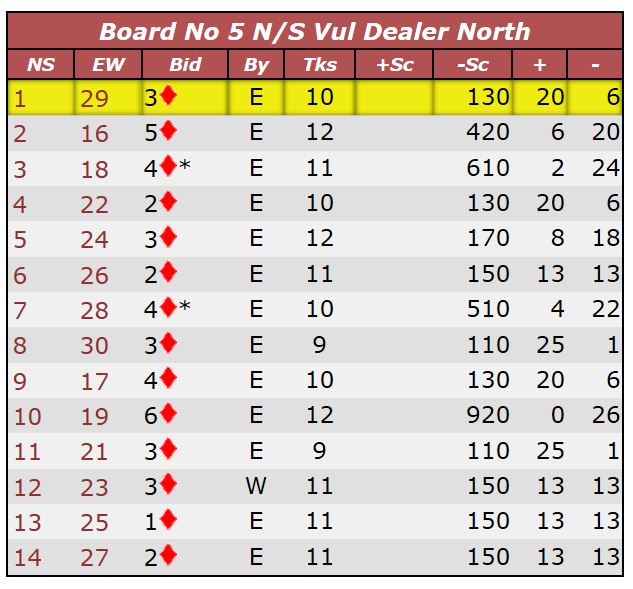
| 2020-02-27 - Did you (or would you) reach the right contract on this hand? |
Show Detail |
How would you bid this hand with your regular partner?
Give it a try before clicking on the 'Show Answer' button below. A couple of bidding gadgets might help...
|
| Show Answer |
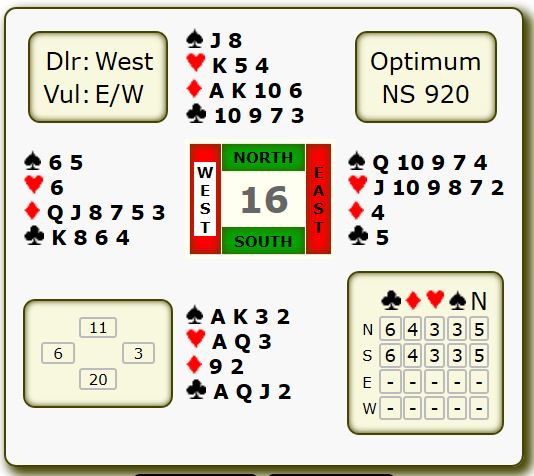
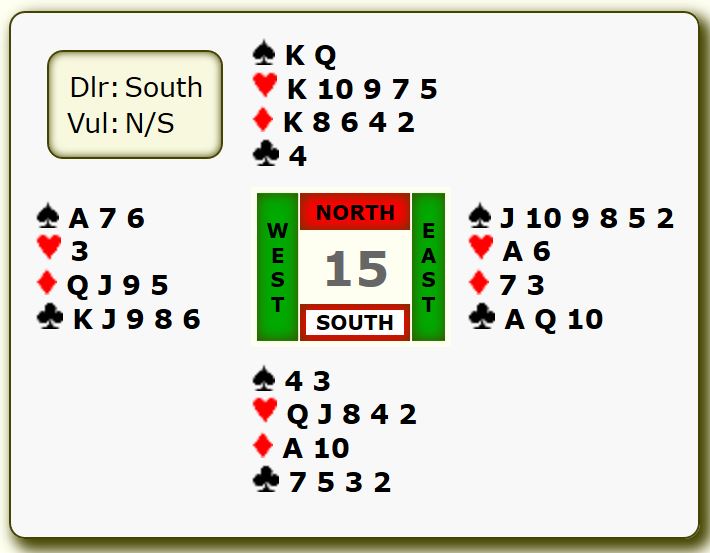
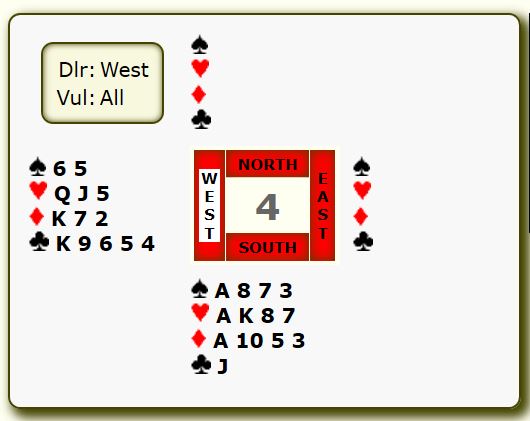
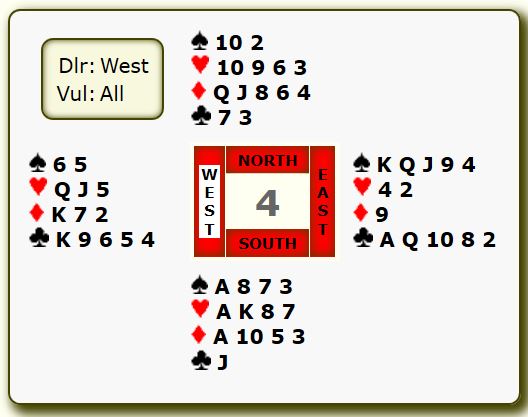
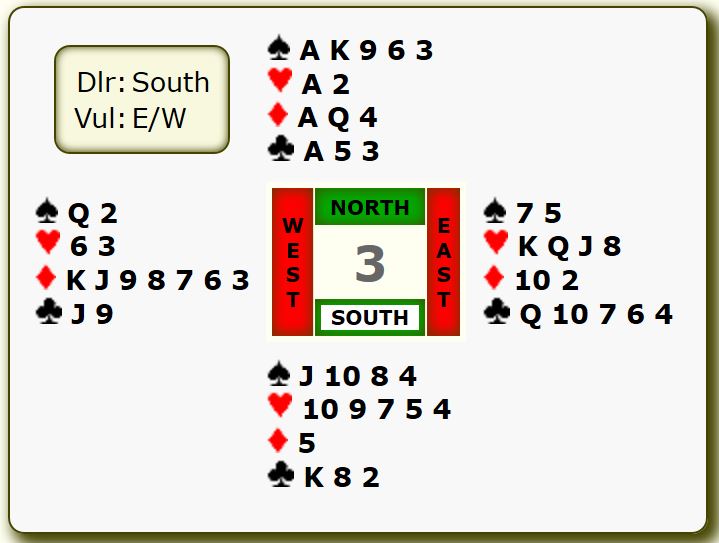
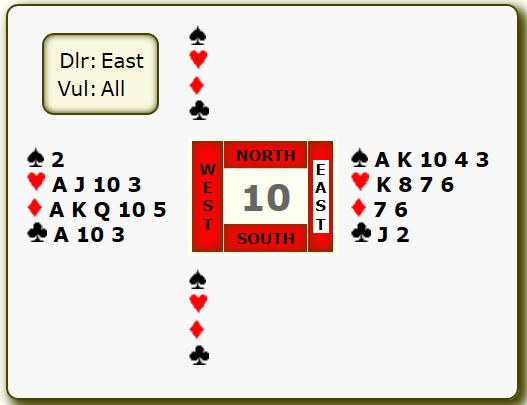
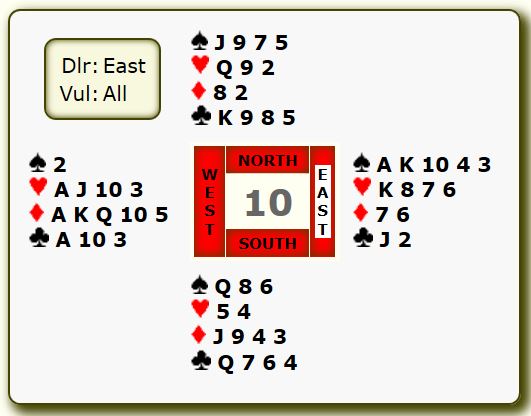
All roads lead to Rome...
The first question is whether West will open the bidding with 1♠.
If he does, then East will bid 2♥ and West will raise to 3♥
Now East can make a cue-bid of 4♣ (♣ A) and West can bid 4♦ (♦ A) which will please East.
East could bid 4NT (RKCB) which might elicit a reponse confirming that West holds ♥ K ...but sadly not on this occasion. East will probably move on to 6♥.
Note that this sequence enables East to pinpoint the ♦ A in West's hand. Also, if East cue-bids the ♠ A then West could show 2nd round contrlol in clubs (either ♣ K or a singleton) by bidding 5♣.
Cue-bids are a very useful means of showing 1st or 2nd round controls in side suits.
Now look what happens if West passes initially.... the bidding develops in a different way but with the same end result.
East opens 1♥ and West will suppress his five card spade suit and bid 4♣. This is a SPLINTER BID and says the following:
1) Partner I have four card trump support
2) I have values for game and a hand that might be useful in a slam if you have a suitable hand
3) I have a singleton or void in clubs
East would be very happy to hear West respond 4♣ as it confirms hearts as the agreed trump suit. Also, East is comforted to know that West has at most a singleton club. At one table East simply bid 6♥ at this point. But East could bid 4NT (RKCB) and West will show his single keycard, either ♦ A or ♥ K. Alternatively, East could make a cue-bid of 4♠ and West would bid 5♦ to confirm 1st round control of that suit, i.e. ♦ A. East will now bid 6♥.
Cue-bids and Splinters are essential tools to have in your Slam Bidding arsenal.
Note also that this hand illustrates, yet again, the Power Of Shape. Indeed with as little as ♦ K J and 4 or 5 trumps in the West hand the slam could still make barring unfortunate breaks in diamonds and/or trumps. It's not always about points, especially in suit contracts! Learn to value the Power of Shape. |
|
|
|
|
| 2020-02-27 - How would you open this hand?7 |
Show Detail |
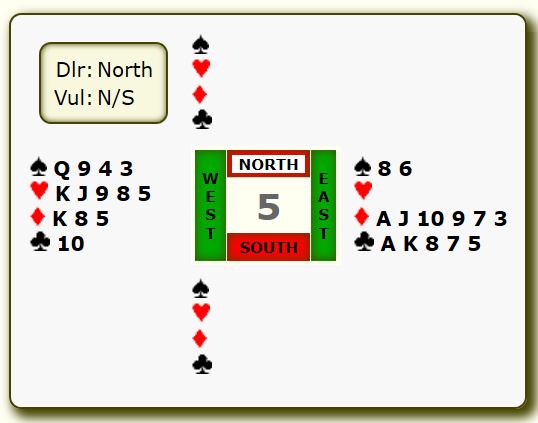
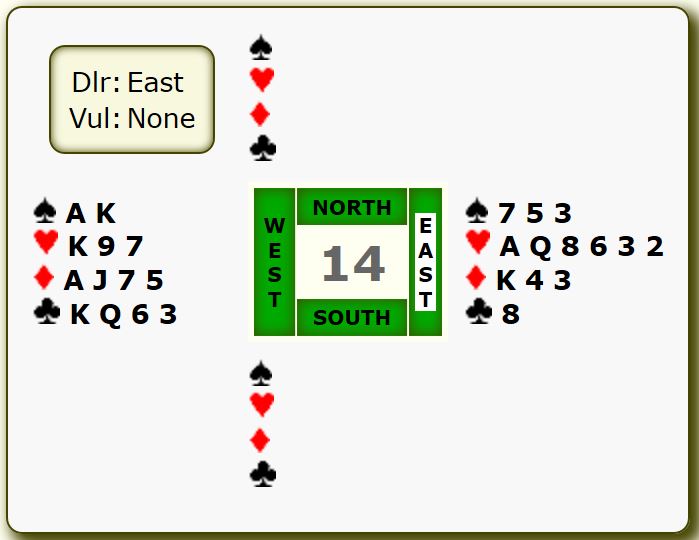
Board #18 seemed to cause problems for E/W on Thursday, 27th February.
As East you hold the following hand. How will you open the bidding?
Give some thought to the question before clickng on the 'Show Answer' button below
|
| Show Answer |
Tip: Never make a bid without thinking about your next bid.
The issue here is how to convey the playing strength of your hand.
If you open the bidding with 1♦ what will you rebid if parrtner responds 1♠ or 1♥ or 1♦ or even 2♣ ...and that's without even considering other possible responbses thatpartner might make.
Over a simple response from partner a jump re-bid in diamonds fails to adequately convey the playing strength of your hand.
So, let's go back to the initial assessment of the hand... This is a hand with eight or possibly nine playing tricks in diamonds. Have you a bid in your system that can reflect that type of hand? And old-style Acol 2 springs to mind but these have mostly gone out of fashion.
Some of the more experienced partnerships who play the Multi-2 Diamonds incorporate a provision to show a hand with eight playing tricks in any suit. One pair, Rory & Maurice, playing such a sytsem reached 7NT after the following sequence:
East West
2♦ 2NT
4♦ 4NT
5♦ 5NT
7♦ 7NT
Explanation of the bidding:
2♦ = Weak 2♠ or 2♥ OR Balanced 23-24hcp OR eight playing tricks in an (undisclosed at this point) suit
2NT = Enquiry. Partner tell me which type of hand you have
4♦ = Eight playing tricks in diamonds
4NT = RKC (Roman Key Card Blackwood)
5♦ = Three KEY cards (♦ A K, ♣ A)
5NT = Intersted in a Grand Slam and confirm no KEy cards missing and asks opener to show how many Kings or a source of trciks.
7♦ = Based on his diamond suit and extra club tricks (♣ K Q)
7NT = Protccts against a heart lead wher East may not have ♥ K. Note that West can count at least eleven tricks...partner's eight and his own top three. In addition, if partner does not have ♥ K there is the possibility of a successful heart finesse which will bring the total to 12 or 13. And West's club suit might produce an extra trick.
Note that West's bidding is based on visualising East's hand. You must have trust in your partner's bids and you must be able to imagine what partner's bidding shows. This is all about systems and partnership trust in what the bids show!
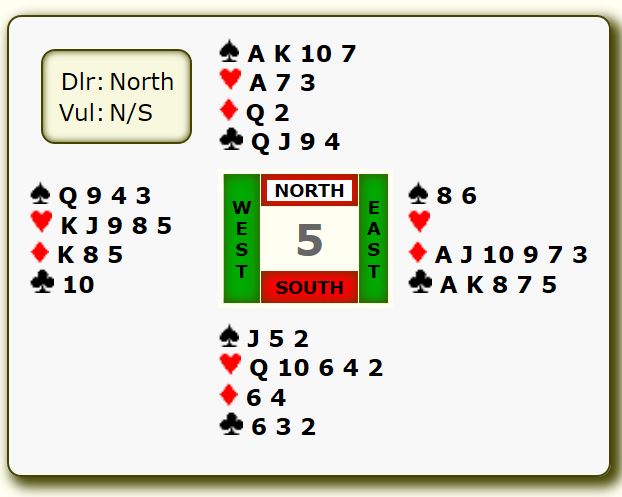
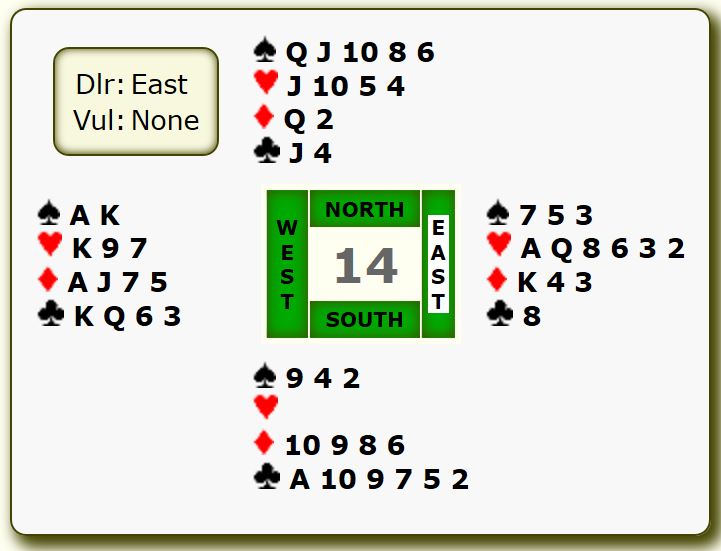
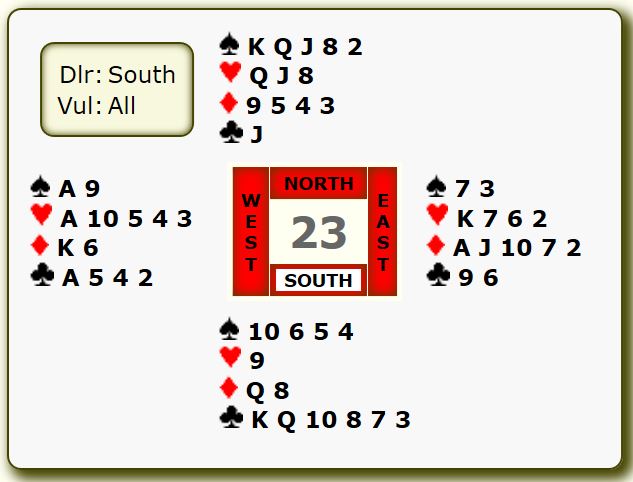
Below is the full hand and results.
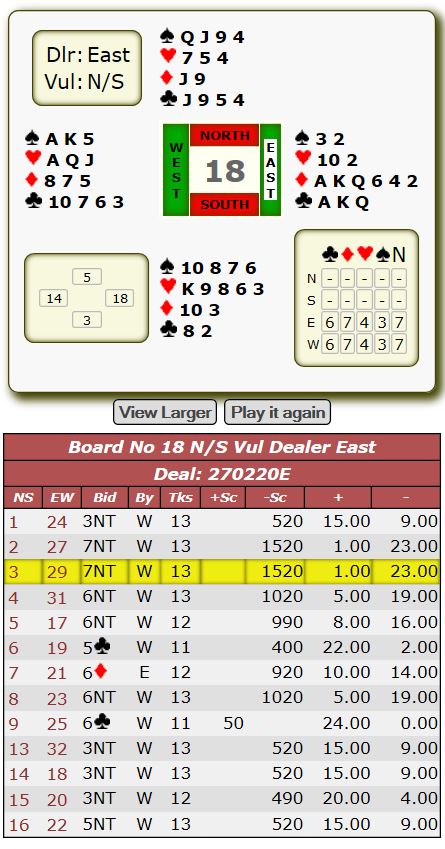
Note:
The hand was played twice with clubs as trumps, once in 6♣, which failed, and once in 5♣ which was held to eleven tricks. As the hand record suggests, twelve tricks can always be made in clubs.
Two different plays will bring home 12 tricks on the layout as shown above.
1) Win any lead and cash three top clubs. Then play play safely to the West hand WITHOUT setting up a spade (or heart) trick for the defense, i.e. if a heart was led into declarer's ♥ A Q J then play a spade to hand and play the last club. If a spade was led then declarer will have to take a heart finesse to hand and then play the last club. Win any return and cash winning diamonds, hearts and spades. THIS LINE WILL WORK AGAINST ANY 4-2 or 3-3 trump break irrespective of whether North or South holds four trumps.
2) Win any lead and cash TWO top clubs only. Now play diamonds from the top. If North ruffs then win any return and play a club to dummy's ♣ Q drawing North's last club in the process. Now cash remaining diamonds and winners in other suits. If North refuses to ruff a diamond then cash all six diamonds, discarding spade and heart losers from hand, before cashing spade and heart winners. NOTE: If trumps actually break 3-3 then Soth might ruff the third diamond in which case declarer can overruff. If North, holds ♣ J he could overruff declarer but that will be the end of the defense. Defenders have no more trumps and no winners in other suits.
Moral of the story is that if you find yourself in a tricky contract it is important to consider your play adn see how you might bring home the requiiste number of tricks.
Bear in mind that when missing six cards in a suit the odds favour that the suit will NOT break evenly! |
|
|
|
|
| 2020-02-20 - A duck in time is worth nine...as long as it's done smoothly! |
Show Detail |
As West you find yourself defending against 3NT after North opened 2NT and South raised to 3NT.
Partner leads ♥2 and dummy is tabled.
Declarer plays the ♥ K from dummy.
Over to you...
Have you formed a defense or at least decided what to do at trick one?
Give it sone thought before clicking on the 'Show Answer' button below.
|
| Show Answer |
Okay...did you do your thinking before playing to trick one?
N/S clearly hold 30-32hcp leaving your partner with a minimum of 4hcp and a maximum of 6hcp.
Did you note partner's lead...♥ 2 signalling an honour. With four small cards (9 or lower) the correct lead is the 2nd highest suggesting the absence of an honour!
Clearly we should recognise that partner has the ♥ J...but declarer doesn't know that!
What card we play at trick should be determined by what card declarer plays from dummy!
If declarer plays the ♥ K or ♥ Q we should DUCK!
Playing the ♥ A sets up a finesse against partner's ♥ J on the second round of the suit.
Ducking leaves declarer with a losing option, i,e. if the ♥ K (or ♥ Q) wins the first tricks then declarer may decide that East has led from ♥ A and may play dummy's remaining honour on the second round of the suit which we can win with our carefully preserved ♥ A and then play a third heart to partner's ♥ J.
If we beat the ♥ K (or ♥ Q) at trick one then declarer will have the option of finessing against partner's ♥ J on the second round of the suit.
Now watch what could happen if declarer wins the first trick with dummy's ♥ K. Declarer will likely (and should!) take a diamond finesse leaving the club honours as entries to dummy to repeat the diamond finesse if required.
But, partner can win the first diamond and if he/she now returns a heart at trick three declarer has to guess right in selecting which heart to play from dummy. And that's where your original duck on the opening lead may now reap its reward.
This holding is not an isolated incident. Anytine that you hold Axx over KQ10(x) it is ofteen the right play to duck if declarer plays either honour on the first round of the suit. The same can apply when the 10 (or 109) are in declarer's hand! Winning the first round of the suit with your Ace leaves declarer in a position to finesse against partner's Jack on the second round of the suit. Ducking leaves him with a losing option!
But note you must duck smoothly! You should anticipate the play as soon as dummy hits the table. You may have a few seconds to think as declarer is assessing dummy and planning his play. But any hesitation at your turn to play is likely to give the game away!
Sadly, the scoresheet from last week records that all declarer's made 11 tricks!
This was the full hand:
|
|
|
|
|
| 2020-02-06 - Can you make 4S... OR would you prefer to defend? |
Show Detail |
As South you overcall 2♠ (Weak) after East opens the bidding with 1♥.
West raises his partner's opening bid to 4♥ and North bids 4♠.
Are you hopeful to make the contract?
Click the 'Show Answer' button to read further
|
| Show Answer |
As to whether or not you can make 4♠ that depends on the following factors:
1) The opening lead
2) Your declarer play
3) How the opponents defend after the opening lead
If West leads a heart then the contract cannot be defeated by the defenders.
A) On a heart lead you win in dummy and play a spade covering with ♠ Q if East plays the ♠ J.
Win a heart continuation (ruff in hand) or club switch (win in hand), and then play a second trump. Dummy now holds a third trump (♠ 8) to deal with a third round of clubs or as a possible entry to dummy.
A defender will win the second trump and if he continues with a third heart you ruff in hand and lead a diamond, finessing the ♦ J. If East ducks, then play a club to ♣ A in hand and lead a second diamond covering West's ♦ Q. It doesn't matter whether East ducks or not. You can win any return and if necessary ruff a club in dummy and cash the remaining diamond winners.
B) On a club lead...win in dummy with ♣ A and lead a trump. Win the likely club continuation and play a second trump. If defenders continue with a third club ruff this in dummy and cash ♥ A and ruff a second heart in hand and then finesse ♦ J. If East ducks then ruff dummy's last heart and repeat the diamond finesse.
You will now score 4 trumps in hand, 1 heart, 2 top clubs and 1 club ruff in dummy, 2 diamonds, i.e. a total of 10 tricks.
C) If the defenders start by cashng two top trumps and switch to hearts or clubs then proceed as before, taking the diamond finesse as necesasey.
And of course if you check the hand records you will note that declarer can be held to NINE tricks... How so?
Well, it's an unusual and likely impropbable defense.
Why not take a minute to have a look at the full hand and see can you work it out for yourself before reading further... This was the full hand:
D) To defeat 4♠ West must lead a diamond and East MUST duck. West MUST win the first round of trumps and continue with a diamond which East will win and then give West a ruff giving the defense FOUR tricks.
Note what happens if declarer attempts to ruff a third club in dummy before drawing trumps... the defense will score FOUR tricks... two top trumps, a club overruff, and ♦A.
Bridge is an easy game, right?
Paul J Scannell, 12th February 2020 |
|
|
|
|
| 2020-01-30 - Anyone for Exclusion Blackwood (Voidwood)? |
Show Detail |
On Thursday, 30th January 2020, N/S faced an interesting bidding challenge on Board #21.
Let's assume, that with opponents silent, South opens 1♣ and North responds 1♥
How should South proceed?
Clearly a slam is on the cards but the question may be whether it should be a small slam or a grand slam and also whether the denomination should be clubs or hearts?
Give the problem some consideration before clicking on the Show Answer button below.
|
| Show Answer |
Assessing South's hand it seems that hearts offers the better option in so far as the club suit can be used to discarding potential losing spades from the North hand and that ultimately South's losing spade can be ruffed in dummy.
Playing with clubs as trumps means that declarer will have a losing spade unless North has one of the following:
a) ♠ K
b) ♦ A
c) five hearts (discarding South's losing spade on dummy's long heart)
HOWEVER, the bigger question is whether the final contract should be a small slam or a grand slam?
What cards do we need North to hold in order to bid a Grand Slam?
There are two key cards that would facilitate bidding the Grand Slam...the ♣ A and the ♥ Q
The question is how to ascertain if North holds either or both of these cards.
Using regular Blackwood or even Roman KeyCard Blackwood will NOT resolve this issue UNLESS North holds ♦ A and ♣ A as well as ♥ Q. Bidding 4NT (Blackwood or even Roman Key Card Blackwood) will leave South with a problem if North shows ONE Ace. South will have no way of knowing if North holds ♦ A or ♣ A
BUT...there is a version of Blackwood designed for this specific situation. Its' called Exclusion Blackwood (AKA Voidwood).
Simply put, once a trump suit has been agreed, a JUMP to the four or five level in an unbid suit (or a suit bid by the opponents) is Exclusion Blackwood and asks responder to show the number of keycards in suits except the one shown by the Exclusion Blackwood bid.
In this example South can bid 5♦ (Exclusion Blackwood) opposite North's 1♥ . This agrees hearts as trumps and asks North to shows his keycards in all suits EXCEPT diamonds!
North will show an ace which clearly has to be the ♣ A (South holds ♠ A, ♥ A K) . Remember that North must not include the ♦ A in his response.
South can now enquire about the trump queen and when North shows that card then South can bid 7♥ with a degree of optimism.
Note that if South re-bids 4♦ over North's 1♥ thsi would be a Splinter, agreeing hearts as trumps and promising a singleton or void in diamonds. Note also that some partnerships play 3♦ in this sequence as showing a singleton diamond whereas 4♦ promises a diamond void.
Resposnes to Exclusion Blackwood can be the same as the partrnership uses for Blackwood or RKCB.
This was the full hand:
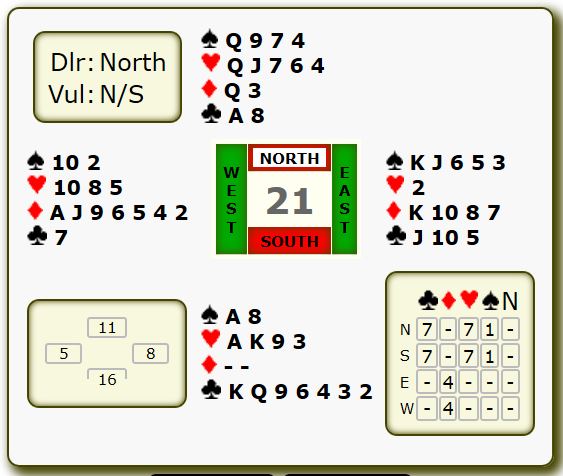
Note that 7♣ only makes because North has a fifth heart!
Also, note that on the night there were bids that could possibly be made which would upset the apple cart! It was for that reason that I suggested that the opponents remained silent simply to illustrate how Exclusion Blackwood could be used! However one or all of the following might disturb an otherwise easy N/S sequence to 7♥:
1) North opens the bidding with 1♥ or even 2♥ (the Flannery convention promising 11-15 hcp with 4 spades and 5 hearts. Partnership agreement re the use of Exclsuion Blackwood might still enable South to respond with an immediate bid of 5♦ whereas others will play this as being natural.
2) West is unlikely to stay silent with a seven card diamond suit and favourable vulnerability.
Traveller records shows the follwoign results:
5x 6♥
1 x 6♣
1 x 5♥ x
1 x 5♥
4 x 4♥
Sometime it's not the number of high-card points that a partnership holds that matters but rather the shape and playing strength of the two hands!!!
Some links for those that might want to explore this topic further:
http://mjbridge.info/continuing/page17.html
https://www.bridgebum.com/exclusion_blackwood.php
https://www.bridgewebs.com/alton/EBU%20-%20Stage%202%20Conventions%20-%20Exclusion%20Roman%20Key-card%20Blackwood.pdf
And an experts forum where variations are discussed in some detail. Not for the faint-hearted!
https://bridgewinners.com/article/view/attention-all-exclusion-blackwood-users/
Paul J Scannell, 5th February 2020 |
|
|
|
|
| 2020-01-23 - 4NT...Quantitative ...not looking for aces! |
Show Detail |
It's not often that the final contract reached is 4NT...but this is one such instance.
On Thursday 23rd January, North is faced with a standard 2NT opening (or re-bid after opening with 2♣ or 2♦ according to bidding system) on Board #16.
How should North proceed? Do you bid on to a small slam or remain at game level?
Click the 'Show Answer' button below when ready to read further.
|
| Show Answer |
Board #16 on Thursday 23rd January provided N/S pairs with an interesting bidding challenge. [Note: If East opens the bidding then the challenge becomes more difficult, Suggested sequences below assume that East does not open the bidding.]
NOTE: The recommended point count for 6NT is 33-35hcp where the hands are balanced. Note that with 33+hcp the opponents cannot hold two cashable aces!
South will probably open 2NT (or a strong 2♣ or 2♦ with a 2NT re-bid) to show a hand with 20-22hcp according to agreed partnership bidding system. Yes, some pairs play an opening 2NT to show exactly 20hcp which works well here but in the long run is wasteful.
If South does open 2NT showing precisely 20hcp then North should raise to 3NT and that should be the final contract....20hcp + 11hcp promises only a total of 31hcp.
If, on the other hand, South's opening bid (or re-bid) of 2NT promises 20-22hcp then North needs to proceed with caution.
The problem that North faces when partner opens (or re-bids) 2NT showing 20-22hcp, is that with 33hcp the partnership would like to bid the small slam but with only 31hcp would prefer to opt only for game.
The question is how to identify whether opener holds 20hcp or 22hcp. With 21hcp you will have to upgrade or downgrade and take your chances...unless you have an option to show 21hcp!
A simple solution is for partner to use a Quantitative 4NT opposite the 2NT opening bid or re-bid.
Simply put the responder bids 4NT (NOT ace-asking) opposite opener's bid (or re-bid) of 2NT.
Using standard responses opener bids as follows:
- Holding 22hcp: raise to 6NT
- Holding 20hcp: PASS
- Holding 21hcp: upgrade or downgrade the hand and bid accordingly as outlined above.
Responder should hold 11hcp or 12hcp in order to raise openers's 2NT to 4NT thus promising a combined point count of 31-34hcp. That enables opener decide whether to raise to 6NT or PASS.
On this occasion:
- 5 pairs bid 3NT
- 2 pairs reachd 4NT
- 5 pairs bid to 6NT and all suffered defeat
NOTE: The Quantitative 4NT can be used opposite any NT opening or re-bid. In all cases it asks the responder to the 4NT bid to pass with a minimum within the range shown by the NT opening or re-bid, or to raise to 6NT when holding the maximum within the specified range.
For example, if responder has a balanced hand with 19hcp opposite partner's opening bid of 1NT (12-14hcp) then a Quantitative 4NT invites opener to bid 6NT with 14hcp, PASS with 12hcp and upgrade or downgrade a hand with 13hcp and bid accordingly.
Opposite an opening bid or a re-bid of 1NT promising 15-16hcp or 15-17hcp then responder can use the Quantitative 4NT with an appropriate hcp holding, i.e. 17hcp opposite a 1NT showing 15-16 hcp or 16-17hcp opposite a NT opening bid or rebid that promises 15-17hcp.
The Quantitative 4NT is a useful tool to have in your bidding armoury. It helps to keep you out of poor slams on balanced hands!
For those interested in further study of this topic I would recommend that you Google 'Quantitative 4NT'. There are quite a few variations re the use of bids other than what is outlined above!
This was the full hand:
Paul J Scannell, 4th February 2020
|
|
|
|
|
| 2020-01-16 - Sherlock Holmes makes a 'Virtual Visit' to Tribes Bridge Club and counts to 13! |
Show Detail |
Sherlock Holmes made a virtual visit to the Tribes Bridge Club recently via the broadband service newly installed at the super sleuth's home at 221B Baker Street, London. Holmes had visited the Galway Bridge Centre on 4th September last year during a brief sojourn in Galway when he found Board #11 of interest. (https://www.bridgewebs.com//cgi-bin/bwx/bw.cgi?club=galway&pid=display_page8#rule_11) [Scroll down the page to find 4th September, Board #11]
But on this occasion the following hand caught his attention.
Board #25 sees West at the helm in 6♣ after North opens 2♥ (Weak) and East makes a take-out double. South bids 2♠. West closes the auction with an optimistic 6♣.
North leads ♠ 10 and South wins with the ♠ A and switches to ♥ 3
When you lead a club towards dummy North shows out. And when you you play a spade to your ♠ K, North again shows out!
Over to you...
Consider your play before clicking on the Show Answer button below.
|
| Show Answer |
Sherlock Holmes had been viewing recent results for the Tribes Bridge Club and this particular hand caught his eye. Whilst enjoying a quiet evening at their Baker Street residence, Holmes suddenly announced in a gleeful tone...'It's easy. Just count to 13.' Dr. Watson, his companion and good friend, was taken aback at this sudden outburst from his normally reserved companion and gently prompted Holmes to elaborate. Holmes replied, in a deliberate and measured voice...'take a look at this hand my good fellow', as he pointed to what was displayed on the computer screen on the side table, 'and then see if you don't concur with my analysis...it's just a simple case of counting to 13'.
Watson strode over to the computer screen and peering over Holmes shoulder he saw what Holmes was studying.
'Nine pairs played with clubs as trumps. Only two declarers made 12 tricks, including two of the three that bid the small slam. It's a fascinating deal and only requires an ability to count to 13 to make 12 tricks' continued Holmes as Watson tried to follow the thinking of his illustrious companion.
Watson knew that there were thirteen cards in each player's hand and that each hand resulted in thirteen tricks but he couldn't work out how this information would enable a declarer to make twelve tricks on this hand. Puzzled, he voiced his thoughts to Holmes who responded in a somewhat rebuking voice...'Yes, my good man...off course there are thirteen cards in each player's hand and each deal produces thirteen tricks. That's elementary, Watson.'
Holmes continued, with a slight touch of exasperation in his voice...'What's at issue here is the ability of declarer to count the thirteen cards in a particular player's hand and then to use that knowledge to successfully squeeze the maximum number of tricks from the hand. Oh, Watson...there I go again...unintentionally foisting a little pun on you. How naughty of me!'
Somewhat perplexed, Watson decided to bide his time as Holmes elaborated further.
'Well, I can reliably advise you that North opened the bidding at one table with 2♥ (a weak two). East made a take-out double and South bid 2♠ leaving it up to West...
West pondered for a while and eventually bid 6♣ which was followed by three passes. North, on lead, enquired about East's double whereupon West replied that it was take-out, with more than a minimum opening bid. Watson quickly pointed out to Holmes that East's hand might prove to be a disappointment to declarer when dummy tabled his cards which only amounted to a minimum opening bid!
Watson studied the two hands on the screen and pondered how Holmes' comment about counting to thirteen would point the way to making twelve tricks. But despite a studious assessment of the two hands he couldn't see how declarer could successfully bring home the requisite twelve tricks.
He could see that declarer could count on 1 spade, 2 hearts, 2 diamonds, 6 clubs...but that only amounted to eleven tricks. Watson internally re-hashed Holmes reference to declarer's ability to count to thirteen as being the route to successfully amassing twelve tricks but, no matter how hard he tried, he simply floundered in his attempts to identify the solution.
Finally he admitted defeat and asked Holmes to reveal the secret to the hand.
'Well', said Holmes...'let's start with the bidding...North has shown a hand with 6 hearts. Also, South has shown some spades, presumably 6 or more otherwise he would have passed partner's opening 2♥.
And then Holmes drew Watson's attention to the play to the first few tricks. North led ♠ 10 which South won with ♠ A. South then switched to a heart hoping his partner held ♥ A in which case the contract would fail by two tricks if North subsequently gave South a ruff. And perhaps South could then give North a spade ruff to defeat the contract by three tricks.
But declarer won the first heart and then played the first round of clubs, winning with dummy's ♣ K, as North showed out. And when declarer safely led a spade towards his ♠ K, North again showed out.
It was at this point that Holmes triumphantly announced... 'Case closed', to his still floundering friend, using that familiar tone which Holmes always deployed after solving a fascinating and challenging crime.
Watson was flummoxed. He privately conceded that his illustrious crime-solving friend was always quick to spot obscure clues that solved crime cases but he could not identify why Holmes was so quick to announce that this mystery was solved after a mere 3 tricks had been completed.
'Holmes, my good and brilliant friend', Watson pleaded, 'please expand further for the benefit of my less than capable brain cells which seem to have totally closed down on this occasion!'
'Okay', responded Holmes, 'lets start by reviewing the evidence. North has shown one void (clubs) and a singleton (spades). That leaves him with twelve cards in the red suits but with a declared holding of six hearts due to his opening bid of 2♥. Note that South returned a heart at trick two thus ruling out the possibility of North holding 7 hearts!'
'Okay' retorted a clearly frustrated Watson, 'but', he continued, 'how does that carry any relevance to the ability to count to thirteen and thus enable declarer to bring home twelve tricks?', a clearly impatient Watson announced to his dearest, but oft-times perplexing, friend.
'Easy', intoned Holmes. 'Let's count to thirteen...North is now known to have six diamonds in addition to his six hearts and singleton spade.' explained Holmes. 'That accounts for North's thirteen cards' declared Holmes with that most irritating of smiles now starting to crease his face.' Yes, Holmes was entitled to his smugness but sometimes it left Watson feeling somewhat embarassed/inadeqaute that he couldn't share in the jubilant moment...not at least until Holmes finally showed his full hand (surely not another pun!).
'Well', continued Holmes, 'if North holds six hearts and six diamonds, how many cards does South hold in these two suits?'
And slowly the truth began to dawn on Watson. South could only hold a singleton heart and a doubleton diamond (another example of counting to 13...North holds 6, West has 2, East holds 3...and therefore South can only hold 2!)
'Oh, Holmes, you genius!' spluttered Watson as he suddenly realised that North could be squeezed in the red suits for the twelfth trick. Declarer could simply cash all his clubs producing the following four card ending with West on lead:
West plays the ♣5 and North is squeezed in hearts and diamonds. If North discards a heart then West discards a diamonds from dummy. If North discards a diamond then West discards the heart from dummy. Either way, declarer will win the last four tricks.
Note that all of this emanated from declarer's ability to 'count' North's 13 card distribution and consequently realise that South was unable to help his partner because of his inability to guard/protect either red suit in the four card ending.
This was the full hand:
Note also that South might have considered continuing with spades at trick 2 in the absolute knowledge (review the opening lead!) that North had a singleton spade. But, on the other hand, the heart switch is not unreasonable on the basis that West was expecting a stronger hand from partner.
So, the moral of the story, as clearly illustrated by the legendary Sherlock Holmes, is to develop the ability to count to thirteen and not just in respect of the number of cards held by each player or the number of tricks in each deal, and to use the knowldge gleaned with regards to identifying the holdings in suit(s) held by the other defender! And the same holds when you are defending...try and count declarer's holding in a suit(s) based on an assessment of the number of cards held by partner, dummy and yourself. You should always be able to count to thirteen!
(c) Paul J Scannell, 29th January 2020 |
|
|
|
|
| 2020-01-09 - Can you form a plan to make 12 tricks? |
Show Detail |
Board#22 on Thursday, 9th January was interesting. Ironically 3 pairs bid to 6♥ and all failed to make 12 tricks whereas 3 other pairs bid to 4♥ and all made 12 tricks! And yes, some pairs bid 4♥ and made 11 tricks, or in one case made only 10 tricks.
How would you have fared?
As East you find yourself at the helm in 6♥. South leads the ♣ 6.
Resist the urge to click on the Show Answer button until you have formulated your plan?
|
| Show Answer |

As East you are declarer in 6♥. South leads ♣ 6.
As is repeatedly said in these columns...when dummy hits the deck is the the time for declarer to step up a gear. Planning is crucial to any contract but particularly so when you find yourself in a contract where the outcome is not clearcut and where various lines of play may be possible.
As always, a good place to start is counting tricks.... Here, with reasonable breaks we can probably count on 4 trumps tricks, 2 spades if finesse works, perhaps a spade ruff in dummy, maybe 2 spade ruffs in dummy of the ♠ K does not fall on first three eounds of the suit. We can also count on 2 top clubs and 2 diamonds, maybe more if we're lucky!
So, that looks like 4 hearts, 3 spades including one ruff in dummy, 2 diamonds (hopefully the finesse works), 2 top clubs.
And a 12th trick might come from ♠ Q or a second spade ruff in dummy. And there is also the possibility of a third diamond trick.
Note that we have finesse options in both spades and diamonds...as well as the trump suit.
So, where to start?
Perhaps a reasonable line is to win club lead in dummy with ♣ K and take the diamond finesse. If this wins then play ♣ A and discard losing diamond from hand. Now play a diamond to ♦ A and then finesse ♠ J. Now cash ♠ A and ruff a club in hand.
Lead a third spade an ruff in dummy noting that South follows with ♠ K thus establishing your ♠ Q as a winner.
Now lead ♥ J from dummy. South wins with ♥ K but has no winning play. Declarer will ruff either a diamond or club return, draw ttrumps and the ♠ Q will be his twelfth trick.
Well planned and implemented. Note the early plays in the side suits BEFORE eventually leading a trump.
Yes, it is a lucky contract...two successful finesses and a helpful trump break. Note that the contract could be defeated if South holds four spades and ♥ K 10 x or ♥ K 9 x and where North holds ♥ 10 x or ♥ 9 x. Upon winning the ♥ K South could play a fourth spade which North could ruff with the ♥ 10 or ♥ 9 thus promoting South's ♥ 10 or ♥ 9.
|
|
|
|
|
| 2019-12-13 - Do you always concentrate during the play of a hand? |
Show Detail |
As East you find yourself at the helm of a spade contract where N/S have bid and supported hearts all the way to the five level.
South leads a heart and you win the first trick with ♥ A
You plan your play and are particularly aware of the spade combination. Holding nine trumps between dummy and your own hand you realise that you could lose two spade tricks if the suit does not break 2-2.
You are also conscious of the fact that the odds are nearly 75% that South holds one or both missing spade honours.
At trick two you lead ♠ J and note South follows with ♠ 3 and you duly finesse into North who wins with ♠ K.
North now switches to a small diamond to South's ♦ A who continues with a diamond to North's ♦ K.
North leads a third round of diamonds which you ruff with ♠ 5 as South discards ♥ 4.
You now lead ♠ 10 on which South plays ♠ 4.
And so you find yourself back facing the same decision that you had identified as soon as dummy hit the table.
The issue is correctly deciding the defenders spade holdings...
Did South start with ♠ Q43 and North with a singleton ♠ K
Or is South's holding ♠ 43 and North started with ♠ KQ
And you note the singleton heart in dummy...
And you remind yourself that the odds of South holding either both missing honours or one missing honour is close to 75%
And now it's decision time. Do you finesse or play for the drop?
Resist the urge to click on Show All Hands... all will be revealed later.
Do your thinking and then click on the 'Show Answer' button below.
|
| Show Answer |
So, did you finesse again on the second round of spades...or did you play for the drop?
Did you see the wood from the trees?
Yes, sometimes too much knowledge, in particular re probabilities and odds, can be a dangerous thing as it could be on this hand...unless you spotted the obvious clue as to what you should do.
You play for the drop...
But why, I hear some of you ask?
For the simple reason that you know South does not hold the ♠ Q...North has it...
Okay, slow down there for a minute I hear you counter. What about the 75% probability that South holds one or both missing honours, you argue? What about the singleton heart in dummy which could well be matched by a singleton in another suit (likely spades!) held by the defenders?
All window dressing I'm afraid. The simple fact is that North holds the ♠ Q (and it's a singleton at this stage).
It's very simple really...just go back to the third round of diamonds which you ruffed in hand with ♠ 5... WHILST SOUTH DISCARDED A HEART. South didn't overruff with ♠ Q which he most certainly would have...if he had the ♠ Q.
Sometimes it's difficult to see the wood from the trees...unless you're really concentrating!
The full hand:
And an interesting set of results.
First point of note...only one N/S pair bid to 5♥ which only goes one down. As a certain regular partner of mine frequently says ...'the five levl is for the opponents'. But on this occasion he was right to push on to 5♥ over 4♠. 5♥ only fails by one trick and even at adverse vulnerability is a good save against a non-vulnerable game.
Second point of interest is that SEVEN (of fourteen) declarers made TWELVE tricks. Not a good sign of the appreciation for a necessary switch by North when he wins a trump trick. The clubs in dummy look threatening and represent ideal candidates for declarer to discard some diamonds from hand! North must switch to a diamond at first opportunity. |
|
|
|
|
| 2019-12-12 - Planning ahead! |
Show Detail |
As East you find yourself as declarer in a diamond contract after North may have opened the bidding with 1♣ or a Strong NT.
South leads ♥ 4 and the play of the ♥ J from dummy draws the ♥ A from North.
Over to you?
Resist the urge to Show All Hands at this point ...they will be displayed later.
So, what is your plan to make as many tricks as possible?
Consider your options and plan the play. When done click the Show Answer button below.
|
| Show Answer |
So, you received a favourable lead and one of your two spade losers can be discarded on dummy's now winning ♥ K.
But what's your overall plan for the play of this hand.
It would be easy to play a diamond to dummy's ♦ K, discard a small spade from hand on ♥ K and then draw trumps. In the fullness of time you will likly lose a spade and a couple of clubs.
But can you do better than that?
Why not try and make something of your club suit? With a pronounced shortage South might have led a club? If we can ruff two clubs in dummy then we will reduce our losers in that suit and maybe even end up losing no club trick at all. After all, with seven cards oustanding the odds favour a FAVOURABLE break, i.e. 4-3.
So, at trick two cash ♣ A and then ruff a club with dummy's ♦ 5. Next cash ♥ K and discard a spade from hand and then ruff a heart in hand. Now lead another small club and ruff in dummy with ♦ 8.
The simple line is to now cash dummy's ♦ K and then ruff another heart in hand. Now cash ♦ A which will bring you a sense of satisfaction as both opponents again follow suit. And the real bonus comes when you win the next two tricks with ♣ K and ♣ 8 giving you a total of twelve tricks conceding a solitary spade at the end.
The moral of the story is not to rush to draw trumps if losers in a side suit can be ruffed with dummy's trumps! Also, note the safety of not cashing both top clubs from hand before ruffing losing clubs which might have resulted (but not on this hand) in North overruffing dummy on the fourth round of clubs!
Note that on a spade lead the defenders can cash two top spades thus holding declarer to eleven tricks.
This was the full hand:
and the results for the board:
Note that at all tables, bar one, East was declarer. At two tables N/S inadvisably doubled 4♦, once again showing the power of shape (East's 6♦ /5♣ distibution) over North's balanced 16hcp which had only two defensive tricks! 6 ♦ was a bridge too far (excuse the pun!) which got lucky on the lack of a spade lead!
|
|
|
|
|
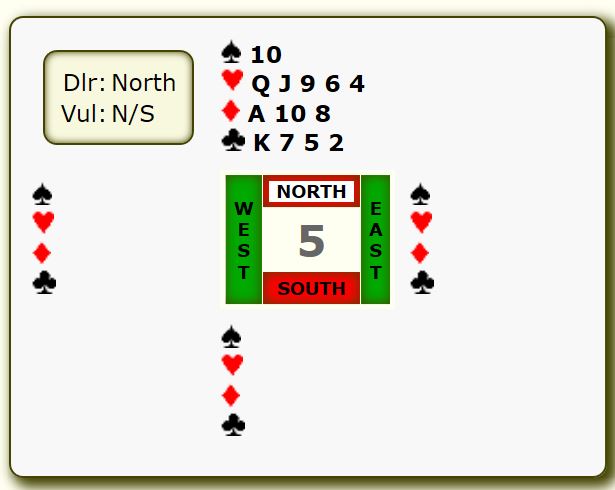
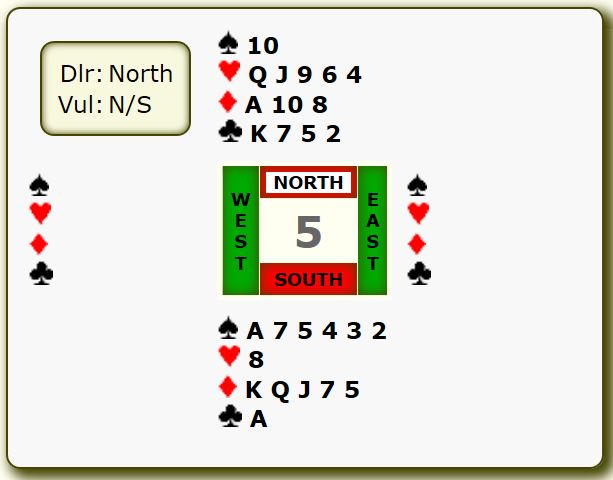
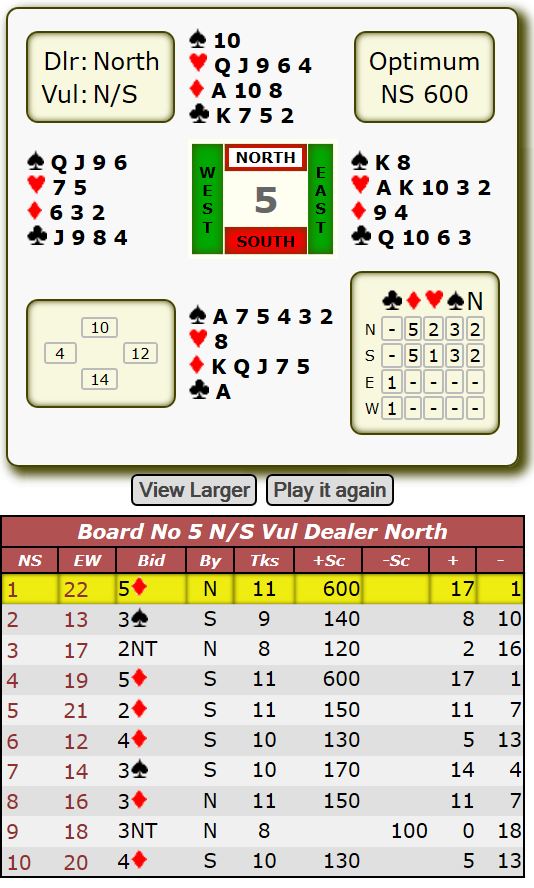
| 2019-12-05 - Board #5 - A re-evaluation of my hand... |
Show Detail |
Board #5 on Thursday, 5th December, proved to be an interesting deal and gave me food for thought in the bidding and the play.
Although I favour 'light openings' I resisted the urge on this occasion. I prefer to use the Rule of 20 rather than the Rule of 19, which some others prefer.
In either case the rule is simple. Count yout high card points and add it to the combined length of your two longest suits. If the total equates to 19 or 20 then you can apply whichever Rule you favour and open accordingly at the one level.
In this instance I passed and the bidding proceeded as illustrated.
Note that South's 3♣ was GHESTEM, a system which shows TWO-SUITED hands, at least five cards in each suit. In this case South's bid promised 5♠/5♦.
What do you do?
Resist the urgwe to click 'Show All Hands' at this stage. They will be deisplayed later.
Click on the 'Show Answer' button below when ready to read a commentary and analysis of this hand, including both bidding and play ...
|
| Show Answer |
To re-cap the bidding. As dealer I passed. East opened 1♥.
Partner overcalled 3♣ (Ghestem) promising at least 5 spades and 5 diamonds.
West passed. My turn to bid...
After West passed I was faced with what I considerd a difficult decision. Several thoughts crossed my mind:
1) We clearly had a fit (5-3) in diamonds.
2) I didn't have good support for partner's second suit (Spades)
3) 3NT could be a disaster on the basis that a) we mightn't have sufficient high-card values; b) more importantly, we mightn't have the potential for nine tricks.
4) I wasn't comfortable with expressing a forward-going interest in the diamond game because at this stage I wasn't sure about the strength of South's hand.
5) The opening heart bid on my LEFT meant that my RIGHT hand opponent (West) was short in this suit and that could prove to be problematic in the play.
After considering the above I decided to make the underbid of 3♦.
My left-hand opponent passed and partner came to life again with a bid of 3♠.
West passed and I was now faced with another decision.
Why did partner bid 3♠ over my 3♦?
My mind went into thoughtful mode once again and I reasoned as follows:
1) Partner's shape was likely to be 6♠ and 5♦
2) Partner had more than minimum values...otherwise he would have passed 3♦
I considered 4♠ but reckoned that the trump suit might break unfavourabley leaving partner with too many spade losers while also not forgetting potential losers in the other suits. I dismissed the thought of the spade game.
I now re-evaluated my hand and felt that a diamond contract offered the best way forward. I could ruff spades in hand and hopefully establish partner's long spades as winners while partner's diamond suit could be used to draw trumps and control, via ruffs, attacks in the other suits.
I duly bid 5♦
East led the ♥ A and dummy was placed on the table. I was pleased to see that my reasoning had proved accurate. South did have six spades and he also had a better than minimum hand.
At trick 2 East switched to a small club.
I could only afford to lose one more trick.
How to proceed?
My original plan seemed best and so I cashed ♠ A and ruffed a spade in hand with ♦ 10 as East followed suit with ♠ K on the second round of spades.
I now took stock...
Clearly the spade suit was breaking no worse than 4-2 and there was now a relatively safe road to eleven tricks as long as diamonds broke favourably. Simply get to dummy and ruff another spade in hand and then draw trumps and give West a winning spade leaving dummy high with all winners.
I proceeded to ruff a club in dummy and then ruffed another spade in hand with ♦ A as East discarded a heart thus confirming the 4-2 spade break.
I now played three rounds of diamonds, being thankful that trumps broke 3-2, drawing all the defenders trumps in the process, and then simply conceded a spade to West, leaving dummy high. Missing five cards in a suit the odds favour a favourable break 3-2 (68%).
Note that this line of play succeeds when spades are no worse than 4-2 with diamonds 3-2 OR where spades break 3-3 and diamonds are no worse than 4-1.
An alternative line of play would be to cash top tricks in the two black suits and then play a cross-ruff (ruffing spades in hand and clubs in dummy), Note that it is important to establish three spade ruffs in hand for this play to succeed. If the defense switches to a diamond at trick 2 then the cross-ruff would leave you a trick short.
A contract of 3NT by North can make on any heart lead but the same contract should fail on any other lead/defense.
This was the full hand:
|
|
|
|
|
| 2019-12-05 - Have you x-ray vision...and did you use it? |
Show Detail |
Board #4 on Thursday, 5th December 2019.
As South you find yourself on lead at trick one. You lead the ♥ A or ♥ K according to your defensive systems. N.B. Some partnerships play that the lead of an Ace calls for an attitude signal from partmner whereas the lead of a King calls for a COUNT signal.
Let's say that partner shows an EVEN number of hearts and declarer follows to the first two tricks with ♥ 2 and ♥ 4.
How do you proceed?
Can you see a potential pothole on the horizon?
Resist the urge to click on 'Show All Hands'...they will be displayed on the Answer Page.
Click the 'Show Answer' button below when ready to view an analysis of this hand.
|
| Show Answer |
So, as South you find yourself on lead against 3♣ after East opened 1♠ and rebid 2♣ over West's response of 1NT.
You cash two top hearts as partner shows an even number of hearts and declarer follows to the first two tricks with ♥ 2 and ♥ 4.
How do you continue?
Is there a potential pothole in front of you and can you take a counter action?
East's bidding (opening 1♠ and re-bidding 2♣ over West's 1NT response) suggests a minimum of 9 cards in the black suits. That leaves declarer with 4 cards at most in the red suits and two of those are now accounted for...
Thus declarer holds at most two other red cards. And if declarer holds five clubs rather than four, then declarer has only one red card left in his hand at this point in the play.
The map is laid out and it's decision time.
So what are the possible holdings that declarer started with?
1) 5♠, 4♥, 0♦, 4♣
2) 5♠, 2♥, 2♦, 4♣
Why can declarer not hold 3♥ and 1♦?...BECAUSE partner has told you that he holds an EVEN number of hearts and hence declarer also holds an even number of hearts, i.e. 2 or 4.
But there is another possible holding that declarer might have ... 5♠, 2♥, 1♦, 5♣ ...and this is the pothole on the road...
If South idly continues with a heart at trick three then declarer will discard his losing diamond from hand and suddenly declarer is chalking up ten tricks instead of nine...
The counter action is to cash ♦ A BEFORE continuing with a third heart. If North turns out to have a doubleton heart he can ruff the third round and N/S will still score ♠ A as the setting trick.
While cashing the ♦ A before playing a third heart is a safeguard where declarer holds a singleton diamond and a doubleton heart it could cost a trick if declarer holds 4 hearts and no diamonds, i.e. partner would not get a heart ruff. Note that cashing ♦ A will not cost if declarer started with 2 hearts and 2 diamonds.
Looking at the results from the session, six declarers played a club contract of which FOUR made ten tricks, i.e. four South's did not take the precaution of cashing ♦ A before continuing with a third heart and thus enabled declarer to discard his losing diamond on dummy's ♥ Q.
Sometimes it takes a little x-ray vision to visualise declarer's hand in order to work out how to steer the defense.
And...you cannot defend effectively withourt showing COUNT.
N.B.Those E/W pairs who played in spade got lucky... How so?
They got lucky because although the outstanding spades break 4-2 the ♠ 10 is with the short holding thus keeping declarer's trump losers to one. Put the ♠ 10 with South and declarer then has 2 trumps losers and can be held to eight tricks.
The full hand was:
Note that N/S can make nine tricks in diamonds. |
|
|
|
|
| 2019-11-21 - Were you careful? |
Show Detail |
A very interesting hand on Thursday, 21st November 2019. Board #14.
Were you (or would you have been) careful?
As East, you find yourself at the helm in 6♥.
South leads ♣ A.
Study the two hands above and decide how you will play the hand.
Resist the urge to click on Show All Hands.
When ready, click on the Show Answer button below.
|
| Show Answer |
As East, you are declarer in 6♥ with the opponents silent throughout the bidding albeit South might have doubled clubs if declarer bid 5♣ in response to West's 4NT (Roman Key Card Blackwood).
South leads ♣ A
An interetsing hand, indeed!
South continues with ♠ 9.
Over to you.
So, after winning second trick in dummy what card do you place on the table at trick 3, and why?
Are you alert?
Have you workd out the possible trump distributions between the defenders in terms of what you can and cannot cope with?
Clearly if the opponents hearts break 2-2 or 3-1 then there is no problem.
But what if one defender holds all four outstanding trumps?
Is there anything you can do?
Well...that depends on which defender holds the four trumps.
If it's South then there is an unavoidable trump loser no matter what way declarer plays the trumps. TRY IT.
BUT, if the four trumps are with North then a loser can be avoided as long as declarer plays the trump suit correctly.
The correct play, to take account of the possibility of North holding all four trumps, is to lead the ♥ K on the first round of the suit.
This does TWO things;
1) It exposes the 4-0 break when South shows out
2) It leaves declarer in dummy to lead a second heart towards his hand AND THROUGH North's now holding of ♥ J10x
Declarer continues with ♥ 9 and, if necessary, covers whatever heart North plays.
If North contributes the ♥ J or ♥ 10 declarer will win with ♥ Q and then return to dummy with a spade and lead dummy's last heart and finesse ♥ 8 if North plays low. NOTE the importance of UNBLOCKING dummy's ♥ 9 on the second round of the suit thus leaving the finesse position of ♥ A8 over North's ♥ Jx. If dummy's ♥ 9 was not previously unblocked then declarer would not be able to draw all of North's trumps without having to get to hand in another suit or via a ruff.
Once trumps have been safely drawn then declarer can discard his losing club and diamond on dummy's top clubs. Slam made.
ADDENDUM:
If South leads ♦ 10 instead of ♣ A then declarer is faced with different options BUT again, the issue re the trump suit still applies.
Best might be to win with ♦ K and continue with a club towards dummy. If South rises with ♣ A then proceed as before, being sure not to finesse ♦ J if South continues that suit after winning ♣ A.
If South ducks the club then dummy wins with a top club and again declarer cashes ♥ K and proceeds with a second trump as before.
Declarer will cover North's heart and return to dummy with a spade for a third and fourth round of hearts, drawing North's trumps in the process.
Now declarer can approach the diamond suit. Many players might simply finesse ♦ J on second round of the suit but there is another way!
Play a diamond to dummy's ♦ A, scorning the finesse, and return to hand with a club ruff and now lead a third diamond towards dummy's ♦ J7.
This will allow for diamonds being 3-3, or South holding ♦ Qxxx and crucially where North holds doubleton ♦ Qx. Note that dummy still holds a spade honour for entry to the winning diamond. Playing the diamonds in this way is much better than simply finessing the ♦ J which on this occasion would lose to the doubleton ♦ Qx leaving declarer with a losing spade at the end.
TWO safety plays in one hand!
And what happens if South leads a spade at trick one? Win the opening lead and cash ♥ K and play a second heart towards hand winning as neesasry depending on what card North plays. Now lead a club towards dummy and if it wins then play a third heart drawing North's trumps as before. Now play diamonds SAFELY, i.e. a diamond to dummy's ♦ A, second diamond to ♦ K and third round towards dummy's ♦ J7. Again this will produce a third diamond winner as outlined previously.
Again, if South rises with ♣ A on first round of the suit then declarer's problems are solved. Simply draw trumps and then discard the losing diamond and spade from hand on dummy's winning clubs.
Over the two separate competitons (Ryder Cup and Dr. Mulhern Trophy) 5 partnerships reached 6♥ of which only 2 were successful, both in the Intermediate section!
At seven tables the contract was 4♥ of which only 3 declarers made twelve tricks, 2 made eleven tricks, and 2 declarers made ten tricks.
This was the full hand:
To summarise...key play is how you handle the trump suit. And taking the best line for THREE diamond tricks. |
|
|
|
|
| 2019-11-14 - Board #3 Did you (or would you) find the play to make 12 tricks? |
Show Detail |
Board #3 on 2019-11-14 offered opportunities for twelve tricks. Only two declarers seized the opportunity.
How would you fare on this board?
Resist the urge to 'Show All Hands'.
Plan your play and then click on the Show Answer button below
|
| Show Answer |
As North you find yourself declaring 4♠. East leads ♥ K.

Well, to put your mind at rest, the trumps break 2-2.
Over to you...
So, it looks like you have a heart loser and a club loser. Eleven tricks can be made by ruffing two of North's diamonds in the South hand.
Clearly North cannot shake off the heart loser. Dummy (South) does not have a side suit on which the ♥ 2 can be discarded.
What about the club loser? Can we discard a club from either hand?
Well we could try and establish a small heart(s) in the South hand. This would be possible if we can ruff one or two of South's hearts in the North hand...and then be able to get to the South hand to enjoy the winning heart(s). To that end we need three entries...two (or maybe only one if hearts break 3-3) to establish the winning heart(s), and a third entry to enjoy the winning heart(s).
The play should go as follows. Win the heart lead; cash two top trumps; enter dummy with ♣ K and ruff a third heart; re-enter dummy with a trump and, if necessary (hearts not breaking 3-3), ruff a fourth heart; re-enter dummy with the last trump (in both hands) and cash the winning heart.
The beauty of this play is that success is guaranteed once both opponents follow suit to the first two rounds of hearts thus confirming that outstanding hearts are breaking no worse than 4-2.
An alternative option is where we can discard the losing club from the South hand on the ♦ A by taking a first round finesse of ♦ Q and then discard the losing club from the South hand on North's ♦ A.
This is a simple play, without danger, which still guarantees only two losers but where, with a bit of luck, we might be able to reduce that to a single loser...
How about taking the diamond finesse. If it wins we can discard, on ♦ A, a losing club from the South hand. And if the finesse loses we can still discard a losing club on the ♦ A...
Heads you win...and tails you win!
Win the opening lead and cash two top trumps, all following. Now play a club to South's ♣ K and then finesse ♦ Q. Lo and behold the ♦ Q wins and you now discard South's losing club enabling you to ruff the third club in the South hand.
Note that even if the finesse fails you still discard a losing club from the South hand and ruff North's third club in dummy.
At first it might seem that finessing the ♦ Q is an unnatural play but when you think about it it becomes quite rational!
HOWEVER, establishing the long heart(s) in the South hand is clearly the much superior line of play with success guaranteed once both defenders follow to the second the heart.
The diamond finesse carries only a 50% chance of success.
The full hand:
Note that at some tables West might have pe-empted in diamonds making the finesse a proposition that is more likely to succeed. But where hearts do not break 4-2 and even if West does not pre-empt, declarer should still take the diamond finesse as there is NOTHING to lose and everything to gain!
The heart position becomes clear when the second round is played thereby confirming whether to contiue with establishing the long hearts(s) or switching to the diamond finesse option.
So, after cashing two top trumps, play a second heart and then choose the right option for your twelfth trick... |
|
|
|
|
| 2019-11-14 - Board #23 - How many tricks did you make? |
Show Detail |
Eight E/W partneships reached a heart contract on this board. So, as West, how do you play the hand on the lead of ♠ K?
Study the two hands above...and RESIST the urges to use the Show All Hands option. Assuming that trumps break 3-1 how many tricks will you expect to make?
Click the 'Show Answer' button below when ready to read on.
|
| Show Answer |
As West, you find yourself as declarer in 4♥.
North leads ♠ K. What is you plan and how many tricks do you hope to make? Trumps break 3-1 with North holding three trumps.
Let's start with losers...
There seems to be a spade loser, a trump loser, a club loser...and we haven't talked about diamonds yet!
Are ten tricks our maximum or can we do better?
Can we avoid the spade loser or the club loser?
If we could bring in the diamond suiit then we could discard at least a spade and perhaps a couple of clubs. However, if that imvolves taking a finesse in diamonds then we face the possibility of losing FOUR tricks if the diamond finesse loses... not good if playing a contract of 4♥!!!
Is there another option?
How about a 'Loser on Loser' play?
What dat?, I hear you say. Exactly as it says on the tin...Throw a loser on another loser...combine two losers into one trick. Magical!
Okay, let's go...
Win the opening lead with ♠ A. Cash two top hearts getting the bad news that North has a trump winner when South shows out on the second round of hearts.
Okay...Now cash ♦ K followed by ♦ A, intending to follow with ♦ J on which you will discard the losing spade from hand if South follows with a small diamond on the third round...a loser (the spade) on a loser (♦ J). Note that it would be fatal to ruff the third diamond if South follows with a low diamond. South might still hold the ♦ Q and you are ruffing thin air! By discarding on the ♦ J you are getting rid of a loser even if ♦ J loses to North's ♦ Q.
But look what happens...South follows to the second diamond with the ♦ Q which promotes dummy's remaining diamonds as winners.
Note that once you can place North with four diamonds you have two options as to what to discard on dummy's winning diamonds. You can discard the three losing clubs or the losing spade and two clubs. In the latter case you will end up with a losing club. Or you can discard one spade and two clubs, losing a club in the end game.
Either way you will end up with eleven tricks, losing a trump and either a spade or a club.
So, eleven tricks made. Well done. Note that the Loser on Loser play could find South with ♦ Qxx(x) in which case you should discard the spade as you have no quick route to dummy if you ruff the third diamond. North will win if you play a trump and cash a spade. Simply discard your losing spade and subsequently concede a club.
Two declarers made 12 tricks, 2 declarers made 11 tricks, and four declarers made ten tricks.
The full hand:
And now for the 'Piece de Resistance'...
The hand records indicate that declarer can make TWELVE tricks!!!
Can you work out, double-dummy, i.e. by looking at all four hands, how declarer can restrict his losers to a single trick?
Answer next week... |
|
|
|
|
| 2019-11-07 - IBU Sim Pairs - Board #12 - Did you bid the slam...and did you make 13 tricks? |
Show Detail |
Another interesting hand from the IBU Simultaneous Pairs on Thursday, 7th November 2019.
Three Grand Slams are possible but the ideal contract is 6♣ ...but did you bid it....and did you make all thirteen tricks?
As Brian Senior mentions in the booklet that accompanied the Thursday/Friday East will open 1♣ and West will respond 1♥. Where to next?
East is holding a very strong hand and if a bid of 1♠ would not be FORCING then 2♠ becomes the best option although not ideal when holding void in partner's first bid suit!
West can now make a constructive preference bid of 3♣ which promises 8+ hcp and 3 + card club support and this should lead to the Small Slam in clubs.
Resist the urge to click on 'Show All Hands'...they will be revealed later.
So, how would you play the contract of 6♣ on the lead of ♥ K?
After you have decided on your plan for the play of the hand click on the 'Show Answer' button.
And a special message of congratulations to Rory Timlin & Maurice Hession and Marie O'Shaughnessy & Billy Cunniffe who were the only two pairs in the Tribes to bid this nice Small Slam. Indeed only ten pairs of the 300+ that played this hand reached 6♣ albeit six pairs bid 6♠ (all making) while eleven pairs bid 6NT with only seven pairs being successful in the play.
|
| Show Answer |
As East you find yourself at the helm in a contract of 6♣ where South has led the ♥ K.
How do you plan to play the hand and hopefully make all thirteen tricks?
Clearly the spade finesse needs to work and you need to find the ♣ Q.
So you win with the ♥ A, discarding a spade from hand. Next you cash the ♣ K to which both opponents follow suit. A second club sees North follow with ♣ Q and suddenly you are looking at a safe twelve tricks and possibly all thirteen...as long as you were very carefu;l at trick one!!!
If you idly discrded the ♠ 9 on the ♥ A at trick one you can no longer made all thirteen tricks!
HUH!
I repeat...If you idly discrded the ♠ 9 on the ♥ A at trick one you can no longer made all thirteen tricks!
Yes, the spade finesse works but note your holding is ♠ 1052 opposite ♠ AQJ.
You enter dummy with ♦ Q and lead a small spade towards your AQJ finessing against North's ♠ K The finesse works...BUT suddenly, and too late, you realise that you have no way of accessing dummy to repeat the spade finesse... 
Now, go back to trick one as you win the opening lead with ♥ A on which you now carefully discard the ♠ Q or ♠ J leaving you with ♠ AQ9 or ♠ AJ9.
Note the difference....
Now, afer drawing trumps you access dummy via ♦ Q as before and then lead ♠ 10....
North is powerless. If he ducks then you let the ♠ 10 ride and it wins BUT now you are still in dummy and can lead a second spade towards the ♠ AQ or ♠ AJ and can take a second finesse against Noirth ♠ K.
And if North coves ♠ 10 then you can cash three top winners in the suit.
Moral of the story...think ahead before you play to trick one!
Note: Only 88 declarers, of 300+, made all thirteen tricks!!!
Detailed results for this board at the ECatsBridge website can be accessed here
|
|
|
|
|
| 2019-11-07 - IBU Sim Pairs - Board #10 - Did you bid the right slam...and play it correctly? |
Show Detail |
An interesting hand from the IBU Simultaneous Pairs on Thursday, 7th November 2019.
There are several elements to the hand, viz. the bidding, reaching the right slam, defenders opening lead, and the declarer play.
How did you fare?
As a bidding exercise, look at the two hands above and see how you and your regular partner might bid the E/W hands.
Resist the urge to click on 'Show All Hands'...they will be revealed later.
When you have given the bidding some thought then consider how you might declare a contract of 6♥, played by either East or West, on the lead of a small club.
After you have decided on your plan for the play of the hand click on the 'Show Answer' button.
There is a detailed analysis, in particular with regard to the play of the hand. There are also some statitics re overall results from circa 300 tables when this hand was played in the IBU Simultaneous Pairs hosted on the ECatsBridge website. A link is included in the 'Answer' section.
And a special message of congratulations to Marie O'Shaughnessy & Billy Cunniffe.
|
| Show Answer |
So...did you get to the right spot... 6♥ ?
Yes, the hand records suggest that 7♥ and 6NT can be made but these are not good contracts.
7♥ is a poor contract... A Grand Slam should not normally be bid with less than 75% chance of success. Here, missing the ♥ Q does not offer good odds of success. And even if you locate the ♥ Q you still have to take the correct view on the play of the diamond suit. A lot of 'guesswork' required on this board!
NOTE: Only 5 of the 298 pairs for whom bidding records are available actually bid the Grand Slam of which only one pair made all 13 tricks. Step forward and take a bow Tribes Members: Marie O'Shaughnessy & Billy Cunniffe.
As for 6NT... in order to bring in 12 tricks declarer will likely have to make NINE tricks from the red suits. That involves finding the ♥ Q AND bringing in the diamond suit without loss!
Alternatively, if West is playing the hand on a club lead then declarer will need to produce EIGHT winners from the red suits without losing a trick, to add to two club tricks and two spade winners.
If East is playing the hand on a club lead then declarer will need to produce NINE winners from the red suits without loss OR EIGHT winners from the red suits without losing a trick AND will also have to assume that the club honours are split and that a second club trick can be negotiated after North wins the first trick with ♣ K or ♣ Q. NOTE that if East is declarer on a club lead it may be important to UNBLOCK the ♣ J from hand on the opening lead if North produces the ♣ K or ♣ Q thus preparing for a possible finesse of the ♣ 10 at trick twelve!!! Visualise the ending...Dummy (West) holds ♣ A10 and East, on lead, holds ♣ J and ♠ x (any small spade). Now you cannot finesse the ♣ 10... An unblock of ♣ J on a club lead from South at trick one, where North produces ♣ K or ♣ Q after declarer plays low from dummy, solves the problem at trick twelve. Sometimes a little foresight goes a long way!!! TRY IT!
NOTE: Only 23 of the 298 pairs for whom bidding records are available actually bid 6NT of which only FIVE pairs made 12 tricks. 2 Tribes partnertships bid to 6NT but both failed to make 12 tricks.
So...the best contract is 6♥. How to get there is the question?
As Brian Senior's instructive booklet notes the East hand represents a minimum opening 1♠, As is the modern bidding style, West can respond with a forcing bid of 2♦. East should now re-bid 2♥ showing his 5/4 shape. West will now become quite excited as a heart fit has been found. Most experienced pairs now use a subsequent bid of 4♣ or 4♦ as a 'Splinter' bid showing a fit in the last bid major suit (hearts in this case), a singleton or void in the minor suit, and an interest in a slam with the agreed major as trumps. In this instance West must find another bid. Note that West has a strong hand...solid trump support, a good side suit, and the ♣ A. Observe that initially West's lack of support for spades might be deemed a negative but in this instance it is compensated for by the solid diamond suit.
Using RKC (Roman Key Card Blackwood), West can simply bid 4NT over East's 2♥ and East will respond 5♥ promising 2 of the FIVE keycards (4 aces and trump king) and DENYING ♥ Q. [NOTE: If RKCis not already part of your bidding system you should give it serious consideration.]
West, knowing that the ♥ Q is missing, should simply bid 6♥.
If East chooses not to open the bidding then West will open 1♦, East can bid 1♠ and West will now bid 2♥ which is a Reverse and promises four (or more) hearts, assuredly five or more diamonds, and 16+ hcp. A reverse is forcing for at least one round and hence partner cannot pass. In the absence of any other agreements, East can now raise to 4♥ whereupon West will again use RKC and E/W should subsequently reach 6♥.
Note that even if East did not open the bidding West should realise that East's major suit shape is at least 5+ spades and 4+ hearts... How so, I hear you say? Think about it... Why would East repsond 1♠ instead of 1 ♥ over West's opening 1♦ ???
And now to the opening lead... It doesn't matter who is on lead...the bidding calls for a club lead...the only unbid suit.
Finally the declarer play...and it needs some thought and a little care.
Play options ...as with many hands, declarer faces different options in planning how to play the hand.
The first consideration is that the opening club lead means that declarer cannot afford to lose the lead while he still has a losing club. Thus an attempt to finesse aganst the ♥ Q would be disastrous if declarer misguesses and the defenders then cash a club. So, perhaps best to simply cash two top hearts hoping the suit breaks 3-2 (68% probability) and then play three top diamonds and discard ♣ J from the East hand. If diamonds break 3-3 (only 36%) then declarer can count 12 tricks...3 trumps, 5 diamonds, 2 spades, 1 club, and 1 club ruff in the East hand.
If diamonds break 4-2 (48%) then the fourth diamond can be ruffed in the East hand, establishing the fifth diamond as a winner, and a club can subsequently be ruffed in the East hand with the last trump. West's second club loser can be discarded on East's second top spade.
Any other reasonable lines of play?
Some East declarers may try and establish their spade suit. This will require a 4-3 break (62%) of the outstanding spades and will also require care with the sequence of plays. Again it is probably best to cash two top hearts whilst simultaneously establishing East's spade suit. So, win the opening club lead, cash a top spade and then ruff a spade in the West hand. Now cash two top hearts ending in the East hand and ruff a another spade (DO NOT CASH the second top spade before ruffing the second small spade with East's last trump. Rejoice when the spades break 4-3 leaving East with ♠ K10 as winners. Now cash three top diamonds and hope that the outstanding diamonds break no worse than 4-2. Discard your losing club from hand on the third top diamond. Now ruff a club with one of West's last two small trumps and then play spades from the top...The defender with the outstanding trump can take it at any time but that leaves East's hand with all winners... Twelve tricks made.
Note that the overall chances of success herea are based on trumps being 3-2 (68%) and spades 4-3 (62%) which converst to an overall probability of success at 68% x 62% = 42.16%
Clearly the first mentioned option of establishing the diamond suit offers the better probability of sucess for 12 tricks, i.e. 57% v 42%
So, declarer should rise with ♣ A, cash two top hearts, breathing a sigh of relief when both defenders follow suit to the two rounds of hearts. Declarer then plays three top diamonds, discarding the losing club from his hand. If necessary, a fourth diamond can now be ruffed in the East hand thereby establishing West's fifth diamond as a winner. Declarer can now cash two top spades (discarding a club from the West hand) and then ruff a spade low in the West hand.
And so this is the position after ten tricks with the lead in the West hand...
Now declarer needs to be very careful... Declarer must lead the last (and winning) diamond treating it as an extra trump. Remember, a defender still holds ♥ Q whilst East and West still hold a single trump in each hand. West also holds a losing club which we can ruff with East's last trump.
Now watch what happens in this three card ending if West ruffs the last club BEFORE leading the winnning fifth diamond. Having ruffed the club in the East hand, declarer will now try and ruff a fourth spade with West's last trump...BUT North may be able to overruff and then cash a winning club.
So, it takes careful planning and a little care to bring home the small slam.
The most imporant thing is not to finesse in hearts after winning the first trick with ♣ A...If you misguess then the defenders will win and cash a winning club.
In essence, the contract is virtually assured as long as the hearts break 3-2 (68%) and where the outstanding diamonds are either 3-3 (36%) OR 4-2 (48%), i.e. a combined probability for the diamond suit of 84% giving an overall probability of success at 68% x 84% = 57%.
Note that it does not matter if North or South ruffs the third diamond with ♥ Q ...declarer simply discards the losing club from the East hand and can subsequently ruff a club and the fourth diamond with the two trumps still remaining in the East hand.
Another thought...let's suppose that after you cash two top hearts the ♥ Q falls. What should you do next? The initial instinct might be to cash a third heart drawing the defenders last trump...BUT that could be a huge mistake if the diamonds subsequently prove to break 5-1 because now you will only be able to ruff one of West's losers (2 diamonds and 1 club) in the East hand. A possible alternative option might be to switch to diamonds after cashing the second top heart and confirm whether diamonds are breaking 5-1, 4-2, or 3-3. One potential problem would be if diamonds are breaking 5-1 and the hand with the singleton diamond has the outstanding trump and so they can ruff the second diamond and cash a club BEFORE you get a chance to discard the losing club from the East hand...DISASTER.
However, if the diamonds are breaking 5-1 the contract is unlikely to make anyway...
So, if declarer cashes the third trump and then plays on diamonds he will make 12 tricks when diamonds are 4-2 or 13 tricks when diamonds break 3-3. Looks best to draw the last trump and then play on diamonds.
Yes, there are some other lines of play but the above two represent the simplest and are also the most likely to succeed.
NOTE: Only 73 of the 298 pairs for whom bidding records are available actually bid the Small Slam in hearts of which only 63 were successful including 5 Tribes Bridge Club partnerships: Declan Harte & Margaret McCarthy, Michele Heaslip & Siobhan O'Sullivan, Maurice Hession & Rory Timlin, May O'Sullivan & Liam Hanratty, Pat Costello & Brendan O'Dwyer.
Finally...how to make 7♥ .... Win the opening lead. Successfully draw three round of trumps (note I haven't said which way to finesse or whther you play for the drop of the ♥ Q. You have to 'guess' that part!). Now finesse the ♦ 10 (or take the finesse when in East hand with ♥ K. Cash diamond winners and discard losing club in East hand and then ruff a losing club with the last trump in the East hand. Cash two top spades discarding the last club in West hand. Thirteen tricks!
NOTE: It is NOT possible to legitimately make 13 tricks in NT...indeed it requires some accurate guesswork to make 12 tricks in a NT contract!
NOTE: 14 partnerships played the hand without bidding game!
Link to ECats Bridge page with full set of results for Board #10 can be found here
This was the full hand:
|
|
|
|
|
| 2019-10-24 - Board #26 - A real test...for declarer and the defense! |
Show Detail |
As North you find yourself at the helm in 4♠.
East might lead ♥ 10, ♦ 7, or ♣ 4
Can you GUARANTEE to make 10 tricks and if so what is your line of play?
Don't click on Showw All Hands ubtil you've given your play of the hand some thought.
Click on the Show Answer button when ready to investigate further.
|
| Show Answer |
Board#26. As North you are declaring 4♠ on the lead of ♥ 10, or ♦ 7, or ♣ 4.
This is one of the most interesting hands from recent times. There are several aspects to the play and defense that warrant the attention of declarer and the defenders.
Let's examine the declarer play first...
At first glance it seems that declarer can count 5 spade tricks, 2 hearts (maybe 3!) and 2 clubs.
Interesting... despite holding 28 hcp declarer can only identify 9 potential top tricks. I say 'potential' because one of them could vanish in unfavourable circumstances and there is nothing declarer can do to overcome that particular situation....
So, can you identify what layout of the defenders cards might see one of declarer's winners become a loser?
Yes, the spade suit may yield only 4 winners! How so, I hear you say!
Obviously if spades break 3-1 or better then declarer will make five tricks in the suit... BUT, what if they break 4-0? In that case it depends on TWO things...
1) Which defender holds the 4 outstanding trumps.
2) If one specific player holds the four missisng spades it then depends on how declarer plays the trump suit....and there is only one correct way to play it!
So, you correctly determined that we must lose a trump if EAST holds all four outstanding spades. Try it. In this case there is nothing that declarer can do to avoid the loss of a trump.
BUT if West holds all four spades then we can avoid the loss of a trick as long as we make the necessary Safety Play in the suit!
The ♠ reuires declarer to lead a small spade towards dummy's ♠ Q974. If East shows out then West is known to hold ♠ J1062. Declarer wins in dummy with ♠ Q and then leads a small spade towards his hand and simply covers whatever spade West plays. Repeat the finesse if necessary thus depriving West of a spade winner.
Note that an unsuspecting declarer may start the play of the spade suit by leading ♠ A or ♠ K from hand which WILL result in a spade loser to West. Try it...
Anyway, in this instance the oustanding spades behave and are divided 2-2 and declarer strips the defenders of trumps in two rounds.
Okay, so now we are guaranteed a minimum of 9 tricks. But from where will we generate the vital 10th trick?
There are several options...
1) The finesse of the ♥ J might prove successful...but sadly not on this occasion.
2) We could play a diamond towards our ♦ K85 and hope that West holds the ♦ A... and on this occasion that works...
3) Declarer could lead a diamond from hand towards dummy's ♦ J43 and hope that East holds the ♦ Q ... but that doesn't work on this occasion...
But, you'll note that all these plays are based on the favourable lie of key cards held by the opponents.
In the case of the diamond suit we would be guaranteed one trick if we can entice the opponents to open the suit....as long as we play low from whichever hand (dummy or declarer) we first play. This guarantees us one trick in the suit. Try it!
So, how can we entice the opponents to open the diamond suit?
Fortunately there is ONE play which will guarantee the tenth trick for declarer.
An Elimination and Endplay will do the trick. We eliminate side suits (clubs and hearts) and put the defenders on lead so that they have to play diamonds or give declarer a ruff and discard.
So, win the opening lead, draw trumps (carefully!) in two rounds, eliminate clubs by ruffing the third round in hand and then throw the opponents on lead by cashing two top hearts and playing a third round forcing a defdender to win with ♥ Q....and it doesn't matter which defender ends up on lead.
Now the opponents must open the diamond suit, guaranteeing us at least one trick, OR present declarer with a ruff and discard, where declarer will ruff in hand or in dummy and discard a diamond from the other hand.
The appealing nature of this type of play is that it doesn't matter how the key diamonds (♦ AQ10) are divided amongst the defenders.
If declarer tries to broach the diamond suit himself he could conceivably lose three tricks as well as the ♥ Q...that's one too many!
Note also that if declarer finesses the ♥ J on the second round of the suit then West can play a third round leaving declarer to open the diamond suit! A finesse of the ♥ J where East leads the suit is fine because if it loses declarer can win with ♥ A and still use the elimination play and throw the defense on lead by playing off two more rounds of hearts.
And so, ten tricks can be guaranteed by safe and careful play.
Now for the defense...specifically West and his diamond holding of ♦ AQ10 sitting over dummy's ♦ J43.
If East leads a diamond then West should play ♦10 if declarer plays low from dummy. That will establish two winners for the defense as long as declarer started with 3+ diamonds and has no means of discarding any from his hand or dummy.
So, what to do if West is thrown on lead with the third heart? In this case West must play the only card that is guaranteed to restrict declarer to a single trick in the suit. West must exit on the ♦ Q. If declarer has the ♦ K he will win that trick and will then be forced to play another round of the suit towards dummy's ♦ J4 and West will win both tricks with his ♦ A10.
The damage is done when West rises prematurely with ♦ A and then finds himseef forced to play a second round away from his ♦ Q10 thus gifting declarer two tricks. Try it!
So, in summary...good declarers always try and avoid a finesse if there is a better alternative! Also, good declarers familiarise themselves with safety plays which may limit potential losers. And good defenders also watch for the best line of play when defending.
This was the full hand:
|
|
|
|
|
| 2019-10-24 - Did you count your tricks and plan the play? |
Show Detail |
Several E/W partnerships ended up in a diamond contract, played by East or West. Some were too high...but most ended up at the 2 or 3 level, a sensible contract.
HOWEVER, despite the hand records showing that ten tricks can be made, no declarer made more than eight tricks!
Could you do better?
Study the two hands and work out a line of play.
If East is declarer then you should expect the lead of ♠ 6. If West is declarer then you should be facing a lead of ♣ 6.
Over to you...
Resist the urge to Show All Hands.
Click on the Show Answer button below when you have formed your line of play.
|
| Show Answer |
Cardinal rule in a suit contract is NOT to draw trumps unless you have tricks in a side suit already established or that can be easily established.
Did you count your tricks on this hand before embarking on the play? I suspect that most declarers did not plan ahead before playing the first couple of tricks. And by then it was probably too late to redeem the situation!
As declarer you MUST try and work out where your tricks will come from. Yes, an original line of play can be altered as the hand develops and certain things come to light...BUT you should have a plan before you start!
So, what have we here. We can count on four top tricks, ♦ AK and ♣ AK. To that we can resonably add ♠ K if East is declarer and a spade was led at trick one.
But that only comes to FIVE top tricks.
From where will we source the remaining tricks? We have NO side suit that is an obvious source of extra tricks. Yes, we could conceivably score a heart, and a club if the finesse works or if some other line could produce a third club trick. But there is nothing substantial on offer.
Enter the cross-ruff...
We should be able to negotiate a couple of heart ruffs in the East hand and perhaps one spade ruff and one club ruff in the West hand. But to do this we need to set up the cross-ruff and avoid playing trumps too early and also resist the urge to take a trump finesse which, if it loses, could see the defense play a third round of trumps thus limiting declarer to a single ruff in each hand. (Yes, we can see here that the diamond finesse works...but we don't have x-ray vison at the table...at least not legitimately so!
It's easy to play hands double-dummy (i.e. when you can see all four hands). But it's not so easy when it's single dummy, i.e. you can only see your own hand and dummy.
On this hand I would win at the first opportunity, i.e. ♠ K in hand if East is declarer and then play a small heart towards dummy. South will play low and North will win with ♥ K. North might do best to switch to a trump, indeed maybe a trump switch at trick two is best defense! Declarer can successfully finesse the ♦ J which will win as South follows with an ominous ♦ 9...
Club to dummy's Ace followed by small heart ruff in hand and then ♣ K and club ruffed in dummy noting that South follows with ♣ Q and ♣ 10 establsihing ♣ 9 as a winner. Lead a heart from dummy and North now faces a decision...to ruff in with ♦ 10 or to discard either his last club (♣ 8) or a small spade.
And now declarer needs to think...This is where good players score... They think at significant point in the play. Have you worked out the distribution of the two defenders hands?
The opening lead suggests that South started with four spades. South is already known to originally have held three clubs and five hearts. Ipso facto South started with a singleton diamond which has already been played.
The hand is now an open book...
North started with four small clubs, three spades, a doubleton heart and hence four diamonds ♦ Q1054.
North's dilemma is whether to discard his remaining club or ruff in with ♦ 10 when the third heart is led from dummy. Note that if North ruffs with ♦ 5 or ♦ 4 then declarer can overruff with ♦ 6. Ruffing in with ♦ 10 means that declarer will have to overruff with ♦ K BUT can then cash ♣ J. If North discards his last club then declarer can ruff with ♦ 2.
North could also discard a spade on the lead of the third heart from dummy thus making it impossible for declarer to ruff the third round of spades in dummy except with ♦ A.
North is really caught no matter what he does.

This is the position with five cards left. West is on lead having ruffed the third club in dummy.
Declarer leads a heart from dummy...what does North do?
Declarer cannot be stopped from making four of the last five tricks!!! Try it...
If North discards a spade declarer ruffs with ♦ 6, cashes ♣ J and then ruffs a spade with ♦ A and then ruffs a heart with ♦ K. That's four tricks.
If North discards a club declarer ruffs in hand with ♦ 6, ruffs a spade in dummy with ♦ 8 and then ruffs a heart in hand with ♦ K and then leads either black card from hand and ruffs with dummy's ♦ A. That line also produces four of the five tricks.
If North ruffs with ♦ 10 declarer overruffs with ♦ K, cashes ♣ J, ruffs a spade with ♦ 8, and leads a heart. North can ruff with ♦ Q as declarer discards his last spade and declarer wins the last trick with ♦ A in dummy. And, again, that leads to four tricks for declarer.
This is an illustrative hand and shows the importance of using a cross-ruff where you don't have sufficient side suit-winners.
It also illustrates the importance of trying to work out the distribution of the defenders hands. Work out one and the other follows!
This was the full deal.
|
|
|
|
|
| 2019-10-24 - Ten tricks...or did you lose one? |
Show Detail |
This should have been an easy ten tricks...but several declarers seemed to lose their way!
As North you are at the helm in 4♥ where East may have bid spades at the one level.
The lead is ♣ 5. West wins with ♣ A and returns a small club....
Over to you...
Resist the urge to Show All Hands.
Click on the Show Answer button below when you have formed your line of play.
|
| Show Answer |
Depending on your bidding system you will probably have reached 4♥ where East may have bid spades.
East will likely lead ♣ 5 which West will win with ♣ A and will then return a low club.... Over to you...
The imporant thing to focus on is your losers!
You have lost a club, will lose at least one spade, could lose a diamond, and might conceivably lose a trump... This latter loss might occur if you ruff the club at trick two with a top honour and East subsequently shows up with ♥ 10xxx . Or you might elect to ruff the second club with ♥ 9 and have East overruff with ♥ 10. If East then switches to a diamond whilst still holding ♠ A you will subsequently lose a diamond and spade.
So, how to overcome these possible scenarios?
Very simple....discard your losing diamond on the second club. Now, East can ruff and switch to a diamond but you are now in control. Win with ♦ A, draw trumps, and then lead a spade towards dummy's ♠ KJ8 and a couple of winning clubs.
Note the importance of discarding a diamond rather than a spade from hand on the second club. If you discard a spade, East will ruff, switch to a diamond and win the first roud of spades and cash a winning diamond. That's FOUR tricks for the defense...one too many!
An alternative option, and successful line on this hand, is to ruff the second club HIGH, draw trumps (silently giving thanks that trumps break 3-2), and then play a spade towards dummy to gain entry to the winning clubs.
I still prefer the first line of play...discarding a diamond from hand on the second club. It takes account of the possibility of East holding ♥ 10xxx.
So, moral of the story... keep an eye on potential losers as well as your winners.
The full hand:
|
|
|
|
|
| 2019-10-17 - Board#20 The power of shape....and watching the opponents cards...and spotting the opportunity! |
Show Detail |
You pick up the hand shown above having just bid 6♥ on the previous board.
You open 1♥, East bids 1♠.
South raises your opening bid to 4♥ and West bids 4♠.
Over to you?
Study the hand and RESIST the urge to click on Show All Hands.
Decide how you will proceeed and then click on the Show Answer button below.
|
| Show Answer |
Does lightning strike twice?
After West's Pass you open 1♥ and East bids 1♠.
To your surprise, perhaps, partner raises your opening bid of 1♥ to 4♥ and West bids 4♠.
Ball in your court. But first a brief explanation of partner's raise to 4♥. This promises good trunp support but is otherwise a weak bid usually with distributional shape.
I simply grabbed the bull by the horns and jumped to 6♥, a speculative bid. I liked my shape...a void in spades, a good diamond suit and ♣ AJ9.
I did not want to disclose my second suit by bidding it at the five level. As declarer it is always nice to have a secret weapon up your sleeve!
The play was straightforward enough.
Win the spade lead in hand. Cash ♦ A and ruff a diamond AND NOTE EAST'S DIAMONDS!!!
Now it was a case of finessing the heart. East won with the ♥ K. Win any return in hand (East switched to a club), draw the outstanding trump and cash ♦ K, discarding a club from dummy and noting East's third diamond.
Have we now got a road to twelve tricks without taking the club finesse?
YES...
If you have been watching the diamond suit you should have noted that East followed the first three rounds of the suit with ♦ QJ10 thereby promoting the ♦ 98 in your hand as winners. Cash the two winning diamonds and discard two more clubs from dummy thus leavuing dummy with a singleton ♣ Q.
Now cash ♣ A and then ruff a club in dummy. Return to hand with a spade ruff and ruff your last club with dummy's last trump.
No need for the club finesse! BUT, if the diamonds did not behave nicely (East holding ♦ QJ10 thereby enabling declarer to establish THREE discards from dummy on ♦ K98) there would always be the club finesse for the twelfth trick.
It's important to keep an eye on non-honour cards which can sometimes be promoted to winner status! Also, note that when playing the second top diamond from hand it is vital to discard a club from dummy and not a spade which can always be ruffed in hand! And then two more clubs can be discarded from dummy on ♦ 98.
Also, it is crucial that declarer does not draw an unnecesasry round of trumps which would leave dummy only able to ruff one of declarer's losing clubs!
Three N/S partnerships bid to 6♥ with two declarers bringing home the small slam. One E/W pair played in 4♠x and scored a 2nd top for only registering -500. Eight N/S pairs played in the heart game at the 4 or 5 level.
Note also that it takes a club lead by West to beat the slam if played by the South hand.
This was the full hand:
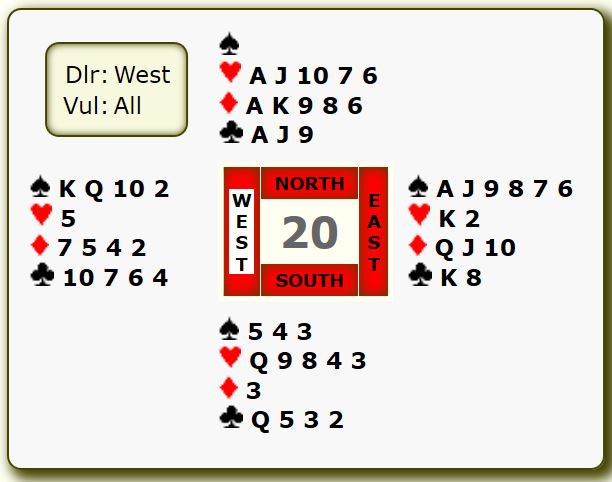
|
|
|
|
|
| 2019-10-17 - Board 19. How do you bid opposite partner's Opening Weak 2 |
Show Detail |
Set 10 last thursday brought a pair of spectactular hands. First up is Board #19.
This is all about the bidding...
You hold the North hand as shown above.
Depending on your system partner, Souith, will open either 2♥ (Weak) or 2♦ (Multi 2 Diamonds which shows either a Weak 2 in a major or a Balacnded 23-24 hcp, or eight playing tricks in a suit (one of the four).
How do you proceed?
Resist the urge to click on Show All Hands ...they're all displayed in the Answer section.
Click on the Show Answer button below when you are ready to proceeed.
|
| Show Answer |
This is all about hand evaluation. Its about controls (Ace and kings, voids and singletons) rather than simply high-card points.
Your hand is HUGE opposite a weak two heart opener from partner.
You need to be able to imagine partner's hand oin order to decide on the final contract.
When playing Weak 2s it is a huge advantage if you can use an 'Enquiry bid' to get further information about opener's hand, i.e. strength and or shape of the Weak 2.
Many partnerships use 2NT as an 'Enquiry Bid' and there are various responses that can be deployed to further describe the Weak 2 opening. Remember that at favourable vulnerability some players may open with a VERY weak Weak 2!
A set of responses that is popular shows suit strength and hand strength:
3♣ = Weak hand and Weak suit
3♦ = Weak hand and Strong suit
3♥ = Strong hand and Weak suit
3♠ = Strong hand and Strong suit
N.B. Partnerships need to agree their understanding of 'Strong' and Weak' with respect to HCP range and suit quality.
Others use suit repsones to show a feature (Ace or K) in the bid suit.
Some partnerships use a Multi 2 Diamonds which shows EITHER a Weak 2 in a Major, or a Balanced 23-24 hcp, or eight playing tricks in one of the four suits. At one table where N/S were playing the Multi 2 Diamonds the bidding proceeded as follows (opponents silent throughout):
South North
2♦1 2NT2
3♣3 3♦4
3♠5 4NT6
5♣7 6♥8
1 = Multi 2 Diamonds, i.e. Weak 2 in a Major, or a Balanced 23-24 hcp, or eight playing tricks in one of the four suits
2 = Enquiry
3 = Upper range of Weak 2 in spades or hearts
4 = Which suit, hearts or spades?
5 = Hearts
6 = Roman Key Card Blackwood
7 = 1 or 4 of thew FIVE Keycards, i.e. 4 Aces and King of Trumps
8 = Final contract...and the first tme that the trump suit has been bid. And the strong hand is declarer!
Why did North go on to bid 6♥?
South is showing an upper range Weak 2♥
South's response to 4NT promises one of the five keyacrds, i.e. ♦ A or ♥ K. In either case this means that N/S have only one loser in the red suits. And so to the black suits. Remember, South has shown an upper range Weak 2 and therefore has some values other than ♦ A or ♥ K!
If partner has the ♣ K then the slam looks fairly solid. And if partner has ♣ J then at worse it will be on a finesse. Other options might exist if South has a club void or singleton (better than a void).
All in all it looks like there is a good chance of success.
The Small Slam was bid at seven tables. Five tables bid game.
This was the full hand:
|
|
|
|
|
| 2019-10-17 - Can you see a way? |
Show Detail |
Sometimes you find yourself in what is probably a no hope contract. But perhaps you can see a way through, albeit with a little help from the defense...just one moment when a defender makes 'the automatic play' without thinking!
Study the two hands and see how you would approach 5♣ by North after East doubled your opening bid of 1♣ and where East/West competed in hearts.
East leads ♥ K.
Give it some thought and refrain from clicking on the Show All Hands button before clicking on the Show Answer button below.
|
| Show Answer |
Can you see a way to make 5♣?
As North. you open the bidding 1♣. East doubled for takeout, South passed and West bid 1♥. You bid 2♦, showing your shape (5 clubs and 4 diamonds) and a strong hand as per your Reverse Bid.
East bids 2♥ and South comes to life with 3♣ and eventually you end up as declarer in 5♣.
East leads ♥ K.
Can you see any possible line that would give you a chance to make this contract?
At one table declarer studied dummy and then proceeeded to win with ♥ A and straightaway led the ♦ J which West covered with ♦ Q. Declarer won in hand with ♦ A and then cashed two top trumps.
North then played a second diamond towards dummy. West won with ♦K ...and then made the little mistake that gave declarer the chance to make the contract.
Declarer was doubly delighted that West won the second diamond trick because this gave him the confidence that his plan would work!
What did West do next?...and what should they have done?
West continued with a heart which declarer ruffed in hand as East followed suit. Declarer now played a diamond to dummy's winning ♦ 9, East discrding a small heart.
This was the six card ending:
What was declarer's plan (worked out before playing from dummy at trick one!) to make five of the last six tricks? And why was declarer reasonably confident that it would work?
The plan was to only lose one spade trick. Declarer was reasonable happy that it would work because of the bidding.... East had doubled declarer's opening bid of 1♣ and so far had only shown up with ♥ KQ (and maybe the ♥ J). And West had already produced the ♦ KQ....So East HAD to hold the oustanding top spades, i.e. ♠KQx(x).
Can you see a way home now?
Okay, follow me....
Lead a club from dummy and overtake in hand and now lead a small spade towards dummy's ♠ J954.
East must rise with ♠ K or ♠ Q othewise dummy's ♠ J will win.
BUT, East is now endplayed....and must concede either a ruff and discard if he plays a heart (ruff in dummy and discard your losing spade from hand)...OR else East must play a spade in which case declarer will win two spade tricks with ♠ J in dummy's and ♠ A in hand.
An unmakeable contract comes home...with a little help from the defense...
So, how did the defense help?
When West won the second diamond they should have returned a spade thus breaking up the planned endplay. East can with with ♠ K or ♠ Q and then exit with a second heart leaving declarer to lose a second spade trick in the endgame. This is called 'protecting partner'. West should know from the play up to the point of winning the second diamond that East has only shown up with ♥ KQ, no honours in clubs or diamonds, and therefore MUST have spade honours. Given East's actual holding (♠ KQxx) it is vital that West switches to a spade and thus breaks up the endplay.
Note that in planning the play declarer hoped that the two diamond honours were split or that West held both (as was the case).
Declarer also visualised the possibility of an endplay in spades even though that was a long way off at trick one!
Also, declarer avoided ruffing dummy's small heart in hand at trick two because that would have made it easier for West to find the spade switch.
So, perhaps you think that at the endgame you could play ♠ A and a small spade and force East to win and concede a ruff and discard if East held only two spades including ♠ K or ♠ Q... This is NOT a likely scenario when you realise that East has already been shown to have started with only two cards in each minor!
Note that an opening lead of the ♠ K would also present a winning line for declarer who could subsequently lead towards dummy'♠ J95.
This was the full hand:
Only two of seven declarers made 11 tricks in a club contract. |
|
|
|
|
| 2019-10-17 - Did you stop to think...and did you think clearly? |
Show Detail |
As West (dealer) you open the bidding, probably with 1♣ or a strong NT (15-17), which is passed to South who bids spades and subsequently becomes declarer in 4♠.
You start with ♣ A or ♣ K according to your partnership agreement and partner will play a small club (again according to your signalling agreement).
You continue with the second top club and partner will again follow with a small club, denying a doubleton, whilst declarer follows with ♣ Q.
HOW DO YOU PROCEED...AND WHY?.
Give it some thought before clicking on the Show Answer button below. And refrain from clicking on the Show All Hands button!
|
| Show Answer |
So, what is there to think about, I hear you say.
Did yoiu attempt to construct possible hands for declarer?
Well, let's start with the liklihood that the bidding has suggested that declarer holds 6 (or more) spades.
We also know that declarer has only 2 clubs. You did know that your partner holds three clubs and not a doubleton? Did you note the sequence of partners play of his club holding? Small cards can tell a story...but partner needs to be awake to recognise the message!
So, that's 8 (maybe 9) of declarer's cards.
That leaves 5 (or maybe only 4) unknown cards in declarer's hand.
Now comes the real thinking....
If declarer has 4 diamonds and 1 heart then at most the defense will score a single diamond trick, assuming that declarer plays corrctly by leading TOWARDS dummy's ♦ KQxx, twice if necessary. So, no chance for an extra diamond trick other than your ♦ A
If declarer holds 3 diamonds and 2 hearts then declarer can avoid a heart loser by discarding it on dummy's long diamond unless you can score a heart trick before dummy's diamonds are established. Note that you can identify dummy's fourth diamond as a potential winner for a discard if declarer holds 3 diamonds....In case you have difficulty working this out just count to thirteen ...declarer holds 3 diamonds, you hold 3, dummy holds 4 and consequently partner holds 3!
If declarer holds 2 diamonds and 3 hearts then dummy's diamonds will provide at least one discard, maybe 2 if declarer holds ♦ J10.
And lastly, if declarer holds a singleton diamond then declarer can either set-up up one diamond in dummy for a heart discard or maybe two diamond winners in dummy if you rise with ♦ A when declarer first leads a diamond from hand.
All of the above point to a very obvious message....you must try and create a heart trick BEFORE declarer plays diamonds.
SWITCH TO A SMALL HEART AT TRICK THREE.
On the night, this hand was played at 13 tables and eleven declarers made ten tricks! The hand records show that declarer should be held to nine tricks. Making the killing heart switch at trick three will bring that about. On any other defense declarer will score ten tricks.
This was the full hand:
Note also that if partner actually holds ♥ Q10xx or ♥ Q10x then the heart switch at trick three will gain two tricks for the defense and thus restrict declarer to eight tricks.
So, I hear you say...well what if declarer holds the ♥ Q? In that case you are never getting a heart trick because declarer can always finesse aganst your ♥ Kxx and may also be able to discard a losing heart(s) from his hand on dummy's diamond winners.
Clear thinking, with good reasoning, is a pre-requisite to good defense. |
|
|
|
|
| Paul's Hand Analysis |
Occasional anlysis focusing on interesting aspects of bidding, defense and play from hands fetaured in games on Thursday nights.
|
|
|
|