| About 'VBC Bridge Hand Spotlight' |
The VBC Bridge Hand Spotlight is based on one of the hands played at the club. Since we play Common Game hands, the analysis can be used for any club who also uses the Common Game.
- The dealer is indicated by the white lettering of the direction: e.g. "North"
- A partnership is vulnerable if the background for their "direction" is red. Thus, if both "East" and "West" have a red background then that pair is Vulnerable. Non-vulnerable pairs have a green background.
Please contact us if you have any questions or would like to suggest a hand.
|
|
|
|
| Bridge Hand Spotlight - Board 3, Tuesday, March 3, Elaine Said |
Show Detail |
Analysis by Elaine Said
Lots of questions!!!
- Should West bid 2♦ on a 9-count vulnerable?
- Should North bid 4♦?
- Should South bid 5♦ with only 12 points?
|
| Show Answer |
- Should West bid 2♦ on a 9-count vulnerable?
West really should not bid on 9 points and make partner think they have a good hand. In addition, West is probably going to be on lead based on the bidding.
- Should North bid 4♦?
Yes, North should bid 4♦ as a splinter bid. It shows a singleton or void in ♦ with at least 4 trumps and an opening hand or better.
- Should South bid 5♦ with only 12 points?
Yes, South should show first round control of ♦ with only 12 points. Do not rely on point count with fits! You have no losers in ♦ since you have the ♦A. You have a 7-card suit (with an 11-card fit) and West bid 2♦, so your partners points are elsewhere.
Making intelligent and informative bids will get you North/South to slam with only 26 high card points! |
|
|
|
|
| Hand of the Week - Board 1, Friday Morning, July 24, 2020 |
Show Detail |
This is a hand with bidding opportunities and a playing challenge that was played by 15 tables who participated in the Virtual Vanderbilt Game Friday morning. Did your bidding go like this and if you were sitting East, what was your response to partner's 4th seat opening?
|
| Show Answer |
Possible responses:
- 2♣ Drury (Standard Drury, Reverse Drury, 2-way Drury) shows support for partner with 10-11 points. For more information about Drury see any of the following links:
- 2♠ Raise (6-10)
- 1 Notrump (forcing) – If you play 1NT is forcing even by a passed hand, you can bid this first then jump to 3♠ showing a limit raise with 3-card support
- 1 Notrump (nonforcing) – Partner could pass when we have a 5-3 fit in spades so this is not recommended
Since the hands are from The Common Game, we can see how other players across the country played the same hands. Almost 1/3 of the pairs did not reach the makeable game. Here is the breakdown:
| Contract |
Made 5 |
Made 4 |
| |
VBC Open |
VBC 499 |
TCG* |
VBC Open |
VBC 499 |
TCG* |
| 4♠ |
5 |
3 |
233 |
1 |
0 |
47 |
| 2♠ or 3♠ |
2 |
1 |
107 |
1 |
1 |
27 |
*The Common Game
One advantage of The Common Game is we often times get further analysis from bridge experts. This particular hand was analyzed by Lynn Berg, a Gold Life Master and National Teacher Trainer for the ACBL.
So if partner gives a simple raise of 2♠, what should declarer do?
Lynn Berg says:
West has a hand which illustrates a useful principle for evaluating 5-5 hands. When he opens 1♠ , East (a passed hand) will certainly raise. Will East bid 2♠ , or will he use Drury to show 10-11 points and three cards spade support? Even if he just bids 2♠ , West should try the game. He knows they have a spade fit and he has an excellent second suit. Go for it! This time, only those two Aces will cash, even with the 4-1 trump fit.
Some of our players showed the second suit (♦) and responder corrected to 4♠.
Third Hand Open Light
Instead of passing initially, a few players in third seat preempted with the 5-card heart suit by opening a weak 2♥ This not only interfered with their opponents bidding but also helped the defenders lead against the 4♠ game contract.
If you review the play of the hand where Pair 5 played Pair 18 in the open game, N/S attacked hearts and E/W now has to play trumps differently in order to maintain trump control against a 4-1 split. With ♠KJ1042 opposite ♠Q73 you must begin drawing trumps by leading a high trump from your hand.

In this example, West led low to the ♠Q and continued drawing trumps. When North won the ♠A, she forced declarer by leading a heart, shortening declarer’s trump length to 1.
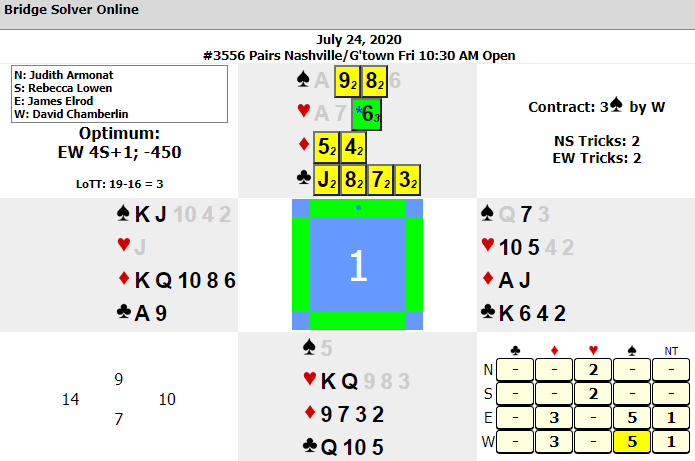
This defense helped hold E/W to 4 instead of 5. The hand is much easier to play if you receive any other lead since the tempo is not lost.
Good luck at the virtual bridge table and please continue to stay safe.
-- Reporting from Maine, Rees Mitchell, VBC Webmaster |
|
|
|
|
| Hand of the Week - Board 19, Friday Eve, March 13, 2020 |
Show Detail |
This is a hand where both sides face bidding choices that are not clear cut. Instead, the final contract depends on how aggressive is your bidding style.
|
| Show Answer |
After the opening bid of 1NT by South, the auction arrives to East in the balancing position. I think most people would look at the robust spade suit and not give a second thought to bidding 2♠. But, is that necessarily a good choice? Note that East possesses a vulnerable SEVEN-loser hand. Where are the tricks coming from? Given the 1NT opener, the ♣Q is doubtful to produce a trick. So, the point is, balancing on this hand vulnerable is more risky than if you are non-vulnerable. To my way of thinking, you have the very real risk of going down 200, which is not a good result against opponents who were in a part score. At the same time, a 2♠ bid does tell partner what to lead. On this hand, it turns out that the hand only makes 1♠ against inspired defense.
The next decision belongs to South. Most of the time, I advocate the principle that when you open any level of NT, the remaining decisions are up to your partner. However, I think this is an exception. While you have a maximum of 17, it is not really so since two of those points are from the ♠Q. You do not have good defensive values. If you are playing against an East you judge to be a reliable bidder, I think it reasonable to double (takeout). You have support for the other three suits, and from the vantage point of your hand, you think the solid bidder should have a good chance at making 2♠. And while this is also a seven-loser hand, there is a reasonable chance of finding at least an eight-card fit; I am willing to bet our side has a chance of making 8 tricks against a somewhat probable 110 by East. I am really not speaking out of both sides of my mouth. Instead, I am encouraging you to consider how actions should be different given the vulnerability you face.
If the final contract becomes 3♦, you will likely lose this battle. While you actually can make the contract, it depends upon guessing the diamond position, which you almost certainly will not.
If your style was not to double 2♠, you face a defensive problem. If you solve it, you get a great board, but if you don’t…..
Against 2♠, it is reasonable to start off with either the ♥A or ♥K (depending on your agreement). Partner plays the ♥8. It is now incumbent upon South to think. He can see all but 16 points. Most of the missing points are undoubtedly held by East, maybe all of them. Where are the defensive tricks coming from? Whether East chose to play the ♥3 or ♥4 on the fist trick, there is room for North to have ♥8x, meaning a ruff is possible. Therefore, South should cash the other honor. Whatever North now plays, it becomes clear that his original holding was the 10-9-8 of hearts. Is there meaning in which one he plays on the second heart? Well, yes! It is advanced thinking, but the higher card should encourage the higher side suit, and the lower card should encourage the lower side suit. North should play the ♥9. South then takes a deep breath and under-leads the ♣A, which North takes, retuning a club followed by a ruff for a well-deserved great score. What if you don’t have that carding inference in your tool box? You should still think about that the club play as the only chance to set the contract. Since you know declarer has a heart pitch coming, the greatest risk of costing your side a trick is when East holds specifically the ♣Kx doubleton of clubs.
In the Common Game
The result distribution indicates that the split between some number of spades EW and some contract by NS (going down) was 58% to 48%. There were six distinct outcomes, with NS collecting at least 85% for setting spades. Down one was a good score for NS as well, scoring 70%. The worst score for NS was allowing 2♠ to be played and made for 24%.
Double Dummy Makes:
NS 3♦; EW 1N; EW 2♣; EW 1♠;
NS 1♥; Optimal Contract +110
-- Pat Williams |
|
|
|
|
| Hand of the Week - Board 26, Monday Aft, February 10, 2020 (Part 1) |
Show Detail |
You are sitting South. After the auction shown, your partner leads the ♣K. Is he asking for count or attitude? For now, let's assume he is asking for attitude and we play upside down so we follow with the ♣9 (meaning, no ♣Q). West played the ♣8.
North then plays the ♣A and you play your ♣6 and West plays the ♣Q.
With the next card, North will be signaling exactly what South should lead so North can take the remaing club tricks.
North then leads the ♣2, A VERY CLEAR SIGNAL FOR WHAT HE WANTS YOU TO RETURN IF YOU WIN THE ♣J.
After winning the ♣J and without looking at the hands, which card do you lead back to North?
|
| Show Answer |
The ♣2 must be Suit Preference for diamonds, the lowest suit outside of clubs, correct? NO...NO...NO!!
Logic - look at the board. West's primary source of tricks is the long diamond suit. If North has the ♦A, he will get in when declarer plays diamonds.
North's lead of the ♣2 was a perfect suit preference play for the LOWER OF THE 2 OPTIONAL SUITS - preferring hearts not spades.
It goes to show that you have to always be thinking and don't just play cards using muscle memory!
-- Nat Harris
|
|
|
|
|
| Hand of the Week - Board 26, Monday Aft, February 10, 2020 (Part 2) |
Show Detail |
Here is part 2 of board 26 discussing a recommended auction for this board. You are sitting East and partner has opened 2NT. What is your call?
|
| Show Answer |
For this example, we will assume West opened 2NT with a balanced hand containing 20-21 High Card Points (HCP) and she may have a 5-card major. East has 8 HCP with two 3-card majors and a doubleton. It would be nice to know if West has a 5-card major and the way to do that is to use Puppet Stayman. After the 2NT opening we should bid 3♣ which promises at least game-going values and asks opener if she has a 4- or 5-card major. With five hearts, opener rebids 3♥ . With five spades, she rebids 3♠ . If opener has four hearts or four spades (or both), she rebids 3♦. With no four- or five-card major suit holding, opener rebids 3NT.
In this auction, West will bid 3♠. We now know that West opened 2NT with a 5-card spade suit so we respond 4♠.
The responses to 3♣ Puppet Stayman are Alertable. For a more detailed explanation of Puppet Stayman, click here.
On this particular hand, E/W can make 4♠ but, with proper defense, will go down three tricks playing in 3 Notrump.
-- Rees Mitchell |
|
|
|
|
| Hand of the Week - Board 13, Thursday Evening, October 31, 2019 |
Show Detail |
A great hand for Halloween! This deal is all about hand evaluation. Sitting N/S, how would you and your partner bid this hand?
|
| Show Answer |
Proposed Bidding
| West |
North |
East |
South |
|
1♠ |
Pass |
2♥ |
| Pass |
3♥ |
Pass |
4♣ |
| Pass |
4NT |
Pass |
5♣* |
| Pass |
6♥ |
All Pass |
|
*3 key cards
The 2♥ bid was game forcing. North’s second bid is critical. Should one show the heart fit or rebid the very nice spade suit? It is best not to hide the heart fit, so bid 3♥. But, you may ask, how will partner know about the excellent spades? Partner will not. But consider: If partner can support your spades, their next bid is likely going to be 3♠, so if spades is the better strain, it is unlikely to be lost by bidding 3♥. Additionally, from north’s perspective, based on a known heart fit, his hand has more potential in a heart contract than in a spade contract. Why? Because of potential ruffs in the hand with the short trumps, and the ability to still use the spades for a source of tricks, provided partner has the ♣A or the ♠Q.
At his second turn, South gave a courtesy cue bid of the ♣A, and North was off to the races. North could see the ♣K would be an entry to the spades, which could likely be established with one ruff in the South hand. The response to 4NT showed three key cards. About the only thing that could beat this slam was a foul break in trumps.
At the Club
This contract was played seven times. All other pairs were in spades, which only makes five. So, it seems the field that night chose to emphasize the spades instead of showing the fit in hearts.
In the Common Game
The common game is scored across a larger field of participants, and in theory, provides a better comparison. This board was played 151 times, with 10 scoring up the slam and achieving 97%. An additional 27 pairs appear to have played in hearts short of slam, scoring 85%. So, one did not have to be in slam to get a great score. Just being in hearts instead of spades corralled most of the matchpoints. What was true in our club was true in the common game: most pairs played in spades.
--Pat Williams |
|
|
|
|
| Hand of the Week - Board 17, Thursday Morning, Aug 22, 2019 |
Show Detail |
How would you bid this hand?
|
| Show Answer |
2♣ was strong. 2♦ said nothing about diamonds, but promised at least one Ace or King. Jumping to 3♠ indicated a suit so strong that there was no question about trumps. East led the ♠4. North won in dummy and took the losing heart finesse. Nothing could be done about the other two losers, which resulted in down two.
This hand is really all about the bidding. What a hand North has – only two losers! One could open this hand 6♠ and be right more often than not. But, as we have seen, as long as East avoids leading the ♣A, this two loser hand has three losers.
There is a way to avoid this unmakeable slam. South’s raise to 4♠ should deny holding any ace. The North hand is so strong, that one should still have interest in slam. What is the key card? Right, it’s the ♥K. North can ask for this by bidding 5♥. Yes, North is showing the ♥A, but the importance is that slam is there if South has the ♥K.
At the Club
Half the field stayed out of slam. Of those in slam, three got the gift of the ♣A and were down only one.
-- Pat Williams
|
|
|
|
|
| Hand of the Week - Board 1, Thursday Morning, Aug 15, 2019 |
Show Detail |
Without looking at the East and West hands, how would you bid this hand?
Supposde the final contract was 3NT by South and West led the ♠8. East smoothly won the ♠A and returned a low spade. Which card would you play?
|
| Show Answer |
The Play
West led the ♠8. East smoothly won the ♠A, and then played back a low spade. There is enough information at this point to give suspicion about the actual layout, as the opening lead cannot be 4th best. One of the middle honors would be the appropriate lead from KJT8, and if the original holding is K third, then East did not open with a 6-card spade suit. Even if South figures out to play the ♠Q, the contract is doomed to go down since the ♦K is off.
The Bidding
Many times, North’s 3NT bid will produce a favorable result. South’s spade holding could easily be strong enough to provide the timing to gather 9 tricks. There is a more scientific way to get to a makeable contract and avoid the bad one. Let’s say you are playing 4-suit transfers. So, you bid 2NT to show diamonds. Partner will respond that they like diamonds. By agreement, that would be your partnership choice of 3♣ or 3♦; I like the suit bid to show acceptance. Regardless, after the acceptance bid, North bids 3♠ to show the spade shortness. Then, South knows they should play diamonds, and signs off in 4. This shows the bottom of the NT range; if South has a robust 17, they should bid 5.
You can tell partner about a short major the same way in conjunction with minor suit Staymen. After 2♠, South would bid 3♦. Once again, 3♠, shows the shortness.
At the Club
Half the field played in diamonds and half in 3NT. East/West earned a well-deserved top. They were the only pair to set the contract 2, thanks to the defensive prowess of Larry Averbuch who properly concealed his spade holding by winning the first trick with the A instead of the K.
-- Pat Williams |
|
|
|
|
| Hand of the Week - Board 22, Tuesday Morning, November 6, 2018 |
Show Detail |
This contract can be made but only a small percentage of players at the club figured out how. Give it a try and then look at the answer.
|
| Show Answer |
The 4NT bid asked North to bid 6NT if he was on the top of his 2NT range. Although he only had 23 (not 24) points, they were comprised of prime cards. He obliged. If a strong hand is weighted toward ownership of aces and kings, it is worth more than its total of high card points. I would value this hand at 23.5.
North saw a disappointing dummy hit the table. He was in a small slam holding only 32 points with no long suit in either hand.
On this hand, start by counting your tricks. There are only 10 tricks for sure. If the spades split 3-3, that will get you to 11 tricks. There is the possibility of a 12th trick if the clubs split 3-3, as you can lose a club to set up the 4th club in dummy. What are the odds? With 6 outstanding cards, they will break 3-3 35.5% of the time. If you need that to happen in two suits, the odds of that occurring are 12.6% - not very encouraging. As you can see from the diagram, that is not the lie of the cards on this hand. Yet, the double dummy analysis says the small slam makes. How? You ask.
The answer is a squeeze. Even if you find it difficult to recognize a squeeze, you should be able to identify the situation when a squeeze can exist. That is, you must be able to take all of the remaining tricks except one. In that situation, if an opponent must guard two suits and has to make his critical discard before you, then you will have executed a squeeze. If the possibility of a squeeze exists, it is vitally important that you play your tricks in the proper order so that you do not throw away what is there for the taking.
Playing the spades is not the first priority. Here, you will not make 6 without three club tricks. So, start by losing a club early. Since you need them to be 3-3, assume that as fact, which brings you to 11 tricks. More importantly, for squeeze purposes, you have “rectified the count.” Again, assuming the favorable club break as fact, you for sure have all but one of the remaining tricks. If spades split 3-3, the slam is made without a squeeze. And if not, the slam still makes if there is a squeeze. After losing the first club trick, win the next trick no matter what card is returned.
Where is a squeeze possible? Note that the squeeze cannot involve hearts. You have three top tricks in hearts with no possibility of any more. So, the squeeze has to involve diamonds and spades. Cash the three hearts and the ace and king of diamonds. Now, play the clubs. They split 3-3! When you cash your 4th club, look at what happens to West. He must keep four spades to keep you from running that suit. So, he pitches his remaining diamonds setting up your ♦10 in dummy and the slam is made. If instead, he chooses to protect the diamonds by piching a spade, you score the 12th trick in spades.
If you have difficulty seeing the squeeze, mark off the cards played one at a time. Better yet, use the Play it Again Bridge Solver application and step through the hand playing each card. To invoke the Play it Again option for this hand click here. For more information on Bridge Solver click here.
Squeezes are not always easy to see. At the club, this hand was played seven times by an above-average group of players. Of those, six were in slam, and only one of those made it. Congratulations to Doris Philamalee. The pair who stopped in 3NT also made six.
---Pat Williams |
|
|
|
|
| Hand of the Week - Board 14, Friday Morning, June 15, 2018 |
Show Detail |
Bidding commentary:
South opened 1♦ = 12-14
West overcalled 1♥ = 5 hearts, 8+
North DBL = Negative Double = 4 spades
South 1NT = stopper in ♥
West 2♥ = extra values (> 8)
North 2NT = 10+, also stopper in ♥
Opening Lead = ♥J
Declarer thought process - A R C
A - Analyze the lead
R - Review the bidding
C - Count (points and suits)
Tricks:
| ♠ |
- 3, maybe 4 |
| ♥ |
- 2, with proper placement |
| ♦ |
- 0, 1 if lucky (East is the danger) |
| ♣️ |
- 1, maybe 2 (or 3) |
Key suit = ♣️. How do you play it?
|
| Show Answer |
Play:
After the opening lead of the ♥J, with ♥Qxx on the board and ♥Kx in declarer’s hand, play for West to have the ♥A. Play low and take it with the ♥K.
Since all the real points are with West, and 8 clubs are in sight (5 outstanding), declarer must lead toward the ♣️Q. Hopefully, West will take it, giving declarer the 2 club tricks needed. But, what if West ducks it? Now, 3 clubs are outstanding, and declarer has an unsupported ♣K! Knowing West supposedly has the ♣️A (& ducked), when the club is led from the board toward the ♣️K, when East plays a card (now, only 2 remain), declarer must play low, which drops the doubleton Ax, making the ♣️Q, ♣️K and another ♣️ good.
The contract is now secured.
-- Nat Harris |
|
|
|
|
| Hand of the Week - Board 24, Friday Morning, June 8, 2018 |
Show Detail |
This hand offers lessons in bidding and play. How would you bid it assuming it starts out Pass, 1♦, 1♠, your bid? I have shown the way we bid it and just for your information, we were the only table in the room that went down.
|
| Show Answer |
At the Vanderbilt game, ten N/S pairs played this in hearts and one N/S pair played it in 3NT. All of the pairs playing hearts made 4 or 5 except for Nat Harris and me. We were set 1 because our opponents (Jon Levine and Ree Robinson) found the killing defense. Ree led the ♠8, Nat ducked, Jon won the ♠J. Jon might have cashed his ♠A which would have given us the contract. Rather than give up, Jon tried to reach his partner by leading his ♣4, away from his ♣K. Ree played her ♣J and Nat won with his ♣A, removing his only entry to the board and preventing him from pitching a club loser on the ♦K. Nice defense opponents!
After reviewing the hands, Nat suggested the bidding should have gone as follows:
| West |
North |
East |
South |
| Pass |
1♦ |
1♠ |
2♥ |
| 2♠ |
3♣ |
Pass |
3♠1 |
| Pass |
3NT |
All pass |
|
1 Western Cue - asking for a spade stopper
Makeable
| |
♣ |
♦ |
♥ |
♠ |
N |
| N |
3 |
1 |
3 |
1 |
3 |
| S |
3 |
1 |
3 |
- |
3 |
| E |
- |
- |
- |
- |
- |
| W |
- |
- |
- |
- |
- |
Assuming a spade would be led, South knew he had 8 tricks in his hand... needing only a spade stopper to make 3NT.
He would gamble on not having a club stopper. So what? He could always fall back to 4♥.
Playing in 3NT would have the benefit of making an unmakeable contract (with proper defense) and getting the 10 point bonus if it makes the same number of tricks in notrump as in hearts.
Just for the record, when I checked our results on The Common Game, I saw that Sally & Jeff Meckstroth played it in 3NN making 6.
-- Rees Mitchell |
|
|
|
|
| Hand of the Week - Board 2, Monday afternoon, March 26, 2018 |
Show Detail |
There is a little to talk about in the bidding. West chose to enter the auction by showing the diamond suit. This is an action many would choose. But, for my money, I think a takeout double is better. It is true that takeout doubles are mostly about shape; partner should be able to count on you having four of any unbid major. However, you can offset a lack of shape with extra points. Here, 17 HCP and a nice five-card suit are enough for me to be able to double and bid if partner responds in spades or clubs. If West starts with the double, East shows values by responding 2♠. After this, West bids 3♦ , to which East responds 3NT. Yes, on this board, you wind up in the same place, but the way you get there is much more satisfying to me. In the long run, I think starting with the takeout double pays dividends.
That being said, this hand caught my eye more because of the play than the bidding. 3NT is a challenging contract, but it requires proper analysis and timing: you only get one chance to get it right. You receive the opening lead of the ♣2. Will you make the contract or will you go down? Make your analysis and plan before reading on.
|
| Show Answer |
After the lead, you need to assess your prospects. You have seven sure tricks: 2 clubs, 1 diamond, 1 heart and 3 spades. If the spades split 3-3, that provides an eighth trick. A successful heart finesse would also supply an eighth trick, but that is likely a fool’s errand since South opened the bidding. So, it looks like you need diamond tricks to bring the contract home. There is a lie of the cards that will allow you to score FOUR diamond tricks. Did you see it?
The opening bid marks South with most, if not all, of the honors not held by your side. That means South rates to hold both the K and Q of diamonds. If they are doubleton or accompanied by a third diamond, you will make your contract!
It is an all too common error of playing to the first trick before figuring out your plan. In this case, that would prove fatal to your chances. Let the opening come to your jack. Then, confidently lead your singleton diamond intending to cover whatever South plays. Whether or not South splits his honors, you will be in control. You only have to lose one diamond trick and 3NT rolls home. On this day, making was worth 65% versus going down for 5%.
-- Pat Williams |
|
|
|
|
| Hand of the Week - Board 20, Thursday night, November 3, 2016 |
Show Detail |
Would you get to game on these cards?
|
| Show Answer |
Sadly, I think most would not. Yet, the combined resources held by North/South produce a choice between two games.
This deal is all about hand valuation. If your bidding is based on high card points alone, you won’t be as competitive as you need to be as a bridge player. There are valuation points on both sides.
After two passes, East has a fairly routine 2♦ opener. The only drawback is the possession of a four-card heart suit. It is correct that if your partner has not had a chance to bid, you should avoid preempting in a minor holding good support for a major. But, once they have passed, the advantages of preempting the opponents become more important.
The most important valuation decision in this hand lies with South. The choice he makes sets the tone of the whole hand and likely determines whether his side bids game. He has an opening hand of 13 high card points. But, this hand is better than that. Why? It is because this hand is rich in aces and kings. Here is a rule of thumb: If only one of your honors is not an ace or king, you can add a point (with at least an opening hand). Another thing this hand has going for it is the possession of both majors; the preempt increases the likelihood that you can expect to find your partner with a fit for one of them. But the preempt has done its job in taking away bidding room, making it harder to describe the holding.
South must decide how strongly he is going to bid this hand. If he views his strength negatively, he will choose an overcall of 2♥. That bid will do little to excite North and they will almost certainly miss game after (as it likely turns out) that East advances the preempt. On the other hand, if South is a glass half full kind of guy, he will decide that this hand is strong enough to double and bid, and he will start things off with double. Yes, I agree, it is a little short; I would like to have a trick more, but preempts put pressure on us to bid bravely.
After the double, East must advance the preempt. His choices are bidding anywhere from three to five. In the advancing position, I think one should bid to the level they are willing to go. I judge this hand to be 4♦.
After the advance, it is North’s turn.
- If his partner is a pessimist (having overcalled 2♥), he will see no good reason to bid a suit. But, with what appears to be a trick on defense, he should double, in my opinion.
- If his partner is an optimist, (starting with double), he is in much better position. Although he only holds eight high card points, his hand is worth more. I count it as 13 or 14 as follows: 8 points, 3 roughing values and the remainder for the source of tricks provided by the great clubs. Since South’s double should show at minimum something resembling an opening hand, North should be glad to bid the spade game. Sometimes, it won’t work. South is expected to have spades, but sometimes he will only have three, which makes North’s diamond singleton worth less and endangers the hand by losing control.
At the club on Thursday night, the board was played five times. Only one pair bid game, but they were outbid with 5♦. Though they did not double (as they should have), they got the best score of the evening by setting it three by collecting all of their tricks.
-- Pat Williams |
|
|
|
|
| Hand of the Week - Board 8, Wednesday Aft, April 20, 2016 |
Show Detail |
|
| Show Answer |
Some boards are equal-opportunity for all. This is one where almost everyone at the table could have done better.
North opened 1NT. While company would be expected, this action would not be universal. The hand is semi-balanced. It is a deficiency that there are two doubletons, and particularly that one of them is the KQ tight; you just cannot tell how that holding will fit with partner’s hand. But with 16 HCP and the possession of the five-card club suit, I vote for showing the potential strength of the hand right away.
After East doubled a second time, the prospects did not look as rosy. Now, it would be expected that the opponents had lots of red suit winners, so a retreat to clubs looked much better. This analysis was rewarded as the opponents had only their five winners: plus 180 and a top.
Now, let’s look at what the opportunities were around the table:
EAST
I encourage one and all to emulate this approach: a direct double of 1NT should show at least a comparable hand in values as 1NT. You can decide whether you want to promise the bottom or the top of the range. (I vote for the top.) Here, East had two more points than the top. When the auction got back to him, he looked at his two top clubs and those five quick tricks and could not resist doubling a second time.
The question is whether East had enough extra to take another voluntary action. For my money, the answer is “no.” A second double should say that East thinks he has the contract set in his own hand. West had already expressed a willingness to defend by passing after the first double. He was well-placed to judge whether to defend 2♣ or remove to a suit.
MORAL: Resist the temptation of bidding the same values twice.
WEST
EW may or may not have been on the same page in this auction.
I recommend that you treat the doubling hand as having no trump strength and distribution. If you do that, you can then play “systems on” meaning that the partner’s bids will be what you normally play over a 1NT opener: Stayman and transfers. What you give up is being able to bid a minor suit at the two-level to play. (Don’t you willingly give that up opposite 1NT openers?)
Holding the West hand, if your partner opened 1NT, you would not want to let him languish there. The only way the diamonds can take tricks is if they are trump, so your best shot would be to do what you do to sign off in 3♦. On the actual auction, West should have seen no prospect of defensive tricks in his hand. So, he should have preferred to play offense rather than defense and gone to 3♦.
Why he did not do that has a couple of possibilities:
- They may not have had an agreement of what West’s bids would mean over the double.
- West may have decided that removing the double could lead to a larger minus for their side (highly unlikely).
BUT, what should have been abundantly clear to West is that he held even less defense against 2♣ than he held against 1NT. It is hard to imagine that a bid of 3♦ after the second double could have been interpreted as anything other than a desire to play. However, it would not have been correct to remove the second double; remember, that second double should have said that East was sure he had the contract set.
MORAL: Have agreements for common situations.
SOUTH
After the first double, South passed. This should have said that he had a willingness to play there. Sometimes, such a pass means you think your side will make it; at other times, it means you have no place to bail out.
Which was it here? Many a South would add their five points to partner’s strength. Knowing that their side possesses at least half the HCP, they would be willing to take the chance of playing 1NTx. However, having HCP evenly divided between the two hands will most always produce more tricks than if the holdings are skewed toward one of the hands. The more skewed the holdings, the less transportation is available between the two hands; this generally leads to reduced possibilities of developing tricks. My experience tells me that, IN THE LONG RUN, with South’s holding, even a 4-3 fit is a safer contract than is 1NT.
Is there anything South could have done? YES! It is called Trash Stayman. This is technically a treatment within the parameters of the Stayman convention. The way it works is that when you hold a weak hand with 4-4 in the majors, you bid 2♣ Stayman. If partner responds in a major, you gladly pass, comforted that you found a 4-4 fit. If partner responds 2♦, you rebid 2♥. This is non-forcing and asks partner to pass or correct to 2♠, depending upon which major he prefers. You can also use this in response to 1NT openings. If you agree to play Trash Stayman, you must be disciplined about NEVER opening 1NT with doubletons in both majors.
Had NS been playing Trash Stayman, they would have found a better fit in spades. But, they would not have gotten a better board since that was unlikely to have been doubled.
MORAL: Be open to adding some weapons to your arsenal that are easy to remember and are likely to be encountered with some regular frequency.
-- Pat Williams |
|
|
|
|
| Hand of the Week - Board 26, Monday Aft, March 14, 2016 |
Show Detail |
|
| Show Answer |
This auction requires explanation as the EW pair were Precision players:
- 1♣ = 16+ high card points
- 1♦ = negative, 0-7 high card points
- 1NT = balanced, 16-18 high card points
It doesn’t matter what system you play, sometimes it will not be suited to the cards you hold or the opponents you play. That is the case here.
East was forced to make a negative response with his hand; he held a maximum, albeit a collection of quacks. The 1♦ response gave South the opportunity to suggest a spade lead. This action was not without risk, but it is part of the game in matchpoints to take some risks. (It paid off here “in spades!”)
After opener’s rebid of 1NT, East knew they had a chance for game. Holding the ♠Q, he suggested game in notrump, an action for which I have much sympathy. If he had inquired with Stayman and found the heart fit, things would have worked out much better for their side. Since they missed the heart game, which always should make, they were destined for a low board even if they had bid game in notrump.
The play on this hand has some interest as well as both North and South missed opportunities. The spade bid got North off to the right lead. You should prefer to lead a suit your partner bids unless you can find a reason not to. She chose the ♠10, which is the correct card. Declarer won the ace, cashed three heart tricks ending in dummy, and took the successful club finesse. Declarer cashed her remaining three winners, which meant she had eight tricks in the bag.
South had been forced to make a couple of discards on the hearts. He had to keep the good club, so he chose a spade and, finally, a diamond. He would have been better off to have pitched two spades and kept both diamonds. In particular, he chose to pitch the WRONG diamond, discarding the ♦2. Declarer exited from her hand with a small diamond. Not having seen the ♦K, North ducked the trick to South. Now, South was end-played, forced to cash his ♠K and concede a spade trick to dummy. North still got her ♦A on the last trick, but NS had made three.
By the time South had to make his last pitch, declarer had played all of her honors, so South knew that his partner had to have the ♦A. If he had pitched the ♦K, North would not have been able to go wrong; she would have known to take the diamond and lead spades again through dummy’s ♠Q6. This would have given NS the rest of the tricks.
Was South totally at fault? No! North should have been counting and realized that she needed to hop up with the ♦A anyway. Yes, she knew that South had the ♦K, but more importantly, she should have known that South had those spades remaining. After all, he had bid them.
So, there are three morals for the defense:
- Discard the correct suit (South)
- Discard an unnecessary honor if keeping it would give your partner a chance to go wrong. Said another way: help your partner do the right thing. (South)
- Don’t forget to count. (North) Not only is it important to count high card points as they show up, but it is also vital to visualize the shape of the hands around the table.
|
|
|
|
|
| Hand of the Week - Board 4, Wednesday Aft, March 9, 2016 |
Show Detail |
How would you bid this hand?
|
| Show Answer |
Sadly, this auction actually took place. It was the last board of the day. As the dummy went down, partner said, “I didn’t know what to do, but I knew I wasn’t going to pass!”
In their methods, the 2♦ cue bid is Michaels, showing an expected hand with at least five of each major. At this vulnerability, opposite a passed partner, one would expect the South hand to be fairly rich in trick taking potential as well. One thing is for sure, once you tell as big a lie as this one was, you are unlikely to have a way out; that proved to be the case on this hand.
The second bid by South was an attempt to show the diamond suit, but it really indicated a strong hand, asking partner to bid 4♥ or 3NT if they could accept the invitation. With enough solid values, North chose game in hearts. The defense could have set it two tricks, but they were kind and allowed North to come home down only one. Still, that was worth only about 20% of the matchpoints for N/S.
Probably, most people would open the East hand in third seat. It is a fairly rich 11 points. But, I would argue against it. Notice that the hand is weak in the major suits. You might be opening this hand for the opponents to find their major fit instead of allowing for them to pass the hand out. If this hand is not opened by East, South has a much easier time in the bidding.
But, East did open. What is a body to do with this hand? PASS!!! Too many people think that just because they hold a certain number of points (the amount varies), they have to open. Not true! The sooner you disabuse yourself of that notion, the better off you will be. If you don’t have a bid to describe your hand, pass and await developments. On this particular hand, wouldn’t you love it if partner is able to balance with a double? Even if the hand is passed out, wouldn’t you be happy defending 1♦? I think so. On this hand, it is likely that whichever side wins the auction loses the game. Most bidders will get too high on these cards, whichever side of the table they are on.
-- Pat Williams |
|
|
|
|
| Hand of the Week - Board 36, Monday Aft, February 1, 2016 |
Show Detail |
Plan your play...
|
| Show Answer |
It is not often that we get a chance to write about board 36, so when this chance game, I could not let it go by.
Given the auction above, you might be asking yourself how this possibly could qualify as a hand of the week. Well, the interest in this hand is not in the bidding; rather, it is in the play. As declarer, you should always make a plan. Unfortunately, many bridge players just don’t. This is generally to their detriment. This can manifest itself in either careless loss of tricks or missed opportunities.
East starts the defense with the spade 4. Declarer wins the ace as he would not welcome a heart shift. Declarer starts with six top tricks. If diamonds split, then his contract is made. Is there anything else declarer can do to develop a trick for his side? YES. If one club honor is held by East along with the 10, then declarer can finesse the clubs twice and get an extra trick. Not only does this give him an extra chance to make the contract, but to do so with an overtrick (or even 2).
But you have to plan on this from the get-go. To take advantage of a favorable lie of the cards, declarer must plan to lead toward his club holding twice. He has two diamond entries that make this possible. If he cashes his diamonds first, he will be rewarded with making his contract, but there will be no possibility within his control of making an overtrick.
So, after winning the spade, declarer crosses to dummy with a diamond. He leads a club toward his hand, inserting the 9. When East wins with the queen, the first thing needed has happened, and prospect for an overtrick is alive. East-West cash their spade tricks, and declarer is relieved to see that they split 4-3.
On the fourth spade, West discards a diamond, and declarer parts with a heart. East shifts to a heart. This heart may or may not be rife with meaning, depending upon the carding methods the opponents employ. Does a high card at this point deny anything higher? Does a low card promise interest?
To keep you from getting a good count on the hand, West’s best play is the king. If instead, he plays the queen, declarer will be more apt to place the king in East’s hand. If so, declarer will know that he should not take the second club finesse. Why? Declarer will cash the diamonds. East will show up with the king and jack of spades and the jack of diamonds. If he is suspected of holding the king and queen of hearts, then there is not room in his hand for the club king as well. Declarer will then know that the only hope to make the overtrick is to play for East to have an original holding of only two clubs – the king and queen.
If playing against a wily East who plays the heart king instead of the queen, declarer will go down in a contract they were destined to make. In search of the maximum score, he will take the second club finesse, losing to the king. East will then lead to his partner’s hearts, for the last two tricks. The defense will beat declarer one trick scoring three spades, two clubs and two hearts.
But, “Wait!” you say. Doesn’t the play of the heart king have as much chance of misleading partner as it does declarer? Yes, at the time it occurs. But, by the time East is in with the second club, declarer cannot hold both the heart queen and the club king. His play to that point will mark him with the club ace.
-- Pat Williams |
|
|
|
|
| Hand of the Week - Board 7, Tuesday Aft, January 26, 2016 |
Show Detail |
|
| Show Answer |
For me, 2015 was a much busier year in bridge activities than previous years. I began teaching more, which was good news for me of a fashion. However, I let that eat into non-paid activities, and I did not do a good job in keeping up with the hands of the week. I apologize for that, and I promise to try to keep on top of it this year and do a better job.
North has a good hand for opening light in third seat. He chooses 1♠. This has a couple of things going for it. First, it takes up room, requiring E/W to start competing at the two-level if they have values with a suit. Second, if this is the only bid that is made by North, then South is more likely to lead a spade if he is on lead. However, for my money, I would rather open this hand 1♣. I am more than willing to play a 4-3 heart fit. If partner bids either 1♥ or 1♠, I plan to pass. While opening 1♠ does indeed have some pre-emptive value, some of the time you will pre-empt your side out of its best place.
Although East has the best hand at the table, he cannot compete at his first turn. But, when South’s raise is passed around, he can compete with double. His partner should expect him to be more minor suit oriented because of his failure to make a takeout double at his first opportunity. South, holding four spades, raises to three hoping to keep E/W from declaring in their fit at the three level. With no ruffing values, he should realize that his hand is likely not as good as his high card points indicate. Opposite a partner who may have opened light, a pass is not out of the question, though he reasonably expects partner to have at least 5 spades.
It is the play that caught my attention on this deal. East starts by cashing two clubs and then leads the ten to give his partner a ruff. The ten is a suit preference signal for hearts (the higher ranking of the two non-trump suits – diamonds and hearts). West cashes two diamonds and leads the heart jack to East’s ace. Instead of attempting to give West another ruff, East exits with a diamond.
Declarer should ask himself WHY a club was NOT led. In hindsight, the answer is obvious. If East does lead a club, West cannot overruff the dummy, and East is marked with the ♠Q. When declarer does not process this information, he is reduced to making the decision of how to play the spades on other factors. Sometimes he will get it wrong.
It turns out that getting the spade position right on this hand means nothing to the matchpoint score. The ill-advised contract seals the doom of N/S to a board well below average.
-- Pat Williams |
|
|
|
|
| Hand of the Week - Board 20, Monday Aft, September 21, 2015 |
Show Detail |
|
| Show Answer |
It is routine for North-South to reach a good 4♠ contract on these cards. When this hand was played at the club, 16 out of 25 declared that contract. Not everyone made it, however. If given the chance, declarer always can bring the contract home. All that is required is to play for the spades to have a normal 3-2 split. Declarer can afford to draw one of round of trump. Then, cross to the ♥A, ruff a heart; cross to the ♦K, ruff another heart (over-ruffing East if necessary). Then, draw the last trump ending in dummy where the hearts are now good. Some of those who went down likely did not find the correct sequence of plays.
Did you notice that I said declarer could always make this hand “if given the chance?” Yes, this hand is being discussed not because of the declarer play, but because it is a defensive gem. After three rounds of clubs, East sits at the critical juncture leading to trick four. East can see that the hearts in dummy will produce at least 3 tricks – likely more. After producing the king and queen of clubs, West cannot have much more, although there is room for them to hold the ♦A. But if they had that card, they made a mistake in not cashing it before leading the third round of clubs. Given that declarer should have the ♦A, is there any hope for your side to take another trick. Yes, but it is most unusual. You need to lead the 13th club. If partner has either the ♠Q or ♠8, it will promote a trump trick for you. If partner has the ♠8 only, your side will set a contract that looks like it makes all day. If partner has the ♠Q, you were always setting it, but now you are setting it two.
-- Pat Williams
|
|
|
|
|
| Hand of the Week - Board 24, Monday Aft, August 17, 2015 |
Show Detail |
|
| Show Answer |
The bidding shown is as it occurred at the table. Aside from the puny heart holding, West had a very good hand - only five losers - with 16 high card points and four quick tricks.
After the heart opening, North ventured into the fray with 2♦. The North hand would be improved if the honors in the doubletons were moved to the longer suits, but it was still just worth an overcall as it counted to only seven losers and the vulnerability was favorable. Then East gave partner a simple heart raise, which was followed by South’s raise of diamonds.
Knowing that partner had a fit for his hearts and that East-West likely had no wasted values in the diamond suit, West bid the heart game. But with six diamonds, South bid the good sacrifice. West pressed on and bid again. A more disciplined approach would have been to pass. West had already freely bid game. This made a pass at the five level forcing on East to either double or bid five depending on their judgment of the hand. However, West knew that East would not necessarily envision a void in his hand, so he pressed on and bid 5♥.
Unfortunately, East’s assets were about as meager as could be, and with no shortness in the black suits, there were no ruffs to be enjoyed by the hand with the shorter trumps. The ♠Q did fall, however, and if the North-South heart holdings had been reversed, the hand would have made five. But, down one was the actual result for 12%. They had forgone doubling 5♦, which would have been worth 69%. In the Common Game, the percentages were 11% and 61%, respectively.
The main point of this hand is not in what happened but in what did not happen. The missed opportunity was in East’s bidding. Many people find out they have a fit and immediately discount that there might be a better fit to be uncovered. Instead of bidding 2♥, East has the perfect shape and just enough points for a negative double. It won’t happen too often, but West will sometimes have four spades along with his five hearts. And when he does, the hand will often play better in the 4-4 fit rather than the 5-3. Why? It is because the five-card suit will often be able to take care of one or two losers in the hand opposite. In addition to holding the five-card suit, you must be able to set up using it for discards before the opponents establish winners. Sometimes, the opponents will forfeit timing by making an unfortunate (for them) lead. Other times, as is the case here, your controls in the side suits are so strong, they cannot keep you from getting two club discards and making five in the process! 450 to East-West was worth 94% locally and 91% in the Common Game.
-- Pat Williams |
|
|
|
|
| Hand of the Week - Board 7, Wednesday Aft, June 17, 2015 |
Show Detail |
|
| Show Answer |
This is an interesting hand because your bidding methods have a direct bearing on which of three game contracts you will reach or whether you reach game at all. The auction above is one path.
North started with a straightforward 1♥ call. South responded with a forcing notrump, which was followed by 3♣. My recommendation here is that you play jump shifts by the opener as forcing to 3NT or a 4-level contract. Instead of showing the diamonds, South elected to give a preference by bidding 3♥. With the information at hand, North chose to play 4♥. With both clubs and hearts breaking abnormally nice, this contract rolls home after incurring a heart loser and the two black aces.
It turns out that 3NT also makes on these cards, but how many tricks are taken mostly depends on which side declares. From the south, if West makes the normal diamond lead, the likely result is making only three. However, from the North, East’s normal lead is a spade, and that likely leads to two overtricks.
Not all Norths will open 1♥. Many will look at that very powerful hand (only four losers) and want to express that right away with either a 2♣ or off-shape 2NT opener. Either of these openers should lead to North declaring in 3NT.
How do I think it should be bid? I like the given auction through the 3♣ bid. Rather than the heart preference, I think South should show the diamonds. This would be even if one of their diamonds was a club. Without a major suit fit, the likely best matchpoint opportunity is 3NT. South needs to cooperate to help the partnership get there, and the best way is to show diamonds. After this, North will likely bid 3NT. Unfortunately, on this hand, that likely leads to making only three. That was worth 71% at the Vanderbilt Club. In The Common Game, however, making 3NT was worth only 49%. The Common Game is a tougher field than the limited game at Vanderbilt on Wednesday. The Vanderbilt percentage was propped up because six of 16 pairs did not find game. (That should never happen on these cards…….folks, take a hard look at why you missed game and correct your bidding for the future.) Also, a couple of pairs managed to go down in 3NT. (That generally should NOT happen, so shore up your declarer play.) As to 4♥, no one declared that at Vanderbilt, but 13% of The Common Game field found and made that contract for a score of 65%.
-- Pat Williams |
|
|
|
|
| Hand of the Week - Board 6, Friday Eve, April 10, 2015 |
Show Detail |
|
| Show Answer |
There is no way around it. Sometimes, we just gotta put in examples of how NOT to bid a bridge hand. This is one of them.
There were five rounds of bidding, and, sadly, the pair wound up bidding the wrong slam. They will make 7♥, but they played in the less desirable 6NT, which can make only six. You ought not get it so wrong with so much unimpeded bidding. How did this happen?
The fault here lies almost entirely with West. After the big hand shows his suit is hearts, it is a waste of time to bid 2♠. East bears a small amount of blame for charging directly into asking for aces; there is still a chance that the best contract is in diamonds, and East gave up on that. You really can’t ask for better than a nine card fit after your partner opens a strong 2♣. West’s proper action is to show support in hearts right away.
West can bid either 3♥ or 4♥. Which is correct? While West does not have a lot extra, the possession of two kings, one of which heads a five-card suit (that might provide extra tricks), points to biding 3♥ only. This shows a hand that has at least a mild interest in exploring slam opposite the strong opening bid. Bidding 4♥ directly would show a hand with less values, and therefore, deny such interest.
After that, East should use Blackwood, even though he is looking at all four aces. After West’s response, East should continue with asking for kings, and will find out they have them all, too. Now, East can count a minimum of 11 tricks. He really cannot see his way to a sure 13, but if West should show up with a side queen, there are at least 12 tricks if it is black, and all 13 if it is the ♦Q. There is a chance for all 13 as well if two diamonds can be ruffed in dummy. At worst, making 12 tricks depends on a successful diamond finesse (when West has only the two kings). Even in that case, 12 tricks are always there if diamonds break 3-3 anytime West holds three of them. All in all, 6♥ is almost a lock to make, while 7♥ will be there something less than half the time.
This time, I would be in 6. On this Friday night, it would still be a little below average because one intrepid pair bid the grand. But at least I would not have gotten a zero!
-- Pat Williams |
|
|
|
|
| Hand of the Week - Board 11, Wednesday Morn, March 11, 2015 |
Show Detail |
|
| Show Answer |
Is it ever right to play notrump when you have a strong fit in a major? You betcha, and this hand illustrates that. These are the key characteristics:
- No ruffing values in the hand with the fewer trumps
- Stoppers in any unbid suits
- A double stop in a suit bid by the opponents
On this hand, the auction was swift and simple. Some people play that the direct 3NT bid promises exactly two of partner’s major. However, I think a holding of three is OK so long as the distribution is 4-3-3-3.
When you declare on a hand like this, assume that most people will play in the major. At matchpoints, you need to envision at the outset how the play will go in 4♠ and make sure that you play to make at least as many tricks as those who are in 4♠ will make. However, since you are in notrump, that extra 10 points will cause you to beat those who play in 4♠ . That means that if the opponent’s open a suit in which you have only one stop, you still must take any finesse that is likely to be taken in the major suit contract. On this hand, there are no such issues present.
East opened the ♥J. While a low heart would have been more effective on this layout, there is not a compelling reason to do that. The lead allows you to set up a third heart trick and collect eleven tricks in all. This time, you are richly rewarded since 4♠ does not even make if the opponent’s collect their ruff in diamonds.
-- Pat Williams |
|
|
|
|
| Hand of the Week - Board 8, Friday Morn, February 13, 2015 |
Show Detail |
|
| Show Answer |
North’s takeout double had nothing extra, but he could hardly be blamed for wanting to get into the auction. He had the required major suit holding and extra shape.
East raised preemptively to 3♠. Opposite the takeout double, South’s hand was worth as much as 12, although that assumed the ♠K would retain its full value. Taking the optimistic view, he decided to try 3NT.
This was passed around to East. With the excellent fit in spades and an entry, he knew that North-South were in trouble, so he doubled.
West started with the ♠A. East contributed the ♠10; note that he had to play a high spade – otherwise, the suit would have been blocked. East-West were playing upside down signals. West mistakenly read the ten at face value (as negative interest) and switched to hearts, knowing his partner had to have at least four of them. Fortunately, the opponent’s contract was hopeless, and they still went down one. But, it was only a 50% board.
West fell from grace in misreading the ♠10 at his opening lead. Many people play that the lead of the ace ASKS that partner play his highest card in the suit. Even without that agreement, can East really be saying that he is disinterested in spades? His preemptive raise should show four spades, which marked South with only two. Therefore, West should have realized that continuing spades was the right thing to do. If he had done so, South would have come to only seven tricks, and 300 would have been 81% for North-South. Had west found the inspired opening lead of the heart king, the opponents might have been held to only six tricks, and 500 would have been a top.
-- Pat Williams |
|
|
|
|
| Hand of the Week - Board 3, Wednesday Aft, January 28, 2015 |
Show Detail |
|
| Show Answer |
This hand is all about the bidding. When East bids 3♣, it should be viewed as a game try, asking for either help in clubs or a strong hand. With positive answers in both aspects, West has an easy acceptance to 4♠.
But East has a surprise, next bidding 5♥. Now the character of 3♣ takes on a different nature. By bidding 5♥, East shows that he always intended to bid 4♠, and not only that, he has first-round control in both of the cue bids and definite interest in slam. With full control of diamonds and a doubleton club, West could hardly have a better hand for his partner. He accepts the invitation by bidding 6♠.
The combined high card points is only 28, but slam is practically a lay-down because of the excellent fit and the controls held. As East, would you even think to prepare for the possibility that slam might be there? Once West raised to 2♠, East revalues his hand to 17 (14 HCP and 3 for the 5th and 6th spades). So, thinking that it is safe to stop at the five-level, East can leave open the possibility that his partner has the perfect hand for him.
This hand can actually get to slam on another very reasonable auction, although the paths the auction can take can lead down some murkier paths. That auction starts the same, but after 3♣, West can bid 3♦. At face value, this bid denies help in clubs but shows help in diamonds. However, West would be planning to bid clubs over East’s next bid, which should show an accepting hand with good cards in both clubs and diamonds. On these cards, East would next cue with 3♥ over 3♦, and the train would once again stop at 6♠.
Note that West has a very strong opening bid of 1♦. Since aces and kings are worth slightly more than the 4 and 3 points assigned to them, I would not argue with opening this hand with 1NT. If so, East will still be interested in slam, but the auction may end at only 4♠. East’s spades are so good that he doesn’t need to know about the fit to be interested in slam. He can bid 4♣ directly over 1NT. This is Gerber (4NT is quantitative), and when he finds out they have all the controls, he can reasonably bid slam. On the other hand, if playing Texas transfers, East would start by transferring to spades at the 2-level, then bidding 4♠. This shows a better hand than using Texas (transferring to spades at the 4-level). While West will receive the message of East’s slam interest, he would not be able to continue over 4♠ since he already upgraded his hand by opening 1NT.
-- Pat Williams |
|
|
|
|
| Hand of the Week - Board 15, Friday, December 19, 2014 |
Show Detail |
|
| Show Answer |
It is certainly rare to have a 70% game, at least for me. My aggressive style creates more action than the average table, but that higher standard deviation tends to reduce the frequency of my 70% games. I also do not get to play with regular partners week in and week out. About 10:15 on Thursday night, Art Lowen and I agreed to play the next day. When we were finished, I had my first 70% game in quite a while. No matter how good a player you are, you generally need more than the usual help from the opponents to score so high. But you also need to do your part and hit one out of the park every now and then. This hand was one of those for us.
Although it contains only 11 high card points (HCP), most people would open Art’s hand. The void contributes to having only six losers. Also, it counts to 21 under the Rule of 20 and 22.5 under the rule of 22.
The opener was followed by a 2♦ overcall, and then, 2♠ by East, a forcing bid. South was correct to pass, even with the fit. This is because the ♥K is likely ill-placed on the auction and the adverse vulnerability.
Now it was Art’s turn to shine. After the 2♠ bid, he evaluated that we should be in game. Others likely did this as well, but Art bid 4♦, a bid perhaps no one else in the field thought to make. This showed control in diamonds (no more than one loser). while it did not promise the world’s fair, such a hand should contain either more than a minimum in HCP (not this time) or a potential source of extra tricks (the hearts). Here, it should also imply a control in the unbid suit (and he did have a control in clubs.). Many of you might have splinter bids in your bidding arsenal, but you may think they require extra HCP values; it does not hurt to use them “on the way” to a contract as long as you are opposite a partner whose hand is unlimited. That was the case here. Once again, 2♠ was forcing, and while it showed a minimum of 10 HCP, there was no topside limit.
The 4♦ bid gave me reason to think about slam. I had a couple of detriments: (1) the ♦A was likely a wasted value and (2) the void in hearts would not be helpful to develop tricks in that suit. However, I did have a couple of plusses: (1) a good trump suit opposite an expected 4-card raise by Art and (2) my own source of tricks in the clubs. Although Art’s bid implied a club honor, our prospects of slam would be much better if he held the ace instead of the king. Both club honors would be better! If he held only one of the top two, he would need the jack It was unlikely that Art held any diamond honors (which would be wasted.) It was also possible that Art held a running heart suit. With all that, I decided that slam was worth the risk as long as Art held two of the three missing key cards (♠K, ♣A, ♥A) so I asked with 4NT. His response showed two without the ♠Q (which I already knew), but it also denied extra spade length, so I knew he almost certainly held specifically four spades. Hearing the response I wanted, I signed off in 6♠. Although I could never find out more about Art’s hand than the number of key cards he held, we were rewarded when he, in fact, held one of the possible hands that did, in fact, produce slam.
-- Pat Williams |
|
|
|
|
| Hand of the Week - Board 9, Monday, November 10, 2014 |
Show Detail |
South starts off the defense by cashing the ♠A and continuing with the ♠Q, which you ruff. How do you plan the play to maximize your tricks?
|
| Show Answer |
Sometimes it is hard to distinguish between actions that might help you side and those that cannot. Note that I said, “might,” because often, as is the case on this hand, the odds may be less than 50%. But if it costs nothing to give yourself a chance, then why not take it?
In addition to the spade already lost, you are faced with losing a club and one or two diamonds. To avoid a loser in spades, you need to ruff twice or have a place to park the 3rd spade. Do you see how you can possibly avoid one of these losers? Might it be an endplay to make the opponents lead diamonds for you? That is a possibility, but it is hard to construct defensive hands that will allow you to enjoy that benefit. It is hard with these cards to be able to ruff two spades and draw trumps. Another possibility is that you could play for the clubs to be 3-3, which would provide a winner on which to pitch the losing spade instead of ruffing it.
My assessment of this hand is that it is better to play for diamonds to be 3-3. In that case, you are able to throw a losing club from dummy on your established 13th diamond. In the happy instance that the ♦K is on side, it makes the play of the hand fairly easy because that likely provides you with the transportation needed to ruff spades twice and draw trumps.
So, my play at trick three was a low diamond toward the queen. It lost, but the opponents cooperated by continuing spades for my second ruff. I then cashed the king and queen of hearts, getting news of the bad split (now, another loser). This was followed by the ace and another diamond, which established the 13th diamond. But, the opponent missed the opportunity to shorten my trumps when they returned a trump instead of a spade. This allowed me to make three instead of going down one. The real key on this hand, as it is with almost every hand, is to plan your play to provide maximum opportunity and safety. The distribution of the outstanding cards was mostly bad, but the initial plan avoided going down two. And when the defense slipped, it allowed the contract to make.
|
|
|
|
|
| Hand of the Week - Board 17, Saturday, September 27, 2014 |
Show Detail |
What do you open with this hand?
|
| Show Answer |
Most of what you learn in bidding is centered on bidding the common hand types you will encounter. As you progress, your horizons expand to address some less common bidding challenges. A lot of these expanded situations involve “freak” hands. It is easy for us to become fooled into thinking that all freak hands require unusual bidding methods you don’t use every day. But that is not the case, as this hand illustrates.
With ten diamonds, this hand is certainly unusual. Since the suit is headed by the top three honors, you cannot lose a diamond trick even with the most adverse break of 3-0. So, there is a minimum of ten tricks for your side if you declare a diamond contract.
Apparently, when our players picked up this hand, the freakish nature slapped them in the face and knocked the bridge sense out of their heads. With a singleton in each side suit, the ONLY thing that matters is how many aces partner has. Depending on the answer, this hand makes four, five, six or seven diamonds. So, the proper bid is to open 4NT! After partner responds showing three aces, the bid of 7♦ is quite easy. This hand does not require some esoteric bid or involved bidding sequence. It simply requires the forthright use of one the first conventional bids we all learn.
| West |
North |
East |
South |
| |
4NT |
Pass |
5♠ |
| Pass |
7♦ |
All pass |
|
Should you think about bidding 7NT? In a team game, the answer is, “No.” At that form of scoring, you want to take the sure plus, which 7♦ represents. The danger is: if partner has no diamonds to get to your hand – the case here - you will not be able to enjoy those ten tricks. At matchpoints pairs, however, 7NT is not such a bad proposition. If I have correctly calculated the possible distributions of the remaining three cards, partner will be void 8/27th of the time, or roughly 30%. So, most of the time, you would be rewarded by bidding 7NT. But, since you may never see a hand like this again, don’t you want to ensure you are in a contract that will make? Would it not be a bitter pill to go down on a one in a million hand? So, I vote for forgoing the good odds of 7NT and sticking with the sure 7♦.
In the open game, only one pair bid seven, and it was in diamonds, not in no trump. Another pair bid 6♦, and the other seven pairs bid 5♦. Our 299ers fared better. Although only one pair out of nine bid the grand slam, three other pairs did manage to bid a small slam in diamonds. One intrepid pair bid 7NT, and they went down seven. The players in the Common Game did a little better than our locals. Overall, 9% bid the grand and 39% bid the small slam.
One other note: it is not an absolute given that opening 4NT is ace asking. You and your partner might choose to assign some other meaning. But, in the absence of having done that, 4NT asking for aces is so universal that you should be confident in using it as an opening bid as described in this article.
Thanks to Chuck Said for bringing this hand to our attention. Yes, he was the one who bid 7♦. The 299ers who bid the grand were Richard Cummings and Pat Bridges.
- Pat Williams |
|
|
|
|
| Hand of the Week - Board 17, Wednesday Morn, 8/20/14 |
Show Detail |
The opening lead is often critical. If you can zero in on the likely issue for your defense, it is better to do that with the opening lead. If not, the timing may shift away from you and to the opponents. Such is the case with today’s hand.
Sometimes, the auction will contain an important clue for you. As you gain experience, hopefully, you will pick up on available clues more often. In this hand, the opponents’ bidding paints a clear picture as to the what the opening lead should be. Can you see it before you read further?
|
| Show Answer |
East-West wind up in 4♠ after East’s 1♥ opener. Use this information to envision the play: West will be able to draw trumps in three rounds; since North holds only three hearts, East is a favorite to be able to set up the fifth heart in East’s hand for an extra trick. But, he needs time to do it, and if North can select the correct suit to attack, he might be able to seize the timing needed for his side.
But, which suit to attack? In truth, it could be either minor, but North has some assets in clubs. It is better to attack a suit in which you hold an honor if you hope to get a trick in it than a suit in which you hold no honor. Another way to think of it is to realize that your partner opposite this holding can have any one of three missing honors, and that will be good for your side; you will not give up anything no matter which of the three cards partner holds. If partner has the ♣A, the lead likely gains no advantage (because you already have the advantage) but if partner has either the ♣K or the ♣J, you might get the timing you need to score a club trick before declarer can establish a discard.
On this hand, if you lead a club, your analysis is rewarded. If you lead anything else, declarer will establish the hearts and discard the club loser. Here, the choice of lead is the difference between holding declarer to four or letting declarer make five. Would you rather score 65% on this board or 25%?
- Pat Williams
|
|
|
|
|
| Hand of the Week - Board 14, Wednesday Morn, 8/13/14 |
Show Detail |
|
| Show Answer |
Hands like this one make bridge the very interesting game that it is. Through a combination of actions on both sides, this board turned out to be a disaster for North-South and a boon for East-West.
After two passes, West opened with 1♣, and North followed with 1♦. East chimed in with 1♥; while this bid does not have to show 10 points at the one level, many would expect East to have a better suit. East’s hand would be better overall if the ♦Q were an honor in another suit. But a negative double is not an option with a singleton ♠A. After West’s simple raise to 2♥, East thought even more of his hand and bid 4♥! We can’t recommend this bid; there was nothing in East’s possessions that calls for him to be so aggressive. But, sometimes, such aggression is unjustly rewarded, which can only encourage the aggressor to continue on his merry way.
South dutifully led partner’s suit. North had no reason to suspect South’s actual holding, so the winning play of rising with the ace never entered his mind. Instead, he made the normal play of covering the eight with his jack. From his perspective, he could easily expect to win a trick with all three of his high honors. If his partner could produce a club trick or if he happened to be able to score two spades, they would set this contract. Since South had chosen not to bid on his very distributional hand, North had no clue as to the actual layout. North knew that South had no more than one heart (as East must have at least five of them). So, the low diamond looked like it was either a doubleton or was from Qx5. South holding Qxx5 was unlikely, as he almost certainly would have bid 2♦ with that.
So, East-West scored 420, and thus, the disaster for North-South. East-West scored a game that could be set, and to add insult to injury, it was a game that should never have been freely bid.
The sadder truth is that North-South should never have been faced with this situation. One of the catchy aphorisms in bridge is “six-five, come alive!” South should not remain quiet with his mostly black hand. Even though the spade suit does not meet the normal qualities for opening a weak two before partner has had a chance to bid, I advocate doing it here because of the side five-card suit. If you are going to bid on this hand, do it sooner rather than later. Waiting allows the opponents two more bids before you have another chance to bid. Not all will agree, but I think the combined risks of pre-empting partner and getting him off to the wrong lead are offset by the opportunity to pre-empt the opponents with this hand.
Just look at what likely happens after a 2♠ bid. West would not be able to overcall with his minimum opener and flat hand. North would properly advance the pre-empt by bidding 3♠, and East-West will be completely shut out of the auction! North-South would glide home making five.
As it turns out, if South is one who chooses to be disciplined in second seat and passes, things are likely to turn out much worse for East-West. In that scenario, a bid of 2♠ by South at his second opportunity may result in a competitive auction that pushes North-South to their unbeatable game.
- Pat Williams |
|
|
|
|
| Hand of the Week - Board 19, Wednesday Morn, 7/2/14 |
Show Detail |
|
| Show Answer |
There are rules of thumb that are drilled into us early in our bridge careers. You don’t have to understand the logic behind them. If you follow them blindly, then you will be right in the long run. But, one of the factors in your development as a bridge player is the ability to recognize when you should break these bromides.
This hand features the rule about leading against a no trump contract. You are told very early on to “lead fourth best from your longest and strongest” on the opening lead. Sometimes, you will break this rule because of data you receive from the auction. This time, it is for a different reason.
On lead against 3NT, East dutifully followed the rule and led the spade nine. In a hand like this, where there is no outside entry to your long suit, it is often best to lead fourth best on opening lead. This is because in order for you to win tricks in that suit, you know you need immediate help from your partner. That would be a suit similar to this one, but missing either the queen or the jack.
Do you see what makes it wrong to lead fourth best from this holding? The suit is too strong on its own. You know from the bidding that South has four spades and that North likely holds two or three. What you must guard against with a holding this strong is giving up a needless cheap trick. On its own, your suit may be able to smother the ten of spades. (And as can be seen, that would happen.) Instead, because the “fourth from longest and strongest” rule was followed, declarer was ahead a trick of the field from the get go. But there was more to come.
The proper lead on this hand is the ♠Q . If led, North’s best action is to duck. East must then decide whether to clear the spades or switch to another suit. North’s duck marks him with three and, more importantly, marks his partner, West, with only one. (If West has three, he would be able to signal high unless North specifically holds the stiff ten.) If East is prescient, he will cash his spade ace, holding declarer to nine tricks. If East does not favor setting up a trick for declarer, he will be disappointed when declarer comes to ten tricks on the line next described.
When East cashes the ace of spades, the spade threat is there. But, declarer will have no choice in the matter of the diamond finesse; it needs to be successful to come to nine tricks. When the queen is not led, the threat of the spades is not imminent, which gives declarer the timing to develop additional tricks in diamonds. How? His plan should be to lead diamonds, covering whatever West plays so that he can lose a diamond to East who can only cash one spade. Once in, East can challenge declarer by now setting up the spades, but if North sticks to his guns, he will even risk going down in order to score the extra diamond trick. Declare will come to ten or eleven tricks depending upon whether or not East cashes the spade ace.
In practice on this hand, remember that declarer won a cheap trick with the ten on the opening lead. When declarer ducked a diamond to East, the spade ace was cashed. In this scenario, declarer was destined for eleven tricks when the fourth best lead was made.
At Vanderbilt, two Easts made fourth and fifth best leads and suffered the consequences of declarer scoring eleven tricks. In Williamson County, only one East made the fourth best lead. Scoring eleven was worth 95% and 100%, respectively, and 93% overall in the common game.
|
|
|
|
|
| Hand of the Week - Board 15, Monday Morn, 6/9/14 |
Show Detail |
|
| Show Answer |
One thing is true for bridge players of almost any level: we don’t double enough. Doubles are hard because they are often filled with nuance. Sometimes, you must double because you know something should be done, but you are not sure what it is. So, you double and pass the ball, in effect saying, “Do something intelligent, partner!”
On this hand, South took a conservative approach at his second bid. With only three losers, there is a case for bidding 3♦. He needs very little from partner to make game an attractive proposition. The case for bidding only 2♦ is that partner is a passed hand. In matchpoints, it is more about getting plus scores than getting to thin games that won’t make more often than not. Additionally, it allows room for a diamond rebid by South so that he can show that he is 5-5 in the red suits.
Over 2♦, West showed the fit for her partner by bidding 2♠ . When it returned to South, he was more than ready to bid 3♦. With nothing particularly helpful and a badly placed spade king, North signed off in a simple preference of 3♥. East, however, was carried away with her spades and competed once more, bidding 3♠. This was not necessarily a bad bid. With a six-card suit and a support call from partner, East could expect to get some help from partner’s hand to cover one or more of her six losers. On a good day, down one is likely; on a great day, 3♠ will make. But, this was not a good day for East-West.
When it got back to North in the pass-out seat, the red card hit the table. Was he crazy? How could this double be right? Now, be honest, would you ever have thought to double this hand?
Look at the vulnerability. Because of adverse vulnerability, South had to be bidding 3♦ thinking he had prospects of making it. Otherwise, his bidding was foolish, risking a double that would give the opponents more than they could ever make on their own. So, this created a forcing situation on North - in the pass out seat, he had to either bid or double. He did not have a good fit in either of partner’s suits. He knew his partner was short in spades, but could his two or three clubs be good enough to make bidding 4♣ attractive? Dismissing that, North doubled and was rewarded by setting the opponents three for a score of 500.
Read up on doubles. Try to plug more doubles into your game. You will be richly rewarded.
- Pat Williams |
|
|
|
|
| Hand of the Week - Board 7, Friday Morn, 4/4/14 |
Show Detail |
|
| Show Answer |
Don Hasty is a wily player, and he showed his acumen in defending this hand. We held 28 points, but we were (almost) doomed once he found the best opening lead for his side.
In the auction, 2NT showed a balanced hand with 18-19 points. While it denied four hearts, it did not deny four spades. 3♦ was artificial, inquiring as to North’s major suit holdings. 3♥ announced a holding of exactly three hearts. Holding four of the other major, I like to bid that suit before showing the three-card fit, but most people (I think) prefer to play the opposite of that. Anyway, we wound up in 3NT.
Since North is marked with the huge hand, Don adopted a passive defense. Why should he lead away from either king into the known strength? Sure, he might find his partner with a complimentary holding, but that will happen less often than not. With South having bid hearts, that suit is also eliminated from consideration. So, all that is left is diamonds, and Don led the eight.
In the play, I let the lead run to my ace. As I surveyed the situation, I saw that I probably could not set up clubs without losing a trick to East. Another diamond lead through my QT would likely be fatal, so I decided to play for a holding that would allow me to make the contract. My first play was the ♠7. I was hoping for the jack to be with East and the king to be with West; that position, along with a 3-3 break would provide me with nine tricks. And if the spade did not break, I would still have the club finesse available to try for the ninth trick.
When I led the spade, Don was ready to allow me to hang myself the most tricks possible. Holding two kings, he knew he had to be able to get in again, so he ducked smoothly. It was one of those give and take moments that occurs in matchpoints. If I rise with the queen, I can abandon the spades, cashing seven winners and hoping for a successful club finesse for my ninth trick. Since it does not succeed, I will most likely be down two. I dare say that most people in Don’s position would be so anxious to lead diamonds again, they would hop right up with the king. If he had done that, I would have been down two on the diamond return (so he really did not risk much). When he ducked, he gave me the opportunity for my maximum set. I played for the distribution I wanted and lost to the jack. West returned a club, which I finessed. Now, when diamonds were led a second time, I was down three! It was a tie for bottom (11 out of 12). Had I guessed to put in the ♠Q, going down two would not have been much better (10 out of 12).
OK. Yes. I could have made this hand. If I had played for the 6-2 diamond break and held up one time, I would have made the hand. Perhaps I should have given more consideration to that……but that would have been a different story.
- Pat Williams |
|
|
|
|
| Hand of the Week - Board 28, Friday Morn, 4/4/14 |
Show Detail |
|
| Show Answer |
With this hand, I get to cover an action that many fine players take that is a complete mystery to me. After the opponents open and respond, with a balanced hand, 16 points and a good five card suit, South bid 1NT. West doubled (a doubtful action holding a minimum) and when the dust settled, we were down two for a bottom.
The hand can be played better – declarer can actually come to at least eight tricks – so that gets in the way of my point a little, but I want to make the point nonetheless. If the opponents have opened and responded, and you hold standard overcall no trump values, how many points can your partner have? Not many, to be sure. In fact, it is entirely likely that the opponents’ combined assets are greater than your side. Even if you are fortunate to have at least half the points, you will not have much transportation between your hand and the dummy, so making 1NT will be a challenge. On this hand, the risk is compounded because N/S is vulnerable.
Does that mean you can never bid in such circumstances? No, you can bid, but you need to pick your spots. It is better to be not vulnerable, since you can risk going down one doubled against a presumed part score by your opponents. In my mind, there are only three commonly-occurring good action choices. If you don’t any of have those, it is best to pass and hope the opponents get in trouble. Those choices are:
- Double with shortness in BOTH of the opponents’ suits and at least 5-5 distribution in the other two.
- Make a preemptive bid with hands that you might open three or four as preempts.
- Bid a good suit backed up by a strong hand.
Of the three choices, only number three is up for consideration on this hand. These clubs constitute a good suit. Sixteen points and six losers constitute a good hand, but not good enough, particularly at this vulnerability. With most of the points sitting behind South and both opponents bidding, there are probably at least seven losers on this hand. If that is true, and the opponents find a double, -200 is hardly ever a good score.
As it turns out, the opponents have overbid their position. The North hand is better than anything South could have expected. Since South can (and should) make this contract with at least one overtrick, E/W handed N/S a top. Unfortunately, we have all been in that position where a top is there for the taking and we have an unforced accident and turn it into a bottom. Such is the difference between winning and losing at bridge.
So, how do play this hand? The key to taking tricks on this hand is the club suit. After winning the A♠, East continues the suit, won by the queen. Next, West leads his final spade, won by South. After East wins the opening spade lead, West is marked with almost every outstanding honor, which makes it hard for South to go wrong. Best is to bang down the A♣. (West MUST have the king.) If he does, South is rewarded by seeing the singleton king. He then goes to dummy (best by leading a diamond to the queen). Now, he leads clubs taking all five tricks in the suit - making 3!
- Pat Williams
|
|
|
|
|
| Hand of the Week - Board 17, Thursday Aft, 3/27/14 |
Show Detail |
|
| Show Answer |
This hand has a couple of interesting points on bidding, but the best thing about the hand is the defensive lesson. First, the bidding.
If playing old-fashioned, this hand would not qualify as an opening weak 2-bid. You can still read and hear the recommendation that, opposite a partner who has not had a chance to bid, you should have two of the top three honors. Playing that way inspires confidence in your partner to make an opening lead in your suit. But today, pre-empts are much more free-wheeling, so this decision will have lots of company. On the plus side, the hand does possess three of the top five honors. The major risk here is the good hearts; you might just pre-empt your side out of a heart contract.
Note that East passed, even holding eight hearts! There is not much point to pre-empting over a pre-empt. If it is an E/W hand, East should rely on West to force him to act. Making a free bid of 3♥ over 2♠ should promise more high-card values than East has.
Now, on to the defensive gem.
East started with the ♥A followed by the ♥J, ruffed by West. That ♥J is a clear suit preference signal, indicating that East prefers the return of a diamond (the higher ranking of the other two suits, excluding trumps). At this point, looking at both the ace and king of spades, East asked what qualities N/S required for a weak 2-bid. He was told that in 1st and 2nd seat, they promised the top half of the point count range, i.e., eight to ten.
Well, that is all he needs to know to come to the correct defense. Having shown the king and queen of hearts on the first two tricks, North needs at least three of the unseen five points (♠Q, ♠J, ♣Q) to get to eight. North can reasonably be expected to hold both the queen and jack of spades. There is also the possibility that North will hold the ♣Q (and not one of the spade honors – as is the case), but it is really immaterial whether the ♣Q is held by North or East. In either case, North is likely to have pitches available in the club suit. If North holds zero, one or three clubs, there are only two pitches, but when North holds two clubs, there are three pitches. In the latter case, North will draw trumps when they get in and ALL of the diamonds go away. With the other club holdings, E/W will never get more than one diamond trick.
So, West must cash the ♦A and continue diamonds. If East has a singleton or void in diamonds, the contract will be set.
This is a great example that “rules” of what you should do with certain holdings in bridge almost always have a situation in which they should not be followed. In reality, the rules are really guidelines that, if you follow them blindly, you will be right most of the time. The rule here is that you “never” start a suit with the A if it is headed by the AQ; normally, you wait for partner or declarer to lead the suit to you. Not only is it indicated that you break the rule here, but if you don’t, you won’t set the contract!
- Pat Williams |
|
|
|
|
| Hand of the Week - Board 24, Monday Aft, 12/02/13 |
Show Detail |
Before you look at the bidding, think about whether you have the methods with any of your favorite partners to get to the cold 6♦.
|
| Show Answer |
This hand was submitted to me by Doug Hirt. He noted that this hand is cold for the slam, and he asked how to get there.
We all know that it takes 33 combined points to make a small slam. However, if you have controls in the other suits, sometimes not all those points have to be in high cards – some can be distributional points. Such is the case with this hand.
Well, none of the 24 pairs who played this hand got to 6♦. One pair got to 6NT, and they played it against the right opponents who let them make when they should have been set a trick. The given auction is my view of how this hand should be bid.
After North denies a four-card major, South raises diamonds. This is the key bid in moving this hand toward slam. Why does South do this? South has a very good hand, but it is better for some contracts than for others. One of those was hearts, but the opener did not cooperate there. Once opener denies the major, he is marked with at least seven minor suit cards. If at least four of those are diamonds, then South’s hand has its greatest potential there. His hand would be worth 17 – 14 in high cards and 3 for the singleton spade. Therefore, with a diamond fit, the combined assets would be at least 32 (15+17). So, the raise to 3♦ caters to the possibility of a diamond fit. South’s bid shows 4+ diamonds and interest in slam if the opener has a diamond fit. Particularly in matchpoint scoring, there is not much reason to bid 3♦ without having slam interest as you would almost always prefer to play even a risky 3NT than a sure 5♦.
After 3♦, all of the other bids are control-showing cue bids. North’s initial cue bid of 3♠ is the cheapest available to him over 3♦. By cue-bidding, North tells his partner that he indeed has a good hand for diamonds; otherwise, he would sign off in 3NT or bid 3♥ to show three-card support if he should so choose. North is not in charge of the decision to bid slam; South is the captain of this hand.
After 5♣, South could make one more cue bid of 5♥, but there is no real reason to show this. South has heard that partner has a good hand for diamonds and controls in both black suits, so he wants to be in slam. The only reason to bid 5♥ is if he were interested in a grand slam. He is not – they simply cannot have enough high cards and controls to conceive that a grand slam would have a good chance to make.
- Pat Williams |
|
|
|
|
| Hand of the Week - Board 24, Wednesday Eve, 11/20/13 |
Show Detail |
This hand was contributed by Philip Vest. It is another leap (think about the bidding) before you look (at the bidding). Would you even sniff at a cold grand slam in either major or no trump on this hand?
|
| Show Answer |
It is difficult for most partnerships to get to a grand slam on these cards. Indeed, none of the five pairs on this Wednesday night found it, and only one of the five stopped short of 6♥. It is easy enough to find the heart fit and the fact that you have all of the controls PLUS the heart queen. What is not so easy is uncovering the rich texture of West’s spade suit that provides the extra tricks needed for the grand. Yes, the grand slam is cold even though the two hands hold only 32 of the high card points.
The given auction presumes playing 2/1. After 2♥, West’s hand grows in value; I would peg it at about 18, adding one for each doubleton and one for the solid spades. 3♥ shows a fit plus a better than minimum opener; with less strength, West should jump to 4♥. (The “Principle of Fast Arrival” says the faster you bid, the weaker you are in the context of a given auction.) East is excited to hear about the fit and better than opening values possessed by his partner. His hand grows by one and he cues his ♠A.
That is welcome news to West; his spades are now a source of extra tricks in a heart contract. If West decides to bid Blackwood, he will be rewarded by hearing his partner bid 5♣, which in the context of this auction would show four controls. (Why? Because East must have a good heart suit to be interested in slam, and he already showed the spade ace with the cue bid.) With that, West can literally count to 13 tricks: five in each major, two diamonds and one in clubs. He would then bid 7NT, not 7♥!
Alas! Bidding 4NT carries some risk. What if East does not have all four of the missing controls? West would not know which one is missing, and he is looking at two small clubs, so he won’t know what is right on this hand. West would have to sign off in 5♥. East, still has a bid, of course, and will likely bid on – this time - but this action – bidding 4NT - will cause some to miss a cold slam on occasion.
So, I think it better for West to cue bid his ♦A, which is followed by a cue of the ♣A and the ♦K. With nothing else to say, East signs off in 6♥.
West knows he has unreported value in his hand – the chunky spade suit will produce five tricks opposite partner’s ace. What he does not know is whether partner has both the ace and king of hearts. What can he do? West can bid 6NT, which tells his partner he has something extra in his hand. Of course, this is risky: If partner is missing one of the key hearts, then the hand might fail on a club lead, particularly if it is the ♥A that is missing. East has to draw the inference from West’s bid. He knows that West has made this bid without knowing about the two key hearts. Therefore, East’s bid must be an outside source of tricks, which must be the spade suit. Even so, East cannot tell on this auction whether the grand is dependent on a ruff, so he just bids 7♥. Believe me, any seven bid on these cards is going to be worth 98% or more of the matchpoints.
So, in order to get to seven, East must take a chance. I have identified two in the narrative: either bidding 4NT or 6NT. As noted, both carry some risk, but with the potential of high reward. Are you up to either?
- Pat Williams |
|
|
|
|
| Hand of the Week - Board 26, Wednesday Morning, 5/22/13 |
Show Detail |
Editor's note: This hand was played in May of 2013 but is being published in March of 2014.
|
| Show Answer |
This hand was contributed by Rees Mitchell. Rees and his partner were not a practiced partnership. They found their way to the less desirable contract of 5♦ instead of the much better 4♠. So, this is an examination of how not to bid a bridge hand! But, the less experienced a partnership is, the more things like this can happen.
The first test here is the opening bid chosen by East. Does it qualify as a 2♣ opener in your mind? It does to me. Rees provided some insight from Karen Walker, who has a lot of good info on her website, home.comcast.net/~kwbridge:
Put your hand to the test
So what type of hand should you have for a strong 2♣?
With a balanced hand, your decision is easy because you can rely on high-card points. If your range for an opening 2NT is 20-22, you need 23 points to open 2♣ and rebid 2NT.
Unbalanced hands involve more difficult decisions because you have to evaluate your hand in terms of both trick-taking power and defensive strength. In making decisions about whether or not to open 2♣ with a distributional hand, many good players "test" their hand with some combination of the guidelines below:
- Playing tricks -- at least 8½ to 9 tricks if your long suit is a major; 9½ to 10 tricks if it's a minor.
- Defensive strength -- a minimum of three (preferably four) quick tricks.
- Loser count -- your hand's quick tricks should outnumber its losers.
- The "two-queens" test -- Do you want to be in game if partner has two queens and nothing else?
- Rebid problems -- How difficult will this hand be to describe if you open it with a one-bid instead of 2♣?
Although high-card points aren't the main factor in evaluating an unbalanced hand, it is important to remember that strong is still the operative word in the convention's name. A strong 2♣ should not be used to describe a preempt-type hand. In practice, your hand will seldom meet many of the guidelines unless it has at least 16-18 honor points.
On this hand, the stiff ♥K is a detriment. It is at high risk of being worth less than face value. However, the hand has great pluses with a good six-card spade suit and only four losers (one in each suit). Rees pointed out that it definitely meets to the “two-queen” test. So, I agree that a 2♣ opener is the way to go. Sadly, that is almost the last bid on this board with which I agree.
Rees and his partner were playing a 2♥ response as negative. Rees intended 2♦ as a waiting positive. However, this treatment is at variance with the standard approach within that response system. While Rees viewed possession of two queens as positive, most require 2♦ to show possession of at least one king. Who knows what his partner thought. I would have bid 2♥. In fact, I view a 2♥ response encompassing a hand up to 12 high card points (four queens and four jacks).
The auction continued. Partner showed his spade suit. Rees bid diamonds. But with five in each of the red suits, the appropriate bid is hearts. If you don’t bid the higher-ranking suit first, then you will most likely lose the chance to play in that strain. Opener reasonably raised diamonds. 4♥ was a belated attempt to show distribution, but to me, that shows a control after the suit has been agreed. Partner then bid 5♣ as a control, bypassing spades; perhaps he thought he had shown a control in spades already just by naming it as a suit. Rees signed off in 5♦.
So, how should this hand be bid? Here is my take.
| West |
North |
East |
South |
| |
|
2♣ |
Pass |
| 2♥ |
Pass |
2♠ |
Pass |
| 3♥ |
Pass |
3♠ |
Pass |
| 4♠ |
All pass |
|
|
This is a much less agonizing auction, and you get to the right contract to boot. As discussed, 2♥ is the negative response. The 3♥ bid shows a five-card suit in the context of a “negative” hand. More importantly, it probably shows that West is not completely broke, as many, if not most, would use 3♣ (the cheaper minor) to show a complete bust. So, with most partnerships here, East should be able to rebid his spades without fear of being dropped in 3♠. Even if a partnership does not have the agreement that 3♥ denies a complete bust, I think 3♠ is warranted. Partner should bid again if they do not hold that complete bust; if they do have the bust, you will miss a game most times that partner holds either of two queens – diamonds or spades.
Making 5♦ is easy, but 4♠ has a trap to be avoided. You must not make the mistake of banging down the ace and king of spades. Instead, when you get in, ruff a club in dummy and run the ♠J. That is the percentage play. If you don’t do that, you will make only four when you should make five.
- Pat Williams |
|
|
|
|
| Hand of the Week - Board 8, Friday Morning, 12/13/13 (1 of 3) |
Show Detail |
The topic of my Saturday morning class on December 14th was ace asking bids in slam auctions. It just so happened there were three exciting slam hands (all making seven) in the Friday daytime game just before, so I promised the students I would address each in hand of the week presentation. So, here is the first of three.
|
| Show Answer |
This is my recommended auction, but it bears some explanation.
- 2NT is Jacoby, which announces a game-going hand in partner’s major and requests further info.
- 3♦ is shortness; at this point it can be either a singleton or a void.
- Although shortness opposite an AK holding is not the best, East’s hand is so powerful that he should continue towards slam. 3♠ is a cue-bid, showing the ace.
- 4♦ shows that the shortness is a void.
- 4NT is Roman key card Blackwood in which there are five controls: four aces and the trump king.
- 5♥ indicates possession of two of the five key cards. In this auction, West does not have to be concerned about relaying the value of a void since he has already established its existence earlier with 4♦.
- 5NT asks partner to bid his cheapest king (“specific king approach”) not including the trump suit.
- 6♣ shows the club king.
At this point, East can count five heart tricks, two diamonds, a diamond ruff by West, the spade ace, and the top three clubs. This is twelve tricks: a small slam. There are two good shots at a thirteenth trick. If West has either four clubs or possesses the spade king, then 7♥ is likely a lay down. If West has both of these, then 7NT is there for the making. Unfortunately, this recommended auction uses the “specific” approach in asking about kings, so there is no way to find out if the opener has the spade king when he holds it. (See, there is almost always something you give up when you decide on one approach over another.) If the partnership method is to ask for the number of kings, with two kings, the response would be 6♥, and East would know that both of the black kings were among West’s assets. In the actual layout, the response would be 6♦, and East would know that partner has only one of the two black kings – but not which one.
With respect to the other good possibility, there is no way to absolutely know that West has at least four clubs; however, there is a very strong likelihood of that. West is known to hold at least five hearts and to have a void in diamonds. If he held five spades, wouldn’t he open 1♠ instead of 1♥? Certainly! So, if West has only five hearts, he must have at least four clubs. But, sometimes, West will have more than five hearts. If he has six hearts, then that sixth heart is used for the diamond ruff, a trick already counted. With six hearts held by East, an extra ruffing trick is only achieved if it can be scored by East, and West would likely need the ♠K for that to happen. If West happens to have seven hearts, then that provides a thirteenth trick, a third possibility for seven, but one not so likely or at all discoverable.
So, what is East to do? I must admit that I would bank on the likelihood that West has at least four clubs, and I would bid 7♥. It is not a sure thing, but that is what I would do at matchpoints.
In the actual game, the board was played thirteen times. All but one pair got to slam, but only three bid the grand slam.
- Pat Williams |
|
|
|
|
| Hand of the Week - Board 15, Friday Morning, 12/13/13 (2 of 3) |
Show Detail |
|
| Show Answer |
Most will open this hand with 2NT. North starts off by transferring to hearts. After this, he bids and rebids spades. This sequence shows a very distributional hand in the majors; if either suit is longer, it is hearts. After 4♠, 5♦ should show control of diamonds, which also denies the club ace; it will become clear in the subsequent bidding in which major South has the best fit. With nothing better to do, North rebids spades again; now, South should get the picture that North has extreme distribution with no more than one minor suit card expected. Since South narrowly defined his hand with the opening 2NT, It would be very unusual for him to take control of the hand in any way, and that is the case here. North has asked South to choose between hearts and spades, so South confirms his choice with 6♥.
Distribution can offset high card points in how many tricks one can take. We all know that 33 points are needed for small slams and 36 points are needed for grand slams. Here, North knows his side has a combined 31 or 32 high card points, which means the opponents have eight or nine high card points. The fact that South cue bid the ♦A was actually great news. That means the club ace is held by the opponents, which further means that there are at most five high card points at issue. Are there five points that, if held by the opponents, would get in the way of making 7♥? You betcha! It is possible that North-South are missing both the king and queen of hearts! If those cards are with South, the opponents could have the ♠A. So, on this rather straight-forward auction, I think North should settle for the small slam.
Is there a way? Yes, but it is still hard.
If your partnership allows a super accept after a 2NT opener, this hand certainly qualifies since it has a great heart fit, a source of tricks in diamonds and only a four-loser hand. This could be the auction:
| West |
North |
East |
South |
| |
|
|
2NT |
| Pass |
3♦ |
Pass |
4♥ |
| Pass |
5♣ |
Pass |
5♦ |
| Pass |
5♠ |
Pass |
7♥ |
| All pass |
|
|
|
The advantage in this auction is that the trump suit is established early, and that allows for control-showing cue bids. Both 5♣ and 5♦ show first-round control. On the other hand, 5♠ has to be asking about the spade ace. Why? Because, when North bypassed 4♠, he denied first-round control of spades. Now, if North were not interested in seven, there is no need to bid 5♠; instead, North would just sign off in 6♥. While South does not know as much about North’s hand on this auction, he does know how to answer a question. “Partner, if you have the A♠, please bid 7♥.
Of the thirteen pairs who played this hand, only one bid the grand slam. Eight others bid a small slam, while four stopped in game.
- Pat Williams |
|
|
|
|
| Hand of the Week - Board 25, Friday Morning, 12/13/13 (3 of 3) |
Show Detail |
|
| Show Answer |
To me, this is the easiest of them all. Here, 2♦ is artificial, positive and waiting, denying possession of a good five-card suit. The 3NT bid shows values outside of diamonds in at least two of the unbid suits. This is encouraging to North with respect to the possibility of an eventual heart contract. But regardless of what South would bid at his second turn, I think the best bid by North is 5♥. This asks South to choose between 6♦ and 6♥, promising a very distributional type of hand such as is held here.
Have you noticed just how good that North hand is? From the very beginning, you want to be in slam with this hand – no matter partner’s holding. This hand has only one loser. Your partner has shown a fit in your shorter suit, which leaves those seven diamonds as a great source of additional tricks. Doesn’t partner’s hand have to be good for seven? Yes! Yes! Yes! There are only three bad things that can keep you from seven: (1) The opening lead is a diamond, and it gets ruffed; (2) partner has three diamonds, not including the queen, and you have to take a losing finesse; or, (3) partner is void in diamonds, and you lack the ability to ruff up the diamonds and without losing control of the hand (which includes a bad trump break as well). The combined likelihood of those is probably less than 10%, so you want to be in seven. There are only six outstanding diamonds, and partner will have two of them on average. With one or two diamonds in partner’s hand, 7♥ is almost a laydown.
Some people might open this hand with 1, intending to reverse in hearts and bid out the shape of the hand. The theory is that if you open 1♦, this hand will not get passed out because the extreme distribution of the North hand caters to someone else bidding. However, with only one loser and 22 high card points, I think the chance of being passed is a needless risk.
Of the thirteen pairs, ten found their way to heart slams, but only one bid seven. Congratulations to David Birnbaum and Lois Knight! Of the others, one bid 6♦, one bid 3NT, and one bid 7NT (with decidedly unhappy results).
- Pat Williams |
|
|
|
|
| Hand of the Week - Board 4, Friday Morning, 11/15/13 |
Show Detail |
My apologies for having had such a busy October, which kept me from writing. But I return with a couple of hands for your perusal.
|
| Show Answer |
West is the dealer and has a routine opener of 1♣. With 2.5 quick tricks, North has a good hand, but there is no good action at this point, so he sits back and waits. East correctly bypasses the puny 4-card heart and bids his much better 5-card spade suit. (Generally, this is correct even if the spade suit is the puny one.) West raises this to 2♠.
Now it is North’s turn, and he bids 3♦. Is he crazy? Maybe. But his action is not as rash as it may strike many of you at first. Bidding now does carry extra risk. West has limited his hand to 14, but East can have lots of undisclosed values. However, the risk is mitigated by the bidding up to this point. Whenever the opponents have found a fit, your side has to have at least a moderate fit somewhere. Since the opponents’ fit is in the master suit (highest ranking), they are likely to complete to 3♠. It is extremely difficult for the opponents to determine that a double of a low-level contract is the right action for their side when they know they have a fit in a higher-ranking suit. North’s motivation is that he would like to encourage a diamond lead from partner. If he is ever to mention the diamonds, this is his last chance.
This is not a balancing action. Balancing occurs in what would be the pass-out seat. If North passes, he should be able to rely on his partner to balance over a pass by East. (If East does pass 2♠, then not only should South know that his side has a fit somewhere, but also roughly half of the points.)
Plus 110 on this board was worth 87% to North/South. It also turned out that it was par on the board, which means that East/West could not, of their own accord, improve their lot.
- Pat Williams |
|
|
|
|
| Hand of the Week, Board 15, Friday Morning, 11/15/13 |
Show Detail |
|
| Show Answer |
|
The auction given actually happened, but it is not the path to the correct contract. Even so, it worked since the ♠Q was on side.
In first seat, it is not a good idea to pre-empt with South’s hand. Yes, that is a good description of South’s diamond holding, but his hand is too good to pre-empt opposite a partner who has not yet had a chance to bid. What is that void worth when your partner has a major suit fit with you? If you open 3♦ in first seat, you are unlikely ever to know!
Faced with the opening pre-empt, North had a pretty easy bid of 6NT. Holding the ace and king, he could envision partner’s suit being headed by the queen and jack. Those cards total only three points, so North could expect that partner had to have at least one card outside the diamond suit that would be helpful to his side and serve as an entry to dummy. Was 6NT a lay down? No. But this was matchpoints. In a team game, the safer contract of 6♦ is the preferred contract.
At his second turn to bid, South thought about his undisclosed value, the ace of spades. If partner could bid 6NT without knowing he possessed this card, shouldn’t he bid seven? That was the bid, and although it worked this time, it was not the correct bid. Even with the aforementioned problems about the opening pre-empt, the holding still fits within the parameters of high card points expected. North knew this when he bid 6NT. Since South had described his hand on the opening bid, there is nothing to add to the discussion, and the correct bid is to pass 6NT. While 7NT was worth 100%, 6NT was worth 94%. Had the ♠Q been offside, 7NT down one was worth 0% - not a very good risk/reward ratio.
Now, how should this hand be bid? The best auction requires that you have agreements on how to approach bidding slams after partner opens 2NT. Here is the suggested auction:
| West |
North |
East |
South |
| |
|
|
Pass |
| Pass |
2NT |
Pass |
3♠ |
| Pass |
3NT |
Pass |
4♦ |
| Pass |
4♥ |
Pass |
5♣ |
| Pass |
5♠ |
Pass |
6NT |
| All pass |
|
|
|
This bidding is part of the Kokish Relay system. Three spades is the start of a slam invitational sequence. The 3NT rebid is forced, after which the responder describes where his interest lies. If opener is not interested in slam, he signs off in 4NT. Here, however, holding the two top diamonds, he is more than interested. Four hearts is a key-card response, showing four of the five key cards (including the trump king.) Now, South knows fifteen of North’s high card points. From his perspective, no trump is not yet worth the risk; partner could have fateful wasted values in his club void. However, if North does possess the spade king, South can now count at least eleven tricks. Can he find out? Yes! Five clubs asks North to bid his cheapest king.
Without a system to facilitate investigating slams, particularly minors, after partner opens 2NT, South is left to guess whether to bid six. I must confess that playing without a system, I would be the ever-optimistic bidder and jump to 6♦.
- Pat Williams
|
|
|
|
|
| Hand of the Week - Monday Afternoon, 10/07/13 |
Show Detail |
When it works it works.
|
| Show Answer |
I was playing with Marc Leventhal, and we had a good set. This was the last hand of the day, and it was certainly the most exciting. It features a couple of conventional treatments that contributed mightily to our reaching the primo spot.
I only opened 1♥ because I considered my hand a “bad” 21. How can 21 points be bad, you ask? This is mostly due to the possession of the singleton ♦K. It is one loser as are all singletons below the ace. That king might as well be the four. So, I really only viewed it as a good 18 at the point I opened.
Marc’s response, Jacoby 2 notrump, promised four trumps and at least an opening hand. I could tell right away that he would be able to cover some of my losers, and I was interested in slam. I inquired with 4NT; Marc’s response showed two controls AND the trump queen. 5NT asked Marc to show his lowest king below the trump suit.
After Marc showed the ♣K, I paused to count our tricks: six hearts, and two known tricks in each of the other suits added to twelve. I had several possibilities for the 13th trick: Marc could hold (a) a third club or (b) the ♠Q, and if he had neither of those, (c) the spade finesse definitely would be a 50% option and, finally, there might be a squeeze depending on the threat cards Marc might hold in his hand. So, the prospect of 13 tricks was quite high. (I estimate in excess of 90% on case (a) alone.) I bid 7NT, which rolled.
We were the only ones in our section to bid 7NT. In fact, we were the only one of the 22 pairs who played the hand to bid 7NT. (There were 16 open pairs and six 299ers.) Seven of the open players did declare 7♥.
Why did we not have company? On this hand, North needs to be the one asking about the controls. North holds the hand that can count to 13 probable tricks. I suppose that many opened 2♣ because they always open that when holding 21 points. The person who opens 2♣ is rarely the one who asks about controls.
- Pat Williams |
|
|
|
|
| Hand of the Week - Mon Evening, 9/30/13, Mentor Game |
Show Detail |
|
| Show Answer |
My girls had a soccer game, so I did not get to play in the Mentor/Mentee game Monday night. But this hand caught my attention, mostly because I am baffled by the results.
The given auction is what I recommend (even though it does not yield the best result). Some subscribe to opening the “better minor,” but with 3-3-3-4, I think it always best to open clubs, which gives you more room to wind up in the best spot your methods allow. As responder, some would skip the diamond suit to respond 1NT, but I think this loses in the long run. There is no reason to suppress telling partner about your diamond holding, and, in particular, it might be a bid he needs to hear to feel comfortable about bidding no trump later on.
South faces a decision after North’s spade rebid. Does he have enough to force to game? The answer turns on your partnership’s agreement as to what is required for a minimum opener. If you promise very solid openers (such as North’s actual holding or even a king instead of one of the aces), you can feel some comfort in pushing toward game. But almost no one promises that degree of strength nowadays. So, I think the best South can do is invite with 3 clubs.
That invitation tells North more than the club fit. It also lets him know South likely has no heart stop and/or he is very short in spades. (Otherwise, a 2NT invite would have been in order). A thinking North has to be uncomfortable. He knows that South has specifically four clubs. (Otherwise, South would not have bid 1♦.) And there is no way to tell if South is at the top or the bottom of his invite. At matchpoints, he would rather play 2NT than 3 clubs, particularly on a 4-3 fit and his flat holding, but you cannot get there from 3 clubs. So, in the final analysis, I would hope for getting a plus, and I would reluctantly pass 3 clubs.
The play is fairly routine, and most North’s would expect to lose a trick in each suit, making three. In the game Monday night, this earned a slightly below average score. Most contracts were in no trump; three pairs even bid three, with one making, which topped the field. I can only say that the three pairs who declared 1NT are very timid indeed. No pair declared at 3 clubs, but three pairs declared at 2 clubs (again timid in my view).
- Pat Williams |
|
|
|
|
| Hand of the Week - Sat Eve 8/24/13, Birthday Bash |
Show Detail |
Blind Ambition
|
| Show Answer |
West took a straightforward, conservative approach to her hand with a one spade opening. With 6-5 in the minors, North tried to be a nuisance with her unusual no trump overcall. It was a new partnership, so East could only show the fit for spades, presumed to be a limit raise at this vulnerability. Sticking to her conservative approach, West signed off in four spades.
North started things off with the reasonable lead of the ♦A. As the cards lie, this was not the best lead for their side, but it wound up not costing them. West was glad to see those diamonds suddenly available for pitching her losing clubs. All she had to do was draw trumps and knock out the ♥A in order to get to dummy to enjoy those diamonds. Once again, West showed her conservative stripes and set about drawing trumps. But, alas, South was up to the challenge: he ducked the ace and the jack, holding off to the third lead of the suit. Now, the diamonds were dead, and West wound up going down one. Boo-hoo!
On this deal, the par result is making five. But, when North put the ♦A on the table, West should now make 6! What happened? West was blinded by a natural tendency to lead the highest cards first. The important thing is to get to dummy and use those diamonds. She does this by underleading the ♥K twice or, after leading the king first, next leading the jack, intending to cover with the queen. In either case, the jack must be sacrificed as a potential trick. If she leads toward dummy’s hearts twice intending to use either the queen or the ten as an entry, South has no defense against an entry to the diamonds. This blind spot was expensive; it was the difference between a clear top (100%) and a tie for bottom (7%).
Earlier, I said that because it was a new partnership, East could only show the fit in spades. In the position, there is a way to show the difference between a limit raise and a competitive raise. It is called unusual vs. unusual. With that convention, you agree that the raise is less than a limit raise. A cue-bid of diamonds is a limit raise of opener’s suit while a cue-bid of clubs is invitational values in the unbid major. (These cue-bids can be reversed by agreement.)
You probably noted that I referred to West’s actions as being conservative. I think her hand is strong enough to open 2♣. The hand only has four losers, and, so long as North does nothing to advertise a strong hand, I do not want to stop short of being in game. The main bidding criticism, however, is not envisioning the possibility of slam. Once East shows invitational values, West should make at least one move toward slam. Here, 5♣ would fit the bill. In response, East should cue-bid his diamonds. (First-round control is not required; it can be a concentration of values as is the case here.) But that will do nothing to encourage West, and she should sign off in spades. If East had been able to cue-bid the ♥A, that would be a different story over which West should probably bid six.
- Pat Williams |
|
|
|
|
| Hand of the Week, Board #28, 8/6/13, Atlanta NABC, Wernher Open Pairs Qualifying, 2nd Session |
Show Detail |
Matchpoint Hand from Hell
|
| Show Answer |
The combination of director duties and monetary limitations restricts the opportunities I have to play in out of town tournaments. I do like to go to the occasional national, but specifically to play in national events. To me, there is not much other reason to go. The regional events at North American Bridge Championships (NABCs) are much more expensive than any stand alone regional. (But there is something to be said for atmosphere.)
We have had more than our share of nearby NABCs in recent years. I did get to attend a few days of Memphis, but I totally missed both Louisville and St. Louis. As Atlanta approached, Eleanor Rodgers overheard me kiddingly say that I was not going to Atlanta since no one would have me. She volunteered that she had a couple of days open, so we agreed to play in the Wernher Open Pairs, a two day event.
As part of the adventure, I took Greyhound down – for only $12.50. Their depot was underneath the MARTA station, only one stop from the playing venue. The existence of MARTA also allowed me to stay out in the suburbs where the livin’ is easy and cheaper.
This hand was one of the most memorable of the tournament for me, but not, unfortunately, because I got a good score.
Eleanor was West, and I was East. Our auction was 2/1, so we each got to show extra length by rebidding our suits without fear of stopping short of game. After North’s double of 3♠, I was more than happy to give 3NT a try with my double stop. South dutifully led a spade. I surveyed my options and decided to play on hearts first. I was pleased when the finesse won, but I was disappointed when South showed up with four hearts to the queen.
I now realized that as long as the clubs behaved, I could make six if the ♦A was not in the hand with the long heart. So, I led the Q♦ from dummy and got my wish. North returned a diamond to my king. But the clubs did not break, and I went down one. The qualifying session was being scored across three sections, with a 51 top. Down one was worth 2% versus 83% for making five. Yuck!
Matchpoints is all about taking reasonable chances even though you may risk your contract by doing so. As I sat there after cashing the 3rd heart, I could have played another heart, creating two more heart tricks, and do no worse than making five. But I saw the chance to make six. If the ♦A is with South, I still would make five, but if it was with North, I had a 73.5% chance to make six with normal breaks in the club suit. Really, you say? Yes, really. The 3-2 break occurs 67.8% of the time, and the jack is singleton 5.7% of the time. Add the two together, and you get 73.5%.
So, was I right to play the way I did? The fact that I was playing in fairly strong field made me take a hard look at this hand. Why didn’t I have more company? In hindsight, this is what I think: I don’t think I should have taken the chance to make six. I considered my options only from where I sat after playing four tricks. There were some important variables that led up to that point.
- I had received a favorable lead. I agree with Eleanor’s bid of 3♠ (I still could have four spades), but not everyone will make that bid. Without the spade bid, North could not double for a spade lead. Without the double, it most likely that I would have received a diamond lead. After receiving the spade lead and deciding to make my heart play, I now was in position to make five in a contract that in the worst of layouts would not even make on a diamond lead.
- Some people will play on clubs before they play on hearts. I think it is right to play hearts first because if I have to lose a heart trick to bring in five tricks, I need to do so while I have the ♣A as an entry.
So, there you have it. David Birnbaum still thinks I was right to go for the 73.5% chance. But, after due consideration, I think there is a fairly strong case for taking my five and banking my above-average board.
- Pat Williams |
|
|
|
|
| Hand of the Week - Wed Aft 7/31/13 |
Show Detail |
|
| Show Answer |
Thanks to David Birnbaum for suggesting this hand.
One of the most annoying things about double dummy analysis is the program’s ability to see all of the cards. No matter the position, whether on offense or defense, Deep Finesse will always do the thing that works the best. It sees all four hands and uses that information oblivious to whether a declarer or defender, with more limited information, would do that action in the real world.
North has a very powerful hand. Not all would agree with my choice of 2NT, but with five quick tricks and no card below a king, I rate this hand worth 20 instead of 19. This choice also defines the north hand within a fairly narrow range; most pairs would consider this to promise a balanced hand of 20 or 21 points. From there, the auction is a straightforward transfer to hearts. South rebids 3NT offering the choice of games, and with only two hearts, North passes. Because of the limited opening bid, South has no reason to think about a slam. (Even if North has the hand to correct to 4♥, there are not enough combined assets to consider slam; usually, you need shortness and/or a second suit source of tricks in order to make slam with fewer than the required number of high card points.)
There are a couple of variations to the bidding available. First, North could start with 1♦ and rebid 2NT over 1♥. I would argue that this, another limited bid, does nothing to encourage thoughts about a slam. A very few would open the South hand. I would not recommend it with nine losers and only one quick trick. But, if the South hand is opened, it puts a lot of pressure on the partnership to wind up in slam.
Deep Finesse insists that 12 tricks are there in all strains except clubs. They are! In hearts, diamonds and notrump, you come to 12 tricks by dropping the Q♦, and after stripping West of his spades, throw him in with the 3rd heart (which means you do not take the finesse), forcing him to lead away from his club king. Six spades is more complicated.
Many of you will look at the indicated double dummy results and think that you must have made a mistake by not getting to a contract it said you can make or defeating a contract it said you could defeat. Double dummy analysis, at best, points the way. It might reveal a mistake in your execution of the game or it might just be taking anti-percentage actions to achieve its results. Sometimes, you will need to figure out which it is.
What if you find yourself on lead against 6NT? With no clear-cut lead against opponents with slamish points, it is usually best to adopt a passive strategy rather than hoping an aggressive lead strikes gold. More often than not, the aggressive lead will locate an honor for declarer that they might misguess if left to their own devices. Here, the lead of the 8♣ would fit the bill.
- Pat Williams
|
|
|
|
|
| Hand of the Week - Wed Eve, 7/24/13 (1 of 4) |
Show Detail |
|
| Show Answer |
Today’s theme is some thoughts about pre-empts. We will start with this board and move on to a couple of others played Wednesday night.
I was sitting North. With seven spades, a weak hand and no support for the other major, I wanted to pre-empt. However, although the vulnerability is even, my hand had too many losers (eight) to open 3♠. If the losing trick count prediction proved right, I would be offering the opponents more than the value of a game if they were able to double. What to do? I downgraded my length and treated this as an opening weak two bid.
I caught my partner, Art Lowen, with a great hand. It is so good, that slam is a likely make if I have an ace among my assets. His 2NT asked for a feature. Having none, I bid 3♠. So, Art settled in a routine 4♠. We made the expected five for a near average board.
On this board, it did not matter what I did in first seat. I could have passed or overbid with 3♠. No matter, we will still reach 4♠. But, on some hands it will. Here, I was able to give a reasonably good description of my trick-taking potential.
There is a maxim that embraces my approach on this hand. There is no bidding system that perfectly describes every hand. The maxim: If you have to tell a lie about your hand, lie about length; never lie about strength. This will serve you well in the long run.
Now, on to the next hand, board 5.
|
|
|
|
|
| Hand of the Week - Wed Eve, 7/24/13 (2 of 4) |
Show Detail |
|
| Show Answer |
Wow, two seven-card suits in a row that I elected to open at the 2 level! I think this one a little more risky given the unfavorable vulnerability and a six-loser hand. But, I thought it worth the risk to get the nature of my hand out on the table. But a 2-level bid was less risky than a 3-level bid. The thought process here is essentially like that on the previous hand.
I do, however, have some commentary on the opponents’ bidding. They are lay-down for a grand slam but did not sniff at it. There could be some sympathy that my pre-emptive opening mucked up their communication, but I think, if anything, it should have helped them. The key for them to think about is what kind of hand the pre-empter would hold vulnerable against not. I think it should be exactly the kind of hand I had, with concentrated values in my suit. To the extent that I my hand meets expectations, it means that the values of the opponents are working together…..they likely have no wasted values in diamonds.
First, with a five-card spade suit, West is on the cusp of invitational values. Given the pre-emptive opening, I would push this hand to the high side and bid 3♠, but certainly, not all would agree.
Second, even with only a 2♠ bid, I think East should express some interest in slam. He would do this by bidding 4♦. This agrees spades as trumps and shows control of diamonds, likely first round. After this, West should realize he has prime values and bid his control with 4♥. That should be enough for East to jump to 6♠. In the game, all pairs made the lay-down seven, but only one pair bid a (small) slam. Congratulations to Don Turner and Barbara Newman!
Our final visit for the evening is to board 32... |
|
|
|
|
| Hand of the Week - Wed Eve, 7/24/13 (3 of 4) |
Show Detail |
|
| Show Answer |
Wait! You say. There is no pre-empt in this auction. You are correct. This time I will tell you why I elected not to pre-empt, and then, I will show you a very different auction with a much different result.
The one no trump opening was straightforward, a balanced 15-17 points. A pre-empt is justified with the hand I held: a good seven-card suit; plus, seven losers advertises minus 500 against a presumed vulnerable game. However, since East and South had yet to bid, it was very much up in the air how the missing 16-18 points were distributed between those two hands. One thing was for sure: whatever points my partner held, they were poorly placed in front of the no trump opener. Said another way, any finesses facing my partner were likely to lose. Since they were likely to lose for us, they were likely to win for the opponents. And this meant they might have a game available to them with fewer than 26 points between their two hands.
Why should I help them get there? A pre-empt pushes most opponents to bid higher. In this situation, I still wanted to bid my heart suit, but I thought I would be better served by making an overcall instead of a pre-empt.
In situations such as this, not only does the overcall avoid pushing the opponents, it may serve to help them undervalue some of their finessable assets. In the long run, if you can recognize this situation, I think it more likely to talk the opponents out of a makeable game with an overcall instead of a pre-empt.
On this hand, nearly all the missing points were in responder’s hand, so the opponents would not be denied game. The 3♥ bid was Lebensohl, showing four spades AND denying a heart stop. With no fit for spades, opener signed off in 3NT making the routine five.
Now, on to the different approach to this hand observed at another table. It is so different, I will present it on a new page... |
|
|
|
|
| Hand of the Week - Wed Eve, 7/24/13 (4 of 4) |
Show Detail |
|
| Show Answer |
This version shows what a difference both system and approach to the game can make. Playing 14-16 no trump openings, West started things off with 1♦. Then, North decided to trot out 4♥.
If you have understood my approach to evaluating pre-empts in terms of losing trick count, then you know that I thought this to be an overbid. With seven losers, the initial evaluation of risk would be -800 (down 4, doubled), which would not be a winner versus a presumed game by the vulnerable opponents. If the opponents do not have a game, then you might improve to -500 or -300, but both of those are losers against a part score.
Is there a time to be so aggressive? Yes, I do think so. Holding these cards opposite a passed partner, I would consider 4♥ acceptable (but certainly not required) over a 1♦ opener. When partner is a passed hand, it is less about describing your hand to partner because there is more of a balancing element that comes into play. Your partner is certain to have some of the missing high card points, so your bid can include consideration of that. With pre-empts, my rule of thumb is that you can bid one level higher than you would have opposite a partner who has not yet had a chance to bid. If you use this approach, make sure your partner knows your style; they need to know that some of their assets are likely to have already been considered.
Now, back to our story…..
This time, the aggressive pre-empt put a lot of pressure on the opponents. East made a reasonable negative double. But the screws were put to West. Ultimately, he decided to risk a weak fit and bid 4♠ after a noticeable period of consideration. This passed around to South who elected to double. Even holding the five spades, I don’t think I would have done that; if I had, our side might take only a couple of spades and one heart. You just cannot count on a pre-emptive partner to produce defensive tricks. But the bridge gods were with North-South, and declarer failed by two tricks.
Let’s go back to West’s options after East’s takeout double. He was in a yucky situation. He had a strong opener, but the longest suit in his flat hand had been bid to the four-level by his left-hand opponent. I don’t think 4♠ was an action likely to succeed against most outstanding distributions. With his flat hand, he needed his partner to have a five+ spades in order not to lose control of the hand. The fact that East doubled instead of bid spades on his own tended his holding to be shorter rather than longer. The high-level pre-empt cried out that whatever outstanding spades would be breaking badly.
What else could he have done? We do not know what else he considered, but I think the other reasonable choices on this hand are 4NT and pass. I think 4NT is a reasonable call. If partner has his bid (saying in effect that he has an opening hand himself), then 4NT will make most of the time. It is unlikely North can have an entry that provides access to established hearts. So, to me, the choice comes down to whether West thinks his side can beat 4♥ more than three tricks. He knows he has a heart trick. He also knows that South is broke (again, if he believes his partner…..you should always believe your partner – or get a new partner). But, I would place eight hearts in North’s hand, expecting him to be able to score seven tricks. Down three doubled does not beat a vulnerable game, so I would (hopefully) bid 4NT to play.
- Pat Williams |
|
|
|
|
| Hand of the Week - Wednesday Afternoon, 7/10/13 |
Show Detail |
|
| Show Answer |
This hand was a special request from Berkeley Montes. I don’t particularly like to discuss freaky hands like this, because they exist in the narrow part of a bell curve; I had rather discuss hands that have issues with applicability to more hands.
Berkeley was sitting West and playing with Connie Spector, East. Connie’s 2♣ was strong and artificial. Berkeley’s 2♦ was waiting. When he rebid 3♦, he was showing a biddable suit. There is no scientific way to bid this hand. Connie knew that her hand was very powerful offensively, but how high – and what strain – each depended on the specific cards held by Berkeley. She needed him to cover two losers for her. If he had the ♦A along with another key card, seven was the appropriate level. Those three cards: ♠A, ♦K or ♥Q. If he had the two aces, then 7NT is the winner. But, there is no way to find out. So, she guessed to bid 7♣.
This time, Connie was right, but Berkeley fell from grace. He forgot that she was the captain on this hand and was blinded by the assets he held that he had not been able to tell Connie about. Her bidding, however, said that she was not interested in knowing anything further about Berkeley’s hand. She was signing off in 7♣. Right or wrong, it was her decision to make, and it was not to be interfered with by Berkeley. Berkeley could not tell if his assets were important, and he failed to allow that her bidding had been based in part on a void.
On lead, South had a choice between leading a heart or a spade. Either could have been right. South guessed a spade, and Berkeley’s indiscretion was punished.
I do take issue with the bidding in one other aspect. You should not “wait” with good suits. With two of the top three honors and five or more in length, show a positive response right away. Here, with an even better suit and a side queen to boot, I think Berkeley’s first bid should have been 3♦. Following a positive initial response, there is more merit to the belief that he might hold the right cards for seven. As long as he has the A♦, the worst holding would be AQxxx, and the grand slam would be at least a 50/50 proposition on a finesse at the end.
This hand was played both at the Vanderbilt 749er and the Williamson County open games. The most prevalent contract was 6♣, making seven, by 12 of the 22 pairs. That earned 67% in Williamson County and 63% in Nashville. Only one pair between the two locations bid and made 7♣. That was Sue Wrye and Doris Creamer who reaped an exciting top at Vanderbilt.
- Pat Williams |
|
|
|
|
| Hand of the Week - Sun Afternoon, 6/30/13 (1 of 5) |
Show Detail |
Bridge is more a game of mistakes than of brilliancies. Generally, the pair that makes the fewest mistakes has a good shot at winning.
It has been a while since I did a hand of the week, but you will get more than one hand this week. On June 30, Marc Leventhal and I played in the Sunday open game STaC. I am going to go through several boards to show you how we turned a potentially great game into a so-so game.
|
| Show Answer |
I was sitting North. Because of my lack of shape, I decided to delay showing my spade fit. This bears a little risk of losing the spades. If partner has five, he will use new minor forcing to advance the contract to game. If his hand is shapely, he will bid four of one of the minors. Here, however, he also had flat distribution, so I gladly passed his raise to 3NT.
East started the ♥8. I saw that I had a lot to do, but 3NT certainly looked to be an easier contract to make than 4♠. After winning the ♥A, I cashed the ♠A followed by the two. I was grateful to see the ♠J - one hurdle crossed. West won the ♠K and returned a heart.
From the beginning, my plan had been to hope for holding spades to one loser. Then, I could throw the opponents in with a heart and let them break a minor suit to help me toward nine tricks. I was not particularly afraid of the hearts. The eight looked like a high card. But, I failed to notice that I had all the little cards in hearts. It never occurred to me that the eight of hearts was 4th best from five. (With the actual holding, East’s appropriate lead is the ten, which, if anything helps clear the situation for partner  . So, I won the heart return, cashed my two spade winners and exited a heart. . So, I won the heart return, cashed my two spade winners and exited a heart.
My plan turned out to be a disaster! When the hearts split 5-2 instead of 4-3, I had to part with one of my minor cards, which meant that the “sure” help of the opponents was not forthcoming. I wound up going down one, worth 11%. Had I adopted the other major choice in line of play by ducking one heart, I would have known the heart situation. I would have been able to finesse diamonds into West, hoping for the actual placement of the ♦A and ♦Q. And, most importantly, I would have made 3NT, which would have been worth 100%. Even with 25 points between them and a spade fit, only two of the six pairs bid game, both in no trump. The other game bidder went down one as well.
My play may not be an out and out mistake. I like to think that if the normal ♥10 had been led, I would have adopted the winning line. Nonetheless, it does qualify as a lost opportunity on the day. Now, on to board 22, for which you will need to open a 2nd article. |
|
|
|
|
| Hand of the Week - Sun Afternoon, 6/30/13 (2 of 5) |
Show Detail |
|
| Show Answer |
After a competitive auction, we managed to land in the par contract. (“Par” is the contract at which neither side can improve their position by bidding further.) We were headed for a top, but partner mysteriously decided to lead a trump. Best defense against a doubled slam is take your tricks before they have a chance to go away. Holding an ace, it is appropriate to lead that, hoping it cashes. After looking at dummy and partner’s signal, you hope to have a better idea what to do. Our club trick was the only trick that could disappear, and it did under the ♠A. The difference here was 1% versus 89%.
Let’s move along to board 23. |
|
|
|
|
| Hand of the Week - Sun Afternoon, 6/30/13 (3 of 5) |
Show Detail |
|
| Show Answer |
In our methods, 3♣ is game forcing puppet Stayman, asking partner if he has a four- or five-card major suit. After east competed with 3♦, partner passed. When it got to me, I now discounted my ♦K and thought better of my game force. I elected to double. We did not drop a defensive trick, setting them two, but that was below average at 31%.
Our problem on this board is that we were not prepared for the interference. Since I have announced we are going to game somewhere, partner should still be able to tell me if they have major suit interest over interference. With interference in diamonds, we have all this available:
- 3M = five-card major
- X = 4-card major
- Pass = neither
But we had never discussed it, so I did not know whether we had a fit. Had we been prepared, Marc would have doubled, and I would have bid 3♠, intending to pull 3NT to 4♠ if Marc did not have four hearts. It would only have moved us into a 3-way tie for 2nd, or 60%. (Every little bit helps.)
OK, on to board 27. |
|
|
|
|
| Hand of the Week - Sun Afternoon, 6/30/13 (4 of 5) |
Show Detail |
|
| Show Answer |
Marc elected to open this hand 1♥ instead of 2♣. I would have gone the other way, but different views are one of the things that make bridge interesting. Marc’s 3♠ is likely a control-showing bid toward a possible slam. AND, it is highly likely that he is short in clubs. I was so overly focused on my flat distribution, I lost my head. I bid 3NT. Now, Marc does not know that I have the heart fit. What’s worse is that I promised good club cards, which I do not have. I should have signed off in 4♥. Instead, we went down one in 3NT (17%) in lieu of making 4♥ (67%).
On to our final stop, board 6. |
|
|
|
|
| Hand of the Week - Sun Afternoon, 6/30/13 (5 of 5) |
Show Detail |
|
| Show Answer |
Sitting south, Marc had a freak of a hand. He had two six-card minors, headed by honors, although he did not have a lot of points. The auction was dangerous in that 3♣ could have been passed. With only four losers, I would want to play this hand in game.
After going down one in 5♣ and seeing the results of others, Marc observed that he probably should have passed my 3NT and hope that I would be able to bring in one of the minor suits. He was exactly right! Playing in five of a minor is not a long-run winning proposition in match point scoring. If you can make five, you are most often going to be able to make three (equal) or four (better) no trump. The time to settle in five of a minor is when you believe you have no or a tenuous stop in a single suit. Here, Marc could not tell how good my spade (or heart) stops were, but I did bid 3NT, so at least he knows I think that is right from my side.
I have sympathy with Marc’s 5♣, but he should never have temporized in 3♣ (because of the risk I might have passed) if he was always going to bid 5♣. He could have been right, but the matchpoints “mistake” was not going for 3NT. In that contract, we would make at least three (60%), but we can make four (95%) double dummy. Instead, our down one was worth 31%. Since 3NT was the sure thing we would make, we will use that for comparison purposes.
What does all this mean? As we played the game, we had a reasonably good score of 56%, finishing 3rd overall in our 7½ table STaC game. For that we received 1.05 masterpoints. We did a lot of good things during our play that day, however, these were the most expensive missed opportunities. Had we avoided booting these five boards, a full 10% would have been added to our score. We would have been first overall in our local game, and our 66% would have placed us 6th overall in the STaC for which we would have earned a little over three masterpoints. There were several huge games in the STaC that day, including 78% and 74%. On other days, 66% would have been worth even more than 6th place. No doubt there were other less valuable opportunities during this session where we could have picked up another percent or so.
The point of all of this is to make sure you are aware of how costly mistakes can be.
- Pat Williams |
|
|
|
|
| Hand of the Week - Wed Afternoon, 6/12/13 |
Show Detail |
This hand was a lot more trouble to players than it should have been. Would you and your partner reach slam?
|
| Show Answer |
After North’s pass, East might pause to consider whether to open. It is an ugly hand, devoid of any ace. The stiff king of Spades will not necessarily deliver its full value. The worst thing is there is only one quick trick. But wait! The hand contains 13 high card points. Sure, you should subtract a point for holding no ace, but that applies more to later in the auction – not the opening bid. Never pass 13 high card points in 1st or 2nd seat. East should open 1♣. After that opening, South has nothing to contribute.
West sits there with a monster of a hand. I rate this hand as 4.25 losers. The extra diamond length reduces the chance not holding the Q makes any difference. With that extra diamond length, the hand has an adjusted point count of at least 19. What red-blooded bridge player would not want to be in slam with a 19-point hand opposite a partner who opened the bidding? Even so, slam is not yet certain, so he needs to proceed along calmly to see if he can learn more about partner’s hand and how they fit together. Bid 1♦ to start. There is no need to rush or make a snap judgment and jump to a contract you think you can make. This question needs to be answered: Does this hand belong in 5♦, 6♦, 7♦ or 3NT? Many less experienced players jump over the bidding room they have available and which they can use to reach better contracts.
If I am sitting North and this auction comes to me, I am bidding 1♠. What! You say, “I would never think of that!” Here is why. If my partner is on lead, I would like to suggest a spade. If the opponents have a heart fit, my spade bid will probably not get in their way of finding it, but my bid does put my partner in position to compete or sacrifice if he has spades with me.
Now, should East bid? Remember, we established earlier that this is an ugly hand. Actually, as East, I would be grateful that North bid because that allows me to pass holding this dog. 2♣ shows more length in clubs than East has and/or extra strength. 2♥ shows a much bigger hand (16+). The only bid I would ever consider making is double IF I am playing responsive doubles AND we include them to apply to minor suits, in which case, I would be showing exactly three diamonds.
Most South’s will not bid. But I would bid 2♠ letting partner know we have a fit over any bid East would make through 2♥. If we have at least nine trumps and I have a singleton, we will be safe at the 2-level. If East has not rebid, I will remain silent about my spade fit.
Let’s continue under the scenario that East and South both pass. This is where players are most likely to panic. But I don’t want my partner to pass – what bid is forcing? Actually, there are three of them: 2♥, 2♠ or 4♦. I do not like 2♥. Partner could (and does) have four hearts. Can you see how things would get confusing? Why is 4♦ forcing? Because it is a voluntary bypass of 3NT, so that says, “We are going at least to game in diamonds, but I am also interested in slam.” I think best is a cue bid of 2♠. At this point, this says. “Partner, tell me more about your hand.” It does not yet show control of spades. You should not have to worry about this confusing your partner. If it does, have a discussion so that you can use this useful bid effectively in more auctions than you might think. In answer, East should show his most outstanding feature of his extra length in clubs by bidding 3♣. If he had better hearts, he should show control of that suit with a heart bid. Some might think that QJxx in hearts is a better feature than the 5th club. Bidding the control/stop does cater to reaching no trump. Note that the heart bid would NOT be looking for a fit: since West did not advance with 3♥, he denied holding four of them.
West is not encouraged by the club bid; he needs his partner to have points outside of clubs for the combined forces to work best together. But, slam is still on. In my mind, the question is between small and grand slams, not between game and small slam. West continues to drag his partner along by bidding 4♦. This is the same as previously discussed: as a voluntary bypass of 3NT, it indicates interest in slam. To this East responds 5♦. “I don’t care how interested you are, I have no reason to cooperate.” It denies possession of what West would consider a key card. If East holds the club A, he should bid 5 clubs to show possession of the control.
West should remain undaunted. From the moment East opened, West is in all likelihood bound for slam. The auction has told him that his partner has a minimum opener lacking the club A, and it is likely uncertain that the diamond fit is confirmed. What is the worst hand East could possess? Length in clubs headed by the K, Q & J; short diamonds without the Q; and, QJ in both major suits. That would not even qualify as an opener for me, however. It is more likely that East holds at least one major suit K. The better spades held by North, the more likely it is that East has the Q of diamonds among his assets. If South chirped with 2♠, East has diamond length by inference, so the Q is likely not material. As long as West can get to dummy after leading a club, the only question is whether there truly is a diamond loser. That is a risk I am willing to take.
In the 749er pairs, only two of 11 pairs reached 6♦. Somehow, one of these went down (a club must be led for an eventual heart pitch and a couple of spades must be ruffed). Three pairs got to 3NT, making at least four, so they beat all who were not in slam. Two unfortunate pairs did not bid game. It did them little good to make six. In the 49er pairs, two reached game while the two others did not. The results in the Williamson County game were similar to the 749ers: two of nine bid 6♦; two bid 3NT; four bid 5♦; and, one stopped short of game.
- Pat Williams |
|
|
|
|
| Hand of the Week - Tuesday Night 6/4/13, Mentor-Mentee Game |
Show Detail |
This hand was played in last Tuesday’s Mentor-Mentee game. I was asked afterward how this hand should be bid. The player was somewhat frustrated since slam is available in either diamonds or spades. Before looking at the answer, think about how you could bid this hand. Is there a reasonable way to bid this that gives you a shot at reaching one of the slams?
|
| Show Answer |
The newer the player, the more likely they are to ask, “How do I bid this hand?” Usually, they are so focused on the “how” that they completely miss the “why” inherent in the answer. The “why” is the principle that can be applied to future bidding situations.
Since we cannot learn all there is to bridge at the beginning, we learn general principles first because they apply to the most situations. One such principle is the application of the point count system to the question of, “How high should we bid?” We learn that 13 points is an opening hand, 6 points requires a response, 26 points is a game, and 33 points is a small slam. But not all hands fit neatly within the general principles. Some hands should be opened with less than 13 points. You will not make game every time your side holds a combined 26 high card points. Sometimes, you need less in high card points to make a game or slam than the general principle states.
Such is the case here. North/South hold a combined 26 high card points, yet slam is virtually a lay down in either strain. What are the principles in play here?
- High cards that are working together are more productive than those that are not. (An example of a non-working card would be a King opposite a void or a Q opposite a small singleton.)
- High cards in your long suits are more valuable than those in short suits.
- A double fit makes a hand more valuable in trick taking potential
- Control of a suit keeps the opponents from taking two tricks quickly in that suit and gives you time to dispatch other losers.
- Control can be EITHER high cards (Aces or Kings) OR shortness (singletons or voids).
- If all but one of your high cards is an Ace or King, your hand is worth more than its point count: add a point.
No pair in the Mentor-Mentee game reached slam. That is to be expected since many bidding tools are not available to most of the players in the game and the partnerships are not practiced. But there is actually more than one way to skin a cat on this hand.
Most uncontested auctions would start out 1♦ - 1♠ - 2♥. The 2♥ bid by South is key. It is a reverse. The reverse says, “My hand is strong enough that we can safely play at the 3 level.” (Do not tell me you do not play reverses – if you do not, then your partner will soon quit playing with you for overbidding when you reverse on weaker hands.) It is not quite game forcing. It does not promise 4 hearts at this point, however, it does promise length in diamonds – at least 6 if lacking 4 hearts. In general, you need a couple more high card points to reverse; here, this is offset by South’s having a hand rich in aces and kings and his knowledge of at least a partial fit in spades. (See 1 & 6 above.)
After the reverse by South, North should be thinking this hand has slam potential. With a known fit in diamonds and a side 6-card suit with two of the top 3 honors, his hand soars in potential value. The only negative is the singleton heart opposite his partners heart bid. (See 1, 2, 4 & 5.) Adding in distribution points, I would value this hand at 15. East has several choices available that will steer the remainder of the auction:
- I think best is 4♦ (See 3.). If you voluntarily bypass 3NT with a jump to 4 of a minor, it shows interest in something more. North will cooperate in some fashion.
- 4♥ would show either the A (most likely) or a 5-6 hand (hard to unravel). Regardless, North should bid 4♠ intending to show extra length, a source of tricks. If South confidently believes his partner, he can now bid 5NT, which gives North a choice of either slam.
- 4♠ would show either the A (while denying the ♥A) or 3-card support (most likely). If the latter, it completes the hand pattern, which screams that South has shortness in clubs. (See 4.) Regardless, either helps North know that they should be in slam. Once again, 5NT would ask partner to pick between slams, this time allowing him the chance to confirm the spade fit if that is his hand.
- 4NT would be Blackwood in whatever form your partnership plays it. With the confirmation of 1 ace in North’s hand, South would bid 6♦. This is the bid when South is uncomfortable about going astray by keeping the possibility of spades alive. Generally, it is less important in matchpoints which slam you get to as long as you get to some slam. 5NT would still be a choice of slams, but it might not be clear to North what the choice is between.
- Another possibility is 3♠. After a reverse, a jump rebid by responder should set trumps. I don’t think this hand qualifies without the jack, but it would not be an awful bid. It likely would lead to the top matchpoint contract of 6♠.
- 3♣ would cater to a couple of things. It tends to be asking partner if they have a club honor, in which case they will bid 3NT. If partner does not bid 3NT, North can feel much more confident their combined assets are working together because neither side has wasted values in clubs. Conversely, 3NT by South would slow North down, but they can still reach slam when North pulls 3NT to 4♦. (Once again, this would be showing interest in going further.) Here, South would bid 3♠. Now, it is unclear to North whether South has a club honor. But, North does know there is a double fit (See 3), and he can push towards 6♠.
- 5♦ is the saddest bid. It almost certainly leads to the poorest result because it loses to all slams and spade games. But, in a new or mentor-mentee partnership, this landing spot could be expected to occur.
As we all know, we do not play in a world where there are only uncontested auctions. Here, some Easts will bid over 1♠. Many of the bidders would bid 2NT unusual. I would opt for 2♣ because that is what I want led. However, if my partnership is playing Sandwich, then I would elect to bid that 1NT. This has the same distributional meaning as 2NT (though it is usually at least 6-5). Can slam still be reached? Yes, but that is another story……
--Pat Williams |
|
|
|
|
| Hand of the Week - Saturday Afternoon, 5/18/13 |
Show Detail |
How would you bid this hand?
|
| Show Answer |
| West |
North |
East |
South |
| Pass |
Pass |
3♦ |
Pass |
| 4♦ |
Dbl |
Pass |
5♣ |
| Pass |
5♥ |
Pass |
5♠ |
| All pass |
|
|
|
A major hurdle in player development and confidence is competitive bidding, especially at higher levels when the opponents preempt. First, I will examine this hand in my view of what I believe to be optimum bidding by all parties.
Everyone has important contributions to make in this auction. After two passes, West starts things out with 3♦. Most would consider this a routine opener on this hand, but I would not argue with pass. West has a 7-loser hand. At equal vulnerability, this advertises going down one too many if the opponents double. Also, with three little hearts, West might preempt his side out of a heart fit. But, given the shortness in spades and the lack of a heart honor, I think 3♦ is OK at matchpoints.
Facing the 3♦ opener, South must decide what to do with his hand. He has lots of assets including the strong club suit. Double is out of the question, as South lacks sufficient support in the majors. With 6 losers, I think this hand is not strong enough to commit to the four level with a club bid; partner should expect a hand that is a bit stronger. So, South should pass, trusting his partner to balance with some values.
Given his holding, West should expect that game prospects for the opponents are very good. With three diamonds, he can see that their side can take at most one diamond trick. It is possible that he could score all three of his honors on defense, but that is unlikely. The aces in both suits would have to be in South’s hand, plus the hearts would have to split evenly. The best guess is that East/West can take two or three tricks on defense, depending on who has the ♦A. Therefore, West's obligation is to further the preempt in diamonds to the highest level his side can risk. He can expect to contribute a couple of tricks on offense and should count on a possible diamond loser. That totals eight tricks, which means that he can risk a double of 4♦ against the expected game available to North/South. If his hand were more distributional, he would count in the possibility of getting a ruff, which would allow him to bid 5♦. But the lesson is: furthering the preempt to the highest level expected to be profitable against an expected game by the opponents is an obligation!
East/West have made it very hard on North/South. But, North has enough information to tell him what to do. Though he doesn’t have a lot of points, his hand is pretty good under the circumstances. He knows that his side should have no diamond losers. His partner likely has the best hand at the table. While you never know for sure, the points held by South should be working with North’s major suit holdings. With equal holdings in both majors, I think double is called for here, all the while hoping that partner does not bid 5♣.
Shucks! Partner does bid 5♣. North should think about his hand this way: We may be too high already, but in almost all circumstances, my hand will contribute more to our contract if we are in a major suit instead of Clubs. So, North bids 5♥, asking South to choose between hearts and spades. Happily for North/South, 5♠ does come home (as does 5♣).
In the open game, most North/South pairs declared, but only 4 found a game with only two of those in spades. The difference experience makes is quite evident on this hand. In the 299ers, no declarers bid game, and all were in clubs instead of spades. In the open game, one declared 3♦ (out of 13) while there were two declarers in that contract in the 299ers (out of six).
There are, of course, many variations in the bidding on a deal like this. I expect that the most common auction saw South bid 4♣ directly over the 3♦ open. When this happens, North can see no value in his hand and will pass. If the auction goes 3♦ – P – P, the failure to further the preempt makes it easier on North. Now, he can bid 4♦ asking his partner to bid his best major.
- Pat Williams |
|
|
|
|
| Hand of the Week - Saturday Evening BAM, 5/4/13 |
Show Detail |
Imagine that you are sitting at all four seats of this deal. What would be the final contract at your table?
|
| Show Answer |
| West |
North |
East |
South |
| |
Pass |
Pass |
Pass |
| 1♥ |
1♠ |
Dbl |
Pass |
| 1NT |
Pass |
Pass |
Dbl |
| All pass |
|
|
|
This hand features the two most important bids in bridge: Pass & Double. Some people tend to pass too much; others too little; and some do both inconsistently. Double is the most versatile bid in bridge, but that also makes it the least understood. In matchpoints, your best games will most often include some doubled contracts. If your opponents are not making about one in every six contracts you double, you are not doubling enough. If they are making more than that, you are most likely doubling enough but defending not so well.
After three passes, West opened a reasonable 1♥. After his initial Pass, North, David Birnbaum, overcalled 1♠. East elected to double, showing support for the unbid minor suits. I was sitting South and had a good hand for my partner with the fit for spades and 10 points. Certainly, I could have raised, but the ♥K is of dubious value given the opening behind me. One thing I suspect on this bidding is that someone at the table is overstating their values, but who? Because of the double to my right, I know that I will get another chance to bid, so there is no rush to punish partner if they are the one pushing their values. I elected to pass and see what would happen. The next actions of the other three players could help me evaluate my next action.
West responded to her partner’s double with 1NT. With a double stop in spades and an honor to fill out East’s announced values in the minors, prospects looked pretty good. In the pass out seat, I could have bid 2♠, but I thought double to be a more versatile bid. By doubling, I could tell partner that I had maximum values in the context of this auction. Since I would have opened with 11 points (per our agreement), partner could read me for a great nine or ten points. Armed with this information, David had a reasonable pass, and one side or the other was destined to win this board for their team. It turned out to be us, since E/W lacked any transportation and no ability to develop tricks in her long suit, hearts: Down 2, +500.
What went wrong for E/W? I think the decision of West to make a Negative Double was an overbid, particularly at this vulnerability. With only 2 Queens and a Jack, he was not bringing much to the party. West could have a full opener in 4th seat, and E/W might not have half the high card points in the deck. As it turned out, the points were evenly split between the two sides. On this deal, neither side can make more than a 1-level contract. Once E/W went past 1♥, they were doomed to go down.
--Pat Williams |
|
|
|
|
| Hand of the Week - Monday Afternoon, 4/22/13 |
Show Detail |
|
|
| Show Answer |
One sure thing at the bridge table is that you can only control what bids you make. If your partner makes a crazy bid that leads to you declaring a crazy contract, do the best on the task before you. And if your opponent makes a crazy bid, don’t get lazy by letting that crazy bid become a bad board for your side.
On this deal, North started off with what most would consider an unjustified nuisance bid of 2 Spades. While it may qualify at this favorable vulnerability on the basis of Losing Trick Count (8 losers), it is certainly not the hand partner would be expecting, especially opposite an unpassed hand. North might be further embarrassed if the bid encourages partner to lead a Spade in place of an effective lead they would otherwise make. In the long run, expect a bid like this to be a loser.
I was sitting East, and I had a pretty good hand. My first bid was OK. I hoped that partner could reopen with a Double; with my great Spade holding, I think we have prospects of beating this contract a lot, possibly enough even if we have a game our way. Plus, my shape is not quite right for a Takeout Double; to do that, I would need a couple more minor suit cards and a couple less Spades. Alas, partner’s hand was, with the long Diamonds, not suited for a balancing double.
Now, I lost my head. Instead of realizing that partner’s hand likely held values sufficient for game, I was so disappointed in the lack of a Double, I made a timid pass. I should have bid 3NT. Yes, partner is bidding my values in the balancing seat, but she does not know that I have the best hand at the table. This game is not a sure thing, but the more points in partner’s hand, the more likely game will be successful.
After my Pass, South competed with 3 Spades. I, too, would have done that. Opposite a reasonable 2 Spade opening, I would expect to make 2 or 3 Spades with these cards in support of my partner.
Ah, another chance for me. But did I seize the opportunity? Sadly, no. I was still in mental block. I remember thinking, “How can I Double when I was willing to sit for 3 Diamonds?” 3 No Trump was still off my radar.
So, the sad ending to the story is that I let North get away with a ridiculous bid. We got all our tricks in setting North 2, for a score of 1 on a top of 8. Had I doubled, we would have gotten 5; had I bid 3NT, we would have gotten 6.5.
Most pairs in the game did not receive the 2 Spade opening, but only 4 pairs out of 17 found the 3NT game. How should the hand be bid? After a Pass by North, East starts things off with 1 Diamond. It is entirely reasonable for South to bid 1 Heart. West ‘s hand is improved by East’s opening bid; with the Diamond fit, it is worth 12 points. I would recommend 3 Hearts. This is forcing, implying Diamond length and promising no more than 3 Spades. East does not have a Club stop, but with better than a minimum opener, it is now or never: 3NT. After all, South, the opening leader, bid Hearts, not Clubs.
- Pat Williams |
|
|
|
|
| Hand of the Week - Saturday Afternoon, 4/20/13 |
Show Detail |
East is the dealer. How would you and your favorite partner bid the East/West hands?
|
| Show Answer |
| West |
North |
East |
South |
| |
|
1♣ |
Pass |
| 2♣ |
Pass |
3NT |
Pass |
| 4♦ |
Pass |
6NT |
All Pass |
East has a very good hand. It is really worth a little more than its 19 high card points because those points are composed of almost all Aces and Kings (and there are no Jacks!) Hands like that are worth about a point more than their actual count. In fact, if the East hand had the same points and contained a 5-card suit as well, 2 No Trump would be the better opening. But, the flat distribution is a detraction, so a minor suit opening is called for. One Club is the bid of choice when opening one of two 3-card minors; in the long-run, leaving partner the ability to bid 1 Diamond pays off.
More experienced players are more likely to be playing inverted minor suit raises, which gives them an advantage on this hand. The 2 Club raise by West promises 10 or more points, 5 or more clubs, and denies a 4-card holding in any other suit. It is forcing for one round. If you are not familiar with this system of responses, you would do well to familiarize yourself by Googling “Inverted minor suit raises” and reading the basic information. After the inverted raise, East completes the description of his hand by bidding 3NT, which means he has a flat hand of 18 or 19 points.
What if you do not play inverted minors? The opener would still bid 1 Club, but West would describe his hand with a 3 Club limit raise. Now, East has a harder time (in most partnerships) of showing his powerful holding to his partner, and most will not find the good slam.
After 3NT, it is up to West to realize that his hand is worth more than its 12 points. He should add three points for the extra length in Clubs, bringing the total to 15. Let’s see: 15 plus 18 or 19 is slam territory; how does he communicate that interest to partner? A 4NT bid would ask partner to bid 6 if they are on top of their holding. A bid of 4 Clubs would ask for Aces. Neither of those choices is attractive because West can have no idea if they have sufficient control of all the suits; from his perspective, they could be off the AK of either major suit. So, it is better for West to tell rather than ask. He does this by cue bidding the only control in his hand, the King of Diamonds! Since East is looking at the Ace of Diamonds, he knows that West has the K and does not have the Ace of Spades (since West would have cue bid an Ace before a King). East can infer that West has at least 6 Clubs as part of the basis of his slam interest. With the K of Spades protected on the opening lead, East can count at least 11 tricks, and if West happens to have more than 6 Clubs, slam will be a sure thing. When the dummy comes down with the Q of Spades, 12 tricks are there. In most events, 6 Clubs, a potentially safer contract, will also yield an above-average matchpoint score.
- Pat Williams |
|
|
|
|
| Hand of the Week - Monday Afternoon, 4/8/13 |
Show Detail |
|
Distributional hands always provide fodder for lots of action at the table. Here, both sides have distribution along with fits, which makes for even more action.
Before looking at the suggested bidding, think about how you would bid these hands. North is the dealer.
|
| Show Answer |
|
West
5D
Dbl
|
North
2C
5S
All Pass |
East
4D
Pass
|
South
Dbl
Pass
|
There is no right answer on this hand, but here is the thinking behind this suggested bidding. North faces the first decision. He has only 18 high card points, but the hand is more powerful than that. There are only 3 losers in the hand, which means that opposite any hand partner might hold, this hand has excellent prospects for game. If partner has the right A and Q (Hearts), slam is very likely. The last thing North wants to do is make an opening bid of 1 Spade only to have the auction die there. I like to have 8 winners to open 2C holding a major suit. Here, there are only 7.5 by my estimation, but I think 2 Clubs is the less risky action.
What is a loser? It comes from a whole system of hand evaluation, Losing Trick Count. Early vestiges of this approach go back as far as 100 years, although it was not known by that name. The name first appeared in a 1934 book. The modern codification and popularization came from Ron Klingers excellent book in 1986. At its simplest, you have 1 loser for each A, K or Q missing from your holding in any suit. If you have a void, there are no losers in a suit; if you have a singleton, there is a maximum of 1 loser in that suit; etc. I often use it to think about my initial action and how far I am willing to bid based on my own hand. Generally, I plan my bidding based upon finding partner with a complementary hand that allows our side to make 7 minus the number of my losers.
After the 2C opening, some will be silent and others will only bid 3D. On this hand, with 5 losers, I would assume our side can make 2D. I am willing to go down 2 doubled against a presumed game by North-South, so I bid 4D, the maximum I am willing to compete on my hand, right away. If you are taking a pre-emptive action, it is best to get all the mileage out of it you can by bidding as much as you can immediately.
Souths double does not indicate a desire to defend; instead, it shows doubt about the prospects for game given his holding opposite the 2C opener.
West has an interesting hand for this auction. If he and partner are on the same wavelength, he can judge his partner for a 5 loser hand. His two Aces and a fit are a bonanza! If partner has not lost his mind, they will almost certainly make 4, and 5 is a possibility, even with a 2C opening to his left.
North finally gets to name his suit at the 5 level. After this, East has nothing else to say. (Remember, East told his story on his initial bid.) South remains silent, even with the fit unknown to his partner. But West is back on the catbird seat. He had bid 5D as either a probably good sacrifice or a lucky make, but 6D does not look attractive. Should he double? He will almost certainly score his two Aces. If partners hand can produce just one trick
..Double!
The more distributional the hand, the harder it is for the two sides to arrive at the par contract that bid at which point neither side can improve their position by bidding again. (Of course this does not take into account imperfect play or defense.) Here, North was past what he could make the first time he named his suit. The best each side can do is to make 4. So, par on this board is 100 to North-South for 5DX.
In the open game, the par result was bid and achieved only 3 times out of 13. It was slightly below average to North-South. Most contracts were in Spades, but only one declarer got to play the 4 Spades contract. In the 299er game, none of the tables saw a par result; all played in either 4 or 5 Spades. In a competitive auction, it is almost impossible for North to be satisfied with doubling 4 Diamonds.
- Pat Williams |
|
|
|
|
| Hand of the Week - Tuesday Afternoon, 4/2/13 |
Show Detail |
|
What is your lead after this auction?
|
| Show Answer |
|
If partner
goes to the trouble of bidding a suit even as a pre-empt you should lead
that suit UNLESS you have a good reason not to do so. Those Spades of yours are mighty nice, and
they would be an attractive lead if you thought you had an entry to be able to
cash the long ones. Here, the Club Q is
suspect as an entry, so dutifully lead that Q.
Since you hold that honor, declarer probably has only one stop, and you
can hope that partner has an entry to his suit.
(If declarer turns out to have two Club stops, you and partner should
discuss pre-empts after the game.)
This is one
of those hands where the Deep Finesse analysis may be mystifying to you. It says E-W make 3NT against any lead. Remember though, that this analysis is made
double dummy. Deep Finesse is not wrong
because it sees all the hands. Each
virtual player makes the best play available to him at every turn, but that
does not mean that you would do it at the table.
The Club Q
definitely provides the greatest challenge to East making the contract. The first seven tricks are easy: win the second Club and cash five Diamonds
ending in hand. Hopefully, you realize
that you have work to do while you cash the Diamonds. Watch the discards from both opponents to get
clues for how to proceed after that.
North should have a potential entry in one of the majors. This is confirmed when he discards at least
one Club. Many Norths will discard two
Spades and one Heart in order to hold a protected K of Hearts along with four
Clubs. From declarers perspective,
North can now be played for holding the Kx in one of the majors. Which one is revealed when the eighth trick
played is the A Spades. If North plays a
Spade, the Heart finesse should be on; if instead, North plays a Club, the
Heart K is offside, but you still have your contract (against this defender).
Throw North in to cash the remaining three Clubs after which he must lead into
your AQ of Hearts.
But there is
an option for killer defense on this hand.
A perceptive North will realize that the K Hearts is key to this
hand. So, his job is to make it appear
as though he doesnt have it, which against most good declarers, will ensure
that he gets it. Either on the run of
the Diamonds (absolute best) or on the A Spades (not so good as East might
sniff out the rat), North must pitch a second Heart, baring the K. In this way, he encourages declarer to play
him for a Spade honor instead of the heart K.
Declarer will confidently take the Heart finesse, then fall out of his
chair when it fails. But, he will
recover to congratulate his opponent for a job well done.
- Pat Williams |
|
|
|
|
| Hand of the Week - Tuesday Afternoon, 3/26/13 |
Show Detail |
|
Just Another Average Board
This hand supports the case for playing negative doubles at the 4 level! South, Art Lowen, provided maximum interference by bidding his 8-card suit at the 4-level. West, Barbara Newman, showed her support for both majors with her double. Note that South did not compete further over 4 Hearts; to do so would have violated good practice, e.g., dont bid your values twice. Souths 4 Diamond bid was indicative of how high he was willing to play on this hand. If his judgement had been the 5 level, he would have been better off bidding that immediately.
After the Club 10 is lead, you can count 8 top tricks. Pause and plan your play. Because of the 4 Diamond bid, North is the favorite to hold Heart Q, but is it right to take the finesse?
|
| Show Answer |
|
NO! Souths 4 Diamond bid is key to your plan (regardless of the lead). You can expect that to show 8 Diamonds. That leaves only 5 places for Hearts, which means, on average, South will have 1.7 Hearts. But it also increases the likelihood that Hearts will split poorly: 4-1 or 5-0. Further, it is unlikely that you can set up a side suit. The 10 of Clubs screams that it is a singleton, and North almost certainly holds more Spades than South. Also, note that you have shortness in both hands, Diamonds in hand and Clubs in dummy. So, you need to take advantage of that and do a little crossruffing. Therefore, proper play is NOT to finesse. You cannot afford to lose to the Q doubleton in Souths hand. If you take a successful finesse against North (even 3-2 distribution as in this layout), you win the battle but lose the war by reducing the number of crossruffs available to you.
Do this: win the opening lead, and draw TWO rounds of trumps. Now, play 3 top Spades pitching your stiff Diamond in hand. You are now positioned to cash your two club winners and crossruff the remainder of the hand. Because of the exact position in the hand, North can never over ruff the dummy, and you score a 12th trick with your last trump in hand en passant leaving the opponents winning only their Q Hearts.
What if you get the A of Diamonds lead instead? Presumably, this will be followed by another Diamond, forcing you to ruff in hand. Your goal should still be to make 12 tricks. If South switches to a Heart or Club, 12 tricks are easy along a similar line of play. However, Souths best defense is to continue a Diamond, making you ruff in hand. There is still a path to 12 tricks, but it is complicated, involving a 1st round Heart finesse, 3-2 Hearts, and you must overtake the Q Spades! Since North must guard both black suits, you can come to an end position that squeezes him for 12 tricks. But, most people will not find the sequence of plays that work.
One intrepid pair bid and made the slam. Slam is not a great prospect on this hand given what is known about the freakish nature of Souths hand. But, this time it worked! And in our 6 table game, 680 for East/West was just another average board.
- Pat Williams |
|
|
|
|
| Hand of the Week - Monday Afternoon, 3/18/13 |
Show Detail |
|
| Show Answer |
This hand contains lots of interesting facets.
At our table, north started with a self-described "funny bid." Many people agree not to open 1NT with doubletons in both majors. Given the lack of a stop in either major suit and the robust minor suit holdings, most would not open this with 1NT. That being said, the 1NT bid has two pluses: (1) increasing the chance that the strong hand is the declarer and (2) expressing the strength of the hand with the first bid. I overcalled 2 hearts opposite my passed partner. After a misunderstanding, South declared in 4 spades. After partner led an eccentric K of clubs, declarer played very carefully in view of the 4-2 spade fit and made only 5. This was still worth 75% of the matchpoints for them, but should it have been worth that much?
Certainly, that beats all folks who are in 5 clubs, which makes 6 or 7. As might be expected, that was the most frequent contract (5 declarers). The second favored contract, with 4 declarers, was 3NT. After most of them received a heart lead, the most any of them made was 4 even though 6 is there for the taking. Did they play correctly? Any time you declare, your goal should be evaluated in light of the alternative contracts you are competing against and the likelihood of their occurrence. Here, the 3NT declarers cannot imagine the two declarers who played this deal in 4 spades. The contracts they can see are 5 clubs, which can be judged as likely, and 6 clubs, which can be judged as not very likely. 6 clubs is irrelevant to their plan in 3NT because they will always lose to the 6 club bidders. However, 5 clubs is very relevant to their plan. But, the plan is further impacted by the lead. After a heart lead, there are 10 top tricks. Since 630 beats 620, I think declarer would be correct to play it safe and eschew the club finesse, which dooms the contract if it is off. With any other lead, there are only 9 top tricks. So, at matchpoints, declarer MUST risk the contract and take the club finesse in order to make enough tricks to beat those in 5 clubs.
A couple of declarers, including the event winners (Boze), found the 6 club slam.
- Pat Williams
|
|
|
|
|
| Hand of the Week - Monday Afternoon, 3/11/13 |
Show Detail |
|
How would you bid this hand?
|
| Show Answer |
Berkeley and I bid to 5S and went down 2.
Several people bid 4S down 1 and several other people bid 5D down 1. The experts tell me this hand should not be opened with a strong 2C bid.
We are considering posting a Hand of the Week, taken from actual hands played at the club. If you have an interesting hand, please notify me and I will try to have someone comment on it and post it on this site.
Thanks,
Rees Mitchell |
|
|
|
|