Nothing too unusual about the bidding. Possibly North is a little too good and might open 1H. East bid of 3S is perfectly okay and then South has a difficult decision, but if West is going to bid 4S then he will do so whether South bids 4H or not and although. probably south doesn’t expect 4H to make it’s probably close enough not to be doubled, although this is pairs.
East leads A♦ and then 9♦ . The Jack pulls the King and then K♠ is taken by the Ace. Its not a great fit with the QJ♦ in effect wasted because its losers we are worried about not winners. We have 2 diamond losers and a grotty looking 3rd spade that will need to go somewhere; Either on a long club or the boss diamond and somehow we have to get away with only 1 heart loser.
So do we play for 3-2 break and hope to get the heart finesse right, followed somewhere by a club finesse.
If the club finesse is right I might not need to ruff a spade, but to do the heart finesse I had to get to dummy and other than the spade ruff the club Ace was an entry, but if I used that up early I might have a few problems so I decided to go for a spade ruff (rightly or wrongly). Another option was to use the clubs to do a double heart finesse but this is probably way less than the obvious 25% as the hearts would need to be 3-2 with K,J on-side and I would still need to club finesse. Anyway I took spade ruff leaving the following
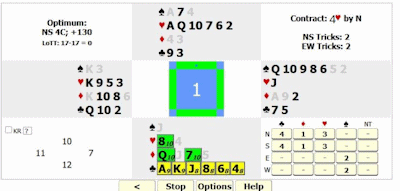
South is to play and I took the heart finesse putting the queen up. If I put the Ten in then If it loses I have an automatic spade loser.
When the Jack dropped, my first thought was “That's curtains”. But then I realised I could in fact get rid of the last spade loser on the Boss diamond by going back to the Ace of clubs, ditching a spade on the QD. (I had earlier suspected East to have a doubleton, but now it doesn’t matter)
But I still had 2 more trumps than West and to stop West having an exit card on a throw-in he must end up with the same number of trumps as me.
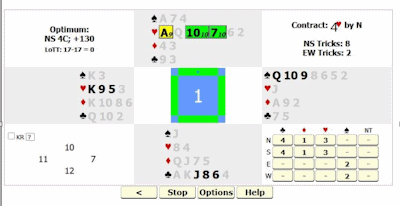
So I ruffed the last diamond. Played a club to the King and ruffed a club. Now the 3 card ending leaves East endplayed as we both have the same number of trumps. It matters not which heart I lead as long as its not the Ace.
Note if I had 4 hearts left and West had another club he would be able to exit with a club and thus avoid the end play. For this to work I must have the same number of trumps as West.
|