| Board 2, 23rd September 2019: Visualise Partners lead |
Show Detail |
North’s simple raise to 2S (with three card spade support) is to be noted. With a flat hand and ten points jumping around is not recommended. West led the heart 4 declarer plays the 7 from dummy and the moment of truth has arrived for East.
He knows the heart 4 is from an honour and as his partner is not in the habit of underleading Aces in a suit contract, the lead is most likely from the Queen. If declarer has Ace 9 X ,East is powerless to stop three tricks in the suit. The correct card for East to play at trick one is the 8. That safeguards a heart trick for the defence.
If there is a similar holding in a suit in a notrump contract and the suit is led at trick one declarer should insert the 10. Declarer’s best hope of three tricks in the suit is to hope defender has led from Queen Jack.
In a spade contract declarer should make eight tricks. The spade finesse loses but a diamond to the King will score.
Tip: Try and envisage your partner’s holding.
|
|
|
|
| Board 14, 23rd September 2019: The Hold Up Play |
Show Detail |
North leads the H J. East plays an honour and South wins the Ace and returns a heart. North plays the heart 10 on the second round indicating an entry in spades (the higher ranking suit) for his established hearts. It is best for West to duck the second heart. The hearts may well be divided – 4 3. If they are South will be unable to access partner’s hand.
The hand is similar to having three small cards opposite Ace X X. In such situations declarer will wait until the third round to win with the Ace (in a NT Contract).
In the particular hand hitting the second heart. will not cost. Long term it is best to follow the correct percentage play and sever connections between opponents hands.
Tip: With three small opposite Ace X X hold up until third round in a no trump contract.
|
|
|
|
| Board 20, 23rd September 2019: Can I see a way to twelve tricks |
Show Detail |
South leads the diamond 3. East counts his tricks. Three outside Aces, three diamond ruffs in dummy and five top hearts only comes to eleven tricks. Good declarer play involves getting side suit going early. To make this contract declarer will need a favourable spade lay out and probably an even trump break. A spade to the Ace should be played at trick two followed by a spade ruff. The diamond Ace is cashed a diamond ruff follows. A spade ruff, a diamond ruff and a further spade ruff will see the spades established. Fortunately the trumps break 2 2 and ending in dummy declarer can throw two losers on the established spades – losing just one minor suit trick.
Tip: Count your tricks before you start playing.
|
|
|
|
| Board 7, 29th April 2019: "En Passant" |
Show Detail |
En Passant is more commonly associated with the game of Chess. It also features in Bridge. The play sees a player ruffing a card with a lower trump with an opponent holding the master trump unable to prevent it. The trick is scored “in passing”.
The bidding is instructive. North is uncomfortable passing partner’s opening bid of 1NT but he comes to life on the second round of bidding. His double of 2D is take out. It is important to remember that a double of 2D from either side of the table is take out. East West are comfortable pushing their opponents to a three level contract.
West starts off with diamond Ace and at trick two switches to club Queen. Declarer wins and continues by ruffing a diamond in dummy. A low spade to the Queen follows and declarer notes East’s play of spade 9. He believes that to be a true card and so the spade Ace is cashed with the King falling. Declarer now cashes trump Ace and continues with spade Jack and 10 discarding a club. East is unable to ruff so declarer notes that West has four trumps to Queen 10. Declarer now ruffs a club in hand, ruffs a diamond in dummy leading to this ending:
North
H Jack
C 9 6
West South East (immaterial)
H Q 10 8 H K 7
D 9
Declarer now leads Club 6 from dummy and ruffs with heart King. West follows with heart 8 and prematurely claims the last two tricks. South plays the diamond 9 and scores the heart Jack en passant ending up with ten tricks.
It is important to note that declarer learned about the distribution from the bidding and from the early play. The winning play was obvious three tricks from home.
Tip: If opponent’s bid after you or partner open 1NT a double from either side of the table is best used as take out.
Play out the cards and often you will accidentally fall on your feet.
|
|
|
|
| Board 17, 29th April 2019: "Bid your second suit and give partner a choice" |
Show Detail |
This hand was played twelve times on Monday night. On ten occasions NS played in a spade contract, one EW pair played a heart contract and only one NS pair played in a diamond contract. North was mesmerised with his six spades and obviously failed to mention his diamonds in the bidding. It is always better to mention your second suit and give partner a choice. Partner may have long diamonds and no spade at all so it is best to involve him in the auction.
In this hand NS will make seven tricks in spade for plus 80 but will make at least eight tricks in diamonds for plus 90 or sometimes nine for plus 110.
In defence after lead of the top heart East will do best to switch to club 10. With best defence in a diamond contract EW will score 2H, 1C, 1S and 1D In a spade contract EW will score two spades, two hearts, one club and a slow diamond.
Tip: Give partner a choice – mention your second suit.
|
|
|
|
| Board 20, 15th April, 2019: "Watch the spot cards - settle for 12" |
Show Detail |
The 2H bid by South is fourth suit forcing to game. North supports spades and with singletons in partner’s two suits South settles for the spade game.
After the lead of the diamond Queen in accordance with sound principles of declarer play South gets his heart suit going early. The lead of the heart 5 sees East play the 8 and South successfully finesses the Queen. When he cashes the Ace East will play the King. The King of course could be played from King Jack 8 but as often the case it is best to accept the King as a true card. South has been watching the spot cards in the heart suit. He is left with 9 7 3 and West has Jack 6. That means he has just one loser in the heart suit. It is a mistake for South to try and ruff a heart as East can over ruff the dummy and exit on a trump leaving declarer with just eleven tricks.
The lesson is when there is a good possibility of twelve tricks - take them.
|
|
|
|
| Board 21, 15th April, 2019: "Gerber gone off the rails" |
Show Detail |
East on hearing his partner jumping to 3NT introduced Gerber. West showed no Ace with a 4D response. That enabled North to double showing good diamonds. East retreated to 5C. In the above auction the meaning of 5C was ambiguous. Was it a sign off or was it looking for Kings. The bid of 5NT was also ambiguous. East thought it might show three Kings and in the confusion passed. North duly led his diamond and the defence took the first five tricks.
Gay Keaveney an experienced player and wonderful coach suggests Gerber is often used by a hand that it not good enough to ask for Aces. As the bidding developed and as the response was doubled it is not clear whether 5C is more Gerber or is it to play.
With strong hands it is best for partners to bid out their suits and when it is clear that a slam is a possibility the bid of 4NT (Roman Keycard) can inquire for Aces. Gerber is best used over a 1NT or 2NT opening to inquire about Aces.
Tip: Only use Gerber over 1NT or 2NT opening – after partner shows the number of Aces 4NT is always a sign off.
|
|
|
|
| Board 14, 8th April, 2019: "Get your side suit going early" |
Show Detail |
East was declarer in a 4S contract and received the lead of the heart 5. East won the heart return. Counting his tricks East recognised that he had 6 spades, 1 heart, 1 diamond and 1 club. His tenth trick can come from a diamond ruff in dummy or if the club King is favourably placed by playing Ace and another Club while the diamond Ace is still in dummy.
A better line of play is available by getting the club suit going early before touching trumps. At trick three declarer can play Ace and another club. East will win and may switch to a diamond. Declarer can win in dummy and ruff a club back to hand. The suit is now set and the trump King will be an entry so declarer can discard two diamonds and make eleven tricks.
Tip: Get your side suit going early
|
|
|
|
| Board 24, 8th April, 2019: "The 5 Level belongs to the Opponents" |
Show Detail |
North’s bid of 3D was pre-emptive showing a seven card suit. East’s bid of 3S showed good values. With two Aces South feels 5D must be a good save . Both West and East have a dilemma. West has minimum for his opening and does best to pass. East has good defensive cards and a double of 5D is in order.
The play is interesting. North is in danger of losing 1S, 2H, 1D and 1 club. Minus 500 will not score well. If declarer plays Ace and another heart that will happen.
An interesting technical play in the heart suit will allow declarer hold his losers to one in the suit. When in dummy with the club Ace (or the diamond 10) declarer can lead the heart 6 and run it around to East’s Jack. In the later play declarer can lead the heart Queen and pin East’s ten confining his losers to one the suit.
Tip: Double a 5 level contract and take the money instead of bidding on.
|
|
|
|
| Board 10, 1st April, 2019: "Keep link with Partner's hand" |
Show Detail |
(EW were playing strong NT) East led the heart 5 (his fourth highest). To cloud the issue North played heart Queen at trick one. West won the Ace and returned the 8. South followed with the three and East won with the King. That was the end of the defence. North won the heart return, cashed some clubs and later knocked out the top diamonds to score nine tricks.
East should pause for thought at trick two. He knows his partner does not have the heart Jack. That card is with the declarer. East also knows from the bidding that North does not have four hearts. As East has no outside entry he must duck the second heart and retain a link with his partner’s hand. To open the bidding West will surely have a quick entry and in the later play a heart return will see the defence score at least five tricks.
Tip: With no outside entry retain a link with partner’s hand (by ducking in the early play).
|
|
|
|
| Board 2, 9th March 2020: "How to floor a good slam" |
Show Detail |
I found a way to floor this excellent contract. 2S was a weak jump overcall. 3D was an inquiry and the response of 3S showed a minimum. 4D was a cue bid as was 4H. 4NT was Roman Key Card Blackwood and the excellent 6S contract was reached.
A ♦ was led by West. It looks like there are two ♣ losers. I set about the possibility of bringing down the ♥ King in three rounds so that a ♣ can be discarded. That did not happen. So, in vain, my last hope was that East had a doubleton honour in clubs. That was not the case and minus one resulted.
South’s thinking was incomplete. As East is known to have almost all the missing high cards there is a more elegant ending. After the diamond lead declarer has plenty entries in trumps to ruff two diamonds in dummy. All the trumps are cashed leading to this ending:
West : (Immaterial ), North: (A Q (♥ ), J 7 (♣ ) ), East: (K x (♥ ), K Q (♣ )), South: (8 (♥ ), A 8 6 (♣ )).
Ace and another Club from South will see East endplayed and forced to concede two tricks in hearts in the endgame.
An initial heart lead from West will break up the squeeze.
Tip: With eleven top tricks by cashing your winners a squeeze will appear before your eyes.
|
|
|
|
| Board 18, 9th March 2020: "Watch the spot cards" |
Show Detail |
South has a solid nine card suit which he bids twice at a high level. He reluctantly passes North’s penalty double of 5S. The play highlights watching the spot cards an oft mentioned theme in this column.
After the ♥ Ace is cashed, South switches to the ♦ 9. There is no winning switch. Declarer correctly rises with the Queen and wins with the Ace. He draws trumps ending in dummy and plays a diamond. North wins and switches to a club. Declarer wins with dummy’s Ace and leads the ♦ 6. North plays the 2. Unfortunately, declarer has not been observing the diamond spots and mistakenly ruffs it instead of letting it run.
There is no winning defence. Even if South switches ♣ King at trick two, declarer can win draw trumps and lead the ♣ Jack or towards it if he chooses. North will win and is presented only with losing options. A ♦ can be let run to the Queen as can a low club.
NO EW pair made 5S on Monday night.
Tip: Watch carefully the spot cards.
|
|
|
|
| Board 3, 24th Feb. 2020: "Use of the Lebensohl Convention" |
Show Detail |
It is important to remember that the opening bid of 4♠ is a pre-emptive bid and usually shows at least a trick more than a pre-emptive 3♠ opening. East’s double will usually show a strong no trump or better hand with values in the other suits. With a weak hand and no great distribution partner should pass the double. With a weak hand and a long suit West should bid 4NT advising partner that he is weak but has a long suit. It follows then that any bid by partner over the double will show good values – in this hand 9 to 11 points as he has already passed.
East with a good fit and a spade void might judge to advance to a small slam. After the lead of the ♠ Ace, West can ruff in dummy and take the successful trump finesse. A successful negotiation of the diamond suit will see declarer score all thirteen tricks.
If West had a weaker hand with a long suit he would bid 4NT over the double. Partner now would bid 5♣ and West could pass if his suit was clubs or bid 5♦ /5♥ as appropriate.
Tip: When partner doubles 4♠ opening, bid 4NT Lebensohl with a weak hand. It follows if you bid a suit over the double you are showing values 9 points plus.
|
|
|
|
| Board 4, 24th Feb. 2020: "Don't be afraid to play in the Moyesian fit" |
Show Detail |
Playing five card majors West must decide how best to advance over partner’s 1S response. Rebidding a poor five card suit is not ideal. With a doubleton club a simple raise to 2S best describes the hand. Sonny Moyse was a great American Bridge writer and was the first to recognise that playing in a 4 - 3 fit can sometimes lead to an excellent contract.
Holding a side suit doubleton and three trumps supporting partner’s suit (maybe only four card) may be the best option.
Many modern teachers recommend opening a weak no trump with all five card suits. We live in a democracy. I prefer to open 1 of a five card major. Frequently we can play in a 5/3 or a 5/4 fit. The disadvantage of opening 1NT holding a five card major is that you can end up in the wrong contract.
Tip: Remember Sonny Moyse – and don’t be afraid to play in a 4 - 3 fit when it is the best option.
|
|
|
|
| Board 6, 17th Feb. 2020: "33 points, sufficient for 6NT" |
Show Detail |
The 2♣ opening followed by 2NT rebid shows a balanced 23-24. The 2NT rebid is preferred to 2♥ which will normally show a six card suit. West adds his points (10) to what partner has shown and knows the values are there for 6NT. There is no need for any detours and even if there is a ♠ fit a NT contract is likely to play well.
South does not like to lead from a queen and may start with a low ♣ . Before playing to first trick declarer should plan his strategy. He will certainly need to discover the heart position. He can win in dummy and run the ♥ 9. Another heart finesse will succeed and now he is up to twelve tricks. His thirteenth will come from an even spade break or a diamond finesse. If he cashes the hearts first he will be forced to discard prematurely from dummy. It is best to test the spades after the second heart finesse succeeds. The favourable spade break will lead to thirteen top tricks without any diamond finesse.
Tip: A combined 33 points is needed for a 6NT contract.
|
|
|
|
| Board 23, 17th Feb. 2020: "Double and take the money" |
Show Detail |
West looks like to have eight tricks in a spade contract and an overcall of 3♠ seems in order. The spotlight is on North. He has an opening bid and must take action. 3NT is not recommended. West is likely to have a certain outside entry in addition to a good spade suit and NS are unlikely to be able to run nine tricks without losing the lead. Double and take the money is the recommended action. If South is highly distributional he will likely bid again but not on this occasion.
The ♥ Queen should be allowed win the first trick. North will win the ♠ Ace at trick two and South will play a low ♥ indicating values in the lower ranking suit. Two clubs are now cashed and the play of the ♥ Ace from South will promote another trump trick for the defence. Any plus score for NS will be a good result.
Tip: When opponents engage in obstruction tactics don’t be afraid to double and take the money.
|
|
|
|
| Board 12, 10th Feb. 2020: "Count to nine" |
Show Detail |
The pass by North on the first round of bidding is notable. If North bids 2♥ on the first round of bidding he will show a better hand and South will get overboard. North has a good heart suit but the two outside Jacks are not worth much. South also passed the 1NT response by East. He has good defence against a NT contract. North in the balancing position bids 2H and South passes noting North’s initial pass.
The defence is interesting. The lead of the spade 4 will be either a doubleton or a singleton as East has not supported spades. The Queen and Ace are cashed and West now plays the spade 2 asking partner to switch to the lower ranking suit after obtaining a ruff. East obliges by switching to the Club King and a low one. West wins the Ace and considers his options. The only possibility of another trick is in the trump suit. A spade must be the right play and this promotes a trump trick for the defence.
Tip: When you immediately overcall at the two level have proper values. In defence watch for the chance of a trump promotion.
|
|
|
|
| Board 23, 10th Feb. 2020: "Take out the Axe" |
Show Detail |
East’s double is for penalties, shows at least fifteen points and usually more. South is in difficulty with a poor hand and retreats to 2♠ showing at least a five card suit. West must take some action with seven points. He has no five card suit so a double would show some values and ask partner to do something useful. When opponents run from 1NT doubled they usually have a weak hand so some action must be taken.
On this particular hand 4♥ can be made, so defending 2S undoubled is not a winning action. The defence will score seven tricks in a spade contract by South. Plus 500 will score well as 4H may not be reached at every table. With a balanced hand and some values if opponents run from 1NT doubled, take out the axe.
In the play West should lead the heart 2 (his best suit) showing an honour. East can insert the Jack and the defence will be straightforward. Provided East does not switch to a low diamond, the best declarer can do is scramble six tricks.
Tip: After partner doubles 1NT and opponents run do not be afraid to double for penalties.
|
|
|
|
| Board 16, 27th Jan. 2020: "Count to nine" |
Show Detail |
South decided to open 2♣ showing a strong hand. His rebid showed a six card suit. After 3♦ from partner South decided to chance 3NT – holding eight tricks and hoping partner could have some useful cards in the majors.
West started with the ♠ 4. South was a lover of the finesse and tried the ♠ Queen. East won and found the deadly switch of the ♥ King (essential). Declarer’s goose was now cooked. He lost five tricks. Note how important it is to switch to the ♥ King. A small ♥ is not good enough. East knows that declarer has good clubs so he needs his partner to have a helpful holding in the heart suit.
The big mistake, as is often the case, was made by declarer at trick one. He can count nine top tricks – 6 clubs, 1 spade and two diamonds. He should decline the spade finesse and run for home.
Tip: When you see nine top tricks and are wide open in another suit take the 9.
|
|
|
|
| Board 26, 27th Jan. 2020: "Listen to the Bidding" |
Show Detail |
East led the ♥ 2. Declarer won and led a ♣ . East took his Ace and switched to a ♦ . Declarer won in hand and led a ♠ to the 9, losing to the Queen. West switched back to a ♥ and declarer won with the Ace. A second ♠ went to the Jack, King and Ace. Declarer now had ten tricks.
East should have considered the bidding before making the opening lead. North had used Stayman and settled for 2S after South denied a major. He obviously had hearts as well. East should have avoided a heart lead and will get four tricks in defence. The ♦ 4 or ♣ Ace are good alternatives. When West gets in with trump Queen, a ♥ switch will guarantee a trick in that suit for the defence.
Tip: Listen to bidding before choosing opening lead.
|
|
|
|
| Board 3, 13th Jan. 2020: "Differentiate between a weak and a strong response" |
Show Detail |
West’s first double is not ideal. At our table East responded 2♦ which is an underbid. 2♦ could be bid on no points. It is important to differentiate between a good and a weak hand. Frequently you will hear the observation “I was waiting to hear again from partner”. There might be no again. Partner is fully entitled to pass a two level response with a minimum hand and that will end the auction.
East should jump at the first time of asking to show a good hand. A “waiting”bid of 2♦ is not recommended.
Nine tricks are available in a NT contract
Tip: When responding to partner’s take out double jump to show a good hand
|
|
|
|
| Board 5, 13th Jan. 2020: "Winning the Part Score" |
Show Detail |
South’s bid shows spades and a minor. At unfavourable vulnerability it is a dangerous option. In such situations it is best for opponents to play a double as take-out from either side of the table. East has an option to bid clubs or hearts. It is a fair assumption for East to accept that partner has four hearts for his take out double. In such instances 3 ♥ will probably be the final contract.
In the play declarer will need to take a double finesse in the heart suit. He will lose two spades and a heart in addition to a possible club.
Playing in spades after the lead of the heart 6 (2nd highest from bad suits) East must refrain from playing the heart ace at trick one. An early trump switch will prevent declarer from ruffing clubs in dummy. Good defence will hold NS to seven tricks.
Tip: When opponents overcall a suit at the two level after 1NT opening by partner an immediate double is best used as take out.
|
|
|
|
| Board 2, 6th Jan. 2020: "Exercise the option to Pass" |
Show Detail |
East will open a weak 2 in spades. After two passes, the spotlight turns on North who has 15 high card points. He will be tempted to bid. 2NT is a possibility – other North players might double “to show points” (!) When bidding no trump in such situations a source of tricks is required. North has five tricks and he will need three more to make 2NT.
North examines the evidence. South has passed and will be short in spades. He has not made a take out double or bid a suit of his own. Therefore, it is more likely that he has not a great hand. Of course, he may have a flat 12 or 13 points and does not wish to enter the fray immediately over 2 ♠ . IF that is the case maybe N/S will miss a vulnerable 3NT.
I think the greater probability is that South has a hand like the above and caution is rewarded. In the play South will most likely lead a ♥ . After three ♥ tricks are cashed, looking at a strong ♦ suit in dummy, North will switch to a ♣ . The defence will score six tricks. If North becomes declarer in 2NT he can be held to six tricks – minus 200 rarely a good match point score.
Tip: Caution will be rewarded frequently rather than venturing into the unknown.
|
|
|
|
| Board 24, 6th Jan. 2020: "Get side suit going early" |
Show Detail |
East has a bit in reserve for his 4♠ bid. Splintering with singleton ♦ Ace is not ideal, nor is introducing a poor heart suit an attractive option.
North leads a low ♦ and West has a number of different options. He can play a club towards the King and if the Ace is on his left a heart can be discarded. He might be able to ruff three diamonds in dummy but in that scenario the trump queen might come into play.
As often is the case the simple and straight forward option works best. At trick two declarer should get side suit going and start with a winning ♥ finesse. The ♥ Ace can be cashed, dummy entered with a trump and a ♥ ruff will see two winning hearts established in dummy. The club can be discarded in addition to a diamond. Two diamond ruffs in dummy will see declarer score all thirteen tricks.
Tip: A principle of good declarer play is to get a side suit going early.
|
|
|
|
| Board 9 16th Dec 2019 One for the road |
Show Detail |
North’s first double was a support double showing three cards in the suit partner bids. That is a useful convention and comes into play after opponents make a suit overcall. North’s point count is not yet revealed. With a good seven card suit and a fit in diamonds South jumps to the heart game. East will not be silenced and South’s 5H bid is one for the road. North would have spoken to the 4S bid if he got a chance.
Now to the play. West cashes spade Ace and switches to the diamond 4. South rises with the Ace and ruffs a spade. He is not yet sure of the diamond position. Two rounds of trumps follow ending in dummy and a spade is ruffed. A club is played towards dummy and East will win and smoothly return a low club. South will ruff this and run off all his trumps throwing a diamond from dummy. The play of the last heart will finish East as he is unable to hold the club honour and three diamonds.
Note when a club is played towards dummy East West will need to have their count signals crystal clear to know that a second club is not cashing. A proper count system is a vital ingredient for proper defence. Odds and evens and revolving discards are an interesting topic for discussion over coffee.
|
|
|
|
| Board 18, 16th Dec. 2019: "The Bishop and his Partner Make 6NT" |
Show Detail |
North South are playing Inverted Minors at all times except over a double. In the above instance the bid of 2C by North is initially 10 plus points with at least five clubs. Playing inverted minors the next suit bid by partner shows a stopper in the suit – that is the meaning of South’s 2H bid. West’s bid of 2S is unnecessary. 4C by North is Roman Keycard Blackwood with clubs the agreed suit. 4D shows one Ace and North advances to 6C.
There is little to the play. A diamond can be discarded on a heart and a diamond to the King will see declarer make his contract in comfort.
The superior powers of the Bishop and his partner lead them to the ambitious contract of 6NT. There appear to be eleven top tricks – 2 spades, 3H, 1D and 5 clubs. Where is the 12th coming from? One needs a diamond trick so it will be necessary to play a diamond towards the king early. West can win and no return can damage declarer. The diamond King is now cashed and the run of the Clubs will squeeze West. He cannot guard the 4th heart and Q J other spade.
Well done to Tom Monaghan and Kay Scarry on successfully negotiating a difficult contract.
|
|
|
|
| Board 3, 9th Dec. 2019: "The Money is in the Defence" |
Show Detail |
With eleven cards in the majors and adding his high card points to his two longest suits (coming to 19) West is worth an opening bid of 1♥ . Some Bridge players unwisely treat such holdings as similar to 5 - 5, and open 1♠ first. Page one of your notes tells you to open your longest suit first and such is the case here.
After North opens 1♦ East joins the action with a bid of 2♣ . Partner has passed and at unfavourable vulnerability 2♣ is a risky bid. South passes hoping partner can make a take out double. West now comes to life with a bid of 2♥ . After two passes South bids 3♥ looking for a stopper. After a pause West passes and North shows his heart cover by bidding 3NT. After some further consideration around the tabl, three passes follow.
East with a sense of the dramatic opens proceedings by leading ♥ King and is delighted with his efforts when he pins the ♥ Queen in dummy. A low ♣ towards dummy sees the Jack score. North now leads ♦ Jack from dummy unblocking the 9 from his hand to preserve an entry in dummy. After winning with the ♦ King, East continues a heart and sees the ♥ 10 losing to the Jack. At this stage East must know that declarer has the ♥ 9.
A club towards dummy is won by East with the Ace and another heart is played. Declarer now has nine tricks – he has preserved an entry to dummy with the ♦ 7 and scores four diamonds , two clubs and three hearts .
Once West plays the ♥ 10 on the play of the second heart, East should sit up and realise there is no future in hearts. The ♠ switch will see the contract go down three. It is true that declarer can take eight tricks after winning the second heart. He preferred to enlist the help of another declarer to bring home his contract.
Tip: Add your high card points to your two longest suits and if the total comes to 19 then open.
|
|
|
|
| Board 6, 9th Dec. 2019: "Sylvia strikes again" |
Show Detail |
Sylvia did not deem her spade suit headed by the Jack, ten worthy of mention. So on the first round of bidding Sylvia passed. North’s bid of 1S showed four or fewer spades, and was like a forcing NT bid. Sylvia now decided to introduce her good four card ♣ suit, and South bid 2♥ showing a six card suit. Sylvia felt she had not shown her hand fully so when the bidding came around to her again she decided to double, hoping her partner would do something useful. Three passes concluded the auction.
South ruffed the third club with the ♥ 8 – fearing an over ruff – and was surprised to see West follow with a third club. He entered dummy with King and another spade and played the heart 6 inserting the Jack and losing to the Queen. After a diamond switch he discarded a potential diamond loser on the ♠ Ace and was surprised to see it ruffed by West.
There was nothing West could do in the subsequent play to avoid three further trump losers. Sylvia’s ingenuity left South floundering.
Tip: Watch out for Sylvia’s manoeuvrings, and if possible, avoid being taken in.
|
|
|
|
| Board 4, 2nd Dec 2019: "Count the Points " |
Show Detail |
A normal auction will result in North declaring a contract of 2NT. Only one EW pair found the correct defence to that contract on Monday night. What suit should East lead? “I always lead a major against a NT contract” is an often quoted comment (misguided). The best advice is “lead your best suit”. The texture of the club suit is marginally better than the spade suit. Q 10 8 are close to each other and there is a gap between spade King and the spade 9.
North will win the first club with the Ace and will play on diamonds. When West wins the 3rd diamond he will return a club. East will win and will take stock. North has shown 20 to 22 points. He has Club Ace King, diamond K Q J. He has 7 or 8 more points – most likely the heart Ace and the missing spade honours. It is an error by East to cash a top spade at this stage before the club exit. If he exits on club first North will win enter dummy on a diamond and play a spade towards the queen jack. East will win and cash his winning club. North will have to discard a heart. A low heart now
from East will sink declarer. If declarer plays low from dummy West can insert the 9. Defence will score 2 clubs, 2 hearts, 2 spades and 1 diamond.
During the play it is necessary to work on the defence. Frequently declarer’s points can be worked out.
Tip: Count declarer’s points during the play – this will lead to the winning defence
|
|
|
|
| Board 18, 2nd Dec 2019: I was showing opening points partner |
Show Detail |
What should happen
P P
1S 2D P P
P
How often do you hear it said “I was doubling to show opening points partner. “An overcall doesn’t show opening points”.
On the contrary an overcall at the two level should always show opening points (an exception is if you play weak jump overcalls). A double on the other hand should usually show shortage in the suit opened and tolerance for the other three suits. Sometimes with an exceptionally strong hand one can double first and then bid a suit over partner’s response. That bid will always show a strong hand.
In the above hand a take out X is not suitable. A simple overcall of 2D is best. An overcall of 1NT showing 15 to 17 points is also a possibility.
In the play as long as EW remain passive 2D is the limit of the hand for NS. If East panics and exits on heart Q after winning a trump trick declarer will make nine tricks.
Tip: An overcall can show up to 17 high card points – if partner cannot respond you are not missing game.
|
|
|
|
| Board 4, 25th Nov. 2019 "Fall on your Feet" |
Show Detail |
East showed a balanced 23 – 24 points, and after his partner showed five spades, East became declarer in a 3NT contract. After the natural lead of the ♦ Queen East paused for thought. He can see three heart tricks, one spade trick, two top diamonds and a possibility of four club tricks on a three three break, or if the jack falls on two rounds.
After North won the ♥ Ace at trick two, a diamond was returned, and the moment of truth has arrived for declarer. It may seem safe to duck but here that play is fatal as it concedes a definite third trick to the defence. Some East players on Monday night fell into that trap. At our table a wise East did no ducking. She cashed four clubs, three hearts followed by the ♠ Ace and another, having noted South’s discards. North was forced to yield the last trick to the ♠ Queen in dummy.
On a different lay out a diamond exit would have led to an end play, but declarer observed that North probably only had two diamonds from the earlier play.
Tip: Do not engage in any unnecessary ducking.
|
|
|
|
| Board 13, 25th Nov. 2019: "Stay in tandem with dummy" |
Show Detail |
South had a difficult decision on what to bid after his partner’s 1♣ opening. He invented a bid of 1♦ . North’s double was a Support Double showing three diamonds. South next made the practical bid of 3NT. Unexpectedly West cashed the ♠ Ace at trick one and continued with a spade. South now has ten top tricks. He cashed five clubs, one top heart and returned to hand with a low heart. He cashed the winning spade leaving dummy with
♥ King, 8
♦ Q
East's last four cards were ♦ Ace, King and ♥ J, 10. East was reluctant to discard a top diamond and unwisely discarded a heart. Dummy’s two hearts were now winners. The evidence indicated that declarer was unlikely to isolate himself from the ♥ King. East should throw the ♦ King and he will score two tricks in the end game.
Bridge players often ask “What discards do you play”. You hear “I play odds and evens”. I think Gay’s response to what discards does he play is best: “I don’t discard". Work out what is going on and do the practical thing. One guiding principle is “Hold the suit you see” and let partner mind the other suits.
Tip: When discarding hold the same number of cards as the suit in dummy if possible.
|
|
|
|
| Board 4, 18th Nov. 2019: "No Ducking" |
Show Detail |
West’s re-bid will show 18 – 19 points. East has a good club suit but without an Ace may simply Pass rather than making a forward move. North will lead the diamond Jack. West should win 2nd diamond with Queen – no ducking. He has most likely 6 club tricks, 1 diamond trick, 3 heart tricks and one top spade. As the play develops, he will know if it is necessary to finesse a spade for the 12th trick.
He wins second diamond discarding a spade from dummy. He follows by cashing two top hearts in his hand and then plays on clubs. The heart jack falls on three rounds so declarer has twelve top tricks without any spade finesse. It is important to count your tricks and do no unnecessary ducking.
Tip: Count your top tricks and do not engage in unnecessary ducking.
|
|
|
|
| Board 23, 18th Nov. 2019: "Be in the Right Denominaton" |
Show Detail |
Quite a few times recently hands have come up and one is not sure whether to play in 3NT or in five of the minor. East’s original bid of 2S shows club support and asks West to describe his hand further. West shows a good hand with a stop in spades. East is not certain if the clubs are good for five tricks and his bid of 3C expresses doubt about a NT contract. West has good controls but only one cover in spades. He knows his partner does not have running clubs so he bids 5C which becomes the final contract.
The thinking is one should have two stops in the suit overcalled to bid NT if one does not have a running suit. 5 of the minor suit will be a safer contract in many situations. There are eleven tricks in. If playing in 2NT, a club finesse should be taken early. When it loses declarer will settle for eight tricks. If declarer plays on hearts first and does not finesse the 10 she will have floored a NT contract.
Tip: Without a running suit have two stoppers in suit overcalled before bidding NT.
|
|
|
|
| Board 4, 11th November, 2019: "Watch the spot cards - it's not a race" |
Show Detail |
West decided to bid 2♣ over partner’s 1NT which was a wise decision. There are eleven tricks available in a club contract and only eight in NT. North commenced proceedings by leading the ♥ Ace and continued with the 9 of the suit. West, fearing a heart ruff if he played low and losing to a possible ♥ Queen, rose with ♥ King at trick two. West in a hurry drew trumps in three rounds and played King and Queen of spades overtaking the ♠ 9 with the Ace. That play produced a ♠ trick for North’s 8 of spades. Declarer failed to notice that South perforce had followed with the 10 and Jack of spades on the play of that suit. Overtaking the ♠ 9 with the Ace was unnecessary extravagence.
Rising with the ♥ King at trick two could have been the right play, but overtaking the ♠ 9 with the Ace was inexcusable. Declarer needed to slow down and take note of the spade spot cards.
Tip Watch the spot cards – slow down it is not a race.
|
|
|
|
| Board 8, 11th November, 2019: "Where can I get tricks?" |
Show Detail |
After North’s pre-emptive 3♥ bid, South should not get excited with nineteen points. He should simply bid 4♥ with soft values in the minor suits. The spotlight turns to East and to his choice of leads. Leading an innocuous ♠ suit is out of the question, so he starts with ♣ Ace – if partner can supply the King he may be able to obtain a ruff in the suit. His ♣ Ace will score and with the ♣ King in dummy, there is little future in that suit. It is clear the spades suit before his eyes is solid and declarer may be able to obtain a useful discard later in that suit.
East should ask the question : Where else can I get tricks? The answer is surely in the diamond suit. East should switch a low diamond at trick two and the defence will score three tricks. Even if declarer has ♦ Ace, a diamond switch will not cost as declarer’s losing diamond can be discarded on a spade.
Tip: Looking at a good side suit in dummy switch and try and get tricks in another suit.
|
|
|
|
| Board 2, 21st October 2019: "Make life difficult for the opponents" |
Show Detail |
Over West's weak 2♠ , the bidding would proceed as above. However West's hand has a 6-4 distribution with good spades, reasonable clubs and a void in hearts, so an opening bid of 3♠ is quite justified and much more effective than 2♠ . Indeed 3♠ is likely to make life much more awkward for the opponents. North will probably bid 3NT, and that will close the auction
In the play of 3NT, North will make 10 tricks, losing a diamond, a spade and a club trick.
In 6♥ , after the likely lead of a ♠ , South's losing ♣ will disappear on a winning ♠ . South's only loser will be the ♦ finesse into East's king of diamonds.
|
|
|
|
| Board 18, 21st October 2019: "With a strong 2-suited hand, open at the 1-level" |
Show Detail |
West has a strong 2-suited hand. By opening at the one level, plenty of bidding space is left for partner. Rarely will the strong hand be left to play in 1♦ . In this deal East, having 4 diamonds (trumps), a good side suit and one loser in hearts, will bid 3♦ . West will be happy to hear this and will bid 4NT, Roman Key Card Blackwood. East will respond 5D showing 0 key cards and West will bid 6♦ .
North will likely play an attacking lead of a ♠ . Declarer will win with the Ace of spades, cash two top diamonds and two clubs before entering dummy with a trump, cash the three club tricks and only lose one trick to the Ace of hearts.
If West opens 2♣ (say), then after East's relay of 2♦ , the final contract may be 3NT or 5♦ .
|
|
|
|
| Board 6, 14th October 2019: "Bid your values at first time of asking" |
Show Detail |
West’s initial double puts both majors in the picture. North’s bid of 2C over the double does not show a good hand but indicates a suit of at least six card length. The spotlight is now on East. A free bid of 2H does not adequately describe the hand. On the contrary with good cards in both majors and almost an opening bid he should bid 4H. He knows after partner's take out double that the hands fit well.
South at favourable vulnerability bids 5C. West has a difficult decision over 5C. His ♦ King is well placed (in defence). His partner has passed on the first round of bidding. It is a difficult decision whether to double for penalties or bid 5H. The double is money in the bank and West has minimum values opposite a partner who passed originally.
Such decisions are a matter of fine judgement. Esperience will be the best teacher.
In the defence to 5C doubled, when East switches to a singlton diamond, declarer must rise with the Ace to avoid a penalty of 800
|
|
|
|
| Board 10, 14th October2019: "If you bid them up - you must be able to play" |
Show Detail |
West was a player who took no account of the vulnerability so his overcall of 2♥ (!) did not cost him a thought. Once East offered support there was no stopping West and he bid the threadbare 4♥ .
He could bid them up and now the question was could his play do justice to his bidding. He ruffed the second spade noting that North was placed with ♠ King. He followed with Ace and another heart playing low from dummy. He knew South was favourite to hold the ♥ King. The play to date indicated that South had six spades so declarer had to hope the ♥ King was doubleton. He ruffed the spade return and entered dummy with the ♥ Queen drawing the last trump.
King of Clubs and another club revealed South’s distribution and declarer cashed four club tricks ending in dummy. As North had shown four points declarer was confident that South held the ♦ Queen and also three diamonds. To date he had shown 6 spades, two hearts and two clubs. Declarer led ♦ Jack, covered by South, and won by the King. Running the ♦9 ensured three diamond tricks for the declarer, and eleven tricks in all.
The rare diamond backward finesse play saw declarer score eleven tricks. His play of the cards justified his optimistic bidding.
|
|
|
|
| Board 8, 7th October 2019: "An elegant endplay secures the contract" |
Show Detail |
South’s double is negative showing the other suits, and 3NT becomes the final contract. East correctly leads a low spade. He gives one spade and if he or partner obtains the lead there are four spades to cash. It would be a mistake to lead spade Ace or King – if that happens the spade suit is dead.
North considers the play and recognises that if an early finesse loses, the contract will fail. He starts with ♥ King and ♥ Jack, which leads to four tricks in the heart suit. He observes East’s discards – two low diamonds. A club to the Ace follows and a diamond is led. East is unlikely to discard two small diamonds holding the King. When East follows with a low diamond, declarer recognises that West is favourite to hold the diamond King. He rises with the ♦ Ace.
Now comes the key play – declarer exits with a spade. East cashes his four spade winners but has to conceed the last two clubs to declarer’s King and Jack of clubs.
The hand is like a crossword puzzle. The clues are there. East’s overcall and discards led declarer to the winning line.
Tip: In NT contract lead low card from A K x x x. Look out for clues.
|
|
|
|
| Board 23, 7th October 2019: "I will wait to hear from you Partner" |
Show Detail |
West, with a minimum hand correctly passes 1S. Amazingly five (!) pairs played in a spade part score on Monday night. East must realize that partner’s double will show tolerance for the other three suits. An opening bid opposite an opening bid equals game. East should bid a straight forward 4S at his/her first time of asking. 1S can be bid on zero points. Partner will always have at least three spades for his/her take out double. Don't wait to hear from her/him again – you might never do so.
Express your appropriate values at the first time of asking.
Tip: After partner’s take out double jump to the appropriate game at the first time of asking.
|
|
|
|
| Board 18, 30th September 2019: Establish tricks for yourself not for declarer |
Show Detail |
North in 4th position decides to enter the bidding recognising that partner is placed with some points. The bid of 2D shows either both majors – or diamonds and one major in which case the diamonds will be a longer suit which will enable South to give preference to diamonds at the three level.
West leads the Club Queen. South recognises that he has 2 spade losers, two diamond losers and a club loser. Solid defenders will not go astray. At trick two declarer continues with a club from dummy. Panic sets in from East. He rises with the Club King and soon the spade Ace and King hit the table. Even if East now switches a diamond it is too late as a spade can be set up by declarer for a diamond discard.
East should play low on the second club. West will win and the switch of a low diamond or even the spade queen will hold declarer to eight tricks.
Tip: With control of one suit try and set up a defensive trick in another suit.
|
|
|
|
| Board 14, 30th September 2019: The Principle of Restricted Choice |
Show Detail |
West decided to lead the club 4. A heart lead (the better suit) was also a possibility. East won the Club King and contined the suit. South(the declarer) pondered the best play of the diamond suit. If the suit divides 22 he has no problem. If the suit divides 3 1 with a singleton honour in the West hand declarer can make five tricks in suit with a finesse of the diamond 10 on the second play of the suit.
Sure enough West produces the diamond Queen on the first play of the suit. Here the principle of restricted choice (so much loved by Terence Reese) comes into play.”The play of a card which may have been selected as a choice of equal plays increases the chance that the “player started with a holding in which his choice was restricted." It is in line with the idea of split honours in the suit.
The play of the Queen by West suggests that his choice was restricted. A finesse of the diamond 10 will allow declarer make eleven tricks in the notrump contract.
Note if a singleton honour is in th East hand there is no fnessing position. Playing towards the diamond Ace when first playing the suit is the correct technical play.
Tip: Watch out for the possibility of a finesse after an honour appears on the first play of the suit.
|
|
|
|
| Board 18, 1st April, 2019: "Fortune favours the brave" |
Show Detail |
(EW were playing a Strong NT)
When North looked at his hand he did not expect to become declarer in a slam contract. The bid of 3C by South is an example of the Ghestem convention. That convention enables the person who uses it to show two suits of at least five card length in one bid. Remember the three principles:
A cue bid shows the extremes – the two suits furthest from each other.
A jump to 2 NT shows the next two suits (usually the minors)
A jump in the minors shows the exclusives – the other two suits.
In the above hand the bid of 3C shows the exclusives (the other two suits) – in this instance the major suits. North bids his better major. It would be courting disaster to pass 3C. South makes the practical bid of 6H. He hopes that North will have a trump entry to take the spade finesse. East is favourite to have the spade King for his opening bid.
North ruffs the second diamond and plays Ace and a small spade. It is his lucky day as the spade King is doubleton and twelve tricks come home.
TIP: Learn Ghestem and evaluate the power of two strong suits.
|
|
|
|
| Board 23, 1st April, 2019: "Put Exclusion Blackwood into your Armour" |
Show Detail |
West has a powerful hand after partner’s bid of 3H. The bid of 5D is Exclusion Key Card Blackwood. It asks partner how many Aces he has outside of diamonds. The response of 5H shows one Ace – remember 1430: First step 1 or 4, second step 0 or 3. (Or: "Half past 2 (PM)".)
The bid of 5NT states “We have all the Aces” and is a grand slam try. With nothing extra to show partner responds 6 of the trump suit. In the above hand East has golden cards – the club Queen and the spade King X. He can confidently bid 7H.
TIP: Learn the tools to bid a slam – especially splinters and keycard Blackwood.
|
|
|
|
| Board 15, 25th March, 2019: "Watch the spot cards: Don't overtake" |
Show Detail |
South takes his life in his hands with a 2H bid. He is unlikely to win the contract but he is suggesting a lead to his partner. West with no four card major passes on the second round of bidding. East invites game and West with a maximum and a good club suit advances to 3NT.
North leads the heart 4, the Queen from dummy and West decides to win the first heart. He must look at the club spots – he can see five tricks in the suit. But he must play carefully in case there is an adverse divide in the suit. He cannot afford to overtake the 10 on the second round of the suit. Instead he returns to hand with the spade Ace. The run of the clubs will give great discomfort to South. He will need to keep four spades to prevent adeclarer from scoring an overtrick. On the second play of the spade suit the Queen will appear and West will score well for bidding and making game.
Tip: Watch the spot cards in a suit and try and help partner choose the best opening lead.
|
|
|
|
| Board 20, 25th March, 2019: "Welcome back Gerber" |
Show Detail |
Readers of this weekly column will not have seen the “Gerber” convention mentioned to date. Less experienced players are frequently heard to sing its praises: “It keeps the bidding low”. It is best used over a 1 NT or 2NT opening and is meant to complement Blackwood not replace it. It is ideal in the above hand. East has a powerful hand over a 2NT response showing 18-19 high card points. It is possible from East’s point of view that two Aces could be missing. The bid of 4C asks West how many aces he has. The response of 4NT showing three Aces will clarify the position. East can confidently bid 6NT as he has a great source of tricks in the heart suit. Note that a 2NT rebid shows a balanced hand and 18 to 19 points. A rebid of 2D would show a strong unbalanced hand with longer clubs than diamonds.
A bid of 4NT over 2NT rebid would be Quantitative – asking partner to bid 6NT with maximum points (19) and to pass with 18.
Tip: Use Gerber over a 1NT or 2NT opening or Rebid.
|
|
|
|
| Board 19, 18th March, 2019: "Manage your entries in the right order" |
Show Detail |
North with a good six card suit intervened with a bid of 2C. West decided to make a forward move of 3S and East with four trumps and an Ace advanced to 4S.
North started with two top clubs and continued with the 10. West made the first good decision when he rose with the spade King. With short clubs South was favourite to hold the spade Jack. He now followed with the spade 10 intending to run it playing South for Jack X X of trumps. The spades broke two two and finishing in hand declarer now set about attacking hearts. The favourable heart position allowed declarer discard his losing diamond on the heart 10. Eleven tricks were there.
At our table declarer tried the spade 10 at trick three and then drew an unnecessary third round of trumps. The established heart was isolated.
Tip: Count the trumps (up to 13) and end up in the correct hand.
|
|
|
|
| Board 24, 18th March: "An intricate winning defence" |
Show Detail |
East made a weak jump overcall of 2S. South’s double was negative. His hand is ideal for this bid showing two minors and a fall back position with two hearts. North has a seven card suit and makes the practical bid of 4H.
East starts with a low club and after West wins with queen the switch of the spade 8 will follow. At most tables East won the spade Ace and continued spades. The bidding and early play told North that East was short in hearts. On this assumption declarer ran the heart 10 and his losers were confined to a club, a spade and one trump.
The winning defence is difficult to find. If East can recognise that partner needs a significant holding in the trump suit (or the diamond Ace) to defeat the contract the winning defence will come into view. If East ducks the first spade declarer is finished. The spade Queen will win and when declarer leads the heart 10 West can rise with the trump Ace and return a spade. A spade ruff will sink the contract.
Defence is the most difficult part of Bridge. Once East makes the correction deduction of partner’s possible holding a chink of light is on the horizon.
Tip: Make an act of faith in the cards your partner must have to defeat a contract.
|
|
|
|
| Board 26, 11th March, 2019 "Caution best: lead best suit" |
Show Detail |
East (vulnerable) has a poor hand. With only one spade he will have to rebid 2C after a 1S response from partner. West has just twelve points and should simply bid 2NT on his second bid. Jumping to 3NT with no source of tricks is not recommended.
North has listened to the bidding and with an excellent spade suit and an outside entry he starts with two top spades and continues with the spade Jack indicating an entry in the higher ranking suit. West has to find two discards from dummy. Once he believes North he should cut his losses and discard two clubs. He knows he will lose five spades and the heart Ace. Setting up another trick for the opponents in the club suit is not recommended.
Scrambling seven tricks will be a reasonable result.
TIP: Cut your losses when in a poor contract.
|
|
|
|
| Board 27, 11th March, 2019: "A bid of 5NT- a Grand Slam try" |
Show Detail |
The pre-empt from North means that East West must have their bidding boots on. East is best to start with a take-out double – showing the two red suits. If West had a weak hand he can pass South’s bid of 4C. West’s bid of 4D shows diamonds in addition to spades and a good hand. East follows with 4NT – Roman Key Card Blackwood with diamonds (the last suit bid) the agreed trump suit. The response of 5S shows two key cards and the trump queen. 5NT from East guarantees all the key cards and is a grand slam try. With nothing else to show West can simply bid 6D. In this hand he has a six card spade suit, the heart King and a club void – an excellent hand. The spade suit can be set up and the King X of hearts is of great value. 7D must be a great spot.
Only one pair bid 6D on Monday night – the cold 7D was but a dream. Well done to Margaret Forde and Anne Cooney for at least reaching the small slam.
Tip: A bid of 5NT guarantees all the Key Cards and asks for Kings. With a source of tricks in a side suit bid 7 in the agreed trump suit.
|
|
|
|
| Board 11, 25th February, 2019: "A thoughtful lead" |
Show Detail |
North with an Ace and a five card suit is well worth a bid. East has a poor twelve points, and opposite a partner who has passed, wisely chooses not to enter the fray. At nil all making noise with a bid of 2 Clubs will only help the opponents arrive at the best contract of 4S. South’s rebid of 2NT showing 18-19 points is normal.
The spotlight turns on West who gives thought to the opening lead. A lead from Jack x x x is the worst lead in bridge. A far crisper lead is the club Queen and here it strikes gold. The defence will score five tricks. A lead from four to the Jack will see declarer score eleven tricks. My partner David Walsh led the club Queen which reaped a huge dividend.
Tip: Lead from a suit with substance ‘ “Lead our suit not opponent’s suit”
|
|
|
|
| Board 12, 25th February, 2019: "A thoughtful switch" |
Show Detail |
South with a good eleven points decides to make a forward move over North’s 3C. North with a minimum opening decides to pass. East correctly made an attacking lead of the spade King, followed by the spade Queen. Once again David Walsh was equal to the occasion and looking at an ominous club suit in dummy, overtook the spade Queen and thoughtfully switched to the Diamond 7.
North had no winning play and lost two spades, 1 diamond and two trump tricks. If West does not overtake the spade Queen, North will be a step ahead as East will eventually find himself endplayed in diamonds.
Tip: Good defence is a combined effort. Try and envisage the entire hand and what partner might have.
|
|
|
|
| Board 21, 25th February, 2019: "Make a safe lead against a NT Slam"" |
Show Detail |
East found himself on lead against 6NT Playing after South raised North’s rebid of 1NT to 6NT.
A lead from a queen against a NT slam is not recommended. East was not a follower of that particular theory and started with the heart 6. He was later to regret that decision. North cashed two top clubs and the diamonds King and Queen. He now cashed four spades ending in hand, followed by the diamond Ace discarding a club from dummy. East was finished. He could not guard the club Queen and his remaining three hearts.
A lead from one of the shorter suits headed by the Jack would have avoided the finishing squeeze.
Tip: Make a safe lead (one that does not give a soft trick) against a NT slam
|
|
|
|
| Board 8, Feb 18th 2019: "A Slam or a hold up in NT" |
Show Detail |
East’s bid of 3C should show a good hand. If playing Inverted Minors a bid of 2C is recommended. West’s bid of 3NT is probably an underbid. East decides to make a forward move and if two key cards are missing he can hopefully sign off in 4NT. 4C is Roman KeyCard in Clubs. Once West shows three key cards East bids a hopeful 6C. After the lead of the spade King West wins and discards two spades on the top hearts. A losing club finesse follows and the small slam comes home.
After North overcalls 1S West may declare 3NT. He can win the second spade and then take the club finesse. South will have no spades left and eleven tricks will accrue.
TiP: Take note when it is appropriate to hold up an Ace.
|
|
|
|
| Board 26, Feb 18th 2019: "Competing over Opponents 1NT Opening " |
Show Detail |
After East opened a weak no trump South introduced a popular method to show both majors – a bid of 2C. North did not jump around at his first opportunity but simply gave preference to hearts. South next bid 2S to show a stronger hand and better spades. North needed no further encouragement and 4H was the final contract. East started with a low club attempting to establish a trick in that suit. North took stock. He has potential losers in three suits. If he starts with the heart finesse or the heart Jack covered he is in the wrong hand to take the spade finesse.
The winning line is to take the spade finesse first. When that succeeds the spade Ace is cashed and the losing club is discarded on the winning spade Jack. East can ruff but has no winning option and twelve tricks will accrue.
Tip: Get your side suit going early.
|
|
|
|
| Board 10, Feb 11th 2019: "Bidding 4 4 4 1 Hands" |
Show Detail |
Formerly bidding theory recommended to open one of the suit below the singleton. But unless the singleton is in the spade suit it is best to open one of your lowest ranking suit. In the above hand some West players opened 1D and found themselves declaring a 3D contract after NS competed in hearts. A diamond contract at the three level was destined to fail while there are ten tricks available in clubs.
After a 1H overcall East has a difficult decision. His hand is not suitable for a take out double as there are no four spades. But usually in such sequences partner’s opening of 1 Club will show clubs and it will be safe for East to raise the suit.
If 1D is opened it may be difficult to discover the club fit.
With a spade singleton and three four card suits a 1D opening is recommended. After a likely 1S response it is best next to bid 2C. That will usually show five diamonds and four clubs but it is the best way to avoid trouble in such hands. Rebidding 1NT at an early stage with a singleton is not recommended.
|
|
|
|
| Board 22, Feb 11th 2019: "Return Partners Suit" |
Show Detail |
North bids 1 NT protective showing 10 to 14 points in 4th position after three passes. A double was also an option holding two four card majors but should partner respond in clubs North is not good enough to bid 2NT.
The money is in the defence. North wins the opening diamond lead in hand and sets about establishing tricks in spades hoping to bring down a doubleton ace. West wins the second spade with the Jack and returns a diamond (Partner’s suit). Another spade will see East win and exit on a diamond.
Declarer will now score 3 diamonds, 2 spades, 2 top hearts and will be a tempo behind in establishing an extra heart trick. If North wins the last spade in hand and plays a club East can cash his two clubs, winning diamond and wait for a heart trick.
The moral is for West to return partner’s suit at the first opportunity. Passive defence wins the day on this hand.
|
|
|
|
| Board 19, Jan 28th 2019: "A Pre-Empt Upsets the Apple Cart " |
Show Detail |
After West opens 1S North ups the ante with a pre-emptive bid of 4D. That makes life difficult for East. He has a good hand and a simple raise to 4S does not adequately express the quality of his hand. Hiding a good six card suit is rarely correct. The bid of 4H should show a good hand. South does not want to encourage his opponents to bid on to a slam so a strategic pass at this juncture is recommended. The spotlight turns on West. He has good heart support and a diamond void. A bid of 5D is recommended – that will show first round control of diamonds and heart support. East needs no further encouragement and advances to 6H. At favourable vulnerability South judges to sacrifice in 7D. There is n danger of East West making a grand slam. 7D is a good save – conceeding 1100 instead of 1430.
The hand has many interesting points
- The value of a pre-empt
- The importance of showing where your values are even at a high level
- Strategically passing with support for a pre-empt so as not to help opponents.
|
|
|
|
| Board 20, Jan 28th 2019: "Singletons are for Leading Attack against a slam" |
Show Detail |
Or Bidding could go like this:
| W |
N |
E |
S |
| P |
P |
2NT* |
P |
| 3H* |
P |
4S* |
P |
| 6S* |
P |
P |
P |
Playing weak 2 Bids West will open 2S and with a wonderful hand East will introduce Roman Key Card Blackwood and West will become declarer in 6S. North has one sure trick and if partner can produce the club queen the contract may go down so he starts with a low club. When he gets in on the trump Ace nothing else looks more attractive than a club continuation and South will get a ruff and the contract will fail.
If East becomes declarer the lead of a singleton club is recommended. Partner may have the missing Club Ace and an immediate ruff will follow. Instead partner has the trump ace and a club ruff will defeat the contract.
It is not easy for East West to find the successful contract of 6NT.
|
|
|
|
| Board 16, Jan 21st 2019: "Did East West bid Vulnerable Game or Defend accurately? " |
Show Detail |
East with tolerance for three suits doubles North’s opening bid. As partner has passed East must have good values to enter the fray. South at favourable vulnerability bids 4S and after West bids 5D (his best suit) South decides not to bid on. 5D is difficult to make after dummy is forced in spades. Trumps are drawn and West leads the heart Jack unblocking the 8 in dummy. South will exit with a spade. West will need to finesse in hearts to make the vulnerable game. The odds favour a finesse as North will have shown six spades and three trumps in the earlier play.
Defending 4S after playing club Ace and diamond King East will need to switch to a heart to defeat the contract. For a successful defence it is frequently correct to place partner with a particular card as is the case here. If there is no heart switch declarer can draw trumps and play towards the club queen. The potential heart loser can then be discarded.
|
|
|
|
| Board 19, Jan 21st 2019: "A Dilemma for East" |
Show Detail |
East overcalls firstly at the one level hoping that partner might be able to speak. North at his second time of bidding comes alive with a full blooded 4H bid. What should East do? In all probability, he has nine tricks in his hand (after a likely heart lead). It looks like he has three tricks at least in defence. 4S might make or go down one. Can 4H make? It is unlikely that North has many spades. If North plays East for both heart honours (on their own) he will bring home 4H.
Bidding 4S at unfavourable vulnerability is the successful action. There are just four losers – three diamonds and the club Ace. Bidding one for the road works here but such is not always the case.
|
|
|
|
| Board 4, Jan 14th 2019: "A Splinter shows the way to a Grand Slam" |
Show Detail |
How often do you hear the question asked: “How many points had you”? (9 and 16 – we should have enough for game.)
Good distribution is frequently more valuable than high card points. North’s bid of 4D after an initial Pass shows a diamond void, four card trump support and at least values for game. If North bid 3D that would show one diamond, four card trump support and at least values for game. South has the ideal hand with no wasted values in diamonds. He can see that all his points are working. The 5Club response to Roman Key Card Blackwood shows one Ace and 6D shows one King. South can see that there are no losers as his potential heart loser can disappear on the club King.
There is no problem in the play and there are thirteen easy tricks. The key bid is 4D showing a void and to differentiate with a 3D bid which will show a singleton. Armed with that information South can proceed with confidence to the grand slam.
Unfortunately, on Monday night eleven of thirteen pairs played in game. Hand evaluation is an essential aspect in the game of Bridge
|
|
|
|
| Board 11, Jan 14th 2019: "Play in the Right Denomination" |
Show Detail |
I prefer a bid of 2H by South on the second round of bidding. He has a singleton spade and his club suit is not substantial. North’s bid of 2S is game forcing and South now shows his distribution is 1 3 5 4. 4H is a far superior contract to 3NT. In NoT the defence can score the first five tricks. Playing in hearts North after the fall of the heart 8 on the first round may play to drop a doubleton queen but the odds favour a finesse.
On some hands with solid all round values and only four hearts North should bid 3NT allowing for the possibility that partner may have supported on a three card holding an outside singleton or small doubleton. If partner had four hearts all along he can then bid 4H over 3 NT.
|
|
|
|
| Board 2, Jan 7th 2019: "West's bid tells the tale" |
Show Detail |
At some tables: this bidding took place

In the second auction given West’s bid of 2S showed spades and a minor. North’s double in principle is take out showing values in the other suits. South bids 3H and North now with the spades covered bids 3NT. He knows South will have 13 or 14 points as they pass with flat twelve points vulnerable.
On seeing the dummy after the lead of the spade 6 (or 4) South plays low and is disappointed that East produces the jack. He feels that the heart suit offers the best prospect of some tricks. He enters dummy with a winning diamond finesse and leads the heart jack. East rises with the Ace and returns a spade. Declarer wins in dummy and finesses the heart and sees the 8 fall from West. As he needs another heart finesse he plays a low diamond and beats the King with the Ace. After another heart finesse declarer cashes the winning heart and the winning diamond. West is in difficulties. He was forced to find four discards. He choose to let go two clubs and two spades. South was now able to exit in a spade and West had to lead away from club King. South made ten tricks.
It could have been worse for EW. On the lie of the cards declarer could take a club finesse earlier and West has no winning return. In the end game he will be squeezed in spades and clubs and with the fall of the club jack on the second round of the suit declarer will score eleven tricks.
If West had remained silent and NS are left to their own devices 2NT will be the likely contract. West’s bid helped South find a successful line of play.
|
|
|
|
| Board 11, Jan 7th 2019: "Did you bid the same values twice ?" |
Show Detail |
West’s double on the first round of bidding is not ideal but he has twelve points and tolerance for two suits. North’s bid of 2D does not show a great hand. Rather it shows a six or seven card suit and can be passed. East joins the fray with 2S. South passes and West should follow suit. He has a minimum hand and only three spades. How often in such situations is a bid found – keeping the bidding open !
The moral is if partner competes in a suit pass with minimum values when bidding comes around to you. In Ireland we are prone to the disease of too much bidding.
In the play South will lead the diamond Queen. East will be tempted to duck. If he ducks South will switch to Ace and another heart, followed by a diamond ruff. In the later play he will score a club trick as his spots are good. 2S is a comfortable make(usually with an overtrick) and caution is rewarded.
|
|
|
|
| Board 1, Dec 3rd 2018: Did you listen to the Bidding" |
Show Detail |
East passed on the first round of bidding and entered the fray on the second round with a bid of 2D. Most likely that shows a six card suit. With seven diamonds he would probably open 3D. South’s bid of 2NT showed 15 to 17 high card points and diamond stoppers.
West led the diamond 8, South played the King from dummy and East won the Ace. East knows from the lead and bidding that declarer holds both the diamond queen and jack. His obvious switch is the heart jack looking at three small hearts in dummy. The moment of truth has arrived for West. The clubs in dummy look ominous. Declarer has opened a five card spade. He has not bid 2H on the second round of bidding. From the bidding it looks like the only high card partner can have is the heart King.
West overtakes heart Jack with the queen, cashes the ace and returns a heart enabling defence to score five tricks. In defence it is frequently correct to examine the evidence from the bidding and place partner with appropriate cards necessary to obtain the optimum result. Once you can rely on partner’s bidding it should be possible to recognise the best defence.
On Monday night six North South pairs were allow make 3 NT.
|
|
|
|
| Board 18, Dec 3rd 2018: Did you blaze your way into a slam without using Blackwood" |
Show Detail |
Plying two over one (forcing to game) North first responds to partner’s 1S opening with a bid of 2C. North’s second round bid of 2H is fourth suit forcing and does not necessarily show a heart suit at this stage. The subsequent bid of 3H clearly shows five hearts. North has shown at least six clubs and five hearts. South has a good bid in reserve for his 4H bid. It is always easier to add on points as the bidding evolves rather than subtract them.
North without an Ace observes a golden rule of Bridge:”Do not go looking for an Ace if you have none yourself”. South may have bid conservatively as his club Ace is an invaluable card in addition to his other two aces. But South knows that if North has a stronger hand he will make a forward move over 4H.
Note it is a mistake for North to bid hearts on the first round of bidding as the strength of the club suit could be lost.
Seven pairs played this hand in 3NT on Monday night and scored 11 tricks! On best defence declarer can make seven tricks in this contract. The use of the Roman Blackwood convention will tell NS that two key cards are missing and slam can be avoided.
|
|
|
|
| Board 2, 19th Nov 2018 "Play in the Right Denomination" |
Show Detail |
With two five card suits East should always bid the higher ranking first. The rebid of 2NT shows 18-19. East’s bid of 3H should show five. With five spades and four hearts the correct forward move is a check back in the other minor. East has just five points but two five card suits improves matters. East might feel a 4H contract is a step too far but from the bidding West must have at least three cards in one major.
In the play South will probably lead the club Q. East can win, discard a club on a winning diamond and return to hand with a club ruff. A spade to the King is the best forward move. In the later play East will be able to ruff a spade in dummy and could well score twelve tricks. An initial trump lead might hold declarer to eleven tricks.
Good distributional values frequently make up for the lack of high card points.
|
|
|
|
| Board 5, 19th Nov 2018 "Will I play the Jack or the King ?" |
Show Detail |
South’s bid of 3C will show five clubs in addition to a diamond suit. North’s bid of 3NT will show good cover in the major suits. When he does not support diamonds he is unlikely to have three of that suit. By inference then he must have at least three clubs. South’s final bid of 6C is a reasonable shot.
At the table East got off to the best lead (on this occasion) with the club 3. Declarer won in hand and led heart ace followed by the heart queen. When it wasn’t covered, he ruffed in dummy returned to the club honour and unblocked the diamond queen and jack from his hand and returned to dummy drawing the last trump. He now cashed the diamond winners leaving dummy with a trump and two spades. A low spade is led from dummy. The moment of truth has arrived for West and declarer. Pat McDevitt remarked if he was playing the hand he would observe if West was squirming when discarding and what his reaction was when a low spade was led.
If West rises with the Ace declarer’s problems are over. Let us presume that West from his knowledge of poker plays low smoothly what should North do? It is not clear cut but perhaps if East had spade Ace he might have led it at trick one so North reasoning thus might find the winning play and rise with the spade King and bring home the slam.
In such situations West must decide at an early stage what he will do when a spade is led from dummy. Shuffling when a spade is led at trick eleven is not a winning policy.
|
|
|
|
| Board 4, Nov 12th 2018: Forcing Defence Wins the Day" |
Show Detail |
After an overcall of 1D from East the bid of 1H from South may only show four. A double of 1D should show two four card majors. 3D from North was a splinter bid (showing 1D – the bid of 4D would show a diamond void. – on this occasion the splinter bid showed a singleton diamond, four hearts and a good hand. South holding club Ace felt he was too good to simply sign off in 4H. The 4NT bid was Roman Keycard and the response of 5H showing two key cards. South quickly got off the bus knowing two aces were missing.
East won the first trick with diamond King and unwisely switched to his singleton club. The evidence suggests that South has club ace as he is unliklely to investigate a slam with no aces. At the table South knowing East was short in Clubs got the heart position right and brought home his contract.
The winning defence is to force the dummy with another diamond at trick two. East can win heart Ace when second round of trumps is played. Another diamond from East forces the dummy again and East will later score his heart ten and defeat the contract.
It is not easy to see but a forcing defence is often best.
|
|
|
|
| Board 21, Nov 12th 2018: Make a Neutral Lead against a No Trump Slam" |
Show Detail |
Playing a simple method East opened 2C, West made a relay bid of 2D and East rebid 2T showing 23 24. West knows that a slam is a strong possibility and as the combined hands (23+9) may have only 32 points he investigates via Gerber to check if two aces are missing. West knows from partner’s response that they have all the Aces and judges to bid 6Nt which must be a good shot.
It is usually wise to make a neutral lead against a no trump slam. Leading from an honour card is not recommended.
Against a trump slam an attacking lead is recommended.
In the above hand South avoided the spade lead and led the heart 7 – the second highest from a bad suit. It is wise for East to plan the play and try and devise a route to twelve tricks. On top he has four clubs, one diamond, three hearts and two spades. To make the contract he will definitely need a successful diamond finesse. It is best to try that finesse at trick iwo and the fall of the D.Jack is a revealing card. Declarer can clarify the diamond situation by now cashing the ace forcing a probable club discard from South.
Declarer can now cash four top clubs and will see South discard a spade. If declarer can deduce that South’s likely distribution is 4 4 1 4 which seems likely from his discards he may well find the winning play. He can cash spade Ace, return to hand on a heart, cash his last heart and put South on lead at trick 12 to lead into his spade tenace.
On Monday night eight out of twelve pairs made at least twelve tricks. I wonder was the play as outlined above or were declarer’s problems resolved after the opening lead.
|
|
|
|
| Board 2, Oct 30th 2018: A splinter shows the way to slam" |
Show Detail |
An overcall at the two should usually show a sound opening bid and frequently a six card suit. East has the ideal hand after this development. The bid of 4C is a splinter bid showing a singleton or void in clubs, a good hand and at least four card diamond support. West has a good overcall and cue bids in hearts – showing a singleton or void in that suit. East cue bids his spade Ace. West now has an even more ideal hand – the spade King to supplement partner’s ace. He could safely bid 6D now but instead chooses Roman Key Card Blackwood. Partner with his 5S response shows two key cards and the trump queen.
Remember the responses to Key Card Blackwood
5C = 1 or 4
5D = 0 or 3
5H = two without trump queen
5S = two with trump queen,
6D is an easy make. Should North South get frisky and bid to 4H at unfavourable vulnerability a double will cost 800.
|
|
|
|
| Board 6, Oct 30th 2018: Jump with a maximum after a transfer" |
Show Detail |
Show your count in defence
Opposite a transfer bid North is maximum with four card trump support and does best to jump to 3H to show this type of hand. If he simply bids 2H that will finish the bidding as South does not have the values to bid again. South has enough to advance to the thin game.
So with a maximum hand and four card trump support it is best to jump to the three level in the trump suit with that type of hand. Even if partner has few points it will freqently be difficult for opponents to enter the auction - and you have a nine card fit..
In the play East will start with two top spades and West will high low showing two or four. In defence you will frequently be presented with this problem and you will have to figure out which is it. The evidence points to two for if West had four spades he would surely play a higher spade first. East must continue with another spade and West will score his trump Queen and hold declarer to ten tricks.
|
|
|
|
| Board 9, Oct 22nd 2018: No Jumping Around" |
Show Detail |
After the Rule of 20 (add your two longest suits and your high card points – if they come to 20 you can open) North opens 1H. Vulnerable East made a dodgy 2D overcall with minimum values. A vulnerable overcall at the 2 level should show always show more than a minimum opening hand. If East had a sixth diamond the 2 level overcall might be in order. South with a good nine points raises to 2H. It would be a mistake to jump to 3H.That should end the auction. If West competes to 3D South in the pass out position will double for penalties showing a maximum for his original 2H bid.
East will need to cash two top diamonds to hold North to eight tricks. Relevant count signals will be necessary for East West to indicate if the two top diamonds are cashing. If East West get to 3D after a penalty double they will suffer a loss of 200 or 500(on best defence) which is rarely a good score.
Note with only eight trumps in a competitive auction North South should not compete beyond the level of the fit – with eight trumps stay at the 2 level and with nine trumps you may go to the 3 level.
|
|
|
|
| Board 14, Oct 22nd 2018: Bidding after 1D Overcall" |
Show Detail |
With two suits and 20 to 21 points it is usually best to open at the one level. If partner cannot respond there is unlikely to be game on. After North’s overcall of 1D a double from East will show two four card majors. That is the case only after a 1D overcall. An immediate bid of 1H or 1S may only show four. With four card support South jumps to 3D.
A bid of 4D is the best West can do at this stage showing a strong hand and first round control of diamonds implicitly showing a fit for one of partner’s majors. East co-operating with partner cue bids his spade control showing a good hand and maximum for his pass.
4NT from West is Roman key card in spades – he is in control of the auction and later in the bidding he will bid hearts at appropriate level. East will show two aces – clearly the spade Ace and King. 5NT guarantees all the key cards and asks for Kings. East will show one King. As diamonds have been bid and supported an optimistic West will hope partners King will be in clubs rather than diamonds. As NS have bid and raised diamonds with few points it is a reasonable deduction that their points are in that suit.
Fortune favours the brave and 7 H rolls home. It was bid once on Monday night.
Six pairs are to be commended for bidding a small slam
|
|
|
|
| Board 16, Oct 15th 2018: Silence a losing option |
Show Detail |
East opens 1 Heart and South intervenes with a 2 Spade bid showing 6 to 9 high card points and six spades. West’s double is take out showing the other two suits. North bids 4S – bidding to the level of the fit.
West must take some action. North couldn’t open and South’s bid is not showing a good hand. From West’s perspective, he knows from the bidding that his partner has just one spade. He also knows that he most likely has at least three cards in both minors. Based on this knowledge West bids 4NT bid which asks his partner to bid the better minor. As West had passed initially, East is unlikely to get excited and bids his better minor. Five of either minor is a comfortable make.
Pass by West over North’s bid of 4S would have been the losing option.
|
|
|
|
| Board 17, Oct 15th 2018: Show where your Values are en route to Slam |
Show Detail |
North opens 2NT and south bids 3C asking to bid suits upwards, North replies 3H. South now bids 4D which agrees hearts and shows a good diamond suit. North with diamond King and maximum points inquires for aces. South shows one Ace. North’s bid of 5D asks about trump queen. If South was without that card he would simply bid 5H. Here he bids 6C showing second round control of clubs in addition to the trump queen. North with Club Ace and two top cards in spades confidently bids 7H.
7H will make provided the trump suit does not break 4/1. A pessimist might never bid a grand slam if he was always worried about the trump suit breaking badly.
On Monday night no pair bid a grand slam and only one pair bid a small slam. Six North South pairs got as far as 3NT. It is true that South has only eight high card points but once the heart fit is discovered the potential of South’s hand improves enormously. Some eight high card points are more valuable than others.
If NS are simply playing Stayman the failure to use it in the above hand is a serious error.
Is it any wonder that the great Sam Stayman died of a broken heart in 1893 after the butchery of his wonderful convention?
|
|
|
|
| Board 12, Oct 8th 2018: Were you squeezed and could you avoid it" |
Show Detail |
The 1NT rebid is 15-17. 2D is a check back. 2S shows three spades and lower range for 1NT rebid. South with good club support makes a further game try and North declines the invitation.
West leads the D 10 and continues diamonds. EW score the first three tricks. East switches to a heart. West wins and continues with a trump (heart is no better). South draws trumps and makes the key play of cashing heart King and ruffing a heart. East at this stage has shown – 5D, 3S and 3H and this places the long clubs with West. South cashes the last trump and West is squeezed as he is unable to hold the winning heart and the club queen.
If East switches a club at trick four South can rise with the Club King and produce the same end position as outlined above.
The winning defence (and most difficult to find) is for East to overtake first diamond and switch a club. West can now win the first heart and continue diamonds. East can cash his winning diamond and another
|
|
|
|
| Board 18 Oct 8th 2018: "Were you jumping around" |
Show Detail |
This hand was played thirteen times on Monday night. On five occasions East West played in 4S and four more times 3S was the contract. It is recommended with flat hands and 8 to 10 high card points a raise to just 2 of the major is recommended. In addition on the above hand the queen jack of hearts are most likely wasted points due to North’s overcall of 2H. If it was the heart King instead of the Queen Jack the hand would play better. Jumping around is not recommended.
North started with heart Ace and observed his partner’s signal , probably indicating two cards in the suit (or maybe one). North now cashed Diamond Ace then followed with Heart King giving his partner a ruff and the defence scored five tricks.
Many partnerships play a raise of a major to the 2 level as always showing 8 to 10 high card points. With a weaker hand ( 5 to 7 points) and support for the major they go via 1 NT first (forcing).. Partner will rebid a major showing six or bid the better minor. Partner can now support the major with the weaker hand (5 to 7 points).
|
|
|
|
| Board 26 Oct 8th 2018: Watch the spot cards leading to more tricks |
Show Detail |
North starts with his singleton spade. South recognising it as a singleton wins with the Ace and returns the spade 2 – giving partner a ruff and requesting partner to switch to the lower ranking suit. West wins the diamond return. He now draws trumps ending in dummy and cashes the diamond King discarding a heart. He now plays a heart to the King and goes down one.
There is nothing to be lost if declarer ruffs a low diamond after cashing diamond King. He will see the queen fall and his diamond ten will provide a heart discard – losing just three tricks.
As declarer take your time playing a hand and watch out for those extra chances. If you do you will see your percentage score rising.
|
|
|
|
| Board 6 Oct 1st 2018 Simple is Best Count to Nine" |
Show Detail |
South was declarer and got the lead of D 6. He has eight top tricks and can establish a spade for the ninth trick. There is also a possibility of establishing the heart suit. In this scenario if West wins an early heart trick and has five diamonds and the spade Ace the contract will fail. Galway native Michael McDonagh was wont to say “When I see nine tricks I take them”. At trick two South led a spade towards the King Queen and when it scored he returned to hand with a club and played another spade. He now has ten tricks as it looks that the spade Ace is with West. West has to find two discards on the clubs. He should keep his hearts as he knows from the bidding there are five hearts with South.
|
|
|
|
| Board 18 Oct 1st 2018 Figure out best Defence |
Show Detail |
2NT is either both minors (weak or strong) or a transfer to diamonds showing a six card suit. South bids his better minor. North will pass – not having enough values for game in this instance. If he had a better hand he would make a forward move.
West leads the spade King (guaranteeing the Queen). East sees a singleton spade in dummy and knows there is only one spade trick for the defence. He should consider where else can the defence score tricks. There is a diamond suit in dummy that he knows can be established for discards. Best defence is to overtake spade King with the Ace and switch to the heart queen. Now the defence will score three tricks. If not the diamond suit can be established early by ruffing with trump queen (for safely) so that two hearts can be discarded after drawing trumps ending in dummy.
|
|
|
|
| Board 22 1st Oct 2018 An injudicious Double and the Power of Distribution |
Show Detail |
Opposite a partner who has passed West at unfavourable vulnerability has minimal values for a 2H overcall. North is going to game so he uses a splinter bid of 4H (showing a singleton or void) on route and guaranteeing four card trump support. East (unwisely) doubles and South passes which gives North an opportunity to clarify whether his splinter is a singleton or void. The redouble shows the void. South now bids 5D indicating a source of tricks in that suit and North subsided in 6S. Even though NS have only nineteen points (including a wasted club Queen )as long as East has spade Queen the slam is unbeatable. It shows the value of the power of distribution. If East passes the splinter bid South is likely to bid just 4S and there will be no story.
|
|
|
|
| Board 2, 24th Sept 2018- Did you double finesse ? |
Show Detail |
The 3D bid gives simple preference to diamonds over clubs and does not show a good hand. 3H from South was a forward move. North has two good features in his minimum hand – 4 card trump support and the Club Ace.
At our table West made some inquiries after the bidding finished as to the nature of the 3H bid but choose the lead of the diamond 10! This lead did not trouble declarer. After two rounds of trumps ending in hand declarer reasoned that the double finesse in clubs offered the best chances. Aside from the King Jack he had all the other spots. That was the winning play. After a heart lead 5D depends on guessing the clubs. The best percentage play is the double finesse. 5H or 5S is a good save for East West but not easily found.
|
|
|
|
| Board 9, 24th Sept 2018- Have you Lebensohl (in this situation) in your armoury? |
Show Detail |
2S was a Benjamin 2. North’s bid of 2NT was artificial showing less than nine points. It commanded partner to bid 3C. North now bid 3H. If North had clubs he would pass the 3 Club bid. If his suit was diamonds he would bid 3D. South would then pass. After 3H South is happy to pass knowing his partner has less than nine points.
North can make nine tricks on any lead. If East chooses the singleton club, North has time to drawn two rounds of trumps and subsequently discard a spade loser on the winning club. After the spade lead declarer can draw two rounds of trumps, cash club Ace and exit on a spade endplaying East.
|
|
|
|
| Board 13, May 22nd 2018: Did you use your entry wisely ? |
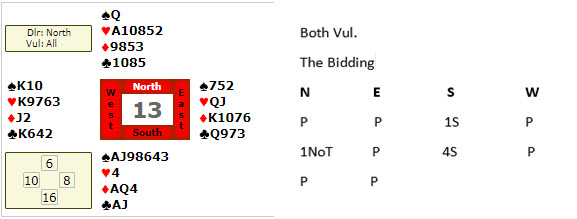 |
West found the best lead of a low heart. Declarer wins in dummy and will not be there again. What should he play? He has a club loser, a likely trump loser and some possible losers in diamonds. The temptation to lead a spade should be resisted. There is only one possible spade holding to avoid a spade loser - if East has precisely King 10. That is against the odds. Rather than playing diamonds put of his hand at a later stage declarer should try the diamond finesse at trick two. It succeeds and his only losers will be a trump, a club and a diamond.
Declarer should put on his thinking cap before playing at trick one and plan out the play. That type of thinking is way more important than “I discard what I don’t want” and many other platitudes. Your thinking cap is is your best tool at the bridge table.
|
|
|
|
| Board 20, May 22nd 2018: The Grand National in Full Swing |
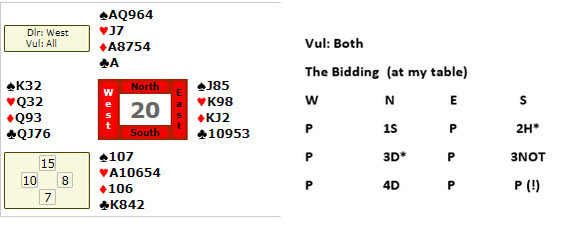 |
All of you will have enjoyed your trip around the room into the unknown on Monday night. Suit preference discards are very popular and a propensity “to show your suit “ on nearly every hand was widespread. The above gem happened at my table.
Points to note
- To respond at the two level in a new suit at least 10 points are recommended
- If partner bids a new suit at the three level after your two-level response that will show a stronger hand than a simple repeat of the opening suit.
- If partner bids two suits responder with equal length in those suits gives preference to the first suit. In the above, that will mean retreating to spades rather than passing diamonds.
What should happen
W N E P
P 1S P 1NOT
P 2D P 2S
P P P
|
|
|
|
| Board 4, May 14th 2018: Did you bid and play properly ? |
 |
The 2H rebid by North shows 12 to 16 points. It is correct with a flat 15-16 points to rebid a simple 2 H. South recognises that North may have up to 15-16 points and judges to invite game with a bid of 3H. The possible Club fit is an added bonus.
Now that you have reached game can you do the business. After the lead of the spade King, South can win dummy and return to hand with the Diamond Ace. The correct initial play in the heart suit is low to the Jack. After that scores, South can play diamond King and return to hand via a diamond ruff noting that East’s diamonds are 7 J Q. From this play it looks like West has 4 spades and five diamonds. His heart holding is likely to be King 3. A low heart now to the Ace will confirm the heart situation. South will have just 3 losers – a club and two spades.
It is frequently important to find out distribution in the other suits before determining on a line of play in a key suit. In the above hand it would have been an error to lead the heart queen at any stage.
Good bidding and good declarer technique are required to make ten tricks in the above hand.
|
|
|
|
| Board 22, May 14th 2018: Did you Pre-Empt or open 1S ? |
 |
South has only 9 points but he is too strong to open with a simple pre-empt. 7 4 distribution is good and an outside Ace is an added bonus. Also the rule of 20 is worth noting. Add your high card points to your two longest suits and if it comes to 20 you should open. 9 high card points and eleven cards in your two longest suits justifies a one level opening. The initial rebid of 2S may only indicate a five card suit (playing weak no trump). North with good cover in all suits jumps to 3NoT. South with a 7 card suit bids 4S by far the safest contract.
Eleven easy tricks are available. Note with 6 4 or 7 4 distribution your hand has good playing strength. An opening bid of 3S by South will frequently be passed By North with the particular holding shown above.
|
|
|
|
| Board 17, May 7th 2018 |
Show Detail |
The effectiveness of a weak no trump opening is clear in the above hand. The weak no trump has a great pre-emptive value and frequently makes life difficult for opponents. East with 19 high card points and 6 5 distribution starts off with a double. South has a choice of red suits to run to. Whichever one he chooses West will double for penalties knowing his partner has at least fifteen points. East now does best to jump to 4C (forcing) showing a strong hand with a good club suit. West will raise to 5 Clubs and now East can take his chances by raising to 6C.
East can win the opening red suit lead. He knows North has all missing points. He can play two top spades and ruff one. Returning to hand with a diamond ruff or a heart East can ruff a spade and now take the marked club finesse to score all thirteen tricks.
No East-West pair bid the Club slam on Monday night. Who said “I don’t like the weak no trump – I am afraid of being doubled!”
|
|
|
|
| Board 23, May 7th 2018: The Ghestem Convention |
Show Detail |
The Ghestem convention is a useful tool and with one bid can immediately show two five card suits. All that is needed is to remember three principles which show the two five card suits:
a) A Cue bid shows the extremes – the 2 suits furthest from each other
b) A bid of 2 NoT shows the next two suits
c) A jump in the minors shows the exclusives (the 2 suits not mentioned)
E.G. 1S 2S* 2S= Clubs and hearts
1S 2NoT* 2NoT shows the minors
1H 3C* 3C = diamonds and spades. – the exclusive suits.
In the above hand the bid of 3C is Ghestem showing the two 2 suits not mentioned hearts and spades and will always be at least five five.
South with 4 spades and an outside Ace is worth a bid of 4S. In the play South will usually make ten tricks. A low club towards dummy is a winning play and South will be able to ruff hearts in his own hand.
|
|
|
|
| Board 5, April 30th 2018: An Unassuming Cue Bid |
Show Detail |
East does best to overcall a simple 1S on the first round of bidding. He is not strong enough to double first and bid 2S on next round of bidding. If partner cannot bid over 1S there is unlikely a game on for East West.
After the 1S overcall by East the spotlight now turns on West. He has an opening bid. His best action is an unassuming cue bid to find out about the strength of partner’s overcall. The unassuming cue bid guarantees a good hand, support for the suit overcalled (ideally at least 3 – in this instance King Jack is good support) and asks about the strength of the overcall. East has a good suit and a good second suit so he is fully justified in a bid of 4S.
In the play ten or eleven tricks are available depending on the play of the heart suit. North is favourite to hold heart Ace because of his opening bid. If declarer believes South has heart Jack then running heart ten and finessing the 8 on the next round will lead to eleven tricks.
An unassuming cue bid = bidding opponents suit to inquire about strength of overcall. If the person who overcalled is minimum then he just repeats his suit at the lowest possible level. With a good overcall he bids game in the suit like the above.
|
|
|
|
| Board 15, April 30th 2018: Plan your play |
Show Detail |
2Clubs is check back – East wants to create a forcing situation. East is too strong for a rebid of 4S after partner showed 15 – 17 points. Missing an Ace East settles for a small slam.
In the play, East recognises if Club Ace is with South twelve tricks are easy as two diamonds can be discarded on the King Queen of clubs. Unfortunately for East that is not the case and a diamond finesse will be required.
After a possible heart lead, East should play a club at trick two. He can win the heart continuation, ruff a heart in dummy and then draw the outstanding trumps. A successful diamond finesse will be followed by a diamond discard on Club Queen and a slam will be successfully negotiated.
In the bidding with such a solid spade suit, East is worth a forward move. Needing (at most) only one finesse is good odds for bidding a small slam.
|
|
|
|
| Board 3, 23rd April 2018: A Grand Slam -bid and made |
Show Detail |
North South are playing the 2 over 1 bidding system. A response of a new suit at the two level is forcing to game. The bid of 2 NoT is forcing and asks South to tell more about his hand. The bid of 3S shows six.
4NoT now is Roman Key Card Blackwood. The bid of 5NoT guarantees all the key cards and asks for Kings. If North had a definite source of tricks he would bid 7 Spades. The bid of 6D shows diamond King. If North had no king he would simply sign off in 6S. South felt 7S was a good shot.
Traditionally a trump lead is favoured against a grand slam. If a trump is led here declarer will have to fall back on heart finesse to make the grand slam. Without a trump lead declarer has other options. He can ruff one heart in dummy and hope the queen comes down in three rounds. If it doesn’t he will have to trump another heart with the spade Ace and hope the Jack of spades is doubleton. Here all roads lead to Rome and bravery is rewarded.
|
|
|
|
| Board 20, 23rd April 2018: Did your card play justify your partner's optimism |
Show Detail |
2NoT by West shows 18 – 19. Raising to 3 NoT by East with just six points is marginal. He has poor cards in three suits. West surveys the dummy with alarm after the opening lead of spade Jack. At trick 2 West leads the Club Jack and his slim hopes appear to fade as the Club finesse loses. He wins the spade continuation and realises if he loses the lead the defence will score five tricks – a club, 3 spades and diamond Ace. His only hope is a favourable heart positions. He enters dummy with a club and plays heart to the 10 which scores. He now enters dummy again with a Club and South has to make his first discard – the diamond Jack. Another heart finesse follows and now declarer plays his last Club to dummy. South has no safe discard. If he discards a heart declarer will score four heart tricks. If he discards a spade a diamond from dummy will produce the ninth trick.
It frequently happens that defenders will be unable to guard all suits when declarer is running a long suit. A good principle is to stay with what you see in dummy.
In the above hand West made good use of the favourable lie of the casrds to bring home the contract.
|
|
|
|
| Timeo Daneos et bene ferentes (I fear the Greeks when they are bearing gifts) Board 24, April 16th |
Show Detail |
A normal auction sees South reach the spade game. From the bidding South knows his partner is short in hearts and he judges his 6 4 distribution to be worth a shot at game. All he needs from partner is some help in diamonds.
West started with diamond King. Declarer won with the Ace, drew trumps and played a diamond to the 10 in dummy. West won and hurriedly cashed his other winning diamond and that was the end of the defence. When two play the same suit one is frequently wrong. After winning his first diamond West must switch to a heart so that defence can score three tricks.
It was not for West’s benefit that South played on diamonds after drawing trumps.
|
|
|
|
| Board 2, April 16th, 2018: Count to Nine |
Show Detail |
West shows reversing values 17+ with longer clubs than spades. East has nine points with cover in diamonds and a bid of 3 NoT is appropriate.
South leads the diamond 4. East pauses for thought and counts his winners. On top, he has four spades, three hearts and one diamond. The 9th trick can come from a second diamond or maybe a club. He wins the first trick in dummy and plays a club to his jack losing to the king. South continues with queen and another diamond. North wins and returns his lowest diamond showing a club entry. East now has nine tricks. At our table, East played another club and now lost five tricks – 3 diamonds and two clubs.
The play of another club by East is dangerous and puts the contract at risk. As Michael McDonagh is wont to say: “When I see nine tricks I generally take them”. East should see the danger and run for home.
|
|
|
|
| Board 17, April 16th 2018: Bid to level of fit |
Show Detail |
South has a weak hand with five trumps and knows that West will enter the fray if he leaves the gate open. In competitive auctions, it is best to bid to the level of the fit early if possible. If North has a good hand he may well be able to make 4H. If North is weak 4H should be a good sacrifice. West has a difficult decision over 4H. There are a lot of gaps in the diamond suit and his partner has passed. He may not bid 5D so the 4 H bid has done its job.
In the above hand 5D will come home after a successful club finesse.
So bid to the level of fit early and make life difficult for opponents.
|
|
|
|
| Board 23, April 16th 2018: Get off the Bus |
Show Detail |
A number of North-South pairs got to the three level. South has bid twice and shown his hand. His hand does not justify a third bid. Many players are prone to bid their hand a few times.
Here and Hear the pass by North; The Pass should be respected.
2S will make eight tricks for East-West. Even without a double, any three level contract by North-South will go for 200 – usually a bad score in pairs.
|
|
|
|
| Board 1, April 9th 2018:Control Responses help in Slam Bidding |
Show Detail |
In recent weeks there have been many slam hands. On a number of occasions, one player was dealt between 25 and 28 high card points. A method is required to bid such hands. Many partnerships play control responses. They work as follows. An Ace counts as two controls, a King one.
After 2C* Opening – the responses are:
- 2D – 0 or 1 control
- 2H = 2 - An Ace or 2 Kings
- 2S = 3 - An Ace and a King
- 2Not. = 3 Kings
- 3C = 4 controls – 2 Aces or an Ace and two kings.
Armed with the knowledge from the response opener can advance in an appropriate fashion – bidding his suit or if balanced no trump. Responder now supports partner’s suit if possible. Or it may bid a suit of his own which will always show at least five cards in that suit. It is important to remember opener with the strong hand is always in control.
A bid of 4 NoT by opener as bidding develops asks for Queens. It cannot be looking for Aces as they are already known. The responses are:
- 5C = no Queen
- 5D = 1 Minor suit Queen
- 5H = 1 Major suit Queen
- 5S = 2 queens of same colour
- 5S= 2 Queens of the same rank
- 5NoT = 2 odd Queens.
Aide Memoire Cro: Colour,rank, odd.
In the above hand 2NoT response = 3 Kings. North knows that they have all the Aces and Kings so
4 NoT asks for Queens and 5H shows a major suit queen.
7 NoT is confidently bid and will make as long as declarer can bring home five spade tricks. After cashing Spade Ace declarer will see the 9 fall from West. Declarer now has a losing option of picking up four from the jack on his right by finessing the 8 on the second round of the suit. But declarer should decline that option as neither his hand or dummy has a singleton.
7 NoTrump rather than 7 spades is the winning Pairs Bid.
|
|
|
|
| Board 14, April 9th 2018 |
Show Detail |
East opened a Weak 2. South has thirteen points but without four spades his hand is not suitable for a double. He has a partner who may just do the right thing. After North’s bid of 4S South comes to life with a bid of 4NoT (key Card Blackwood). 5D shows three key cards. South (knowing they have all the key cards) now bids 5H inquiring about trump queen. North with a bid of 6C shows trump queen and Club King. South can trust North’s bid of 4S showing a strong hand and bids 7S which closes the auction.
If North had just trump Queen and no outside King he would bid 5 Notrump over 5H.
The play is straightforward and anyone who bid the grand slam will score well.
|
|
|
|
| Board 1, March 26th 2018: A Splinter helps along way |
Show Detail |
North with good shape ( 5 0 4 4) is worth an opening as he has a rebid over any response from partner. After East’s take out double South uses a splinter bid of 4D. That shows a singleton or void in diamonds, agrees on spades and shows slam interest. South has a powerful hand with control of all suits.
North with a minimum opening and the diamond queen, a wasted value signs off in 4s. South with an exceptionally strong hand makes another try with a cue bid of 5C showing the ace. North cooperates with a bid of 5H showing a control in hearts either the Ace/King or a singleton. South needs no further encouragement and bids 6S.
In the play North sets about establishing the heart suit and taking the successful club finesse en route to thirteen tricks.
A Splinter shows a singleton or void in the suit and shows slam interest. To use a splinter bid you need four trumps.
If opener has minimum hand and values (other than the Ace) in the suit splintered then he signs off in game.
To make another forward move responder needs an exceptionally strong hand – as in above hand.
|
|
|
|
| Board 16, March 26th 2018: CUE Bids help along the way |
Show Detail |
The 3H bid shows a strong hand and is much stronger than a 4H bid. North cooperates with a bid of 3S showing a spade control – either an Ace, King singleton or void. 4 NoT is Roman Keycard Blackwood.
Remember the responses:
1430
5C = 1 or 4
5D = 0 or 3
5H = 2 no trump Queen
5S = 2 with trump queen.
South knows that an Ace is missing and settles in six hearts.
There is nothing to the play and another slam is safely negotiated.
There were eight slams on 22 boards on Monday night. If you had a 75% success rate you did well.
|
|
|
|
| Board 10, March 19th 2018: Jumping around not recommended |
Show Detail |
On Monday night eight out of nine pairs were overboard in 4H. On flat 15 – 16 point hands jumping around is not recommended. It is true on some occasions the cards will lie favourably and an unlikely game might come home.
Here after a response of 1H from partner a simple raise to 2H is sufficient.
In the play, if South is on lead the safe lead of diamond Jack is recommended. The spade suit is of poor quality and there are too many missing cards in the suit for it to be a success. In addition, there is nothing from the bidding to indicate partner has good spades. The other minor can frequently be led leading to a successful outcome.
|
|
|
|
| Board 12, March 19th 2018 |
Show Detail |
West has a fine hand. His only drawback is that he is short in bully suit (spades). North makes a weak jump overcall – he will be the higher range vulnerable. South bids 4s – to the level of the fit (6S +4S = 10).
The spotlight now turns on West. A double shows a strong hand – short in spades and tolerance for three suits. East is weak but has a six card club suit and secondary support for diamonds. He bids 5C. He takes out the double as requested to do by partner. The hand fits perfectly and twelve tricks coast home.
Partner opens the bidding and opponents bid to game a double by partner is take out showing a strong hand. It is generally right to obey partner’s instructions and take out the double into your suit.
If partner bid 4No Trump after opponents 4S bid that should show both minors – either 6 4 or 5 5. Here partner’s double puts the other three suits in the picture.
|
|
|
|
| Board 4, March 12th 2018 |
Show Detail |
East’s rebid shows 18 19 high card points. West has 6 points but may choose to pass. South will lead a low spade. East considers his options. He has 2 spades, 3 Clubs on top. If Clubs break 3 3 he will make an extra trick in that suit. A successful diamond finesse will bring his tricks up to eight. For his 9th trick he can use his spade entry to play towards heart King. A more elegant line is to end play South. He wins the spade lead in hand and enters dummy via the Club queen. A successful diamond finesse follows. His lucky day continues with a favourable club break. Now he enters dummy via a spade and he is up to eight tricks. He now exits on a spade and he will later score his 9th trick with the heart king. Watch out for the extra chance – an endplay can frequently help declarer.
|
|
|
|
| Board 21, March 12th 2018 |
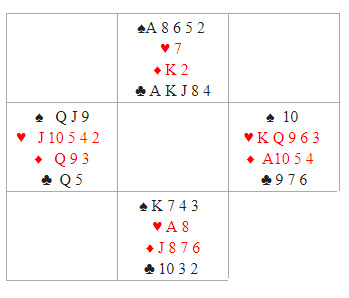 |
Dealer N
Vul NS
The Bidding
| N |
E |
S |
W |
| 1S |
2H |
2S |
3H |
| 4S* |
P |
P |
P |
Once a fit is established North’s second five card suit is a great asset and he bids game. The heart King is led and declarer wins with the Ace in dummy and makes a key play of ruffing a heart at trick two. He now cashes the two black aces and enters dummy with trump King. A successful club finesse follows and declarer cashes his winning clubs. It does not matter if West ruffs. If he doesn’t he will be thrown in on the trump queen. As East has bid he is favourite to have the diamond Ace so when West switches to a diamond and North guesses correctly, lets it run to dummy and makes eleven tricks. Note the importance of ruffing the heart at trick two removing the possibility of an exit card for West. If declarer had to play diamonds himself he will lose two tricks in the suit.
|
|
|
|
| Board 2, March 5th 2018: Jump in a Major at 2 level shows 6 card suit (minimum) and weak hand. |
Show Detail |
South has 20 points and with strong distributional hands, a one level opening is recommended. It is easier to bring other suits into the bidding at a later stage. North has a weak hand but he has six hearts. A jump to two of the major shows a weak hand and a six card suit. Yes, it is true that North is exceptionally weak on this occasion. Passing 1 Club will not be a success and a bid of 1H is a misrepresentation of the hand. A subsequent bid of 2H would be constructive showing 6 hearts and 9 to 11 points. North is too weak for this. Fortune favours the brave. South has a wonderful hand but he may have a club loser. He is content with a bid of 6H as he has control of all suits.
In the play, North gets his side suit (Clubs) going early. With the trumps 2 2 thirteen tricks are available.
Note the principle – a jump to 2 of a major after partner opens shows a weak hand and a six card suit. With a stronger hand and a six card suit, it is correct to bid the major at the one level first. Then on the next round of bidding a repeat of the major will be constructive showing six cards in the suit and 9 to 11 points.
|
|
|
|
| Board 9, March 5th 2018 |
Show Detail |
Opposite a passed partner West’s vulnerable overcall at the 2 level is risky. East with some values and three card support raises to 3d. Now the spotlight turns on South. He has a good hand, a solid heart suit and tolerance for three suits. He makes a take out double. When a suit is bid and supported at a low level a double is for take out. North does as requested and bids his six card club suit at the four level. With solid hearts North is now tempted to bid 4H. He should reflect back on North’s pass over the 2D overcall. That means North is weak and has minimal values. Pass wins the day and North with careful handling of the trump suit will come to ten tricks.
|
|
|
|
| Board 7, Feb 26th 2018: Sylvias Chinese finesse brings home the bacon |
Show Detail |
Sylvia was a renowned Bridge player whose extraordinary feats were the stuff of legend. She made a guest appearance in the RTC Club on Monday night and as West on Bd 7 she opened 2 NoT showing 20 to 22 points and a balanced hand. When her partner transferred to spades Sylvia showed a good fit with a jump to 4 spades. The bidding moved on from there and 5 Clubs showed four key cards. Sylvia’s partner had great confidence in her partner’s ability and confidently bid 7S. She knew that Sylvia’s renowned card play would make up for any lack of high card points.
North led the Club 10 and Sylvia won in dummy with the club King. Trumps were drawn in two rounds and Sylvia now turned her attention to the heart suit. She had heard about the Chinese finesse (one that cannot win if opponents do the right thing) and saw an opportunity here to try it out. She led the heart Queen and North covered with the King. Undaunted Sylvia won with the Ace. She now cashed her diamonds and all her trumps leading to the following position with three cards to play.

East led the trump Jack. South was a little confused but was unable to do anything. If he threw the club dummy’s clubs were good. So he parted with the heart Jack. Sylvia now produced the heart ten and once more her exquisite card play had won the day. Her opponents could only marvel at her skill.
|
|
|
|
| Board 15, 26th Feb 2018: Finding the right contract |
Show Detail |
With a void opposite a weak no trump opening it is frequently correct to explore the possibility of a suit contract. North inquires with Stayman and South denies a major. North is still unsure as to the best contract and he bids 3D which shows at least five diamonds and at least one four card major. South has no stop in spades so he bids 3H which shows some values in that suit. North now bids 3S showing values in spades. South with a good Club holding now bids 3 NoT. If North had no spade stopper the contract could be played in diamonds (at game level)
West will lead the Club Jack. East will rise with the King. Declarer will win and successfully finesse a diamond. A heart from dummy now and West will win with the heart jack. If West switches now to a spade declarer does best to let it run to his ten as West is unlikely to have led from the King. Declarer will end up with ten or eleven tricks.
In the bidding do not be afraid to explore a game contract in a minor if the hand is unsuitable for a no trump contract.
|
|
|
|
| Board 1, 19th Feb,2018 |
Show Detail |
East holds a powerful playing hand and West with an Ace and a five card suit did not wish to be silenced. 4 NoT was Ace asking and further interference by South turned the spotlight on West. In such situations after interference over the 4 NoT bid many players use DOPI
Double = No Ace
Pass = 1 Ace
Next Suit = 2 Aces.
In the above hand West would pass showing one Ace and after hearing the good news East advances to 6 hearts. If you bid them up you must be able to play them too. After the probable Club lead East surveys prospects. He has a definite diamond loser and on first sight the contract appears to hinge on spade finesse. However if the trumps are not 3 nil there is a better line. Declarer ruffs a club in hand at trick two and cashes two top trumps. Ace and Jack of diamonds follow and South has no winning option. If he wins diamond King he must give declarer a free spade finesse or a ruff and discard. If he jettisons diamond King on Ace dummy’s diamonds are good enough for a trick with the heart 8 as an entry. If diamonds are 4 2 with North holding the honours the spade finesse is still available.
On Monday night only two of seventeen players made twelve tricks – room for improvement
|
|
|
|
| Board 19, 19th Feb,2018 |
Show Detail |
South had a number of options on second round of bidding. He or she could have splintered but decided to show where his values were. North was an optimist and advanced to a slam despite having a singleton in partner’s suit. The play is what matters.
East is likely to lead a diamond. North must count their losers. Having two losing diamonds, a losing spade and an unavoidable trump loser. They need to ruff two diamonds and a spade in dummy and discard a losing diamond on spade honour.
Fortunately his or her trump spots are good enough and he/she can ruff a club on his way back to hand. He/she will score 3 ruffs in dummy, 4 trumps in his hand, 3 top spades and the diamond Ace.
In the unlikely event of East leading a trump West will win and return a trump. Now declarer has to guess the location of the Club King to make twelve tricks.
As declarer view the hand from your perspective. Count your losers and see is there anything you can do to avoid them.
The great John Whiriskey and Joe Rabbitte (contemporaries on the hurling field) were one of three pairs to bring home the slam on Monday night.
|
|
|
|
| Board 4, Feb 12th 2018 |
Show Detail |
As West has denied a major indicating good minor suit holdings North decided to attack and lead his best suit so he started with spade 5. West has seven tricks on top but there is a danger if he loses the lead he will go down one. On the surface, it might appear that a club finesse offers the best prospect of making the contract. On reflection the diamond spot cards are good and it costs nothing to test the diamonds first after winning the second trick with spade ace. The diamond 10 is led and is covered per force by South. Declarer wins in dummy and returns to hand via the heart ace. Now another diamond from East sees the second honour (per force) played by South. Declarer now has ten tricks – 5 diamonds, 3 hearts, 1 spade and one club.
Looking at the hand overall it costs nothing to test the diamonds first before embarking on club finesse. Here it is the winning line. So the moral is tens and nines are important cards, particularly when holding honour cards in that suit. The club finesse is an unnecessary risk as ten tricks will represent a good result for declarer.
|
|
|
|
| Board 25, Feb 12th 2018 |
Show Detail |
East has only seven points but with a good six card suit, there is great potential in the hand. A good suit often makes up for the loss of points. West wins the first club – there is little point in ducking as he is in difficulty in the heart suit as well as clubs. He follows with the diamond ten and rises with the Ace and sees South play the diamond Queen. Declarer should take that to be a true card. He should return to hand with a spade (spurning the finesse) and now lead the diamond 9 running it if North does not cover. Declarer now has 6 diamonds, 1 club, 1 heart and 2 spades – bringing home the contract and justifying the earlier optimistic bidding. If East played the queen first – holding doubleton Queen Jack – commend him on his deviousness. Nonetheless, it is best practice to accept the diamond queen when it is played as a true card.
You can see from the diamond suit in both hands there are variations in the plays. But if you read the situation correctly you will land both contracts for good results.
|
|
|
|
| Board 17, Feb 5th 2018 |
Show Detail |
As Feargal O Boyle says in his commentary 6 Clubs ( or better still 6 NoT) is the top spot. East’s bid of 2H is a modern day intervention that often propels opponents into a contract they might never reach. On this hand, it shows declarer how to play the hand.
West had been there before and took no notice of East’s 2 H overall and started by leading Diamond Queen. Declarer notes his diamond 9 and his heart 8 and realises they will come in useful in the later play as neither defender will be able to hold four spades (and a winning diamond or h in the end game).
After knocking out club Ace West switches to heart Queen. Declarer cashes his winners and at trick 10 will have 4 spades in dummy and King 3 of spades in hand pus heart 8 and diamond 9. The defender who has 4 spades (East) is squeezed and declarer makes twelve tricks – 3 spades and heart 8 or 4 spades. East’s intervention in the bidding provided the sign posts for the unfortunate ending from his point of view.
An over call should be constructive – telling a partner what to lead or suggesting a contract in the suit bid. Unnecessary noise is counter productive.
|
|
|
|
| Board 22, Feb 5th 2018; Watch out for Clues |
Show Detail |
A spirited auction with all players involved in the bidding saw East become declarer at the five level. If South is inspired to lead a Club the defence have two certain tricks. After a diamond lead East had a chance to shine. As declarer Sean Glynn ruffed the diamond lead. He surmised that North was likely to be short in spades for his 5D bid. He started with the spade Ace and followed with the spade Jack – a winning play as it smothered North’s 10. If South had 4 spades to the Queen 10 declarer has two trump losers and he cannot avoid them. He now came to twelve tricks, losing just to the heart Ace.
Sometimes the bidding can guide declarer to a successful line of play. So intervening in the auction without the requisite values is not recommended – it only helps declarer in the play not to mention running into a penalty double. In the above hand North quite rightly enters the fray and was unlucky not to be doubled in 5D as it is a great save.
|
|
|
|
| Board 11, Jan 29th 2018 |
 |
South just about has an opening bid (using the rule of 19 – add your high card points to your two longest suit and if it comes to 19 you can open).
North has a good hand, an excellent club suit, a singleton heart and four trumps. He is certainly going to game and is interested in a slam.
He bids 3h. That does not show hearts (if he had hearts he can bid them at 2 level). The bids shows a singleton heart, guarantees 4 trumps and is interested in a slam. South with minimum hand and soft values in hearts simply bids 4S.
North must respect that decision and pass. A five level contract will fail. After a splinter if you have soft values in that suit (e.g. King Queen or Jack) your hand disimproves. An Ace opposite a singleton is good.
Once your partner signs off after your splinter you need an exceptional hand to make another forward move. Put away this toy early
|
|
|
|
| Board 18,Jan 29th 2018 |
 |
After South opens 2S West with 14 points including three aces should make a take-out double. Now the spotlight turns on East.
With a weak hand (0 to 7) he should bid 2 NoT. That is not a natural bid. It tells partner his point range and that he has a suit that he can compete in. West now bids 3 C which the 2 NoT bid commands him to do. If East's suit was clubs he can pass. If not he bids his suit at the three level. West with a particularly strong hand can ignore the command to bid 3C and bid his own suit showing a stronger hand. East can now use his judgement as to the best way forward.
In the above hand East will bid 3H over the double – showing 8 + points. Partner to double 2S will most likely have 4 hearts. West knowing East has values can raise to game.
The 2 NoT bid as outlined above is called Lebensohl.
Any bid at the 3 level over double will show 8 plus
An immediate overcall of 2 NoT will show 15 to 18 points.
A response of 2 NoT to take out double shows 0 to 7 points and commands partner to bid 3C. Over 3C you can pass with clubs – or simply bid your suit at the three level showing the weaker hand.
|
|
|
|
| Board 2,Jan 22nd 2018: A Forcing Defence Wins the Day |
Many North players were congratulating themselves for responding 2H. It appeared to work on this occasion as South went on to 4H but there will be many occasions when South will think North has a proper 2H response and may misjudge the bidding.
On Monday night there were many hands decided by the opening lead. If West decides to lead his best suit and attack then 4H will fail. West starts off with diamond Ace and continues with another diamond after East encourages. South will win, play two top spades and ruff a spade. A club finesse will follow and now another diamond from West will sink the contract. South can do no better than draw trumps and will run out of steam. West will win the third club and as South is out of trumps East/West will score another diamond and the setting trick.
In defence watch out for the opportunity to play a forcing game and you will be surprised to see a rich dividend.
|
|
|
|
| Board 22,Jan 22nd 2018: You got a second chance-did you take it? |
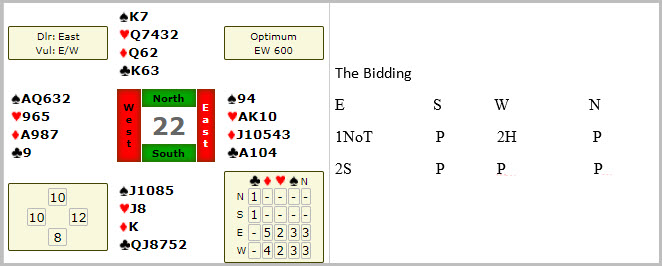
It is difficult to reach 5D (a making contract) after a weak no trump opening. Against 2S South leads Club Queen. Declarer wins and finesses a spade. North wins and instead of switching to a heart forces the dummy with Club King. Declarer now plays Ace and another diamond. North wins and continues a club (South discarding a heart). South ruffs the next diamond and the play of the spade Jack now sees East go down two.
The forcing defence is an effective weapon. Often forcing the dummy or declarer is a better option than opening a new suit.
|
|
|
|
| Board 20,Jan 15th 2018: Were you awake did you count declarers points |
Show Detail |
The 3H bid is invitational showing 6 hearts. North with a top heavy 14 points bids 4H. At some tables East led a club. West inserted the King (the 9 would be better). Declarer wins with the Ace and plays Ace and Queen of diamonds covered by the king and ruffed in dummy. A heart to the King was followed by the heart finesse – West winning.
West should take stock of what has happened. If he was awake he will have counted declarer’s points. He will know he has Club Ace, Diamond Ace, Queen, Jack and heart king – that comes to 14. He will know his partner has spade Ace. He plays Spade King and follows with spade to partner’s Ace. He will now obtain a spade ruff for the setting trick.
After a spade lead and continuation West will obtain a ruff. Declarer now needs to drop the trump queen to make his contract. The diamonds can be set up for two club discards scoring ten tricks.
When defending try and get a picture of declarer's hand. The bidding will assist in this and watch your partner's spot cards. That is the winning formula for good defence - co-operate with your partner.
|
|
|
|
| Board 22,Jan 15th 2018: Cash your side suit winners before engaging in cross ruff |
Show Detail |
West’s double of 2S is take out showing a good hand. East takes it out and West bids one for the road which is marginal as East has promised nothing. However it is the declarer play that matters. East does best to stay away from playing trumps and tries to engineer some spade ruffs in dummy. He ruffs the second spade in dummy. It is good technique to cast your side suit winners first. Start by playing Ace and King of diamonds – if you play clubs first North will get a chance to jettison a diamond. Now Ace King Queen of clubs ruffer by North over ruffed by East.
A spade ruff follows and then a club ruff. Another spade ruff will see declarer come to 9 tricks – 3 spade ruffs in dummy, two club ruffs in hand, two top diamonds, two top clubs. The King and Ace of hearts will see declarer score eleven tricks.
The moral is use your trumps wisely. In a cross ruff correct technique is to cash your side suit winners first prior to any ruffing. In the above hand there is no advantage to playing trumps early and if you may go down in 4 H.
|
|
|
|
| Board 1,Jan 8th 2018:When Partner makes a take out X - take it out |
Show Detail |
East opens a weak No Trump. South considers his options. His partner has passed. If he bids a simple 2 spades West may well be able to enter the bidding easily with a forcing bid or with a hand in which he can compete in a suit. South does best to bid 3 spades and West will have to enter the fray at a higher level and may well go wrong.
What is best for West to do now? In these situations, it is best to play the double as take out showing values and not penalty. East is asked to take it out. Holding Q x x of spades under no circumstances should he pass. Rather he should obey West’s instructions and take the double out with a bid of 4 Clubs. West will raise to 5. A slam is unlikely to be bid but at least you are in game and not playing 3 NoT or defending 3 S doubled.
When interfering bid as high as possible with your first bid and leave the rest to partner. When partner asks you to take out the double follow his instructions and take it out (unless you have good trumps).
|
|
|
|
| Board 16, Jan 8th 2018: A Lebensohl bid and a bid showing values |
Show Detail |
Opposite a passed partner East (Vul.) is delving with disaster by opening 2H (apart altogether from the fact that he has 4 cards in the other major).
When North bids 3C he is showing 8 plus points - in this instance 8 to 11 as he has originally passed. If he had a weaker hand with clubs he would bid 2 NoT which would show 0 to 7. Partner over 2 NoT would bid 3 Clubs and North would pass with Clubs or bid 3D with diamonds showing the weaker hand. (South of course with a strong hand can bid again)
Here South knows North has some values and 4 NoT is Roman Key Card Blackwood with Clubs the agreed suit. South discovers North has an Ace and wonders about bidding the Grand Slam. He can’t go wrong if he advances to 7.
If East passes it will be difficult for North South to find their club fit and they may reside in 3 NoT. Bidding without the requisite values can frequently help the opponents in both the bidding and the play.
|
|
|
|
| Board 7, December 4th, 2017 |
Show Detail |
The Bidding
S W N E
1NoT P 3NoT P
P P
West led the heart 6 (2nd highest from a poor suit). East won with the Jack and returned the 2 (the first mistake) South won in dummy and being a lover of the finesse played a spade to the Queen losing to the King. A heart was returned. East won two more hearts and that was the end of the defence. East should have realised that partner might have had five hearts and returned the heart King (or Queen ) at trick 2.( if partner has only 4 hearts it cannot cost) Now if declarer finesses a spade the defence have five tricks.
South on winning heart Ace should pause and count his tricks. On top he has 1H, 1S, 2D and 1C. He cannot make nine tricks unless he brings home the club suit. At trick 2 he leads diamond to the Ace and places Club Queen on the table. Declarer now has nine tricks. On the run of the clubs declarer should realise that taking a spade finesse is a losing option.
|
|
|
|
| Board 9, December 4th, 2017 "Get Off the Bus Early" |
Show Detail |
Dealer North, Vul East West
The Bidding
What should happen
N E S W
1D P 1S P
2C P 2D P
P P
What happened at one table
N E S W
1D P 1S P
2C P 2H* P
2NoT P 3H* P
3NoT P P P
South with two five card suits is just about worth a one level response. North rebids 2C. South with minimum values bids 2D (getting off the bus early.)
A bid of 2H at this juncture would show a much stronger hand – in fact it is bidding the 4th suit at the two level which in any normal bridge manual is forcing to game. So with a mis fit and minimum values get off the bus early. The bid of 2H by South was of the lu lu variety and the subsequent bid of 3H can only be described as advanced lu lu.
Any pairs who got to play in 2D scored well. It is important to note that West with his 14 points should pass throughout. A double at the one level by West in the above hand should be take out of the two suits bid. His hand is not suitable for such a bid.
|
|
|
|
| Board 14, Nov 20th,2017: Did you play the Jack at trick one |
Show Detail |
Board 14, Love All, Dealer E
The Bidding
E S W N
2D P P 2NoT
P 3C P 3H
P 3NoT All Pass
Weak 2 bids are popular with many modern bridge players. So East sets the ball rolling with a weak 2 bid in diamonds. After 2 passes North bids 2 NoT showing 15 – 17. After a Stayman inquiry from South North becomes declarer in 3 NoT. East leads the diamond King. At our table West played low and East was convinced that declarer had Ace Jack X and so switched to a spade. North was under no pressure and playing the Clubs from the top (shunning the finesse as both his hand and dummy’s had no singleton.) East was squeezed in the end game and South ended with eleven tricks.
West should have given more thought to his play at trick one. He should realize that his partner is worried about the location of the diamond Jack. He should drop it on the King at trick one. Declarer will now walk a tight rope. He may well end up with eleven tricks but he will be under much more pressure. If he takes a Club or spade finesse his goose is cooked.
Help your partner in defence.
If East King Queen and four small diamonds he should lead the 4th highest. The lead of the King will usually show a holding like King Queen 10xx ( if the jack is missing).
|
|
|
|
| Board 23, Nov 20th,2017: You got a second chance did you play the Jack this time |
Show Detail |
Board 23 Game All Dealer S
The Bidding
S W N E
2NoT P all pass
The unfavourable vulnerability prevented West from entering the fray. West led the heart King. East was alert and knew partner was worried about the location of the heart Jack so he dropped it on the King at trick one. On this occasion declarer has eight top tricks so he runs for home. The play of the heart suit did not matter. But it is good practice to help partner in defence.
If declarer had King Queen and some small hearts he would have led the 4th highest. So the lead of the King will guarantee the Queen and 10 (if the Jack is missing).
Similarly in no trump if partner leads Club King at trick one and you have the jack play it and make life easier for defence.
Also if partner leads the Ace and you hold the queen – play it at trick one. If partner had Ace King x x x he will lead 4th highest. His holding is obviously Ace King J x (x).
So help partner and your marriage has a good chance of surviving the course
|
|
|
|
|
|