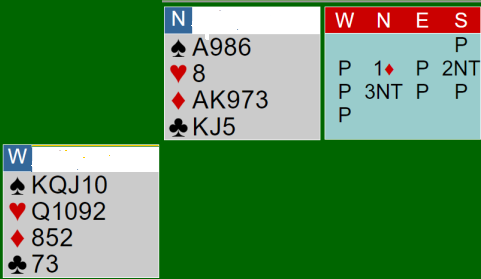
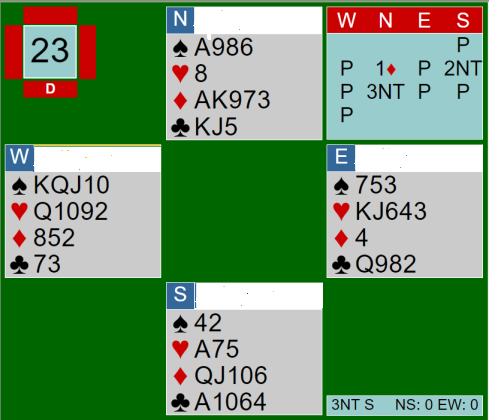
Hand of the month February 2026
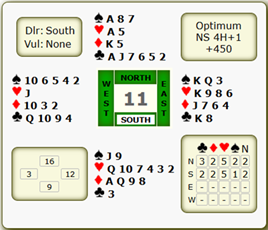
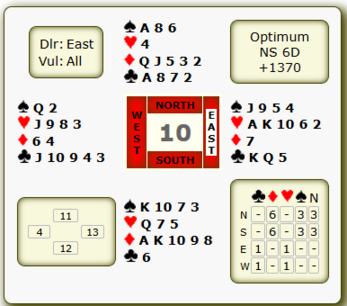
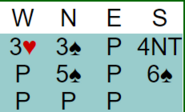
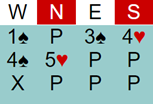
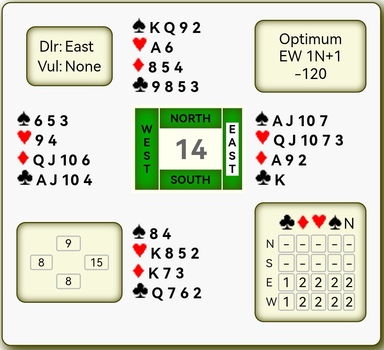
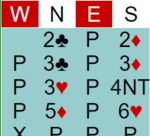
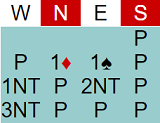
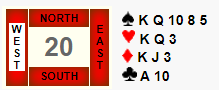
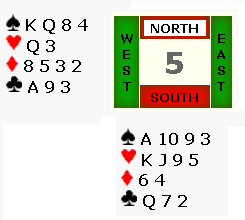
South opened with a Multi 2♦ to have north declare in a contract of 5♥ doubled, after being pushed by some aggressive spade bidding by E/W
Its easy enough to make 10 tricks so long as you ruff a diamond before drawing trumps.
After going 1 off if 5♥, South admonished his partner for pushing on to the 5 level when it was realised that, with razor-sharp defence, a reasonable penalty could have been extracted in a contract of 4♠ doubled.
When the makeables were published, it indicated that 5♥ is on with the right play.
Despite seeing all four hands, its hard to see how one goes about finding the 11th trick.
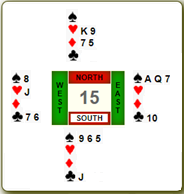
The ♠K was led
You hold up and take the ace on the second round and ruff a spade.
Next cash a top diamond followed by a club to the ace and ruff a club.
Play a diamond to the king and ruff another club, putting you in this position:
The ♣6 is led, forcing east to ruff, over-ruffed by south.
You play the ♦Q and ruff it with the ace to be in dummy at trick 12 for the coup de grâce when you lead another club making your ♥Q a trick!
Hand submitted by Peter Bircher
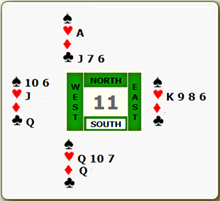
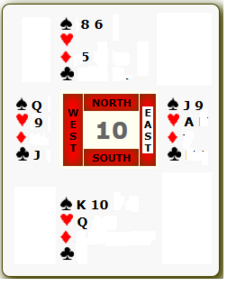
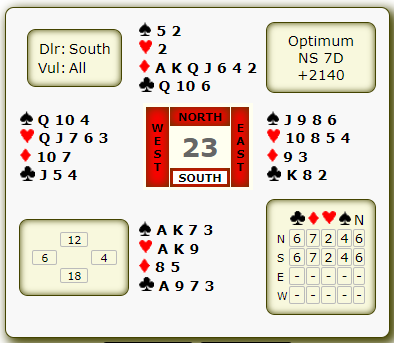
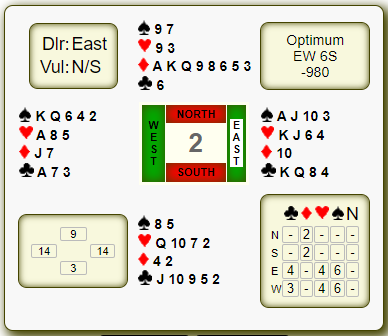
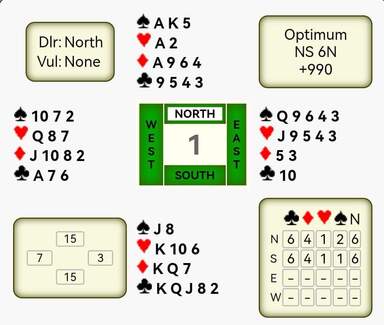
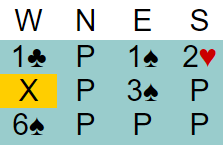
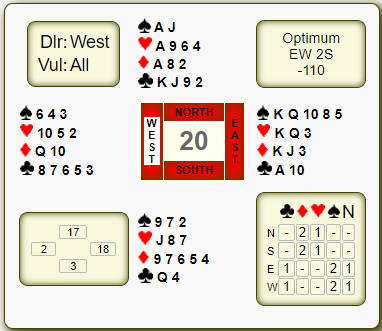
Hand of the month - May 2025
The diagramed hand indicates that the only makeable slam is in clubs, declared by west

The bidding is not relevant but could be along the lines of:
2NT 3♣
3♠ 4♣
5♣ 6♣
The way to make this one is by using a coup called Morton's Fork based on the hisorical figure, Cardinal John Morton
You draw trumps in 2 rounds and lead a heart towards dummy (east)
If north rises with the ace, it's all over for the defence, as the diamond loser eventually goes on the ♥Q
No need to try the diamond finesse
If north ducks, you play 3 rounds of spades, discarding a heart and now you throw north in with a heart
With nothing but red cards north has to lead away from the K♦ or give you a ruff and sluff
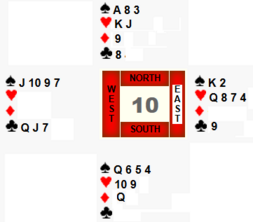
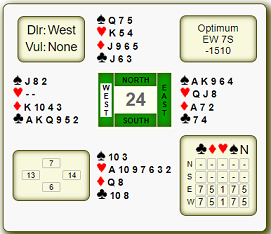
April 2025
You get to a normal 3NT contract and receive the lead of the ♣5 to the king, which you duck, taking ace on the continuation

You can count 8 tricks, so need a 9th to make your contract
Looking at all 4 hands, its hard to see where that 9th trick is coming from considering the heart Queen is off-side
You can arrange your play to squeeze east in the majors
You start by cashing 3 rounds of diamonds ending in dummy and cash a top heart. You must resist cashing a 4th round of diamonds as ♦Q may be needed at the end to access your hand
This is the position:
Now you throw west in with a club!
West must cash his clubs, else he never makes them, while east safely ditches 2 hearts, dummy throwing both small spades
West exits with a spade won in dummy with the ace
This is the position when you cash the last diamond, East has a problem protecting both the ♥Q and the ♠K

What can east do?
If he throws a heart you cash the K-J of hearts
If he throws the ♠K you make the ♠Q
March 2025
This hand had many twists and turns
You get to 3NT and receive the lead of the J♥
First thing is to count your tricks
2 spades, 1 heart, 1 diamond and 5 clubs, but you need to knock out the ♠ A to achieve that and there is the potential to lose 4 hearts along with the spade
Many declarers ran the heart around to the queen, hoping east would play the ace, giving an extra stop
After cashing the clubs, hoping hearts were breaking 4-4, they led a spade. East wasted no time, hopping up with the ace, to fire a heart through for 1 down
Other declarers decided that if hearts were 5-3 a hold-up was needed to clear east of his hearts, so ducked in both hands
West, delighted to see the ♥K now bare, banged down the ace and led a third heart to the queen, setting up the suit
When declarer played a spade he was relieved to see east win. But without a heart to get to partner, east tempted declarer with a low diamond
Declarer, was not leaving anything to chance, jumping up with the ace, cashing out 9 tricks; game made
There is a better case for jumping up with the ♥K at trick 1. If west had possessed the ♠A then the queen cannot be trapped
In the actual hand it would not have worked out as east wins the first spade killing your ♥Q, for the same result
Despite many declarers succeeding by the holdup at trick 1, the LMITB says 3NT should go down.
How is that?
Let's go back to trick 2. After the J♥ holds, west must play a small heart, allowing the king to win!
Now when east gains the lead with the ♠A he can play his remaining heart and west wins 3 more hearts to defeat the contract
How can west find this defence?
It is all about entries. West has no entries outside the heart suit so, setting up the suit, as we saw above, is futile without the means to cash them
As declarer plans the play at trick one, so should the defenders. Playing by instinct is not winning bridge
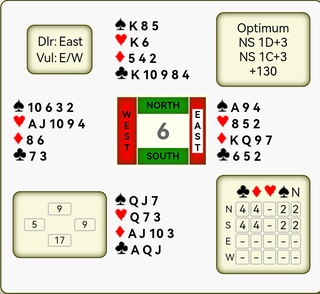
November 2024
This hand cropped up a few days ago on the Sunshine Coast site
After East had opened 1♥, you stretch somewhat, bidding to the ambitious contract of 6♦.
Taking 12 tricks looks like an impossible task
West led the ♥J, won by east with the king, who switched to a trump, won in hand with the ace
You can see 11 tricks and it looks like you may have to lose a spade late in the play
Even with all 4 hands in view, (double-dummy) its hard to see where your 12th trick is coming from
But the LMITB says 12 tricks are there against best defence
It looks like a squeeze is the only way to make this one
You have 2 cards that will pose a threat to East, the ♥Q and the ♠10
After taking the trump in hand you lead a club to the ace and ruff a club
Lead a spade to the ace and ruff another club with the king
Ruff a heart, and ruff your last club
Lead a trump to the ♦J and cash the queen and reach this position
When you play the ♦5 East is in a pickle
He can't afford to throw the ♥A, so has to throw the ♠9
As your ♥Q has done its job you can discard and now when you lead a spade to your king the jack and queen fall making your ♠10 a trick
October 2025
Here is an interesting double-dummy problem to solve
Double-dummy lets you, as a declarer, peak at the opponent's cards to make your very difficult contract
But it also allows the defenders to see each other's cards.
So always assume best defence
The hand is from Thursday's bridge at Eastern Cape on the 5th
After West opened 3❤️, North bids 3♠️ and South raises to 4♠️, a common contract
At every table East led ❤️7
Not surprisingly not one North managed to make the contract
As you can see, the LMITB tells you that 10 tricks in spades is there regardless of the defence.
The ❤️A is played by West nailing your king and you ruff the next heart
You cash 2 rounds of spades discovering the bad break
You still have to lose a diamond, so your task is not to lose more than 1 trump
You must eliminate East's minor suit cards with the loss of only 1 trick, the ace of diamonds
So you lead a club to the 9 and play a top diamond.
East takes the ace and, with nothing better to do returns a diamond, won in hand
You play a club to the jack, and cash the ace.
In dummy you cash the established diamonds forcing east, with nothing but trumps left, to ruff the 4th with ♠5 and has to lead one from ♠J7 into declarer's ♠Q8 thereby avoiding the loss of a second trump trick
This hand was played on Tuesday, 27th August at the Eastern Cape BBO site
After South had checked on key cards, establishing that only one is missing, but with the queen verified in North's hand, pushes you into slam.
With one definite diamond to lose you have to try to avoid losing a club trick
You count 5 trump tricks in hand and a heart ruff to go with your ace of hearts and the 2 diamond tricks and 2 clubs, giving you only 11 tricks.
Making it may seem to rely on East making a mistake in the defence
How do you go about making this one.
You draw trumps and lead a diamond towards dummy
If East were to jump up with the ace, it would be game over for the defence as the fourth round of diamonds will allow you to throw a losing club
You play a diamond back to hand and East wins, exiting with a heart which you ruff in hand
Based on the bidding you know east has no hearts or spades left leaving him with 2 diamonds and 3 clubs
So you play your last trump and East is in a pickle
If he throws a diamond your ♦7 become a trick
If he throws a club both the queen and jack of clubs come down together
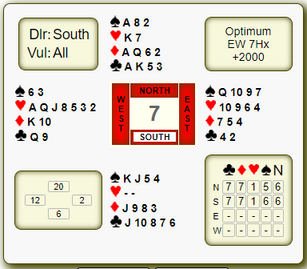
August 2024
When you bid the hell out of a hand, you better play well!
This hand cropped up at the EC (Sunshine Coast) on Thursday, 15th August
North responded 1♦ to South's opening bid of 1♣ and, when South jumped to 2NT, showing 18 or 19 HCP's, north asked and heard south had 3 aces, bidding to the diamond grand slam..
Contract: 7♦
Even when looking at all 4 hands, the way to 13 tricks is not easy to spot.
East found a safe opening lead with the nine of diamonds.
Declarer drew trumps, played A-K of hearts, discarding a club
he then cashed the A-K of spades and ruffed a spade
Then he ran the remaining diamonds
East must hold on to the ♠️J, throwing a heart and a club
When the last trump is played this is the end position:
North
♦ 6
♣ Q10
West East
♠ J
♣ J54 ♣ K8
South
♠ 7
♣ A9
When the ♦6 is played East is caught up in a squeeze in the black suits
If he throws the ♠J, south throws a club, crosses to the A♣ annd cashes the ♠7
If east bares his ♣K, declarer throws the spade and makes the last 2 tricks with the ace and queen
July 2024
Sitting South, you get to 6NT and, after east put in a cheeky heart bid, west leads the ♥6
When dummy comes down you start counting your tricks; 6 spades 2 hearts 3 diamonds and a club.
It looks straight forward after you take the opening lead in dummy with the ace and lead a small spade towards hand.
Unfortunately, East shows out and your count of tricks has dropped to 11
This is a double-dummy exercise, so looking at all hands is permissible and your task is to make 12 tricks despite the spade break. As you can see diamonds break normally, 4-2 and the club finesse is not making
Before reading on see if you spot the way to twelve tricks on best defence.
You have 10 tricks on top; 2 short of your goal
For a squeeze to work, you must get it to be 1 short of the goal
You duck a heart at trick 3. This is critical as you want to be able to play 3 rounds of hearts without letting east in to run them
On the small heart, west happily discards a club. If east returns a club, you spurn the finesse, winning with the ace
Cash the ♥K
Now West is in trouble; what can he discard?
He gets squeezed in all three suits
If he throws a diamond, you cash out 4 diamond tricks, forcing west to choose between pitching a spade or the ♣K
Whichever suit he chooses, you take all the remaining tricks
June 2024
The bidding was vigorous at most tables when this hand was played, although some pairs let East/West play quietly in 4♠, making on the nail
However, a few of the Norths decided not to let E/W have it their way and competed to 5♥ , a good save
The choice whether to bid on or double is always tricky, and in each case West made the correct choice by doubling, as 11 tricks is not possible with correct defence
Its not easy finding your way to 3 defensive tricks to pick up your 200, beating this contract, even if you see all four hands
At the tables where West was on lead, all chose the singleton diamond hoping to be able to put partner on lead with a spade and get a diamond ruff
Singleton leads are like a 2-edged sword, and handled with indifference, may come back to bite
Unfortunately, the lead set up a long diamond in dummy for a club discard, and 5 hearts was now unbeatable
Back to the opening lead. Can you spot the killer lead.
To beat this one, you have to start with the K♣, partner playing an encouraging card. Next, you have to fly up with the ace of trumps, cash Q♣ of clubs and give partner a club ruff
Did you find it?
May 2024
This remarkable hand popped up on BBO on Thursday
Although the spade slam was a potential contract, 6NT was the more common choice.
6♠ had no chance when trumps broke badly
In 6NT, many South declarers were gifted the 12th trick when West led a small spade, won in dummy, setting up the spades, without loss.
However those that received J♠ lead, had their work cut out to make 12 tricks
I cashed the A-K of spades and was not surprised to see east show out
Faced with 2 losers, I led a heart to the jack, which held, and a heart back to the queen, which also held!
What now?
I was about to cash out 11 tricks for 1 down when I decided to play for the only distribution that would offer me a glimmer of hope.
If hearts were 5-2 then there was a chance.
I then led a low spade towards dummy!
West had to take the 10, otherwise she would not make a spade
Fortunately, she was now out of hearts, and I could claim; 4 spades, 2 hearts, 3 diamonds and 3 clubs
East rued the fact that she had not taken her heart ace when she had the chance
However, if she had taken either the 1st or 2nd heart, declarer clears his hearts, west throwing a club on the 3rd
Declarer cashes the A-Q of clubs, reaching this 6 card position:
On the king of clubs west is squeezed, having to find a discard
As a spade would surrender the suit, she has to let go a diamond giving declarer 4 diamond tricks
April 2024
You are playing 2 over 1 on BBO and deal.
Neither vulnerable.
What do you open?
 ' '
When making an opening bid always consider what your rebid will be whatever partner's response is.
If you were to do the "normal" thing of opening 1♥, go though the responses that partner may make, and then consider your rebids
1♠ Easy! You can raise to 2♠
2♥ No problem
A 2♣ or 2♦ response by partner are also easy to deal with. After a 2♣ response, a rebid of 2♠ is not regarded as a reverse as you are already in a game forcing situation
But what about the possible response by partner of 1NT?
2♠ is a reverse and promises a better hand.
Rebidding hearts would promise 6 cards
Passing is out of the question, because in 2 over 1 a hand responding 1NT could have as many as 12 points
A raise to 2NT promises 18 or 19 points. or a very good 17
So, we come back to the opening bid
The solution to this hand is not to open 1♥ , but to open 1NT!
It shows your points perfectly, but with the obvious flaw - the singleton
"But I can't open 1NT with a singleton!", you cry
You can!
The rules of bridge changed in 2017 allowing one to open 1NT with a singleton so long as it is the queen, king or ace
What are the risks of a 1NT opening with a singleton club?
On this hand virtually none at all!
if partner Puppets, transfers or Staymans we are very well placed
If partner can't do any of the above then he must have a fair number of cards in the minor suits so you are likely to be able stop the clubs being run
In any event if you are playing in 1NT, how often does the opening leader lead away from the ace?
It happens quite often, and you make the king
All Easts opened 1♥. From there paths differed - some, not playing 2 over 1, were able to pass the 1NT response
Some easts reversed into 2♠, a bit of an overbid and ended up in the unmakeable contract of 3NT
March 2024
When you look at the makeable, or optimum contract, the way of making it is not immediately obvious
The man-in-the-box says you can make 12 in spades against best defence
The bidding may tip you off to find the line, but even double dummy it is not that easy
If North bid 4♦ , vulnerable, it must be on an 8 or 9 card suit. In that case the heart finesse is likely to fail
The probability of clubs breaking is also not good
But you may be able to put pressure on south for the 12th trick
You ruff the second round of diamonds, draw 2 rounds of trumps, cash the ♥K and lead the ♥J
South covers, of course, and you win with the ♥ ace, smothering the ♥9
You play 2 more rounds of trumps arriving at this 5 card ending
On the last trump, you throw the ♥ 6
But South has a problem as he can't throw out the top heart so pitches a club
This gives you a 4th club trick, making 12 in all
If south had thrown the ♥ 10 your ♥ 8 would become trick 12
February 2024
Bidding should tell you a story
If you don't listen then you may miss an opportunity to give declarer the most difficult road to travel on!
You are West, defending 3NT on the bidding shown, and lead the obvious king of spades and, after declarer holds up, you continue with the queen, ducked once again by declarer
The question is, what next? Of course, the safe play is to continue spades
Count the defencive tricks. You will always make 3 spade tricks if you woodenly contine with another spade, but you need 2 more to defeat 3NT
Look at the bidding. South failed to open and then bid 2NT showing about 10 or 11 points
More importantly, South failed to respond 1♥ .
If south had had 4 hearts he may well have responded 1♥ .
But he didn't. So we can assume he has only 3. You have 4 and dummy has 1, leaving partner with at least 5
A heart switch now may cause declarer a major headache.
Lead the ♥ Q
Is there any risk?
No, not at all. As east is marked to have 5 hearts he is guaranreed to hold at least 1 of the 3 other honours, probably 2
Declarer can hold up once or twice but must then run for home as a losing club finesse will prove disastrous
In this particular case you can't defeat 3NT but you can hinder declarer from making the10th
January 2024
Every now and again you come across a hand that is perplexing.
The field find their way to 4S and every pair takes the 11 tricks without further thought.
It's only when you later look at the optimum contract that you realise that 12 tricks are there for the taking - apparently!
There is no finesses available and ruffing the 3rd heart is futile as the trump is a trick regardless how you take it and then the defender will make the jack of trumps at the end leaving you no better off
There is no squeeze available.
Then it dawns on you. If you can stretch you trumps to 6 tricks you can make the 12th!
How is this possible?
The answer is by using a technique called a dummy reversal
For a dummy reversal to work you need:
- the trumps in dummy to be strong enough to do the drawing of trumps
- to be able to return to dummy often enough to complete the process
One thing you cannot do is draw trumps first as you only have 2 trumps in hand to ruff with
In this deal you must engineer a way to ruff 3 clubs in hand giving you your 6 trump tricks in all
Assume the Club ace is led. The defender sees dummy and switches to a trump
You lead a club to hand and ruff
You get back to dummy by drawing another round of trumps and ruff another club
You get back to dummy via one of the red suits and ruff another club
You can hop back to dummy and draw the last trump
There is no way of stopping declarer from taking 12 tricks so long as declarer gives it a thought before all trumps have been drawn
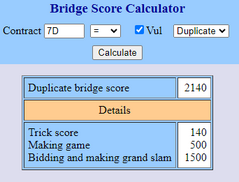
December 2023
On Monday evening, 4th December, at the Durban Duplicate online bridge club, North declared in a perfectly normal 6♥ contract which, on most days, would have been a cake-walk
Without any prior bidding from the opposition, West suddenly puts in a double of the final contreact
If trumps had been no worse than 4-1 you can knock out the ace of trumps and claim the rest
On the day the three of spades lead was taken by the Queen
Time to take stock
West doubled the final contract and this can only mean that trumps are breaking badly
If you were to play a trump at this point, correct defence, will lead to defeat
This is how it will likely proceed
West takes the ♥ A and coninues with a spade. This may not appear to be a significant problem, but the premature removal of the spade entry to dummy will lead to a problem at trick 11
You cash the A-K of diamonds and then draw a round of trumps, ending in dummy and start running the diamonds
West follows for 2 more rounds but ruffs the 5th round of diamonds. You overruff, of course, but are stuck in hand, with no way to reach dummy to draw the last trump to enjoy the diamonds
If you play a trump to the Queen, the ♥7 is established for west. If you cash the ♣A and ruff a club with the six it is over-ruffed
Back to trick 1. If West's double is to have any meaning it must be that he has all the trumps and you will need to keep that ♠A intact
So at trick 2 you unblock the ace-king of diamonds and then lead a top trump. West can win the trick and knock out the ace of spades
But this time you are in control. You cash 2 more rounds of diamonds and switch back to a round of trumps
Then you can cash the ♣A and ruff a club high, while west discards a spade
You continue to cross-ruff the rest of the hand while west follows helplessly underruffing the last 3 tricks!
November 2023
After north had opened 1NT, he declared in 6NT
Assuming East does not lead a give-away spade, making 12 tricks on a neutral club lead is quite a challenge
You knock out the ♣A but before cashing the clubs, which may be needed later for transport, you test diamonds
When east discards a spade on the 3rd diamond you cash the A-K of spades and run the clubs
Before the last club is cashed, with the lead in dummy, this is the 4-card ending:
♠ 5
♥ A2
♦ 6
♠ Q
♥ Q87 ♥ J95
♦ J
♥ K106
♣ J
When declarer cashes the ♣J, west has to hold on to the ♦J, so throws a heart
Having done its job, north can now throw the ♦6
East is under pressure having to hold on to the ♠Q so also pitches a heart
The ♥10 now becomes trick 12
10th October 2023 (Kruger Day)
Oom Paul, an accomplished hunter, was known to have a keen instinct, useful in the Transvaal bushveld of old
North gets to 4♠ after West threw in a heart bid along the way
Instinct may be good for the wilds of Africa, but in bridge it can lead to defeat
The six of hearts was led, taken in dummy
Declarer plays a diamond at trick 2. West takes the ace and continues hearts, ruffed by declarer with the 10.
East is at a critical point in the hand
He must decide whether to overruff or not.
If you instinctively overruff with the queen, declarer can now pick up your king via a simple finesse and then concede a trick to the ace of clubs
Contract making
The question is, how does east know not to over-ruff?
Before you decide to over-ruff let's assess your trump holding. As the 10 has already been played your K-Q-9 combination must make 2 tricks, enough to beat the contract
This is because when declarer plays a trump towards dummy you rise with the queen forcing the ace. Now the king will take care of the bare jack, setting up the 9
No matter which trump declarer plays you are assured of 2 trump tricks. A low ruff, of course, is over-ruffed with the 9. But a high ruff by declarer must be ignored
September 2023
Sometimes the bidding goes awry, and one ends up in an inferior contract
This happens when the poor cousins of the bridge world (the minor suits) get overlooked!
And you end up in a Moysian* fit slam, certainly not the best contract
This happened at the KZNBU BBO pairs last week
Perhaps north should put in a second double after west rebids her hearts
A second double cannot be for penalties just reaffirming the powerful nature of the hand and (by standard) declaring 3 card spade support, asking south to rebid spades if a 5-card suit or do something! Just dont pass!
However if north had bid thus, the story would not have been quite so interesting
When North jumped to 4♠, its hardly surprising that south, with a heart void and some good spade honours, went on to slam,
But sometimes the Gods are smiling down on you and 6♠ is unbeatable
The ace of hearts was led, ruffed by declarer
He then played a spade to the ace, took the spade finesse back and cashed the king, mildly disappointed to see west show out, meaning that East had a sure trick
A diamond to the Queen held and clubs were started from the top, pleased to see the ♣Q fall in 2
Declarer continued clubs, waiting for east to ruff with the master trump. When in, east led a heart to the king
The ♦A caught the king, establising the jack, and the hand was high
There is no lead to beat the spade slam
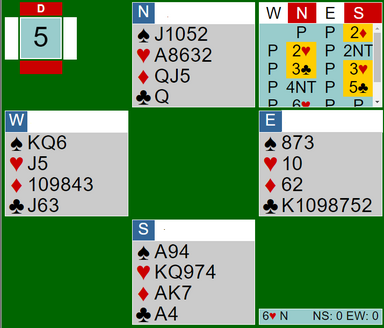
Seeing all four hands, it's easy to spot the best contract, either minor grand slam! Not so simple at the table
But the most interesting part of this hand is that the "optimum contract" is not, as your would expect, 7♦ or 7♣ but 7♥X by west!!
Yes, if a vulnerable grand slam is available to N/S, then west can save a few points by bidding 7 hearts, getting doubled and going down "only" 7!
* Moysian fits (named for Alphonse "Sonny" Moyse) are simply 4-3 trump fits
August 2023
The bidding started off with a Multi 2♦ and then the 2NT rebid showed a balanced 20 or 21 point hand
A puppet enquiry revealed that south had a 5 card heart suit, guaranteeing a 10 card fit
The RKC enquiry confirmed possession of all keycards. Having 10 hearts including the ace and king meant that even if the queen of trumps was missing it should fall in 2 rounds, making the slam a good prospect.
As north had bid hearts when making the relay bid, after the Multi opening by south, he ended up as declarer. West chose a club on opening
Plan your play.
It looks like 2 finesses in spades will be needed, giving one a 75% chance of making the slam
However there is a line that is guaranteed to make despite both spade honours being off side
After drawing trumps, he proceeded to eliminated the minors, ruffing a club and and played 3 rounds of diamonds ending in hand
Declarer led the ♠J and let it ride
West was caught without a suiatble exit card. He didnt want to lead a spade into dummy so chose a diamond, giving declarer a ruff and spade discard, negating the need for another finesse
6 hearts bid and made
On the day, in a small field of 5 tables, only one other pair reached 6♥, but failed after attempting 2 finesses in spades
The contract can be beaten, when north is declarer, but only on a spade lead, as the above endplay cannot be utilized
July 2023
This hand gave declarer a challange in 3NT.
This was the bidding:
You start with 8 tricks, 2 spades, a heart, 3 diamonds and 2 clubs.
With spades breaking badly, even with the benefit of double-dummy its not easy finding your 9th.
You receive a diamond lead, won in dummy with the king, South dropping a spade.
You play the ♦J taken with the ace. West perseveres with a diamond, won in hand, while South pitches 2 hearts.
You try the spade finesse losing to the King and the 8♥ is returned, and ducked (important, as it removes a potential exit card for South later) and the continuation is won in dummy.
You now play off the top two clubs, noting the fall of the queen
When you cash the queen of diamonds, your 6th trick, South has a choice of discards from:
♠ 965
♣ J8
He cant afford to throw a spade giving you 3 tricks, so pitches the ♣8
This is the 4-card ending:
You play a spade to the ace and throw South in with a club
With only spades left he has to lead one into dummys Q-7
If played from East's side, the contact is impossible on a heart lead, as the hearts are setup before declarer has dislodged the A♦
Hand submitted by Peter Bircher
June 2023
The X is a support double
Opening lead: ♥A
After successfully getting to 6♠, you need to ensure 12 tricks
The Ace of hearts is ruffed, of course
The illusion on this hand is that to make 12 you must try to ruff both remaining hearts in dummy
In fact outside losers can be discarded on the clubs - no further heart ruffs are required.
You are not in a grand slam so to make your small slam you can take some form of insurance
The trick is to lose a trump early, maintaining one trump in dummy to take care of a heart continuation
lead a trump to the ♠9 happy to lose a trump at this point
If hearts are continued you can ruff with the last trump, cross to hand with a diamond, draw the remaining two trumps and cash out the clubs, making 12
Of course seeing all four hands you can make 13 by running the ♠J, smothering the ♠10, whether North covers or not
May 2023
West, your partner, passes and North opens 1NT
You are east with this hand
What action do you take?
What can/should you bid with 18 HCP's and a nice 5 card major?
You really want to bid - after all, it's your best hand of the day. A juicy double is maybe worth 500. Or should you simply overcall 2♠
Make your choice before reading on.
If you double you just know your partner will take it out, and most likely, into clubs. Why? Because that's your short suit. That's life, that's bridge!
If you do double and west bids 2♣, now what? Rebid 2NT and possibly down 1 or just rebid 2♠? If partner leaves you in 2♠ it makes, when the ♠J gets swallowed up for +110. Could so easily be 1 down for -100
Jan Chemaly has been around the block a few times and taught bridge for over 40 years! (or is it 50 years)
She knows there is no game on. She notes that N/S are vulnerable and reckons that 2 down will be 200, and a good score. Of course she doesnt know that for sure, but it is likely, even if partner is a yarborough
A couple of the east players overcalled 2♠ and a couple doubled and a couple passed. Barbara Becker, another very experienced player, was the other east to pass
Those that did double all recorded a minus score in 2 (or 3) clubs or a forced rebid of 2NT, neither making
Sometimes it pays to be silent. Here the green card is the gold card!
Nothing south could do to save partner, except to note what experienced players do
Sometimes there is a call for passivity and silence is golden
April 2023
A tip for the defenders
Most of the field ended up in 3♥ after West had invited game
Sitting North you start by leading the singleton J♦. Partner wins with the ace and returns a diamond, which you ruff
The question is how can you get back to partners hand for another ruff.
If partner has the ace of clubs, then a club is called for. However, if partner has the ace of spades, then a spade is the way to partners hand
If you and your partner have no idea about suit preference signals, then it is a guess.
Playing suit preference signals (SPS), it depends on what diamond partner returned for you to ruff
I watched, this deal and the South carelessly lead back the ♦2 for north to ruff. After ruffing North had to decide which black suit partner might have as an entry. North, noting the 2♦, decided on a club. Tickets!
Declarer won with the queen, drew trumps in two rounds, cashed the ♣A, ruffed a club and notched up 11 tricks, after disposing of the spade on a long diamond
Clearly, South had a preference of which suit he had an entry, spades
Looking at dummy, the nine of diamonds is as valuable, in real terms, as the two
So, using SPS South must return the ♦9 as a clear and unambiguous signal to North where he has an entry
Failing to follow this basic principle cost the defence 3 tricks!
Hand submitted by Peter Bircher
March 2023
Optimum Contract
I find the optimum contract suggested by the BridgeWebs results file often quite interesting
The suggestion, upon analysis, has always made perfect sense
Of course, the assumption that the rest of the field will bid to the optimum, is no guarantee for a good result. So going for -1400 (6♠X vulnerable -5) against your opponents 6♥ vulnerable slam making for -1430 may not always work out as you might hope
In the expert game, more so, as the rest of the field are likely to bid to the slam
On Tuesday you may wonder why 4♠X for - 300 is the optimum contract as suggested on board 14
Until you notice that 3NT is makeable on the slimmest of spade stops, but only if played by West
Remarkably, 3 pairs did reach this shaky game and, what's more, 2 made their contract!
The question is, if East declares in 3NT, how do you make sure you beat it?
In this case, the ♠J seals East's fate
The Jack holds, and a small spade is won by north
North keeps firing hearts through, finally forcing an entry to South's hand and he eventually has to capitulate - 2 down
February 2023
You are West
North opened 1NT and, after South failed to find a major fit, lept to 3NT.
Your partner leads the ♣8 and dummy plays the ♣2
Plan your move.
What do you know about the club suit?
If the 8 is a 4th highest that means there are 3 cards higher than the 8 outside your partner's hand
How do we know this?
Subtract the card led from 11 (Rule of Eleven) and you have the answer:11-8 = 3
Dummy has 1 and you have got 2
Suddenly it dawns on you that declarer has no card higher than the 8!
And this means the 8 is winning and will win the trick, even if you play low
This is this time to take control of the defence. If you let the 8 win, there is a remote chance that partner may switch
So, taking no chances you overtake the 8 with the 9, cash the ace and fire back the 3 and down goes 3NT
On the actual day, sadly, a large number of Wests flew up with the ace and returned a club. This now sets up the queen and, without an entry to East, his hand withered on the vine, leaving a bad taste in his mouth and -630 on the scorecard.
Sour grapes, perhaps?
The Rule of Eleven is one of many "Rule Of's" that have been around since the days of Wist
The Rule of Eleven, although an invaluable tool for the defence, can sometimes also be used to declarer's advantage, knowing exactly what card to play from dummy. The knife has two blades!
The other useful "Rule Of" in NT is, this time, for declarer
The Rule of 7 tells him or her how many times to hold up on standard 4th highest lead
This is it in a nutshell:
Subtract the total cards you and dummy have in the suit led from 7 and that number tells you how many times to hold up
So if dummy has 94 and you have A75, you should hold up twice (7-5 = 2)
But with 94, and you have A752, you can hold up once (7-6 = 1)
January 2023
Although tight games and difficult slams are the "stuff" of bridge columns, the fight for a partscore can be just as rewarding in the pairs game.
This hand illustrates the point beautifully
Many pairs were permitted to play in 2♦ after North put in a spade overcall, with South remaing silent, making 8 tricks for an average, +90
However at some tables South, not content to leave E/W to make their part-score, put in a belated bid "stealing" the contract with the master suit.
If 2♠ makes then an excellent result ensures
However if N/S go 1 down, vulnerable, its -100 and a very poor result
Now its up to East/West to get their +100
East leads the ace of diamonds and, after noting West's encouraging card, must decide what to do next
At one table, East cashed the ♦Q and switched to the singleton club
Declarer rose with the ace, entered hand with a heart and ruffed a diamond
The Jack of spades was tabled, and whether covered or not, had to concede a club and a heart and a trump, to make on the nail, E/W conceding -110 for a very poor percentage
Lets go back to the first trick
Its not easy for East to find the switch at trick 2 to defeat the contract
Can you spot it.
A trump switch will ensure declarer cannot ruff a diamond and will fall one short of his target; +100 to East/West
Even after cashing a second diamond it would be too late to switch to a trump as declarer still has one trump in dummy to take care of his third diamond
These part-scor contests have their counterpart in an evenly matched fencing duel - lunge, parry and riposte!

December 2022
You are West
North opened 1NT and, after South failed to find a major fit, lept to 3NT.
Your partner leads the ♣8 and dummy plays the ♣2
Plan your move.
What do you know about the club suit?
If the 8 is a 4th highest that means there are 3 cards higher than the 8 outside your partner's hand
How do we know this?
Subtract the card led from 11 (Rule of Eleven) and you have the answer:11-8 = 3
Dummy has 1 and you have got 2
Suddenly it dawns on you that declarer has no card higher than the 8!
And this means the 8 is winning and will win the trick, even if you play low
This is this time to take control of the defence. If you let the 8 win, there is a remote chance that partner may switch
So, taking no chances you overtake the 8 with the 9, cash the ace and fire back the 3 and down goes 3NT
On the actual day, sadly, a large number of Wests flew up with the ace and returned a club. This now sets up the queen and, without an entry to East, his hand withered on the vine, leaving a bad taste in his mouth and -630 on the scorecard.
Sour grapes, perhaps?
The Rule of Eleven is one of many "Rule Of's" that have been around since the days of Wist
The Rule of Eleven, although an invaluable tool for the defence, can sometimes also be used to declarer's advantage, knowing exactly what card to play from dummy. The knife has two blades!
The other useful "Rule Of" in NT is, this time, for declarer
The Rule of 7 tells him or her how many times to hold up on standard 4th highest lead
This is it in a nutshell:
Subtract the total cards you and dummy have in the suit led from 7 and that number tells you how many times to hold up
So if dummy has 94 and you have A75, you should hold up twice (7-5 = 2)
But with 94, and you have A752, you can hold up once (7-6 = 1)
October 2022
Many Easts showed a weak 2 in spades and inevitably ended up in 4♠
All pairs that played in 4♠ made their contract

However, the LMITB* says that it can be defeated. How?
Lets assume a club is led, which happens to be the only lead that may hold declarer to 9 tricks
This is how play might continue
The Ace of clubs is followed by the queen, taken in dummy
Declarer plays a spade to his king. South takes the ace and cashes the jack of clubs, partner showing out
The 10 and 9 of clubs are good, but declarer is also out of clubs. Reluctant to give declarer a ruff and sluff, South switches to a diamond. Declarer rises with and draws trumps with the queen and ten and claims
What went wrong? Where can you find an additional trick to defeat 4♠ ?
Go back to trick 5. If you continue with the ♣ 10, declarer doesnt ruff in dummy, and if partner discards, declarer ruffs in hand, draws trumps and claims. So that doesnt work
Once again, going back to trick 5, instead of playing the ten of clubs, play the nine as its an equal card. The difference now is that partner cannot see the 10 and feels that he must ruff, forcing declarer to overruff with a top trump. Now when he plays the 10, he has to concede a spade to your 9!
When looking at the deal, it is hard to imagine that you would make two trumps with that holding, but that is what it takes to create a trick out of thin air!
This method of defence, promoting a fairly small trump, the 9, into a winner, has a colourful name, borrowed from boxing, the upper-cut, catching declarer by surprise!
* The little man in the box
Hand submitted by Peter Bircher
|