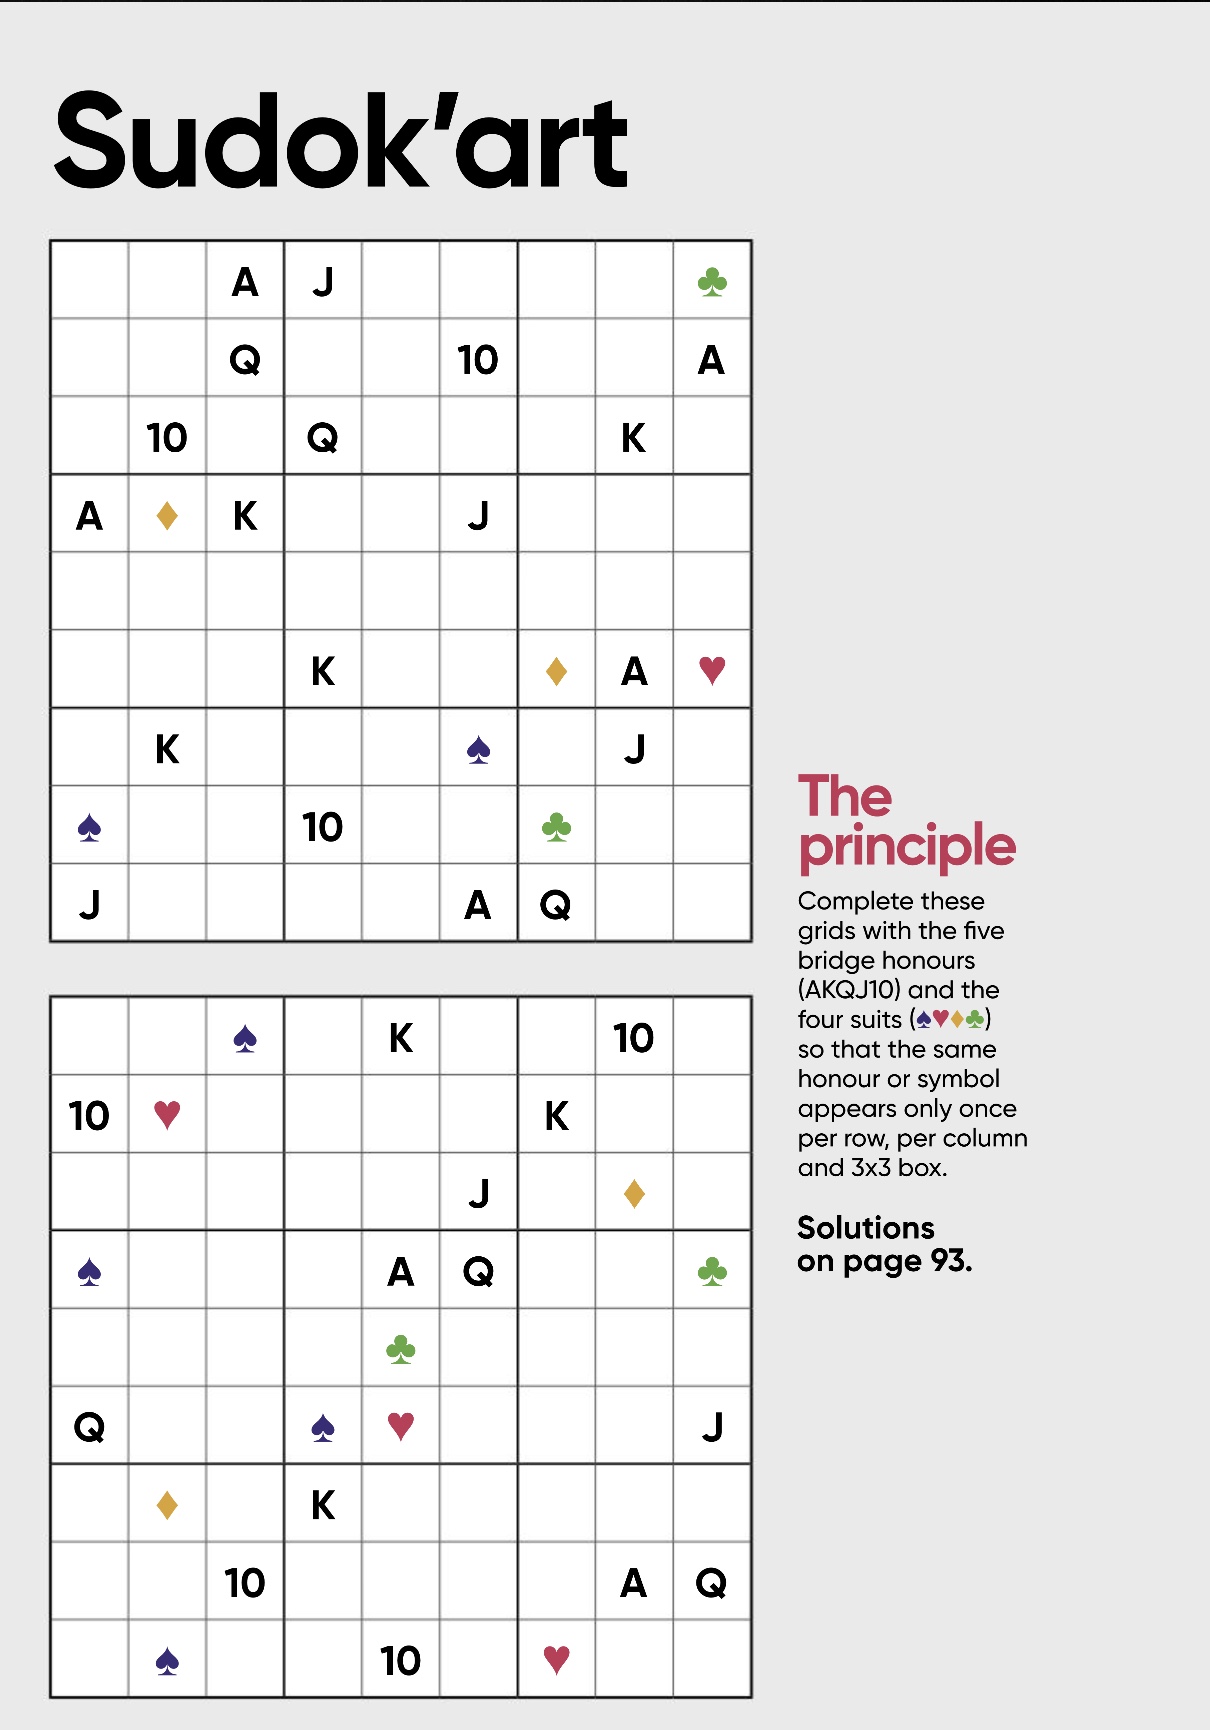
Show Detail |
Back to some expert panel bidding problems
|
| Show Answer |
With 9 high card points plus 1 length point every player choose a bid. NONE choose to bid 1♠ as this would show either 5 spades or at least a better suit. 50% choose to bid 1NT, even without a club stop. 50% choose to raise 1♥ to 2. It isn't perfect but they are happy for partner to lead a heart if they defend and they aren't good enough for a 2♦ bid. |
|
|
|
|
Show Detail |
|
| Show Answer |
most of the panel agreed a 2♥ was worth the risk and happy for a heart to be led
pass was also considered stating: "I am not sticking my neck out at this vulnerability" |
|
|
|
|
Show Detail |
The contract is 4♠ West leads K♥ You appear to have four losers, is there a way to make the contract?
|
| Show Answer |
Looks and easy end play right? If East ruffs the first trick it isn't so easy, you must jettison your A♥ to prepare for a double ruff and discard.
Win the return from E. Probably A♣ over his K♣ , draw trumps, play A♦ and K♦ and exit with a heart. West can only return a heart for a DOUBLE DISCARD
club from table and diamond from hand, on his next heart you ruff and discard. |
|
|
|
|
Show Detail |
South is in 6♥ , West leads K♦ How do you make the contract against best defence?
|
| Show Answer |
This looks easy and we would probably go wrong at the table. You have 3 discard options on the 4th heart
10♣ ,7♦ or 3♠
At first glace it seems a club should be discarded so as not to block the suit as East won't cover the J, you must discard the 7♦ |
|
|
|
|
Show Detail |
contract 4♠ West leads K♣ E overtakes with the A♣ and returns 10♦ How do you play the hand ?
|
| Show Answer |
Win ♦ return, cash AK♥ And play trump to A♠ play the J♥ and discard your club. East has no way to put West on lead for a diamond ruff.
(note the contract can be defeated on a diamond lead)
|
|
|
|
|
Show Detail |
|
| Show Answer |
none of the panel thought the double was for penalties
100% agreement on 5♣ maybe partner can bid slam
|
|
|
|
|
Show Detail |
4♠ lead A♣ and continues with K♣
|
| Show Answer |
If you ruff with the 2♠ you will be unable to redeem your error. Ruff with the 6♠ and play A♠ revealing the position.
3 rounds of diamonds, 3 rounds of hearts.
Play it again and you can analyse all the variations and also see that West's lead of A♣ should on best defence beat the contract, but continuing with the K♣ is a mistake and gives declarer they chance to make. |
|
|
|
|
Show Detail |
6♣ West leads K♦ can you make the contract?
|
| Show Answer |
cross to A♠ and take the heart finesse. play a LOW heart. Win the return in hand and crossruff in the red suits, draw trumps and claim. |
|
|
|
|
Show Detail |
contract 4♥ West leads 4♥
|
| Show Answer |
If the spade finesse loses a club return puts the contract at great risk. Can you set up dummy's spades without losing the lead to East ? Yes, win the lead in dummy and play a diamond to the 9 allowing West to win. If W returns a trump again win in dummy, diamond to the ace, J♠ winning with the A♠ in dummy throwing last spade on K♦ now you have a ruffing finesse. Even if W wins the contract is secure. |
|
|
|
|
| Declarer Play |
Show Detail |
contract 6♥ , which line of play gives you the best chance of making ? West lead the 7♦
|
| Show Answer |
decvlarer won the A♦ cross to A♥ and ruff a diamond. Cash 2 top clubs and ruff a 3rd club with the K♥ a trump to the J drew the last trump and declarer then led the J♣
When W produced the Q the contract was assured. Declarer threw a losing Spade from dummy and West was end played. The contract would also succeed if W held J♠ or East K♠ to end play either. |
|
|
|
|
Show Detail |
South plays in 5♦ West leads Q♠
|
| Show Answer |
If you take the lead with your A♠ you wll lose control.
(notice that Q♠ wasn't the best lead for West, but what human player would lead a small diamond?) |
|
|
|
|
Show Detail |
contract 6♥ lead K♦
Can you make the contract in spite of the unfavourable trump position?
|
| Show Answer |
You take the lead with the A♦ play A♥ and note the bad trump break, your need to eliminate the diamonds so you ruff 2 diamonds and remove the clubs by taking 3 club tricks, NOW you play 10♥ taken by West who is end played. Whatever he leads you can make your contract. |
|
|
|
|
Show Detail |
6♣ lead K♦
|
| Show Answer |
take A♦ cross to A♠ and take heart finesse. Play a low heart !
(note if a club is led then the slam can't make) |
|
|
|
|
| Declarer play |
Show Detail |
contract 6♠ , lead J♣
|
| Show Answer |
The play relies on the first trick so don't rush it.
win the club in dummy and discard the Q♦ draw trumps in 3 rounds throwing a club and diamond from dummy. Play K♥ East should duck or creates and entry in dummy with 10♥ declarer continues with a low diamond W plays a n honour but is now end played plays a diamond from the K♦ or a club declarer makes his contract. |
|
|
|
|
Show Detail |
contract 4♥ How would you tackle this after West leads the K♠ ?
|
| Show Answer |
If the diamonds are 3-3 it is easy. What can you do should they be 4-2? Let the defence win the FIRST a diamond trick. Play to the 9 and E wins the Q♦
if you ducked the K♠ then took the A♠ a spade may be returned you can ruff and only now play your 2 rounds of trumps and ruff the last diamond. |
|
|
|
|
Show Detail |
South 6♥ West leads 5♦
|
| Show Answer |
This boils down to creating an extra entry in dummy to use the spades for 3 diamond discards. Take A♦ play A♠ ruff a spade but NOT with the 5♥
Lead 5♥ and let West win with the 6♥
whatever he leads the contract is made |
|
|
|
|
| Bidding quiz |
Show Detail |
What is your choice of bid ?
|
| Show Answer |
with a panel of 26 (all playing strong no trump I assume)
pass 13
1♣ 9
1♦ 3
1♥ 1
pass if the hand belong to the opponents it is unlikely you can compete effectively. 1♣ misleds partner and is close to a psych
1♣ as they are happy with a club lead, but has no preemptive value
1♦ in case partner raises and is to system
1♥ not to system but preemptive and causing more trouble for the opponents |
|
|
|
|
Show Detail |
|
| Show Answer |
There was a great deal of variation on this bid
4♦ looking for game in either minor
pass
3NT because of the vulnerability prefer to play than defend
4♥ Pushing for a minor slam if partner bids 4♠ a 5♣ bid suggests extra strength than a jump straight to 5♣
one to discuss with your partner. |
|
|
|
|
Show Detail |
6♥ lead J♠
|
| Show Answer |
Not an easy one. It looks like you must lose 1 spade and 1 club, but by dummy reversal you can ruff 3 spades in your hand re-enter dummy to draw last heart with A♣
draw last heart discarding the losing club. The joys of play it again can show you that the spade lead was the downfall for the defence and that there are also other lines. |
|
|
|
|
Show Detail |
6♠ by East, 7♠ lead, play it again with us.
If you have an interesting hand feel free to export or screenshot details and we will publish it, this was made at the table. Would you have made it?
|
|
|
|
Show Detail |
South bid 4♥
West leads the Q♠
How do you make your contract?
(to view properly in another language click "view larger")
|
| Show Answer |
EAST is the DANGER HAND
Win the spade and play a small heart from dummy. Cover whatever East plays. If he plays the 3♥ play the 4♥ West will win with the 8♥ but cannot attack clubs, you can now pick up all the trumps and discard a club on a diamond. |
|
|
|
|
Show Detail |
This problem is from a real, high level match. With East/West vulnerable and East dealer you are South holding the above.
East opens 1♥ and you overcall 1♠ (in preference to 2♥ showing both black suits, the commentary suggest this is better when you hold spades)
West bids 4♥ and your partner comes in with 4♠ The excitment was not over for the bidding continues, what do you bid now?
pass, double or bid on?
|
| Show Answer |
The pro passed, at least he didn't double, as you can see 6♥ is lay down. At the other table 6♠ doubled just 3 down for -500
How would your partnership have done? |
|
|
|
|
Show Detail |
contract 4♥ lead 6♦ dummy plays small East wins with J♦ plays A♦ and returns the 5♦
1/ what is declarer's plan to make the contract
2/ with the advantage of double dummy how can West foil this plan
|
| Show Answer |
1/ declarer's best option is a high ruff A♣ AK♠ AK♥ throwing in West with J♥ who has to led a ♣ for 2 spade discards for declarer on the KQ♣
2/ West defeats this plan by underruffing at trick 3 with the J♥ ! hence discarding his winning trump but avoiding the end play. |
|
|
|
|
Show Detail |
contract 4♠ lead K♥
|
| Show Answer |
Taking the A♥ is clear, If you then immediately play A♣ discarding a heart the contract can no longer be made as you will be forced in hearts.
Instead start establishing your diamonds! the defence win, cash a heart can now only force you once before diamonds are established. |
|
|
|
|
Show Detail |
South plays in 4♠ West leads 9♥
can you make your contract against best defence if East plays the J♥ over dummy's 6♥ and returns K♥ ?
|
| Show Answer |
the only way is to trump the K♥ and lead a SMALL trump from hand. to the 9♠
at this point you still have 7♠ on table to trump if East takes his J♠ and leads a heart. Win any other return take the trumps out and discard clubs on your diamonds. |
|
|
|
|
A few more anagrams of club members:
STRING ARCH
RETRY PAGE
CARD THINKER
ALL A RARE BIOMASS
DEPORT REF
PAPA MERCHANT
RAFT POD
OVAL LAWNS
HARDWARE TYPE
RENAME PLAN
|
|
|
|
Show Detail |
S plays 6♠ W leads Q♥ can you make the contract with the unfavourable club distribution?
|
| Show Answer |
The best idea is to employ a rare technique known as 'trading ruffs' (you will see through play it again there are other options)
You win the heart lead cross to the A♦ lead another heart towards K. Lead a 3rd heart throwing a diamond from dummy. Nothing can now prevent you from ruffing a diamond in dummy for the 12th trick. |
|
|
|
|
Show Detail |
S opened 1♣ (normally a short club) and N responded 1♦ . Fortunately S then bid 1♠ and this was enough for N to jump to 3NT. It was a close decision whether to go on but to S it did not look like a slam with the shortages. What should East lead? Maybe a top of nothing 10 or maybe the J♠ ?. East chose a small club after being told S has two clubs or more. The Ace took the trick then a small spade was played first as all other suits were controlled. West decided to duck which was fatal! 13 tricks were there now with one spade and six of each clubs and diamonds. The lesson to be learnt is to grab the Aces against a freely bid game or they may run away.
|
|
|
|
Show Detail |
contract 6♣, 7♥ lead, even seeing every card with best defence this is still difficult.
Give it a try.
|
| Show Answer |
Win in dummy, play 3♣ finessing 9♣ Then play A♥ and heart to Q♥ ruff 4♥ Cash AK♠ ruff a spade with dummy Q♣ West should not overruff for best defence. This is the key step
LEAD the last ♥ if East ruffs that is not best for him, so he throws another diamond. You throw Q♠, now you lead a ♦ from table and East is doomed and only gets one trick. |
|
|
|
|
Show Detail |
contract 4♥ lead 2♠ Can you avoid losing 1 spade, 1 club and 2 diamonds ?
Use PLAY IT AGAIN to check your answer.
|
| Show Answer |
The easiest option is to duck the first spade to cut communications between East and West, this is the safest line.
However, as the cards lie an immediate club finesses will also succeed. |
|
|
|
|
Show Detail |
contract 5♦ lead K♥
|
|
|
|
One for those from Britian
Towns and cities in the UK
1 Has Paul Hogan stolen an animal from this Scottish city?
2 Cheer around the street after a victory
3 Is your mum in good health?
4 An area of water for a mute or whooper
5 Wizards pub
6 Upgrade for Noah
7 A member of the church in New Zealand
8 Demolishes a pig product
9 Chilly watercourse
10 Dark pond
11 Part of your face for a type of wood
12 Battled with the Duke of Cambridge
13 Paper fastener for farm building
14 To cook properly
15 Not returning for sea heroine in Northumberland
16 Mint cake made by Felicity
17 Sounds like you need these to take the dog for a walk
18 Is this a boat or structure across the river?
19 Sounds like you are tying pork
20 Head for a drinking vessel
Answers.
1. Has Paul Hogan stolen an animal from this Scottish city? DUNDEE
2 Cheer around the street after a victory WINCHESTER
3 Is your mum in good health? MOTHERWELL
4 An area of water for a mute or whooper SWANSEA
5 Wizards pub POTTERS BAR
6 Upgrade for Noah NEWARK
7 A member of the church in New Zealand BISHOP AUKLAND
8 Demolishes a pig product WREXHAM
9 Chilly watercourse COLDSTREAM
10 Dark pond BLACKPOOL
11 Part of your face for a type of wood PLYMOUTH
12 Battled with the Duke of Cambridge FORT WILLIAM
13 Paper fastener for farm building BARNSTAPLE
14 To cook properly BAKEWELL
15 Not returning for sea heroine in Northumberland DARLINGTON
16 Mint cake made by Felicity KENDAL
17 Sounds like you need these to take the dog for a walk LEEDS
18 Is this a boat or structure across the river? FERRYBRIDGE
19 Sounds like you are tying pork NOTTINGHAM
20 Head for a drinking vessel GLASGOW
This will be the last non bridge related quiz posted on the web.
If you would like to be added to the lockdown circulation list please send an email.
There is a new quiz most days.
..... see less
One for those from Britian
Towns and cities in the UK
1 Has Paul Hogan stolen an animal from this Scottish city?
2 Cheer around the street after a victory
3 Is your mum in good health?
4 An area of water for a mute or whooper
5 Wizards pub
6 Upgrade for Noah
7 A member of the church in New Zealand
8 Demolishes a pig product
9 Chilly watercourse
10 Dark pond
11 Part of your face for a type of wood
12 Battled with the Duke of Cambridge
13 Paper fastener for farm building
14 To cook properly
15 Not returning for sea heroine in Northumberland
16 Mint cake made by Felicity
17 Sounds like you need these to take the dog for a walk
18 Is this a boat or structure across the river?
19 Sounds like you are tying pork
20 Head for a drinking vessel
Answers. ..........
..... see more |
|
|
|
The answers are all mammals :
|
1
|
Does God move in reverse?
|
|
|
2
|
Laugh about Japanese money?
|
|
|
3
|
Has teddy forgotten his clothes?
|
|
|
4
|
Right in the middle of a garden pipe
|
|
|
5
|
Iron, luxury car and alien
|
|
|
6
|
Is this animal Petruchio’s challenge?
|
|
|
7
|
Fried potatoes for the friar
|
|
|
8
|
Grilled bread in a muddle
|
|
|
9
|
Manchester is at the head of the river in York?
|
|
|
10
|
Iron or tail?
|
|
|
|
11
|
Untidy Romanclothing
|
|
|
|
12
|
Is it in the ales we drink?
|
|
|
13
|
Auden’s initial beer
|
|
|
|
14
|
Olympic Lord goes round to put toy back
|
|
|
15
|
An animal garbed in black and white?
|
|
|
16
|
Sounds like a bald man does not have this
|
|
|
17
|
Span the river
|
|
|
|
18
|
21 shilling swine
|
|
|
|
19
|
A funky animal? Oh Goody
|
|
|
20
|
Can you find it in hen petal?
|
|
Answers.
|
1
|
Does God move in reverse?
|
DOG
|
|
2
|
Laugh about Japanese money?
|
HYENA
|
|
3
|
Has teddy forgotten his clothes?
|
BEAR
|
|
4
|
Right in the middle of a garden pipe
|
HORSE
|
|
5
|
Iron, luxury car and alien
|
FERRET
|
|
6
|
Is this animal Petruchio’s challenge?
|
SHREW
|
|
7
|
Fried potatoes for the friar
|
CHIPMONK
|
|
8
|
Grilled bread in a muddle
|
STOAT
|
|
9
|
Manchester is at the head of the river in York?
|
MOUSE
|
|
10
|
Iron or tail?
|
|
PIG
|
|
11
|
Untidy Romanclothing
|
|
GOAT
|
|
12
|
Is it in the ales we drink?
|
WEASEL
|
|
13
|
Auden’s initial beer
|
|
WHALE
|
|
14
|
Olympic Lord goes round to put toy back
|
COYOTE
|
|
15
|
An animal garbed in black and white?
|
BADGER
|
|
16
|
Sounds like a bald man does not have this
|
HARE
|
|
17
|
Span the river
|
|
PANTHER
|
|
18
|
21 shilling swine
|
|
GUINEA PIG
|
|
19
|
A funky animal? Oh Goody
|
GIBBON
|
|
20
|
Can you find it in hen petal?
|
ELEPHANT
|
..... see less
The answers are all mammals :
|
1
|
Does God move in reverse?
|
|
|
2
|
Laugh about Japanese money?
|
|
|
3
|
Has teddy forgotten his clothes?
|
|
|
4
|
Right in the middle of a garden pipe
|
|
|
5
|
Iron, luxury car and alien
|
|
|
6
|
Is this animal Petruchio’s challenge?
|
|
|
7
|
Fried potatoes for the friar
|
|
|
8
|
Grilled bread in a muddle
|
|
|
9
|
Manchester is at the head of the river in York?
|
|
|
10
|
Iron or tail?
|
|
|
|
11
|
Untidy Romanclothing
|
|
|
|
12
|
Is it in the ales we drink?
|
|
|
13
|
Auden’s initial beer
|
|
|
|
14
|
Olympic Lord goes round to put toy back
|
|
|
15
|
An animal garbed in black and white?
|
|
|
16
|
Sounds like a bald man does not have this
|
|
|
17
|
Span the river
|
|
|
|
18
|
21 shilling swine
|
|
|
|
19
|
A funky animal? Oh Goody
|
|
|
20
|
Can you find it in hen petal?
|
|
Answers. ..........
..... see more |
|
|
|
Show Detail |
contract 6NT lead 10♥ not knowing the distribution there is a clear best plan to make the contract.
Can you see what it is?
|
| Show Answer |
you have 11 top tricks. If the spades break 3-3 OR the Q♣ is on side you make your contract.
Test both and keep your options open play a small spade from both hands BEFORE reverting to the finesse if needed.
(with double dummy you know the finesse won't work, so you should be guided to the better plan!) |
|
|
|
|
Show Detail |
contract 3NT lead 5♠
|
| Show Answer |
Well the official answer was you cannot make the contact.
Try using PLAY IT AGAIN and you will clearly see it is possible if you unblock your diamonds. |
|
|
|
|
Show Detail |
South plays in 3·NT. West leads Q♥ East plays K♥
You duck, East continues with 8♥
How do you make your contract?
|
| Show Answer |
Look closely and you will see the diamonds are blocked.
After cashing AK♦ lead a heart and throw one of your diamonds.
West can only have 3 hearts left, which he can cash, but then whatever he plays you have 9 tricks. |
|
|
|
|
Show Detail |
6♦ by South. West leads K♥ you ruff in dummy with 7♦, what now?
|
| Show Answer |
You cannot risk drawing trumps from the top in case of a bad split and you may get a heart return.
Lead 9♦ and run it, unless East cover with the J♦ when you are home and dry.
This guarentees the contract even if trumps break 4-1. |
|
|
|
|
Show Detail |
South is in 6NT West leads J♦
How do you make your contract?
|
| Show Answer |
You win with the K♦ and lead a club to hand and find the 4-0 holding with East. You need to create two entries in dummy to make all the clubs or make 3 spades and give up the Q♣ .
You therefore lead the 10♠ and run it. If the 10 wins you will have 3 spades and can play clubs from the top and enter dummy with the A♠ after losing the Q♣ and cashing 10♣ .
If instead the 10♠ loses to East's Q♠ you will have 2 entries to dummy to repeat the finesse and later cash the last club.
This play would be unnecessary in a 6♣ contract as the thirteenth club would be a trump and no entry to dummy would be needed to cash it. |
|
|
|
|
Show Detail |
South plays in 5♠ West leads A♥ South ruffs and leads Q♠ East takes this with the A♠ and returns a heart.
Can you make your contract?
|
| Show Answer |
The books says you can't make it on best defense, you ruff the heart return with K♠ and then when you play a trump to table East holds up, I think that still makes?
my solution is :
Declarer should throw a losing diamond on this heart returns, win whatever East returns and go to table with A♦ leading through Easts J♠
The clubs are then good for diamond discards losing only A♠ and the second heart lead. The defense mistake seems to be taking the A♠ which was part of the given play, if they had held up only 10 tricks can be made (do you agree?) |
|
|
|
|
Click to see the expert panels answers to a set of bidding problems in the BebMagazine (linked in a previous article on our webpage).
I am happy to report your webmaster finished joint second (with 8 others) in a field of over 800 entries. And I still stick by my answer to the problem I got "wrong"!
|
|
|
|
Show Detail |
Contract 4♥ west leads J♣
|
| Show Answer |
You must avoid playing spades yourself. After drawing trumps discard the 6♦ on the last club and play A♦ FIRST then Q♦
DO NOT TAKE THE FINESSE. No matter who holds the K♦ the contract is now safe. |
|
|
|
|
Reveal Answers.
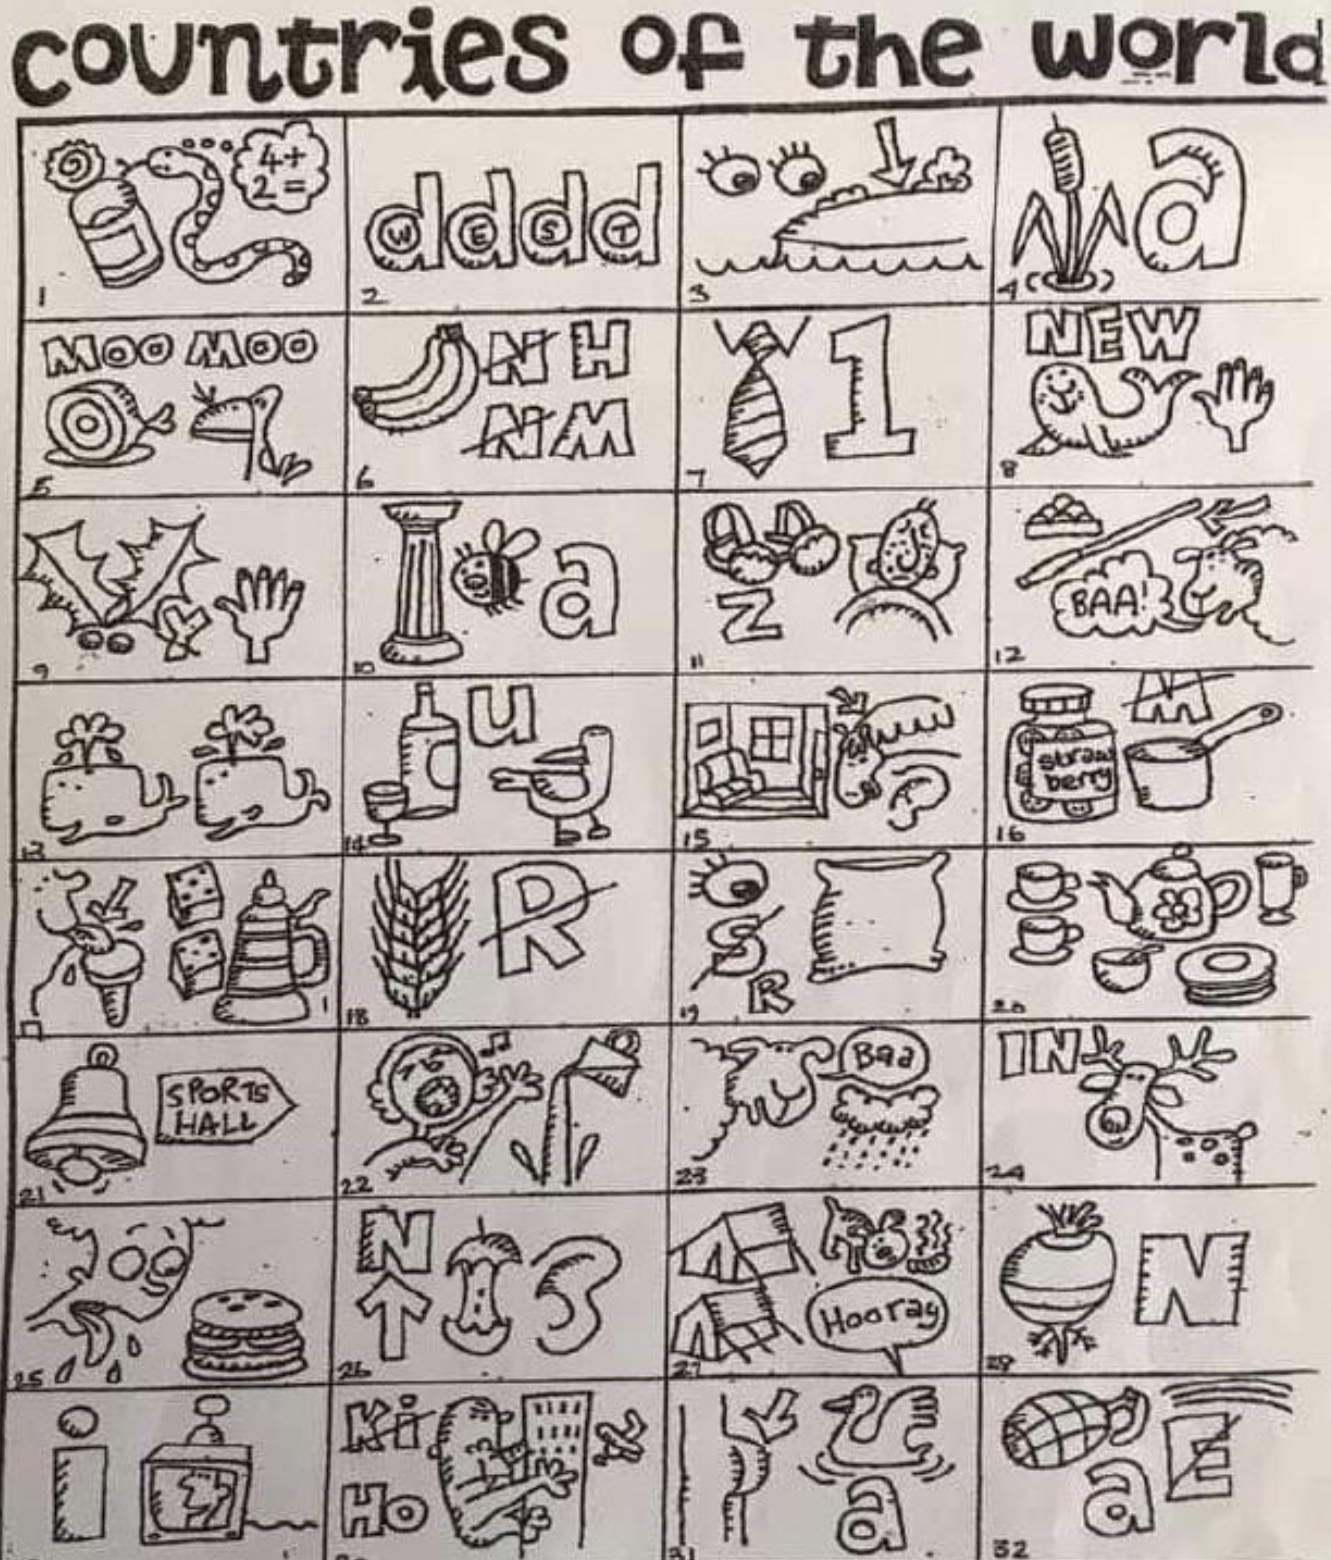
COUNTRIES OF THE WORLD ANSWERS
1. Canada
2. West Indies
3. Iceland
4. Russia
5. Mozambique
6. Bahamas
7. Taiwan
8. New Zealand
9. Holland
10. Columbia
11. Brazil
12. Cuba
13. Wales
14. Portugal
15. Romania
16. Japan
17. Liechtenstein
18. Bali *
19. Iraq
20. China
21. Belgium
22. Singapore
23. Bahrain
24. India
25. Hungary
26. North Korea
27. Kampuchea
28. Sweden
29. Italy
30. Hong Kong
31. Botswana
32. Granada
- Avid quizzers may have a different answer, as Bali isn't a country! .... Rule number one of quizzing.. !The Questionmaster is always right!
..... see less
Reveal Answers. ..........
..... see more |
|
|
|
Show Detail |
What will you bid? 4♠, double or pass ?
|
|
|
|
Show Detail |
What should South call? A simple preference, 2NT or 4th suit (which in this case is real as well as forcing) or something else?
(of the other hands ONLY North's hand is the actual holding)
|
| Show Answer |
Expert panel of 36 top players : 2♦ 100 points, 2♥ 90 points, 2NT 50 points, 3♥ 10 points |
|
|
|
|
Show Detail |
Playing IMPS (teams), what should South bid?
|
| Show Answer |
Expert panel opinion : 2♦ 100 points, 3NT 70 points, 4♣ 60 points, 3♣ 10 points.
2♦ is the best bid as it doesn't preclude a minor contract, still enables a NT option and for most pairs is forcing. |
|
|
|
|
Show Detail |
South plays 4♠ West leads 3♣. Dummy's K♣ was played and East took the trick with A♣
This time try to find the defence which will defeat the contract.
|
| Show Answer |
Surprisingly the answer is to lead 6♥ to establish a heart trick before they are discarded on diamonds. |
|
|
|
|
Peter's hand of the week (15/4/20)
board 18 6/3/20
|
|
|
|
Show Detail |
The main point is you have a singleton, do you run from a NT contract? (NS are playing 15-17 NT openers)
|
| Show Answer |
2♣ 100 points, pass 90 points, 2♦ 30 points, 2♥ 10 points
A strong case is made by those voting for PASS to remember that the opponents will have a spade fit and in actual fact can make 3S.They are much less likely to bid if you pass.
Plus what is your response when partner bids 2♠ ? (some of the panel assume partner would have bid 1♠ holding 4 spades) |
|
|
|
|
Show Detail |
|
| Show Answer |
points awarded for answer
3♣ 100 3♥ 80 3NT 60 4♦ 50 3♦ 40
3♥ , forth suit forcing doesn't show your club fit, the big question is if 3♣ is forcing in your partnership, if so it is a clear favourite |
|
|
|
|
1NT - p - p - 3NT what do you lead holding
♠ A2 ♥ A63 ♦ A85 ♣ 65432
1NT - 2♥(you) - 3♥ - pass(partner) - 3♠ -p - 4♠
♠ 82 ♥ AT6432 ♦ 97 ♣ KQ3
1♥ - *(you) - p - p - p
♠ AKT6 ♥ 2 ♦ QJT8 ♣ KQ85
1♥ p 2♦ p 3♦ p 3♥ p 4NT p 5♦ p 6♥ (no bidding your side)
♠ T9843 ♥ 875 ♦ A6 ♣ Q62
Answers.
5♣ (or any club in your method to show poor holding)
K♣
2♥
2♣
..... see less
1NT - p - p - 3NT what do you lead holding
♠ A2 ♥ A63 ♦ A85 ♣ 65432
1NT - 2♥(you) - 3♥ - pass(partner) - 3♠ -p - 4♠
♠ 82 ♥ AT6432 ♦ 97 ♣ KQ3
1♥ - *(you) - p - p - p
♠ AKT6 ♥ 2 ♦ QJT8 ♣ KQ85
1♥ p 2♦ p 3♦ p 3♥ p 4NT p 5♦ p 6♥ (no bidding your side)
♠ T9843 ♥ 875 ♦ A6 ♣ Q62
Answers. ..........
..... see more |
|
|
|
Show Detail |
South plays in 5♦ West led 7♠ and dummy's A♠ took the trick, South playing 8♠
Declarer entered his hand with the K♥ and led the J♦ West played low and so did table, East's singleton A♦ making.
How can East defeat the contract?
|
| Show Answer |
East return Q♠ and trap declarer on table. Leading a club East wins and gives West an overruff. A spade and West can overruff immediately. A diamond will lose to the Q either immediately or after cashing the K. |
|
|
|
|
Show Detail |
South plays in 6♠ West lead the Q♥ a low card is played from dummy. East throws J♦ and South's King wins. Declarer plays a trump to table's Q♠
West throwing the 9♥ and East discarding the 2♦ How can declarer avoid losing 2 hearts?
|
| Show Answer |
Draw ONE round of trumps play Q♦ from dummy discarding a club. Draw the rest of the trumps. You can now ruff a club in hand after taking the A♣ without being overruffed, reenter dummy with K♥ discarding the losing hearts on clubs. |
|
|
|
|
Show Detail |
|
| Show Answer |
3♦ 100 4♦ 90 2♠ 80 5♦ 80 4♣ 70
This vote was from 1974 (the hands range in date), even then Terence Reese was horrified at this result.
A more modern list of players would no doubt bid more aggresively. |
|
|
|
|
Show Detail |
|
| Show Answer |
2♥ 100 4♥ 60 1NT 30
Yoir heart suit holds plenty of values to upgrade to the 2♥ bid |
|
|
|
|
This is from the BeBridge magazine that can be found in "previous articles"
|
|
|
|
How is your knowledge of songs?
Can you unscramble these 5 anagrams to make songs related to cards/card games.
A FREQUENT SHOE - DAVE EDMUNDS
PEAK FORCE - LADY GAGA
RATIO LIES - CARPENTERS
I GO BLINDFOLDING LANDOWNERS - NURSEY RHYME
FADED CROCKS - MAX BYGRAVES
ANSWERS.
Queen of Hearts
Poker face
Solitaire
London bridge is falling down
Deck of cards
..... see less
How is your knowledge of songs?
Can you unscramble these 5 anagrams to make songs related to cards/card games.
A FREQUENT SHOE - DAVE EDMUNDS
PEAK FORCE - LADY GAGA
RATIO LIES - CARPENTERS
I GO BLINDFOLDING LANDOWNERS - NURSEY RHYME
FADED CROCKS - MAX BYGRAVES
ANSWERS. ..........
..... see more |
|
|
|
Postcards from the edge
Can you match these 10 antique black and white postcards with the local town.
A - Albir
B - Altea
C - Calpe
D - Denia
E - Gandía
F - Jávea
G - Moraira
H - Oliva
I - Pego
J - Teulada
Answers.
PC1Gandía
PC1A Jávea
PC2 Calpe
PC3 Altea
PC4 Oliva
PC5 Albir
PC6 Pego
PC7 Denia
PC8 Teulada
PC9 Moraira
..... see less
Postcards from the edge
Can you match these 10 antique black and white postcards with the local town.
A - Albir
B - Altea
C - Calpe
D - Denia
E - Gandía
F - Jávea
G - Moraira
H - Oliva
I - Pego
J - Teulada
Answers. ..........
..... see more |
|
|
|
“Bridge” Quiz
Spanish born architect Santiago Calatrava is responsible for the wonderful Arts and Science centre and Opera House in his birthplace Valencia.
However, he has also designed numerous bridges throughout the world.
Can you match these five bridge names with their photos :
(a) James Joyce Bridge (Dublin)
(b) Margaret Hunt Hill Bridge (Dallas)
(c) Bac de Roda Bridge (Barcelona)
(d) Peace Bridge (Calgary)
(e) Katehaki Pedestrian Bridge (Athens)
show answers.
Answers:
1-Dallas
2-Dublin
3-Calgary
4-Athens
5-Barcelona
..... see less
“Bridge” Quiz
Spanish born architect Santiago Calatrava is responsible for the wonderful Arts and Science centre and Opera House in his birthplace Valencia.
However, he has also designed numerous bridges throughout the world.
Can you match these five bridge names with their photos :
(a) James Joyce Bridge (Dublin)
(b) Margaret Hunt Hill Bridge (Dallas)
(c) Bac de Roda Bridge (Barcelona)
(d) Peace Bridge (Calgary)
(e) Katehaki Pedestrian Bridge (Athens)
show answers. ..........
..... see more |
|
|
|
Can you identify these Plazas Mayores ?
Valladolid, Sevilla, Salamanca, Madrid y Córdoba
Answers. :
1. Valladolid 2 Madrid 3 Sevilla 4 Salamanca 5 Córdoba
..... see less
Can you identify these Plazas Mayores ?
Valladolid, Sevilla, Salamanca, Madrid y Córdoba
Answers. ..........
..... see more |
|
|
|
Can you identify these provincial flags?
ANDALUCIA
ARAGON
EXTRAMADURA
NAVARRA
VALENCIA
|
|
|
|
Show Detail |
South plays in 6♠ West leads K♣ How do you play the contract?
|
| Show Answer |
Don't take the K♣ with the A♣ but play low and ruff. Then draw the outstanding trump and lead a diamond towards the Q♦
If West goes up with the Ace you can discards a heart in dummy on the K♦ if he ducks you can discard the K♦ on the A♣ and only lose a heart. |
|
|
|
|
Show Detail |
South plays in 6♠ West leads Q♦
can the contract be made?
|
| Show Answer |
This contract can only be made if declarer leads a small diamond at trick 2. This is the only line that can succeed if diamonds split 5-1 |
|
|
|
|
Show Detail |
Declarer plays 5♣, opening lead 3♥ can he make his contract?
|
| Show Answer |
yes, but only if declarer ducks the opening lead in dummy and unblocks the Q♥ on East's K♥ . This will enable declarer to finesse the J♥ to provide a discard for the 3♦ (if East had the J♥ he would have played it) |
|
|
|
|
Show Detail |
The contract is 6♣ by S, opening lead J♥
which is the best line of play?
|
| Show Answer |
You can only make the contract if the diamond finesse works, so don't take the club finesse. |
|
|
|
|
Show Detail |
South plays 4♥ West leads K♣
What is declarer's best line, not knowing the diamond distribution?
|
| Show Answer |
Duck the K♣ and discard a diamond on the A♣ This line only fails if East has 4 diamonds. |
|
|
|
|
Show Detail |
West leads K♦ against South's contract of 6♠
How can you make this contract with the unfavourable position of K♣ ?
|
| Show Answer |
After taking the A♦ at trick one, he crosses to the A♣ , ruffed a club high and led a low trump! The J♠ took a trick to which it wasn't entitled, but declarer now had two entries to dummy, allowing him to set up the club AND get back to them. |
|
|
|
|
Show Detail |
The contract is 5♣ West leads Q♠
declarer takes the K♠ , draws trumps and leads a diamond from table, East eventually gets in with the 3rd round of diamonds and leads a heart, 1 down.
Could declarer do better?
(to view the hand in another language click view larger)
|
| Show Answer |
All you have to do is let West win the opening lead, if he doesn't switch to the A♥ you will make 12 instead of 10 by discarding a diamond from hand on the K♠ , ruffing a diamond and discarding both your in hand hearts
Remember : PLAN YOUR PLAY before you play your first card from dummy. Beware of DANGER HAND |
|
|
|
|
 ACROSS ACROSS
1. Pulls contract perhaps in, protection for keeps (11)
6. 14D Bird's nude swimming doesn't promise much (9)
7 Eccentrics presented by visitors at table? (5)
9 Bridge personality has day abroad and I worry (8)
11 Add up sum, one with opponents (8)
15 Wants partners to hold back letter (5)
16 Very hard pirate in bridge? (5)
17 He knows name is unusual (4,7)
DOWN
1 7, a pair but good for Gooch! (9)
2. Better score with cutting tool we hear (4)
3 Ass from Yarborough dancing hay; go away (5)
4 Suffer from strain curiously enough (5)
5 European composer ? (6)
8 One heavyweight may be in hand (9)
10 Run out of clothes (6)
12 Fails and finishes headless (5)
13 O. Sharif spends hour making capital (5)
14 see 6 across
|
|
|
|
| Solution |
Wow !! If you got anywhere with that you are better than me.
Across : 1. Drawbridges ; 6. 14 Under (bids) ; 7 Cards; 9 Jourdain; 11 Totalise; 15 Needs; 16 Flint; 17 Mkke Swanson (who?)
Down : 1. Doubleton ; 2. Adds; 3 Burro; 4 Incur; 5 German; 8 Singleton; 10 Streak ; 12 Loses; 13 Sofia; 14 (under)Bids
..... see less
Wow !! If you got anywhere with that you are better than me. ..........
..... see more |
|
|
|
Across
7 TD does not worry about this online (4,3,2,4)
8 Double jump shift bid? (8)
9 Think long and hard at the table! (4)
10 Fun loving male (7)
12 Move! (5)
14 Low bid takes the contract (5)
16 Haircut sir? (7)
19 First non-pass (4)
20 Pals forever? (3,2,3)
22 Hard to divine on-line (5,8)
Down
1 Does mixed tintinnabulation jump? (4)
2 Curiosity? (6)
3 Competitive sale - not at the table! (7)
4 Sting-less posturings play mother (5)
5 One in time saves nine (6)
6 One suit shows another (8)
11 Game after midnight - might hold-up! (4,4)
13 Must be treasured (7)
15 History, records (6)
17 A method of scoring? (6)
18 Suit layout (5)
21 About a cafe - card on the table? (4)
see answers.
Answers:
Across
7 TD does not worry about this online (4,3,2,4): leadoutofturn
8 Double jump shift bid? (8): splinter
9 Think long and hard at the table! (4): tank
10 Fun loving male (7): playboy
12 Move! (5): shift
14 Low bid takes the contract (5): steal
16 Haircut sir? (7): barbers
19 First non-pass (4): open
20 Pals forever? (3,2,3): hititoff
22 Hard to divine on-line (5,8): tablepresence
Down
1 Does mixed tintinnabulation jump? (4): leap
2 Curiosity? (6): oddity
3 Competitive sale - not at the table! (7): auction
4 Sting-less posturings play mother. (5): pours
5 One in time saves nine (6): stitch
6 One suit shows another (8): transfer
11 Game after midnight - might hold-up! (4,4): lateplay
13 Must be treasured (7): partner
15 History, records (6): annals
17 A method of scoring? (6): butler
18 Suit layout (5): shape
21 About a cafe - card on the table? (4): face
..... see less
Across
7 TD does not worry about this online (4,3,2,4)
8 Double jump shift bid? (8)
9 Think long and hard at the table! (4)
10 Fun loving male (7)
12 Move! (5)
14 Low bid takes the contract (5)
16 Haircut sir? (7)
19 First non-pass (4)
20 Pals forever? (3,2,3)
22 Hard to divine on-line (5,8)
Down
1 Does mixed tintinnabulation jump? (4)
2 Curiosity? (6)
3 Competitive sale - not at the table! (7)
4 Sting-less posturings play mother (5)
5 One in time saves nine (6)
6 One suit shows another (8)
11 Game after midnight - might hold-up! (4,4)
13 Must be treasured (7)
15 History, records (6)
17 A method of scoring? (6)
18 Suit layout (5)
21 About a cafe - card on the table? (4)
see answers. ..........
..... see more |
|
|
|