 Overcoming fear - planning the play of the hand [0001] Overcoming fear - planning the play of the hand [0001] |
Show Detail |
You're sitting West. Because of a bidding misunderstanding, you've arrived in 6♥ with only 6 trump. Plan the play of this hand.
Hint: Against best defense, you are going to make this contract. All you need is the right plan. If I hadn't given you the hint, you still must approach your planning of the play as if you are going to make your contract.
You have 3 spades, 2 diamonds and 2 clubs for 7 tricks, if noboday ruffs. With only 6 trumps, you can't draw trump. If you try, you will lose control. You need 5 tricks in hearts - that means you need at least 2 ruffs from one hand. It doesn't count as 3 tricks if you ruff one from one hand and once from the other.
In order to make this hand, you must assume that no-one will ruff your 7 non-trump tricks and that no-one can over-ruff your ruffs. That means if someone can ruff at the same time as you, they must have smaller trump and if they can't over-ruff, they can't discard so that they can ruff a different suit before you can ruff that suit.
You can also make by East or West 6♣, 6♦, 5♠ and 5NT in addition to 6♥ against best defense.
If you need help planning your play, go to the 99er or fewer results page for Wednesday, September 25th, 2019 for board 6 and choose Play It Again.
|
|
| Last updated : 30th Oct 2019 07:14 AST |
|
|
|
| Analyzing the play of your hand [0002] |
Show Detail |
I apologize in advance to those persons who played this hand and are embarassed with their results and my explanation.
I found this to be an interesting hand. Best defense against best declarer play will result in declarer being held to 9 tricks. Poor defense will allow declarer to take 10 tricks and poor declarer play may result in declarer being held to 7 or 8 tricks.
Looking at all 4 hands (called Double Dummy) it appears that 3S is cold and 4S may be made with a club ruff. What to lead? Standard leads suggest leading from a doubleton hoping for a ruff or leading from KQ hoping for 2 or more tricks with partner having the A or J. With 6 cards in diamonds, someone may be short and if partner you may get a diamond ruff. With only 2 trumps, partner will need the AH and AS to enable you to get a heart ruff. Double dummy, you can see that the heart ruff will hold declarer to 9 tricks. When playing at the table and not Double Dummy, getting the heart ruff may seem remote and leading the KD from KQ diamonds may seem like the best way to get 2 tricks in diamonds.
The KD likely wins the trick. Looking only at the Dummy hand, you know that someone is void diamonds after the first trick. It is normal for declarer with normal suit distribution to hold up the AD when he has the JD after you play the KD from KQ (called the Bath Coup). This effectively blocks you from leading another diamond. If you lead the QD, you will be promoting the JD as a trick even if partner can ruff, so if you're going to lead diamonds again, lead a low diamond.
If the declarer attacks hearts before trump, will be held to 9 tricks. If declarer plays the AK clubs and then attacks hearts before trump, could possibly lose control of trump because South will lead a club each time gets the lead. Declarer may be held to 7 or 8 tricks.
This hand was played Thursday afternoon, October 10, board 1. You can try playing the hand the different ways I have described to see the results obtained by using Play It Again on the results page. Our club pays for this website to be able to share information with you and to enable you to learn how playing different ways will affect your results.
|
|
| Last updated : 30th Oct 2019 07:13 AST |
|
|
|
| Planning the play using information and odds [0003] |
Show Detail |
This is a fun hand, because I'm going to describe how to make 7H declared by South. It is highly unlikely that South would become declarer in hearts using Standard American even with 2/1. If you are using a big club opening with transfer responses then South declaring in hearts is possible, but bidding 7 seems unlikely.
With South declaring 7 hearts:
On a spade or heart lead, you will need a spade finesse and to setup the long spades by ruffing twice. This will give you 4 spade tricks, 2 spade ruffs, 4 hearts, 1 diamond, 1 club and 1 club ruff. You can do this because any lead by West leaves you with 3 entries to your hand counting the spade finesse as one. You still need to play the suits in the correct order. If you ruff clubs before playing spades, you will make only 10 tricks. If you play diamonds before spades, you will make only 10 tricks. If you hope spades are 3-3 and don't take the finesse you will make only 11 tricks.
On a diamond lead you can ignore the spade finesss because you have lots of entries to the South hand to ruff spades 3 times and draw trump and still be able to get back into the South hand to get the last 2 spades tricks.
With North declaring 6 hearts:
A diamond lead by East guarantees that the declarer won't make more than 6 hearts. Declarer knowing that there is now a diamond loser has to decide whether to finesse or hope for a 3-3 split if one of the opponents doesn't have a singleton K or Kx doubleton. This is where knowledge of statistics without additional information is useful. A finesse works about 50% of the time, a 3-3 split is about 36%, a 4-2 split is about 48%, a singleton K is about 3% and a doubleton Kx is about 16% of the time. Declarer doesn't have enough entries to South if spades split 4-2 which is likely, so a finesse 50% beats a possible 3-3 split 36% hands down.
Losing the diamond finesse and getting a diamond return allows the declarer to crossruff diamonds and clubs and then running hearts allows the declarer to get more information. When everyone is down to 2 cards, West will have been squeezed down to KS and KC or East will have Kx spades. If West has the 2 kings, might have overcalled South's openning bid with 12 points and 5-4 in minors, so this increases the likelihood of the KS being in East's hand, making the spade finesse an even better proposition.
With a diamond lead losing the finesse and not getting a diamond return, means declarer must play on spades early. Given the odds, a spade finesse is the best proposition. Knowing the odds improves your chances of making the best play over time, not necessarily the right play for this hand. Being upset when the best play doesn't work is called resulting and can cause a condition similar to YIPS or TILT depending whether you play golf or poker.
This hand was played October 15th; it is board 7. You can try out these plays by going to those results and using Play It Again.
|
|
| Last updated : 12th Dec 2019 15:29 AST |
|
|
|
| Reaching for the Best Result [0004] |
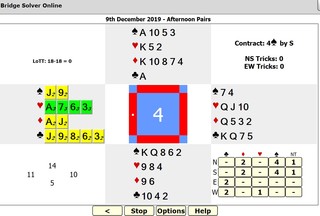 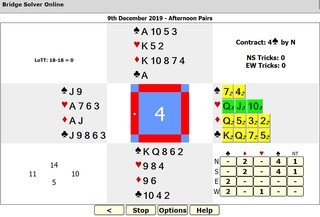
I didn't realize how often achieving best defense relied on making the correct first lead. If you use  , you will see how many off the remaining tricks you can get if you played best defense against best declarer play. The Double Dummy results suggest that declarer will only make 4 Spades with either North or South declaring. The two images above show that if you attack Hearts on your first lead from either East or West hands, you can restrict declarer to only 4 Spades. If you play any other suit declarer may make 5 Spades. , you will see how many off the remaining tricks you can get if you played best defense against best declarer play. The Double Dummy results suggest that declarer will only make 4 Spades with either North or South declaring. The two images above show that if you attack Hearts on your first lead from either East or West hands, you can restrict declarer to only 4 Spades. If you play any other suit declarer may make 5 Spades.
Leading hearts immediately allows the defense to set up for 2 Heart tricks in addition to 1 Diamond trick otherwise declarer will have time to set up Diamonds for a Heart discard making 5 Spades.
In order to setup Diamonds, declarer needs trump to be 2-2 (40%) and to make judicious use of the entries to North and South hands, and have the Ace of Diamonds (50%) be before the King (West) and the QJ of Diamonds to be split (likely) while not getting overruffed. The only way declarer can't set up Diamonds is when the A of Diamonds is after the King or East has QJxx.
Only 1 pair made it to a 4 Spade contract with the 19 HCPs between NS hands likely against competitive bidding. Only 1 pair made 5 Spades worth up to 2 points and possibly moving them up one spot in rank. Players must to be careful not to force their opponents to bid a contract they wouldn't reach without competitive bidding.
Duplicate is not like kitchen bridge. You are challenged to look beyond making the contract you chose. If you see that most other pairs will be in the same contract you must search to see if you can make 1 or more tricks than your contract and more than your opponents at the other tables playing the same hand.
This board 4 was played Monday, December 9th, 2019.
|
|
| Last updated : 6th Jan 2020 09:13 AST |
|
|
|
| I hate Notrump [1005] |
Show Detail |
Actually I have a hate/love relationship with Notrump contracts whether I'm declaring, defending against or bidding competitively against.
Cons: Opening Notrump bids don't guarantee stoppers in every suit and you may be destined to go down. Notrump means you don't have any trump to use to attempt to regain control of the play.
Pros: A Notrump bid forces to opponents to bid one level higher than you did meaning they have an increased risk of going down. Opponents may be reluctant to overcall and may miss their best result. Following the Notrump ladder, means partner knows your exact HCP range and basic shape, and can better place the contract. There are no trump out there against you and opponents can't make a surprise ruff, so you get to practice your strategies and planning skills without additional interference.
On this board, West's Notrump opening keeps most N/S pairs from getting to their best result - 9-10 tricks in Notrump. N/S can still make 9-10 tricks with E/W declaring Notrump but it requires good defense. N/S isn't likely to reach a Notrump contract after West opens 1 Nortump. If North doesn't overcall, East may feel it necessary to rescue West into a trump contract, but bidding East's best suit 2D, will likely be taken by West as a transfer.
More and more opponents are competing against Notrump opening bids, and North is likely to bid 2C. If 2C is natural the auction might end there. If 2C is artifical showing a single suited hand, then bidding may end at 3C. On this board, double would be North's best bid likely resulting in a top, but for most pairs is shows a similar hand to West.
The 1 Notrump opening by West, although it goes down, kept most N/S pairs from achieving their best result.
This board was played January 6th, 2020 and is board 2.
|
|
| Last updated : 15th Jan 2020 17:36 AST |
|
|
|
| An Automatic Throw-in [0006] |
Show Detail |
A throw-in is (mostly) an Intermediate/Advanced declarer play. It doesn't mean the declarer is giving up. The declarer needs/wants another trick in a suit and cannot get it if declarer leads that suit. It requires; trump remaining in both declarer and dummy hands, the ability to strip all possible exit cards from the target hand intended to lead the suit that has the potential extra trick and, the ability to put the target hand on lead. The target hand then has to lead the target suit the trick or give declarer a ruff and discard.
Ok, the experts will tell you there is no such thing as an Automatic Throw-in. In this case, the throw-in became automatic after declarer lead a club from the dummy when either; East automatically attempted to promote a trick in Wext's hand by playing the QC on a likely finesse or didn't play the QC, but after declarer overtook the possible finesse with the AC, West automatically overtook JC. This forced West to lead away from the KC giving declarer an extra trick. Instead West must hope East could overtake JC so that West wouldn't have to lead away from his KH.
I don't know exactly how the play of the board went, but it started when West made an opening lead of a small heart, setting up the automatic throw-in opportunity. Declarer then drew trump, played the AD and KD and led an apparent finesse up to the declarer's hand but then over-took the lead with the AC. Then came the throw-in when declarer leads the JC over-taken by West with the KC.
The questions are; can East know that a throw-in opportunity has developed and, can East stop the throw-in?
Using standard leads; West led the third best card, the 7H from either a 3-card suit possibly topped by an honor or not, or the fourth best card from a 4-card or longer suit. Using the rule of 11, East can see that there are 4 higher cards in dummy and East's hand, so either West led low from the AK of hearts, or from a doubleton. If West led from a doubleton, the South has 4 hearts topped by the AK. Therefore, no tricks in hearts. Another possibility exists, West led from a 3-card suit and using the rule of 12, you see 4 higher cards in the dummy and your hand, meaning the declarer has 3 hearts and one card higher than the 7 meaning declarer has either the A or K of hearts. Your partner wouldn't lead away from the AH, so west must have the KH. Declarer wins the heart lead in the dummy, plays 2 rounds of trump and 2 rounds of diamonds.
East now has a complete count of the hands.
West played 2 spades and 2 diamonds. If West has a heart doubleton, then he has 7 clubs. South has 6 spades and 2 diamonds and either 4 hearts topped by the AK with a singleton club honor or 3 hearts topped by the A and a club doubleton topped by an honor because West didn't lead from his possible AK of clubs. West cannot win a heart trick if he has to lead away from the KH again.
Declarer could throw away a club in the dummy if he had 4 hearts topped by the AK. If his singleton club is the AC, it doesn't matter what East does. If South has the KJ of clubs, East must hold up the QC hoping the declarer will guess wrong. If South has the AJ of clubs, East must hold up the QC to protect against the throw-in. West must not overtake a club if it means he will have to lead away from the KH or give declarer a ruff and discard.
Generally, against a slam, West should lead passively. This means, among other things, not leading from Kings. Leading high from the diamond doubleton may be safer, on this hand. In general, when the opponents have confidently bid their contract, with 2 Kings, West should not lead from a 3-card suit topped by a King, in case of creating a possible throw-in situation.
Rule of 11: 4th best lead means subtract card led from 11 to determine number of higher cards out against leader.
Rule of 12: 3rd best lead means subtract card led from 12 to determine number of higher cards out against leader.
Rule of 10: 5th best lead means subtract card led from 10 to determine number of higher cards out against leader.
If you see all the higher cards in the dummy and your hand, then you know the declarer has none.
If you see more higher cards in the dummy and your hand then you know partner lead from a short suit or top of a sequence or top of nothing.
This is board 10 and was played Tuesday morning, January 14th, 2020.
|
|
| Last updated : 26th Jan 2020 15:06 AST |
|
|
|
| I'm not having a good game today because... [0007] |
[1]...because I'm not getting any points.
Your reason means you are thinking that you are playing rubber, social or chicago style bridge or you don't understand how you succeed at duplicate.
At duplicate, you're trying to get your best score at your table - compared - to all the other pairs that played this board from the same direction as you. Your goal is too win more points than the other pairs or lose fewer points than the other pairs that played this board from the same direction as you. Learning how to do that is what makes duplicate the most challenging bridge game.
[2]...because I didn't make my bid.
If you go back and read "I hate Notrump [0006]", you will see that not making your contract can be a good result. Getting upset over an outcome on any board, may affect your outcome on one or more succeeding boards. Getting upset at a bridge result (called resulting) is like getting yips at golf or going on tilt at poker. It will affect your overall score far more than any single bad board you might have. So don't do it.
Unless you're a "real good" player who can remember where all the cards were and can figure out in your head what the best result for that board was, there is no reason to get upset. Don't even get disappointed.
You can't know how your performance on any board compares to how all the other pairs that played this board from the same direction as you.
Here's what you should do:
For every board, you should record how well you think you did. Then after the game you should see how accurately you guessed your results for each board by looking at the actual results online.
Make it simple:
Do you think you scored worse than most, better than almost everyone or the same as or better than most everyone else on that board? Use whatever coding system you want. A simple coding system might be: W=worse, B=better and A=average or same as. Write this code beside your score on your scorecard. Then compare your guess to the actual results online.
You may be surprised by how many times you guessed wrong. Each time you guessed wrong proves that you can't always tell how well you did on any board.
|
|
| Last updated : 1st Feb 2020 15:18 AST |
|
|
|
| There are too many exceptions to the rules [0008] |
Show Detail |
'Words like "always", "never", "must", generally do not apply to the game of bridge[.] Better are words like "generally", "usually", "tends to be", etc.' Ask Jerry, Jerry Helms, p48, Bridge Bulletin, January 2020
We are taught:
- We need 25+ HCPs for 3 Notrump, 26+ HCPs for 4 in a Major and 29+ HCPs for 5 in a minor. Except we should devalue quacks (Qs and Js), give some value to intermediates (tens, nines and eights), add something for length or shortness and add something for honor sequences (KQ, KJT, etc.). And there is no single guideline on how to add or subtract value.
- HCPs can be almost irrelevant with distribution, voids with suit(s) agreement. And there is no single guideline how to bid to get to the best contract.
- Don't force the opponents into a game they might make but might not have bid. If you do force them, you should probably double them or overbid them again and risk going down. And there is no single guideline on when to do which.
- The 5th level is for the opponents. So what am I supposed to I do?
West dealt. I believe the auction went something like this:
(W)-N-(E)-S; (P)-1D-(1S)-2C*1; (2S)-3C*2-(3S)-4D; (4S)-5D*3-(P)-(P); (P)*4-?*5
*1 - This was an amazing bid by occasional partner.
*2 - Partner has 10+ HCPs, we have the majority at 22+. I can't reverse into 2H. Let's see what partner does next.
*3 - Damn, we've forced the opponents into a game they might make. The opponents may be void in diamonds and short in clubs. Maybe we got slam ?*6. I feel that I can't double, so I bid 5D.
*4 - I can feel West going - Damn, we've forced the opponents into a game they might make. And he feels like he can't double and they can't bid as they might be doubled and go down more than the 400 we will make if we make 5D.
?*5 - I'm glad West passed, because it was still a flip of an imaginary coin as to whether or not I double 5S.
?*6 - For comments on bidding "unlikely slams", see My Bridge and Yours, Frank Steward, p62, Bridge Bulletin, January 2020
When you review the results, you will see that most everyone made different decisions.
Note: When you use Play It Again, you can also Edit the hands to move cards around. This allows you to see what would happen if your imagined card layout really existed.
This is board 8 and was played Tuesday morning, January 28th, 2020.
|
|
| Last updated : 17th Feb 2020 14:30 AST |
|
|
|
| I want to get better, sooner [0009]. |
The first question is; how will you know you are getting better?
The first and the easiest method to view change is using the graph under personal analysis. Ignore the jagged line showing your percentage for each game, as it will never be smooth. Instead, use the moving average and set the number of events to average to the highest number that gives you the smoothest line. If the line is higher on the right than it is on the left, you most likely are improving.
There is a theoretical weakness to this measure; if everyone is a good as everyone else, then everyone's moving average of game percentages will be near 50%. There also may be a theoretical maximum you can achieve because none of our top players have a moving average better than 65%. As you get better, with everyone else remaining the same, then everyone else will appear to be getting worse.
There is at least 3 ways to manipulate this measure to appear to be getting better, sooner: 1 - bring in more novice duplicate players to our club; 2 - play only in masterpoint limited games like our Wednesday morning game, and; 3 - play with a stronger partner.
The second and an almost as easy method and is to track how many boards you play poorly against those you play excellently each game. If you drill down to your pair results, you will see that each board is color coded: green - best, yellow - average, and red - poor. This is similar to the coding I recommended for curing your resulting behavior. Your goal is to reduce the number of boards colored red in each game going forward. To help you set a goal for yourself, look at the pair results for several top players and see how many red boards they have each game. Bridgewebs doesn't graph this for you, but you can do it easily yourself.
One advantage of this measure is that as everyone gets better, everyone has fewer red and green boards and more yellow boards, but you can still easily see which boards you need to work on.
In social or rubber bridge, if one pair gets more points on average than the other pair, they will win the match. In duplicate, every pair playing a board from the same direction will have exactly the same number of points on any board. You bid and play the board exactly as you do in social or rubber bridge and you get a positive or negative score. But then, you are assigned points based upon how many pairs you got a higher or equal score; 1 point for higher than and 1/2 point for equal to.
Some people may still be resulting because they believe not only did they play a board poorly but they got a bottom. Resulting is bad and can affect performance on succeeding boards. Don't do it. You need to understand one more important point about duplicate; you can only earn or lose exactly the same percentage on every board. When you play 24 boards, you can earn a maximum of 100%/24 or 4% (exactly 4.1667% for perfectionists) for a top or get a minimum 0% for a bottom and an average board will get you 2%. If you are an average (50%) player, having one bad board means you are going to have a 48% game and having one excellent board means you are going to have a 52% game.
How fast you want to get better and how fast you can learn, determines the number of red boards you should study from each game. Start off small, pick one, and find out why it is red. This can be done through your own analysis, using play it again, discussing it with your partner, asking an instructor or obtaining the services of a mentor. You should also print off the board, make notes on how the board should be bid or played or defended on the page and save it in a binder, for regular review.
|
|
| Last updated : 17th Feb 2020 14:30 AST |
|
|
|
| Analyzing a red board [0010] |
![Analyzing a red board [0010]](/fiddleheadstudio/poorplan2_1.jpg)
This board was played in a Mitchell movement with 8 tables and a skip. Since 7 doesn't divide in 24 evenly, there were only 6 rounds of 4 boards played; therefore each board was played only 6 times. Masterpoints for a board are awarded based upon comparison with scores achieved by the the other pairs sitting in the same direction on the same board. One point is awarded for each score beaten and 1/2 point for each score tied. If you beat everyone, you would get a top of 5 points, 0 points for scoring less than everyone and 2.5 points for an average, which could be by beating 2 and tying 1 or beating 1 and tying 3.
The yellow box in the bottom right is called the double dummy results and represents the maximum contract each pair can achieve in each denomination if both pairs could see all the cards and each could create their best plan of attack. It doesn't mean the contract is biddable or that either pair can find the best plan of attack meaning your actual result can be higher or lower than the double dummy suggests. Bridge and computer theorists suggest that the experts and programs will more often come closer to the indicated double dummy result.
I arrived at 6 Spades which was unlikely to be bid by anyone else. Making this contract would likely be a top (5 points). Not making it (going down) would likely be a bottom (0 points) since game appeared to be almost certain to be made.
I didn't make the contract. My plan was poorly concieved. And I won't bore you with all the excuses I have come up with.
West led the 10C which most likely could have been: a doubleton, top-of-nothing or top of an interior or broken sequence. If it was top-of-nothing, then the QC was on my right. With 6 cards missing, the likely QD could be a singleton (15%) or doubleton (48%). If I could drop the QC while keeping the JC, I would have 4 spades, 2 hearts and 3 clubs after drawing trump for 9 tricks. If spades split 3-2 (68%) versus 4-1 (28%), and I would need to ruff 2 hearts before drawing all the trump. Fortunately, I can ruff hearts high twice and still draw trump. That brings me to 11 tricks. All that is necessary is for diamond honors to be split and for me to guess where the AD and QD are to get 12 tricks.
If I hadn't bid this unlikely slam but still made 12 tricks, I would have tied for best score for 4.5 points. If I had made 11 tricks, I would have had the second highest score for 4.0 points. Bidding 4S and making 4S would have been an average for 2.5 points. When I adjust my score higher, I also have to adjust the scores or the pairs that I have beaten lower (-1.0) or tied (-0.5). Making 6 Spades would increase our score by 5.0 masterpoints and reduce the masterpoints for pairs 1, 2, 4, 6 and 8 by 1.0 moving us up to tie pair 3 for 5th spot.
Maybe I should be a little less aggressive bidding slams in the future. I definitely should spend a little more time analyzing the risks and planning the play.
This is board 1 and was declared by me Monday afternoon, February 10th, 2020.
|
|
| Last updated : 25th Feb 2020 14:51 AST |
|
|
|
| Duplicate is a game of 10s [0011] |
When you play Social or Rubber bridge, you are rarely concerned which denomination provides the highest score as long as you can make your game or part-score bid.
You are taught, when playing duplicate, that a suit contract usually can make one more trick than notrump with the same HCPs - this is because you are likely to get an extra ruff in a suit contract. You are also suggested that making 9 tricks in notrump may be easier than making 11 tricks in a minor suit, so you should normally choose notrump.
1 notrump (90 points) beats 1 major (80 points) and ties 2 minor (90 points).
3 notrump (400 points) loses to 4 major (420 points) and ties 5 minor (400 points).
If you can make 4 notrump (430 points) beats 4 major (420 points) and beats 5 minor (400 points).
In duplicate, you are measured against all the pairs that play the board from the same direction as you. You get 1.0 masterpoint for each pair that you score higher than on that board and 0.5 masterpoints for each pair that you tie. If you bid and make 4 notrump and everyone else bids and makes 4 major, then you get the most masterpoints for that board. If 6 pairs play that board from the same direction and your score beats them all, then you get 5.0 masterpoints and they only get 2.0 masterpoints for tying each other.
When you play Social or Rubber bridge, you would rarely think of winning an auction knowing you will go down. If you do compete, it's because you believe that you have the best part score contract. If you think your opponents have overbid when they win a part score auction, you probably wouldn't think to double them in case they make the contract and win game points.
Playing duplicate, you may get a better score by going down than if you allowed the opponents to make their game or part-score contract. If all the pairs playing the board in the same direction as you allow their opponents to make their contract while you compete and win the auction and go down losing fewer points than your opponents would have won, then you will get the most masterpoints for that board. If 6 pairs play that board from the same direction and your loss is lower than them all, then you get 5.0 masterpoints and they only get 2.0 masterpoints for tying each other.
Losing 100 points beats your opponents making 110 or 120 points.
Losing 350 points beats your opponents making 400 or 420 points.
You may have attended classes on competitive bidding where you learned that you should make sound pre-empts when attempting to steal the contract. This means that at favorable vulnerability, your bid should guarantee you won't go down more doubled than opponents will get if they make their contract:
NV vs V or NV:
Down 1 doubled (100 points) beats 2 major (110) or 2 notrump (120)
NV vs V:
Down 3 doubled (500 points) beats 4 major (620) or 3 notrump (600)
NV vs NV:
Down 2 doubled (300 points) beats 4 major (420) or 3 notrump (400)
You may also have heard that opponents don't double often enough, meaning that you can take more risks. When you have an agreement with your partner to take more risks, you need to check either Light or Very Light pre-empts on your convention card. If you don't have a convention card, you need to inform your opponents of your pre-empting style before you begin the round.
NV vs V or NV:
Down 2 not doubled (100 points) beats 2 major (110) or 2 notrump (120)
NV vs V:
Down 11 not doubled (550 points) beats 4 major (620) or 3 notrump (600)
NV vs NV:
Down 7 not doubled (350 points) beats 4 major (420) or 3 notrump (400)
If your opponents are pre-empting you out of your best contract or overbidding you and stealing the contract because they are willing to go down, you must penalize them by doubling. This means that you may make less than you might have made if you won the auction, but you will make more than the other pairs who didn't double.
When your opponents realize that you are likely to be double them when they try to steal the contract, they will be more reluctant to make risky bids against you and you will more often be the winner. As in all duplicate bridge rules, there is no guarantee that your double will have the expected effect and you may get a worse result.
|
|
| Last updated : 3rd Mar 2020 11:32 AST |
|
|
|
| With no additional information? [0012] |
![With no additional information? [0012]](/fiddleheadstudio/bd21_1.jpg) This was a red board for my partnership, so I'm going to try to learn something from this board. The only other North declarer in 4H, who got the same lead, went down the same as I did. Is that a valid reason to move on to another board? No. Double dummy says I should make 4H against the best opponents. How can I do that? What conditions must exist to allow me to do that?
Did you know that the steps you should take before you play to the lead, are psychologically similar to the steps a figher jet pilot takes when entering a combat zone. It is called improving your situational awareness.
It could be described as: Don't panic, breathe, consider your objective, count your winners, count your losers, look for alternatives, choose a strategy and optimal plan, execute and adapt. See The Diamond Series, Audrey Grant.
I have 27 HCPs, 8 hearts. It looks like most pairs will be in 4H.
5 Quick Tricks: Ace Spades, AK Hearts and AK Diamonds. I might be able to get 2 Diamond tricks with the QJ if I can draw trump (3-2) and enter North hand with the 8H. The brings my total to 8 tricks. But I will have to give up control of the lead.
4 Likely losers: 1 Spade, 1-2 Hearts, 2-3 Clubs. If Hearts are 4-1, I may have 5 losers. If the AQ Clubs are over my KJ, I may have 5 losers even if Hearts are 3-2 and 6 losers is Hearts are 4-1.
It looks like everyone is going to go down. Maybe the best result is to go down the least. If everyone else is going down, making the contract is likely to be a top.
I can only make the contract if I can get 3 Heart tricks, 1 Spade trick and 2 Spade ruffs, 4 Diamonds and possibly 1 Club. In order to do that Hearts must be 3-2 and when I give up control, the opponent getting control must be void in Hearts and can't ruff Diamonds. That means that one opponent must have only 2 Hearts and 2 Diamonds.
If the AQ Clubs is over North, then I can't give up control by leading a club to the KJ. I also can't give up control in Spades to West allowing a lead through my KJ of Clubs. If the AQ is split between East-West, I will have to guess correctly when clubs are led, so as to not lose 3 club tricks. If East has 2 Hearts and 2 Diamonds and the King of Spades, I can still go down if the AQ CLubs are split.
In order to make my contract, East has to have the KS, 2 Hearts, 2 Diamonds and the AQx of Clubs. I have to win the Diamond lead, draw two trump, unblock diamonds, lead the AS and a Spade throwing East into the lead. Now East has to lead away from his club winners or give me a spade ruff and an entry to North hand. I can now take my QJ Diamonds throwing 2 clubs and give up the lead to the AC. I have limited my losers to KS, AC and a Heart making 4H.
The other pair that declared 4H by North getting the 10D lead may have had a different auction than we did. But I have been ignoring the additional information I have from our auction. Which was:
I have 27 HCPs. EW have 13. West is likely to have less than 3 HCPs. That means that East likely has the KS and AQ Clubs with length in Clubs. All I need is for East to have 2 Hearts and 2 Diamonds.
"Situational awareness or situation awareness (SA) is the perception of environmental elements and events with respect to time or space, the comprehension of their meaning, and the projection of their future status." Wikipedia
I should have made the contract. This board 21 was played Monday, March 2nd.
|
|
| Last updated : 10th Mar 2020 15:55 AST |
|
|
|
|
|
|