 HOTW 27 Nov 2019 | Not up to you! HOTW 27 Nov 2019 | Not up to you! |
Show Detail |
Not up to you!
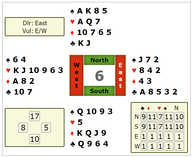
Here's a common situation in which players may be tempted to go wrong. After you respond 1♠ to partner's opening 1♥, she bids 2♦. What do you bid now? There are three (seeming) front-runners. These are, in ascending order:
(a) 2♥ (b) 2NT (c) 3♥
Each bid has its attractions. Let's hear some reasoning:
2♥ We've got a 5-3 heart fit, but partner's not got a blockbuster so game's unlikely – 8 tricks are easier to make than 9!
2NT We've got a heart fit, but I'm flat as a pancake, so maybe NT is a better option. My bid shows 10+ points, just in case partner's got 15.
3♥ We've got a heart fit and I've got 10 points, so I should invite to game in hearts.
There we are, then. Which bit of reasoning do you prefer? Do you notice any flaws in the others?
Unwarranted assumptions ...
The right bid is 3♥. If you'd had 4 hearts and 10 points, you'd have raised partner straight to 3♥, wouldn't you? It's exactly the same here, except that the fit's 5-3 instead of 4-4. The other two bids result from unwarranted assumptions:
2♥ Partner may have only 11 or 12 points, but she may have more – up to 16 points, in fact. It's not up to you to decide whether partner's 'weak' or not. If you invite with 3♥, she can make up her own mind.
2NT NT may look good from where you're sitting, but maybe not from the other side of the table. In fact, you know partner has an unbalanced hand, as she's shown at least 9 cards in the red suits. It's not up to you to overrule a known heart fit just because you're 'flat'.
There's another reason to reject 2♥ and 2NT – they both contain untruths.
... and plain lies
2♥ This is a 'weak preference' and would be fine if you had 6-8 points. But you have 10. It lies about your strength. Even if partner is 'top end' for her bid, she's going to pass 2♥ – and you'll miss your game. Disaster.
2NT This bid is truthful about your strength but not about your shape: it specifically denies three hearts. If partner's strong, she'll accept your invitation to game in NT – again, with disastrous consequences, as you'll see if you look at the whole deal.
The right contract
With a combined 26 points and a 5-3 heart fit, 4♥ is clearly the place to be. It's not a doddle to make, given the 4-1 trump split, but you should be in it and giving it your best shot. Most of the time, subsiding into 2♥ will earn you a deserved bottom.
3NT is (or should be) even worse. On West's lead of the ♣10, East wins with the ♣K, returns a small club and EW take the first 5 tricks.
The twofold moral is simple, and sums up that big poster in the centre of our notice board:
- Bid your hand, not your partner's – i.e. don't make unwarranted assumptions about partner's hand.
- Don't lie, either about your strength (2♥) or shape (2NT).
In Box and Bath
In Box, two tables were in 4♥ (one making) and two in 3NT (again, one making on the daft lead of the ♥3). At least you were all in game!
In Bath, 9 of the 11 tables were in 4♥, 5 making. Just two went for 3NT – again, one making, due to poor defence.
|
|
|
|
| HOTW 18 Sep 2019 | Yet another example ... |
Show Detail |
Yet another example ...
We've been here before, but it's a good place to revisit – by a few Bath Tuesday evening players as well!
Question 1 Sitting South, what do you bid in reply to your partner's 1♦ opener? Do you show your scrappy 9xxx heart suit or raise diamonds? And if so, will it be 2♦ or 3♦?
Trick question. If you plumped for a diamond raise, it doesn't matter much whether you say 2♦, 3♦, 4♦ or 5♦, because a direct raise in a minor denies a 4-card major. And since you have a 4-card major, you should bid it: 1♥.
Question 2 If your partner now raises you (as she will) to 3♥, will you pass or accept the invitation and bid 4♥?
If you're suffering from residual worry about the lowly nature of your heart suit, you're in the wrong place. First, your partner's hand: she has at least 4 hearts, and therefore at least 5 diamonds and she's strong enough to jump raise you: in other words, she's either got 16ish points or a 6-loser hand, or both. Now your hand: only 9 points, true, but that's only 1 point shy of game points, and you've only got 8 losers. Plus you have the added bonus of a double fit with partner. You should raise to 4♥ in your sleep.
How does it play out?
Take a look at the whole deal. You have a cold 11 tricks in hearts – but that's only if you're unlucky enough to get a club lead from West *. If she leads anything else, you can discard a losing club either from dummy (on a spade) or your hand (on a long diamond) and will end up with 12 tricks.
* If East's on lead, by contrast, you're always going to get a club lead – just as well you're the declarer and not your partner!
And if South raises diamonds?
Well, with only 25 points between you you're not going to reach 5♦, are you? And even if you do, it's a near bottom, because it scores less than 4♥= and lots less than 4♥+1.
There's a chance that you can still find your heart fit if North now bids 3♥ over your 3♦ raise: this is a no trump 'try' showing stops in hearts – it doesn't guarantee 4 of them, mind. But most of the time you'll end up in a disastrous part-score contract in diamonds. It's just so much better if you show your heart suit at the first opportunity ...
In Box and Bath
In Box, 3 pairs reached 4♥ – 2 by South, 1 by North – and one languished in 3♦ +2. Why East didn't cash two club tricks against North's 4♥ is a mystery.
In Bath, 5 pairs were in 4♥ – 4 by South, 1 by North – all making at least 11 tricks. 3 others fell into the '3♦' hole and one West ended up in 3♠ (undoubled!) minus 3 – how they were allowed to play in that is mystery no 2!
|
|
|
|
| HOTW 07 Aug 2019 | Crumbling cookies |
Show Detail |
Crumbling cookies
South side story
From a NS point of view, this is a perfect auction. South opens 1♠, intending to jump in NT if no fit is found, but West scuppers that with her 2♥ overcall. Holding a weakish hand but with good spade support and just 8 losers, North jumps (semi-preemptively) to 3♠ and South raises to game.
West leads the ♥A and down goes dummy. Looks good, doesn't it? You're going to lose two hearts and a club, and the rest are yours: 5 spades, 3 diamonds, a club and a diamond ruff. 10 tricks. All you have to do when you get the lead is clear trumps, force out the ♣A and ...
But sadly, you don't get the lead. West cashes her ♥AK, then switches to a low club to East's Ace. East returns a low club, up goes your ♣K ... and West ruffs. Her club was a singleton, and you're one off.
Let's have a look at the whole deal and switch focus.
West side story
You're West and it's your opening lead. With a singleton, you'd normally lead that against a suit contract, but holding the ♥AKQ the ♥A is a no-brainer: it allows you to take a look at dummy while keeping the lead - you can lead your singleton club later. But when? Best to cash your ♥K first so that, if partner has the ♣A, she won't be tempted to lead you back another heart.
And the rest is history. West's two heart tricks, East's ♣A and (providing East returns a club) the fatal club ruff.
Moral
So should NS have stopped in 3♠? Not a bit of it! 19 times out of 20 you'll make it. Any nitwits who stop below game will be getting an utterly undeserved top on this board, but you can console yourself with the thought that the other 19 times they'll be earning a thoroughly deserved bottom. It's just the way the cookie crumbles.
In Box and Bath
In Box, every NS pair was in 4♠, going off each time - well defended, EW!
In Bath, every pair but one reached 4♠, mostly going off, but a couple made it (thank you, defenders!). And the other pair? You've guessed it: they stopped in 3♠ and cleaned up with 80%. 
|
|
|
|
| HOTW 22 May 2019 | Lucky declarer! |
Show Detail |
Lucky declarer!
I chose this hand for two reasons. One, it's dead easy to bid game, yet half the NS pairs missed it. And two, it's an example of luck being firmly in declarer's favour.
First, the auction. South's 1NT rebid shows a balanced 15-16 points (15-17 for some) so with 10 points, North knows immediately that game is on. It's just a question of whether it should be 4♥ (if partner has 3 hearts) or 3NT (if she doesn't). How to find out?
Well, many of us sophisticates at Bath BC use a device called Checkback Stayman, which is quite accessible and for which info exists if you're interested, but let's bypass that and just use simple Acol. With a weaker hand, North would just pass 1NT (2♥ being reserved for a weaker hand with six hearts). Here, with game known to be on, she just jumps to 3♥: 'Hey, partner, we're in game, but just in case you're interested I've got 5 hearts. You choose!' And with 3 hearts, South duly chooses 4♥. Doddle, eh? (It wouldn't be wrong simply to raise partner to 3NT, but when there's still a chance of a major fit, as here, it's usually best to check it out on the way. On this hand, hearts is definitely the place to be.)
Now take a look at the whole deal and we'll see how lucky declarer is ...
The play
It doesn't much matter what East leads. How many tricks are you going to make as declarer?
I make it 13: 5 heart tricks, 3 spades, 4 clubs and 1 diamond. So how come NS can make a grand slam with a balanced holding and only 25 points between them?
The answer is that all the coins have landed heads up. First, the heart finesse is right (and the hearts kindly split 3-2). Then the spade finesse is right. And then, joy of joys, the clubs split 3-3. *
How does it go? Let's say, just to make it harder, a diamond's led. Win with the ♦A and finesse a heart. It wins. Back to hand with a spade finesse to the ♠Q - which also works - and repeat the heart finesse. Now, retaining your ♥A in dummy, start on the clubs. Cash the ♣AK and ruff a third, dropping the ♣Q and ♣J (!). Now lead a 3rd trump, dropping East's ♥K under your ♥A - that's all the trumps gone - and cash your two remaining clubs, discarding that losing diamond and a little spade, and you have 13 tricks.
In Box and Bath
In Box, two pairs reached 2♥ (see above) and the other two were in 3NT (going off) and 4♥. Those in hearts all made 10 tricks.
In Bath, 9 out of 10 pairs reached game, though only 3 bid 4♥, the other Norths (presumably deterred by their 'poor' hearts) preferring 3NT. Two of the 4♥ pairs made 13 tricks for a deserved shared top.
* The odds of both finesses being right AND the clubs being 3-3 are 50% x 50% x 36% = just 9%. It's actually less than that if you factor in the 3-2 heart split. Not a slam you want to be in, then!
|
|
|
|
| HOTW 10 Apr 2019 | Staying honest |
Show Detail |
Staying honest
You opened the bidding with 1♦, crossing your fingers that your partner will respond 1♥: then you can simply raise her to 2♥ and whether it goes further is up to her. But this being bridge, she bids 1♠ instead. So what do you rebid? The candidates are 1NT, 2♦ and 2♥.
1NT is obviously out – partly because of the shape, but also because it shows 15-16 points and you've only got 13. So which is it? 2♦ or 2♥? Most inexperienced players will reach for the 2♥ bid: 'I've got 5 diamonds and 4 hearts and we don't want to miss a possible major fit ...' Not a good idea. But why?
Well, imagine your partner has something like this: ♠ K Q 8 7 5 ♥ 4 3 ♦ 8 6 3 ♣ J 8 4. With only 19 points between you and with diamonds your only fit, you'll want to be in diamonds – at the lowest possible level. Unfortunately, as the bidding has already reached 2♥, your partner's only option is to go to the THREE level and bid 3♦. With the probable result that you'll go one off for -100, instead of +90 for 2♦ making. Ouch!
Q What got you into this mess?
A Your 2♥ bid, which was a reverse. A lot of learners have difficulty getting their heads around the reverse, but it's simple enough: if your rebid comes in higher than a simple rebid of your opening suit (in this case, if it's higher than 2♦) you're reversing. Which is fine, providing you're strong enough to withstand a weak partner having to bid 3♦. That'll normally be 16+ points.
So on this hand, with just 13 points, you grit your teeth and rebid 2♦ (which your partner, should she have the weak holding shown above, can gratefully pass). 'But what if my partner's got 4 hearts?' A reasonable question, to which the answer is: 'Well, she'll bid them now, won't she?'. With 5 spades and 4 hearts (she'd have to have 5 spades or she would have responded 1♥ to start with), she'd still be looking for a major fit, even with modest points. So there's no danger of missing a 4-4 heart fit after all!
One further point: because a reverse is a strong bid, showing 16+, it's forcing for one round: your partner has to bid again, even if she's weak. Which makes it a useful tool in the search for game. But the system only works properly if you don't abuse it by reversing when you aren't strong enough – as on this hand.
What happens on this deal?
Take a look at the full deal. South has only 8 points, giving you a combined total of 21, but due to an improbable cluster of lucky circumstances that belie the board number – the double diamond finesse works, the ♥Q drops, the ♣A is right – you can make all sorts of extraordinary contracts, including 3♥, 3NT and 5♦. On a normal day, though, you'll just be making 8 tricks in diamonds, and that's exactly where you should be.
In Box and Bath
In Box, everyone was in diamonds (one in 3♦, probably forced up there by a reverse by opener), making 8, 9 and 10 tricks.
In Bath, 8 out of 13 pairs stopped in 2♦, mostly making 9 or 10 tricks. The rest ended up in NT contracts with varying success.
|
|
|
|
| HOTW 13 Mar 2019 | It's simple if you remember! |
Show Detail |
It's simple – if you remember!
As we discovered in last autumn's seminar on not missing game, it's often responder's 2nd bid that makes or breaks an auction. On this hand, sitting East, it's simple enough to bid 1♥ in response to partner's opening 1♣, but what do you bid next, over partner's 1♠ rebid?
It's pretty obvious that you'll now want to show your club support. With a minor fit, you're interested in no trumps, of course, but so is your partner – if she's got the diamonds covered she'll no doubt let you know. So what's your bid?
If your answer's 2♣, you've probably just missed game. Why's that? Well, each bid you make gives information about two things: shape and strength. If your first bid is a change of suit, as here, that says little about your strength: merely that you've got more than 5 points. You could have 6 or you could have 20. Your 2nd bid is an opportunity to tie that down a little. So how do you show partner that you have not 6, not 20, but 10 points? Simple: raise her to the three level: 3♣. Now she has no problem finding the right contract: 3NT.
So what's the 'remember' bit in the title all about? Well, imagine West had opened 1♥. With heart support and 10 points, you'd have raised her to 3♥ in your sleep. It's exactly the same in the current auction. Nothing's changed. You have support for partner's clubs. And you still have 10 points. So you still want to raise to the three level. And that's what a lot of responders forget on their 2nd bid: they want to show their fit and forget that they haven't yet said anything about their strength. It happens time and time (and time) again.
The whole deal
Have a look at the whole deal.
Your partner has a very pleasant 17 points. She'd like to tell you that on her 2nd bid, but she can't: a jump shift to 2♠ would be absolutely forcing to game, and for all she knows you only have 6 points. So she crosses her fingers and hopes you won't pass her 1♠ rebid. If you now say 2♣, she may well conclude that you're hovering around 5-7 points and simply pass 2♣. She shouldn't, of course, because she's strong enough to bid 2NT – in which case you'll (luckily!) have a chance to correct your mistake and raise her to 3NT. But if you end up in a part-score it'll be at least partly your fault.
How does it go?
North may prefer to lead her ♥J (leading through dummy's suit) rather than her ♠J (leading round to declarer's suit). If not, she'll certainly switch to a heart lead when she comes in with her ♣K. Declarer must, of course, cover with dummy's ♥Q, limiting South to just three heart tricks. Leaving declarer with nine tricks – 10 if North never leads hearts.
In Box and Bath
In Box, everyone was in 3NT, all making.
In Bath, things were more varied. One pair managed to fade out in 2♣ – making 11 tricks! – while another somehow managed to stop in 2NT (making 10 tricks). Most of the others were in 3NT – all by West – but a couple of Wests, tempted by their 5-loser holdings, tried the club slam, which goes off as the ♣K is wrong.
|
|
|
|
| HOTW 23 Jan 2019 | Screaming at you |
Show Detail |
Screaming at you
A couple of questions:
Q1 What should you have for a 3-level opening bid, eg 3♦?
Q2 If partner opens one of a suit, what point-count would you have to respond 1NT?
The answers (Q1: a weak hand, 5-9 points and a 7-card suit; Q2: 6-9 points) should be enough to guide you to the right contract here.
- Although holding a 7-card suit, East is far too strong to open a pre-emptive 3♦, and should open 1♦, showing opening strength.
- West, knowing that a major fit is the best place to be, shows her hearts: 1♥ ...
- ... allowing East, who also knows of the importance of a major fit, to show her own major: 1♠.
Which brings us to what is so often the crucial bid of the auction – responder's second bid. Having disposed of the likelihood of a major fit, the idea of playing in no trumps should now be screaming at West, who, all being well, has a couple of club stops. So she should bid 1NT, yes? No! We've already established that that would show 6-9 points and West has 10. She should instead bid 2NT, showing 10-11 points. Well, there's only a point in it, you might think ... but that's not quite true. It's actually a whole ACE better than the minimum 6 points promised by 1NT ...
... and that will make all the difference to East's reaction. She'll now reason that West can be relied upon to have tricks in both hearts and clubs, which together with her seven likely tricks in diamonds adds up to nine ... and will raise to 3NT. Which makes comfortably, the combined 22-point count notwithstanding.
But shouldn't we be in diamonds?
No. Game in diamonds requires 11 tricks, whereas for game in NT you need just 9. East's diamond suit will yield 7 tricks whether you're in diamonds or NT, so why give yourself the – probably impossible – task of finding two extra tricks? What's more, if you can take 10 tricks in NT – as you can on this hand with a (likely) club lead – that scores more than TWELVE tricks in diamonds. Two excellent reasons for preferring NT to a minor game.
A prediction
Check out the travellers for any event in any club. The odds are you'll find a hand where the good scores are for declarers in 3NT and the also-rans are in a minor part-score or a minor game. This hand is very much a case in point – see below.
In Box and Bath
In Box, two pairs found 3NT, making 9 and 10 tricks. The other four were in 2♦, 3♦ and 5♦ (which should go off, as EW have 3 spade losers).
In Bath, the winning seven pairs were in 3NT, all making at least 10 tricks. Three also-rans ended up in 2♦, 3♦ and 6♦ (which duly went 2 off – but at least they tried for a good score!)
|
|
|
|
| HOTW 16 Jan 2019 | Losers ⇒ Winners |
Show Detail |
Losers ⇒ Winners
I like the way the bidding on this hand prevents EW from bidding their suits and allows NS to find game on just 20 points.
West's clubs are simply too ragged to merit a 2-level overcall over South's opening 1♦, and North's 1♠ response (the higher of two 5-card suits, allowing her to bid the lower one next time without reversing) blocks East's intended spade overcall.
Over South's 2♦ rebid – no, South should NOT rebid 2♥. which would be a reverse, promising 16+ points – North duly shows her hearts, the fit is found and the losers come into play: South (the opener) has just 6 losers so raises to 3♥ ... and North (the responder), with only 7 losers, raises to game.
The play
East leads the ♠K, which you ruff in dummy. What next? A cross-ruff looks attractive, but the rule is that before you embark on a cross-ruff you should cash your side-suit winners. The club finesse is a no-brainer, but what about finessing the diamonds? With a singleton in hand, it seems unattractive ... but I think it's worth taking the finesse, whether it wins or loses, because you can then discard a spade or two on dummy's remaining top diamonds. (Yes, I know. You can ruff spades anyway, but you have FIVE of them, and dummy's trumps aren't going to last for ever.)
So at trick 2 you perform a (successful) club finesse, then a (successful) diamond finesse. Then cash your ♣A, back to dummy with a 2nd spade ruff, cash your ♦A (discarding a spade) ... and start your cross-ruff.
Eventually, West will get fed up, ruff a diamond with her ♥A and lead another trump, but it'll be way too late and you'll be on course for 11 tricks. Cross-ruffs are often quite hard to visualise, so it's worth playing it out with real cards to see how it goes.
Four useful points ...
to take from this hand:
- Once you have a fit, count your losers and bid accordingly: it's amazing how many points you might not need!
- When reponding, you bid 4-card suits 'up the line', but with two 5-card suits, bid the higher suit first: this makes it cheaper for partner to choose between them.
- Be aware of the extra points opener needs to reverse: here opener's rebid of 2♥ would be a reverse, but she's SIX points short of its minimum requirement. Instead, simply rebid your diamonds and see what partner says next.
- Before starting a cross-ruff, cash your winners in any side-suits. If you don't, you'll find them getting ruffed later on.
In Box and Bath
Everyone in Box, to their credit, found 4♥ – but alas only two pairs made it, the other three making just 9 tricks (probably because they cleared trumps instead of going for the cross-ruff – if you were declarer, deal it out and try again!)
In Bath, it was more varied: some NS pairs stopped in 3♥, while quite a few EW pairs managed to bid their spades – forcing several NS pairs up to 5♥, which they then doubled. Most declarers in hearts made 10 tricks; one managed 11 and one other somehow made 12 tricks (doubled!) for a juicy +750.
|
|
|
|
| HOTW 02 Jan 2019 | A 4-card suit is fine! |
Show Detail |
A 4-card suit is fine!
Players often seem to get stuck for a bid in situations like the one shown here. If partner had opened 1♣ and you had 4 spades, I doubt there'd be a problem: you'd just respond 1♠ and take it from there. But there seems to be a widespread idea that you need a five-card suit when responding at the 2 level. No, you don't! With one simple exception *, responding at the two level is exactly the same as responding at the 1 level, except that you need 10+ points to do it: just pick your lowest 4-card suit and bid it.
This hand's a simple example: you haven't got 4 spades, but you've got 11 points, so are strong enough to respond at the two level and therefore show your (only) 4-card suit: 2♣. 'Oh, I can't bid that - look how weak it is!' Of course you can. You're not telling your partner that you want to play in clubs: you're simply telling her that (1) you haven't got 4 spades (2) you have 10+ points and (3) you have at least 4 clubs. Pretty efficient, eh? And there's no danger of you being left in 2♣ because your change of suit is forcing: your partner has to bid again – and in fact what you're really hoping for is that she'll turn out to have 5 spades so you have your major fit.
And so it turns out. Partner's rebid is 2♥, showing at least 5 spades and 4 hearts. And you can now complete the description of your hand by jumping to 3♠, showing 3 spades and either 8 losers (which you don't have) or 10+ points (which you do). With a mere 13-count (of which 2 are a singleton Queen) and 7 losers, West has nothing extra to offer, so turns down the invitation to game and the complete auction is as shown:
If you take a look at the whole deal, you'll be glad you didn't push on to 4♠. You're missing the ♠AK10 as well as the other 3 Kings. And in spite of the fact that the spade, heart and club finesses are all working (and the diamond one too, via a ruffing finesse!), you're still only worth 9 tricks on the best defence.
'But East can make 3NT, can't she?' She can indeed. But that's only because, as noted above, all those finesses are working for you. Normally you won't make 3NT on a combined 24-count. 3♠ is the place to be.
In Box & Bath
In Box, one pair reached 3NT (going 1 off) and everyone else was in 3♠, two going off and one making 10 tricks (Well done, Jenny – you proved me wrong, though I'm not sure how!)
In Bath, half the EW pairs were in NT (making 6, 9 or 10 tricks) and the others were in spades, making 8 or 9 tricks. Two were in the unmakeable 4♠.
* The exception: If partner opens 1♠, a 2♥ response shows at least 5 hearts. This is the only change-of-suit sequence that requires responder to have a 5-card suit.
|
|
|
|
| HOTW 21 Nov 2018 | The joy of transfers |
Show Detail |
The joy of transfers
Ain't transfers just wonderful? Not only do they tell partner about your 5-card major, but – because your partner has to make a bid herself – you then get another bid to describe your hand further.
Here it works a treat. North's transfer tells opener that she has 5 hearts, and her next bid – a forcing 2♠ – completes the picture: I have 5 hearts and 4 spades, partner, and points. What do you want to be in: hearts, spades or no trumps?
With 3 hearts, South prefers hearts, but with a minimum 12-count, is content with 3♥. With 15 points, North now raises to the heart game. End of auction.
Why is 2♠ forcing?
Because if North is 5-4 in the majors and is weak, she'll use 'weak Stayman' instead: she'll pass 2♥ or 2♠ and if opener responds 2♦ (no 4-card major, partner) will sign off in 2♥.
With this strong 5-4 holding, Stayman doesn't work well. Opener responds 2♦ and you end up in an inferior 3NT – the 8-card heart fit is never found.
So where are your 10 tricks coming from?
West leads the 6♣ . You can count 5 trump tricks, 3 spade tricks and one club trick. Where's the 10th?
Or put another way: you're going to lose one club, 2 diamonds and (once you've cleared trumps) your 4th spade. How do you avoid losing 4 tricks?
The answer to both questions is the same: you avoid losing your 4th spade by ruffing a spade in dummy – the short trump hand. But of course you have to do that BEFORE you clear trumps – otherwise you won't have any trumps left in dummy to ruff with!
So win trick 1. Cash the ♠K, play a low spade to the ♠A and ruff a spade. There's no need to 'ruff high' as ALL three trumps in dummy are 'tops': you hold all the top trumps down to the 8. Then you clear trumps, not caring a jot that East has 4 of them, and you come to 10 well deserved tricks.
But you have to plan it from trick 1!
In Box & Bath
Very telling results in Box: 3 out of 4 reached 4♥, but only one made 10 tricks (and that was because of a defensive error) – should have gone to Trevor's seminar on Declarer Play! One pair missed the hearts (probably via Stayman) and went one off in 3NT.
In Bath, 5 pairs were in hearts (one, strangely, stopping in 3♥), four making 10 tricks. The other three were in 3NT, all making.
|
|
|
|
| HOTW 07 Nov 2018 | Jump shift |
Show Detail |
Jump shift
The jump shift doesn't come up that often, but it's a handy way of ensuring that game is reached. This hand's a good example.
With a shapely 18-count, North opens 1♥ and as soon as South responds knows that they're in some kind of game. The onus is on her, then, to make sure that they get there. 2♦ is out of the question: that would show an ordinary hand with (say) 11-15 points, and a weak South may simply pass. Edge that up to 3♦ instead and you've got the jump shift - an unconditional game force and the strongest 2nd bid opener can make after opening 1 of a suit. Job done - one way or another, you've guaranteed game.
What does South say now? 4♥ is it. Why? Two reasons.
- First, the ♥: North's 2nd bid guarantees 5 hearts, so you've found your major fit. No need to repeat your spades, then. If you've found a good place to be, don't look elsewhere!
- And second, the 4: you're in a game-forcing situation. So with a weak hand (you have just 7 points) simply bid it. This is 'fast arrival' and means: 'OK, partner, you want to be in game. Here it is. Can we stop there, please?' [3♥, on the other hand, would show a stronger holding and an interest in a slam, but that's another topic.]
And missing two aces and the trump King, 4♥ is exactly where you want to be.
What about the jump rebid, then?
An alternative 2nd bid for North would have been 3♥, which shows a decent 6-card suit and 16-18 points. It's certainly not 'wrong', but I prefer 3♦ for two reasons. One, it gives a better indication of your shape - in case NT is the best contract, for example. And two, 3♥ is not forcing: a weak South can pass it, and I think you're strong enough to force game.
The play ...
... turns out to be quite tricky, as you'll see if you look at the whole deal.
On the lead of the ♠9 from East, you might be tempted to win with the ♠A and then lead the ♠Q to discard one of your clubs. Oops - East ruffs! Or, if you win in hand, you might try the diamonds, intending to get a diamond ruff in dummy before clearing trumps. Oops again - the second round gets ruffed, this time by West.
It turns out that the safest play is to win the spade lead in hand and bang out ♥A and another heart, giving West a trick with her ♥K. They can make their two minor aces, and that's that.
In Box and Bath
In Box, 5 out of 6 NS pairs reached 4♥, making 9, 10 or 11 tricks. The other pair were in 3NT.
In Bath, it was a similar story: one pair was in 3NT, the others all in hearts, again making 9, 10 or 11 tricks. One pair got too excited and looked for a slam, stopping in 5♥, but that proved to be a trick too high and they went one off.
|
|
|
|
| HOTW 22 Aug 2018 | It's that Holy Grail (yet) again |
Show Detail |
It's that Holy Grail (yet) again
It's always gratifying when you pick up a chunky 16-count and partner opens the bidding. That's some kind of game, then - at least! The eternal question, of course, is what kind of game and how to get there. What's your response on this hand? The answer's simple, providing you know your basic bridge priorities ...
Stayman. The Holy Grail of the auction is a major fit, and you might have a 4-4 fit in spades. If you have, you're going to be in (at least) 4♠. If not, you'll probably end up in 3NT. Or maybe even in 6♦ on a good day ... But don't let those long diamonds lead you astray - to start with, you look for your major fit. So 2♣ it is.
As luck would have it, partner responds 2♠ and that's that. You have your major fit and with a maximum of 30 points between you, you bid 4♠. End of auction.
'But wouldn't no trumps be worth 10 points more?' 'Suppose we've just missed a slam in diamonds?' Good questions, to which my off-the-cuff answers would be, respectively:
- 'Yes, if you make the same number of tricks. But a suit contract is usually worth a trick more than a NT one.' and
- 'Well, if you can make a slam in diamonds, you can surely also make a slam in spades, and that's worth more!'
Let's have a look at the whole deal and find out ...
What can you make?
Well, we did well to avoid no trumps. Sure, once we get the lead we can take 12 tricks, but unfortunately they can take 6 club tricks first!
The diamond slam is certainly on, with NS making just the ♣A. But, as predicted, you can also make a slam in spades (you simply clear trumps and bang out 12 tricks) so no advantage there.
The moral is, as is so often the case, that a major fit's the best place to be.
In Box and Bath
In Box, three pairs reached 4♠, making 10 (!), 12 and 13 (!) tricks.
In Bath, the results were more varied, and included 4♠, 3NT, 6♦ - and just one pair in 6♠. The 3NT bidders got lucky in that they didn't get a club lead. Why the 6♦ pairs weren't in 6♠ I have no idea.
The 6♠, as it happens, was Trevor and yours truly. Over Trevor's opening 1NT, North made a truly dreadful 2♥ overcall and that made my 16-point hand look even stronger (as my ♥K10 were nicely placed over North's hearts), so when we eventually found our spade fit, I tried Blackwood. Trevor showed me two keycards and the trump Queen and I punted 6♠. But would I have done without North's intervention? Who knows? 
|
|
|
|
| HOTW 01 Aug 2018 | Up the line |
Show Detail |
Up the line (2)
Here's the simplest of questions: sitting West, what do you bid in response to partner's opening 1♣?
Well, what they teach in beginners' class is that responder (that's you) should bid 4-card suits 'up the line' – in other words, start with the 'cheapest' suit, the one that takes up the least bidding space. On this hand, that would mean you should bid 1♦ rather than 1♠.
Why's that? We're always being told that major suits are much more important than minors, so isn't it better to show the major instead? Not really, no. Imagine that your partner started with 5 clubs and 4 spades (she'd have to have more clubs than spades or she would have opened 1♠ in the first place, wouldn't she?). So after your 1♦ response her next bid is going to be spades anyway, isn't it – there's never a danger that you're going to miss a 4-4 spade fit. And it might be important for partner to know that you have a diamond suit – if she's interested in no trumps, for example.
Or it might be very important, as it is here.
Take a look at the whole deal. Let's say that over your response (whether it was 1♦ or 1♠) North bids a preemptive 4♥, as he did at my table at Bath. If I'm sitting East and my partner's just bid 1♦ I'm getting a good feeling: we have a splendid diamond fit and I have a hand with just 4 losers: I shall bid 5♦ and expect to make it.
But if my partner's response was 1♠, I'm stuck. I can't punt 5♦ – if partner's short it could be disastrous, especially with us being vulnerable, and 5♣ is just as dangerous for the same reason. I can't double for penalties because I've no idea if we can defeat the contract. All I can do is pass.
And what happens? 4♥ goes just one off for a miserable 50 points, whereas 5♦ makes comfortably – its success requires the ♣K to be with North, which it is, so that's a lovely 600 points in the bag. The best NS can do is sacrifice in 5♥, which will now certainly be doubled for penalties and goes 2 off for 300 – not as good as 600 but a good deal better than 50.
Handy things, those beginners' classes.
In Box and Bath
In Box, two EW pairs (possibly encouraged by me) bid and made 5♦, one stopped in 3♣ and one very lucky NS pair bid 3♥ and made 10 tricks.
In Bath, not one EW pair got a sniff of a contract. Two NS pairs ended up in 4♠ (after a dodgy 4-point weak 2♠ overcall by South) and the rest were all in 2♥, 3♥ or 4♥, all making 9 tricks. Not much West can say after a spade intervention, but in the other cases no West can have done the simplest thing in the world and responded 1♦ or surely EW would have reached game in diamonds.
|
|
|
|
| HOTW 18 Jul 2018 | Discretion is ... |
Show Detail |
Discretion is ...
Nothing very spectacular about this week's hand, but it nonetheless provides a valuable lesson in bidding. After two passes your partner opens 1NT and it comes round to you. What do you say? (a) Pass (b) 2C (c) 2NT?
Easy, huh? You certainly wouldn't be wrong to pass. You'd normally require 11 points to raise partner to 2NT and you only have 10, so pass seems the obvious answer.
That said, it's quite tempting to bid on, isn't it? You've got some decent 'intermediates' (a 10 and 2 9s) and a possible 4-4 fit in spades, and after all, you're only ONE point short ...
In situations like this, the way forward is to imagine how things might turn out if you bid on. Let's try it.
If you bid Stayman, you'll land on your feet if partner responds 2♠ – but then, of course, you'll have to decide whether to pass or invite to game with 3♠ ... But if (as is more likely) she responds 2♦ or 2♥ where do you go from there? There are situations (see various past hands on 'Weak Stayman' in the Using Conventions section) where you have a safe haven to run to, but this isn't one of them. Your only recourse will be to bid 2NT – which was, of course, choice (c) above.
If you bid 2NT, you're effectively inviting partner to bid game with a maximum 14 points. If she passes your invitation, you're annoyingly having to make 8 tricks instead of just 7 for no extra score. If she accepts, however, you'll have stuck her with the task of making 9 tricks with just 24 points between you and no known long suit to develop – sometimes it'll work out, but most of the time it won't.
In other words, to complete the title, 'Discretion is ... the better part of valour.' The answer is, after all, (a): Pass. Either of the other choices is more likely than not to cause either difficulty or downright grief.
What happens on this particular hand?
Have a look at the whole deal. You can make 1NT. With a bit of luck, you might make 8 tricks, but that's not going to help because with a maximum 14 points partner's going to raise your 2NT (arrived at through Stayman or not) to game, so you're always going off. Sure, on another day partner might turn out to have ♦AKxxx and you'll scrape 9 tricks, but for every one of those, you'll go off 4 or 5 times for an almighty bottom.
In Box and Bath
In Box, two pairs wisely stopped in 1NT, one found themselves (as predicted above) unable to stop before 3NT and went off and one East went off in 2♥ (it's not wrong to open 1♥ but with a scrappy 5-card major like that I prefer to open 1NT).
In Bath, 4 pairs stopped in 1NT, two went off in 3NT, the two pairs in 2♥ scraped home – lucky them! – and one NS pair went one off in a sacrificial 3♦ (they were lucky not to get doubled vulnerable for -200).
|
|
|
|
| HOTW 27 Jun 2018 | Use the Rule of 20 |
Show Detail |
Use the Rule of 20
It's your opening bid. You've got a weakish hand with 7 hearts. Do you open 1♥ or a weak 3♥? Or (as South, here) you have a weakish hand with 6 spades. Do you open 1♠ or a weak 2♠?
The important thing is not to deceive partner. If you open (say) 1♥ when you should be opening 3♥ partner will think you're stronger than you are and may put you into an unmakeable game. And if you open 2♠ when you should be opening 1♠ partner will think you're weaker than you are and you may miss a makeable game. You get the idea. So how do you decide?
I find the Rule of 20 is a useful guide: add your points to the number of cards in your two longest suits. If the total is 20 or more, you can open 1 of the suit. If not, you pass - or, with a 6- or 7-card suit, you can pre-empt.
Sitting South on this deal, you have 10 points and 6 + 4 = 10 cards in your two longest suits. That's a total of 20, so you're fine to open 1♠. Holding 12 points, your partner responds at the 2-level and, discovering that you have 5+ spades, raises you to 3♠. With just 6 losers and a singleton Ace in the opponents' suit, you continue to game, which makes, even on the best opening lead of ♦Q (have a look at the whole deal).
If you open 2♠, however, partner will place you with 5-9 points and decide from the outset that game isn't possible - and you'll miss it.
So although pre-emptive bids are designed to get in the face of the opposition, they also pass information to your partner - and if you pass the wrong information you're likely to end up in the wrong place. And the Rule of 20 is a simple-to-use tool that will help you get it right.
In Box and Bath
In Box, two pairs got to 4♠ and two didn't. Everyone made at least 10 tricks, though - two even wangling an 11th.
In Bath, 6 out of the 10 pairs found 4♠. A few others stopped short, either in spades or clubs, and one tried their luck at doubling 4♥ by East, which only goes one off for -200 - not as good as 420 for 4♠ making.
|
|
|
|
| HOTW 13 Jun 2018 | Unlucky |
Show Detail |
Unlucky
This is just one of those deals. With 25 points between them, NS are going to end up in 4♥ or 3NT (if I'm sitting South I'm going to insist on 4♥ but some won't). Both of which go off.
On the auction shown, East doesn't come in with 2♠, though she well might: her suit isn't very good, but she has opening points. Shouldn't affect the final contract, though, or the result.
So what happens? On the auction shown, East leads her ♠A and her partner encourages with the ♠6. Then the ♠K, with West completing the 'peter' with her ♠4, confirming a doubleton. Then a spade ruff by West, and with the trump Ace missing it's all over for declarer.
If East intervenes in the auction with 2♠, South will bid 4♥ and become declarer. West will lead her ♠6 (partner's suit) and the outcome will be the same: two spade tricks, a spade ruff and the trump Ace for EW.
And in 3NT? EW take the first two spade tricks, declarer taking the 3rd. And when East comes in with her ♥A she cashes her two remaining spades for one off.
So are NS wrong to bid game? Not a bit of it. With 25 points that's where you want to be. On another day, the spades will be 4-4 or 5-3 and North will have the doubleton and declarer will bring the contract home.
So no recriminations when you go off. It's just hard luck. Most of the time game will be on - and on those occasions you need to be in it. Remember that most of the other NS pairs in the room will be in it too. So when it makes, you'll get a respectable score. And when it doesn't, it's not disastrous as most other pairs will be going off too.
Let's see how it panned out in Box and Bath ...
In Box and Bath
Hmm. Two pairs stopped in 3♥, which makes. Lucky them! Should have been in game, though. On another day, a part score will look pretty manky compared with other NS pairs' 620 for game bid and made. The other two ended up in 3NT. One went one off (see the above defence) and the other was allowed to make (even though a spade was led). Which is another reason for bidding game - even if it's not on, you'll sometimes make it through a defensive error.
In Bath, it was a bit different. Three pairs ended up in part scores, making (2NT, 2 x 3♥), but the other eight all bid to game, either 3NT or 4♥. All were kept to no more than 8 tricks in NT or 9 tricks in hearts (except for one pair who didn't bid to game!). Unlucky for them - but on another day it'll be another story.
|
|
|
|
| HOTW 16 May 2018 | A balanced response |
Show Detail |
A balanced response
How do you defend against a weak 2 opening? If you have a decent long suit, you can bid it. Otherwise, there's always the takeout double, asking partner to bid her longest suit. Neither of those seems right here. You have a strong hand, but your 5-card suit is a threadbare minor and the takeout double could land you in all sorts of trouble. Passing is out of the question, so ...
... the likeliest option is no trumps. You have a balanced hand, with not one but TWO hearts stops (South surely holds the ♥K for his opening bid) and, as it happens, just the right number of points. Bidding 2NT over a weak two opening shows 16-18 points with at least one stop in the opponent's suit. Perfect!
Have a look at the whole deal. With 10 points opposite your (say) 17, East will confidently raise to 3NT, and there are a comfortable 11 tricks for the taking.
Good, innit? And there's actually another advantage of the 2NT overcall: 'Systems are ON', which means that your partner can use Stayman and transfers, just as if you'd opened the bidding yourself. By a bizarre coincidence, the very next hand, board 6, features an almost identical situation. Same opening suit – even the same point counts for the four hands. Here it is:
After a couple of passes and a weak 2♥ by West, you bid 2NT. An alert South will bid 3♣ (Stayman) just in case partner holds 4 spades – as indeed she does. So the final contract is 4♠, making 11 tricks – a better score than 10 tricks in 3NT.
In Box and Bath
BOARD 5 In Box, all but one EW pair were in 3NT, making overtricks. Similarly in Bath. The few others were in clubs or diamonds, making a poor score.
BOARD 6 In Box, all NS pairs bar one (my table – my fault!) found 4♠, though not all made the 11 tricks that were on offer. Similarly in Bath, except that they all made 11 tricks. Those in 3NT got a poor score, as it makes fewer tricks.
|
|
|
|
| HOTW 14 Mar 2018 | Which suit first? |
Show Detail |
Which suit first?
Here you are with just 6 points and 5 cards in each major and your partner opens 1♣. What do you respond: 1♥ or 1♠? There's a simple rule (it's given at the end of this article) but it's easy to forget which way round it goes - until you know why it's the way it is. And this hand's a great way of finding out.
If you peeked, you'll know that the answer's 1♠ (yeah, I know, your hearts are better than your spades, but Acol's all about shape, not nice suits). But why?
Well, your partner now rebids 3NT, showing a balanced hand with at least 4 clubs and presumably 19 points (with 15-16 she would have rebid 1NT and with 17-18 2NT, so 19 it is). Another reasonable presumption is that she has at least 3 cards in either hearts or spades, or maybe both. In which case, you'd much prefer to play in 4♥ or 4♠ than 3NT. And if your first bid was 1♠, you're perfectly placed to do just that: you now bid 4♥ and partner can pick her preferred major: she can pass 4♥ or bid 4♠. End of auction.
Now let's imagine you responded 1♥. What do you now bid over 3NT? 4♠? What if partner only has 2 spades, then? 4♥? What if she only has 2 hearts? You're stuck. You just have to pass 3NT and hope for the best.
And that's the reason for the rule: it enables partner to choose cheaply between your two suits.
Does it make?
4♠ is the only game contract that makes on this hand, but it turns out to be pretty hard, as you'll see if you click on 'Show all hands'. You're going to lose two trump tricks for starters, and the club and heart distributions are vile. It's not easy to make 10 tricks even if you can see all four hands! But the opponents' distribution is just the luck of the draw. I think you'll agree if you look at just the NS hands that the only contract you want to be in is 4♠ .
In Box & Bath
In Box, 4 out of 5 NS pairs were in 4♠ (the other being 2NT), but everyone went off!
In Bath, surprisingly, only 3 pairs managed to find 4♠ (making 9, 10 and 11 tricks). The other 8 tables were in 3NT: only ONE declarer made 9 tricks, the others going off by one, two, three or in one case four tricks. Yuk.
Responding to partner's opening 1 of a suit
Unequal suits: bid your longer suit first (if you can afford it: remember that you need 10+ points to respond eg 2♣ over 1♥)
Two four card suits: Bid the suits 'up the line', ie the cheaper first.
Two 5+ card suits: Bid the higher-ranking one first (so in this case, 1♠ rather than 1♥)
|
|
|
|
| HOTW 10 Jan 2018 | The ball's in your court |
Show Detail |
The ball's in your court
A pretty simple question for you, sitting East with this hand. What do you bid now?
Before you answer, let's go back a bit. What are your thoughts when partner opens 1♠? Mine would be something like this:
I've got a 15-count, so we're obviously going to be in game. My partner, however, doesn't yet know this, so it's up to me not to allow the bidding to lapse into a part-score! And if partner's got a big hand, we could well end up in a slam. Meanwhile, I'll show my clubs and see what she says next.
And what she said next was 2♥. Which brings us back to the original question: what's your next bid? When you've decided, read on.
The 'wrongest' thing you could have said is 2NT. Why? Three reasons: it shows 10-11 points (an Ace less than you actually hold); it can be passed (with disastrous results); and worst of all, it passes the buck unfairly to your partner. You're the one who knows that game is on. It's up to you to take the initiative: if partner decides to pass, it'll be your fault, not hers.
What was right about 2NT was the NT bit. You have only two cards in each of partner's suits, so no trumps is clearly the place to look. But as you noted at the beginning, you have the points for game. So bid it: 3NT. Told you it was simple. Couple of further points:
- 'Suppose we've got a slam on. Aren't we going to miss it if I sign off in 3NT?' No. You've done your bit, and any further development is now a ball in your partner's court. If she's stronger than she's announced so far, she's free to bid on.
- 'Isn't this a good situation to do fourth suit forcing? That forces partner to bid again, doesn't it?' Um, yes it does ... but you use FSF to ask for more information when you're unsure what to do next. For example, if you have 3 hearts and want to know if partner has 5. Or if you need a diamond stop for no trumps. Neither of these applies here. You're the one with the diamond stops, so you already know the best contract. So bid it. Using FSF is just another way of passing the buck.
The play
Have a look at the whole deal. What's South going to lead? That's right: the ♦K. Top of a (broken, in this case) sequence. Note that leading a small diamond gives a trick away.
And everything's exactly right for declarer. You cash your ♠K, then successfully finesse the ♠J, then the ♠Q obligingly drops under your Ace and you have 5 spade tricks, three hearts, two clubs and one diamond for 11 tricks. Yes, I know it says the slam is on, but that's only because you can finesse dummy's ♥10 for a cheeky 12th trick. Not a slam you should be bidding.
In Box & Bath
Everyone in Box reached 3NT, but two declarers made only 8 tricks – not sure how that happened. If you start by attacking the spades (to set up the tricks you need) while you're still protected in the other suits, you're home and dry. One declarer made just 9 tricks, and the other made 12!
In Bath, 12 of the 13 tables were in 3NT, almost all by East, and declarers made 10, 11, 12 or in one case 13 tricks. Guess what South's opening lead was at that table? You've got it: a small diamond, instead of the ♦K. Sigh.
|
|
|
|
| HOTW 29 Mar 2017 | Opening 1 spade |
Show Detail |
Opening 1♠
Before we go to the hand, a question: When do you open 1♠ holding only 4 spades?
The answer's quite informative. For starters, you can't have another longer suit, or you'd open that instead. Nor can you be 4-4-4-1 – none of the possible openings is 1♠, whatever your singleton.
So you must therefore have a balanced hand: either 4-3-3-3 or 4-4-3-2. But hang on a minute ... don't we open 1NT with a balanced hand? Sure we do, but only with a 12-14 count. Ah! So if you open 1♠ holding only 4 spades ...
... you must have a balanced hand and 15+ points – and you're intending to rebid no trumps.
To sum up, then: when you open 1♠ you either have 5+ spades or you have a balanced 15+ count.
What to bid?
Which brings us to this hand. You responded 2♣ to your partner's opening 1♠ bid and she raised you to 3♣. What do you bid now?
Well, it all boils down to how many spades she has, doesn't it? If she has 5 you want to be in game in spades. But if she only has 4 you want to be in 3NT. Which is it?
Simple. If partner's got a balanced 15+ count she's going to rebid 2NT. (Yes, even with 4 clubs: 9 tricks in NT is much more appealing than 11 in a minor.) But she didn't: she raised your clubs instead. Therefore she must have at least 5 spades. Problem solved: bid 4♠.
A final point: South mustn't dither around with a 3♠ 'invitation to game'. With a miserable 11-count, North will pass, and it'll be South's fault: South's the one that knows game is on, so South must bid it him/herself. As it says on the board: if you know game is on, bid it!
In Box & Bath
In Box, it was 50-50. Three pairs got to the spade game and three didn't. One languished in 3♣, another went two off in 3NT – and at one table an over-sacrificial EW went 4 off in 4♦X for -800. Ouch!
In Bath, they did better: 9 pairs found the spade game (with just one stopping in 3♠), while one pair found the makeable but inferior 5♣.
|
|
|
|
| HOTW 02 Nov 2016 | Go with the odds |
Show Detail |
Go with the odds
People get funny about no trumps. Some worry about having lots of aces - 'It's so empty' - while others obsess about having a stop in every suit, even when the opposition aren't bidding. Far better not to worry and just go with the odds. Which are that with a balanced holding over the two hands, 25+ points are likely to get you 9 tricks, while 23 should be enough for 8. Sure, it won't work every time, but you want to be there because most of the time it will. Bear this in mind, too: even if you are wide open in a suit, the opposition still have to find the right lead - and with any luck they won't.
So what happens on this deal? With a balanced 14-count, South opens 1NT. What should North do? She has no interest in the majors, so with 11 points and a nice 5-card diamond suit she raises to 2NT. What she doesn't do is agonise about her short spades or rubbish hearts. Nor does she consider showing her diamonds: there's no prospect whatever of a diamond game, but every chance of 9 tricks in no trumps. So 3NT. In her sleep.
The play
West leads a spade, dummy goes down and South's heart misses a beat. You're wide open in hearts, so thank the Lord that you didn't get a heart lead. Fortunately, you have nine tricks off the top (5 diamonds, 3 spades and the ♣A) so you collect your 400 points for 3NT bid and made and move on to the next deal.
But supposing West had led a heart? Well, you would have gone one off. But she didn't. And you'll see why when you click on 'Show all hands'. From where West's sitting, a spade looks like a better lead.
To sum up:
- Most of the time, with 25+ combined points, you'll have a stop in every suit.
- Sometimes you won't. But even then the opposition have to find the killer lead. And sometimes, as here, they won't!
- Sometimes you'll go off. But not to worry - the rest of the room should be going off with you. The most important thing is to be in the contract that makes most of the time. Go with the odds.
In Box & Bath
In Box only 3 out of 5 Souths raised North's 2NT to 3NT. All made at least 9 tricks, and some made more (probably due to East desperately hanging on to her hearts and therefore discarding too many clubs).
In Bath, it was a bit more complicated, as many players there have systems that require North to bid 2♣ on the way to 2NT - thus allowing East to creep in with a 2♥ overcall. My table was sadly one of those, so West knew to lead a heart against 3NT and it went one off. Rats!
|
|
|
|
| HOTW 13 Jul 2016 | The 'pass out' |
Show Detail |
The 'pass out'
A lot of players feel 'cheated' if a hand is passed out. True, you haven't played any cards, but you HAVE got a valid result for the board: zero for EW and zero for NS. The side with the more points tends to regret the passing out (because they could have made a positive score) while the side with fewer points tends to feel pleased (because they couldn't). Here's an example that's worth a look.
Board 2 is a pretty flat hand. N and S have 11 points each, while E and W have 10 and 8 respectively. East passes, leaving South to decide whether to open or not.
South has a balanced 11-count: just a point short of a 1NT opener. So 1NT is out. What about 1♥, then? No good because you haven't got a rebid. If partner responds 1♠ what do you say? 2♥ requires 5 hearts. So does 2♦ for that matter. And a 1NT rebid requires at least 15 points - a whole Ace more than you hold. So hold fire. Pass.
West passes and now it's up to North. If she passes, the hand's over. So should she try to find a bid? Well, she has EXACTLY the same problem as East: she's a balanced 11-count, one point short of a 1NT opener. No 5-card suit, so if she opens 1♠ (yuk) she has no rebid, just like her partner. But the situation's slightly different for North, because after 3 passes she knows that the points a fairly evenly distributed. So maybe she could risk opening a slightly light 1NT? Possibly, but consider the following:
- if partner's got just 7 or 8 points (which is possible on the auction so far) you could go off.
- if partner's got 9 or 10 you've got an even chance of making your 1NT
- if partner's got 11, watch out, because she's going to raise you to the two level. She believes, after all, that you have 12-14 points. And 22 points isn't normally enough to make 2NT, so again you're probably going to go off.
So. If you pass you earn ZERO points. And if you open 1NT, you might get a plus score, but the odds are that you're going to go off, for a MINUS score. And a minus score is a worse score than zero.
So in North's seat I think the odds favour passing.
In Box and Bath
The above analysis was strongly borne out in Box: the three NS pairs that passed out got equal tops, as the other NS pairs went 1 off (in 2♣ and 2NT) for -100 instead of zero.
In Bath, it was a different story, because while a couple of NS pairs went off for -100 (or worse), another couple wangled their NT contracts for a positive score. Lucky them!
Postscript: the rule of 15
This is a rule of thumb (there's a HOTW about it somewhere in the distant past ...) for people in North's position after 3 passes. You add your points to the number of spades and if it comes to 15 or more you're safe to open (the reasoning is that because spades is the senior suit, you're likely to win the part-score battle). But all that presupposes that you have a legitimate bid to start with. A hand with 5 spades, for example. But here North doesn't have a legitimate opening bid. Anything she bids is likely to mislead partner. So although the North hand technically satisfies the Rule of 15, I think pass is still the best option.
|
|
|
|
| HOTW 11 May 2016 | The best place to play |
Show Detail |
The best place to play
Where do think the best place to play will be with this holding opposite partner's weak (12-14) opening 1NT?
1NT? 2♦? 3♦? 2NT?
1NT is certainly likely to make, isn't it? You have a minimum of 22 of the 40 points between you and a chance of developing some tricks in diamonds.
But is it worth raising partner? No – even if partner's maximum, you have just 14 + 10 = 24 points between you. Not enough for game. In which case why risk going off in 2NT when you can stay safe in 1NT?
Some players will, however, worry about their singleton spade and prefer to look for a fit in diamonds. It's true that playing in a suit will usually yield a trick more than the same hand in NT, but it's not a good idea here for several reasons. Here they are:
- In 1NT, the defence may well take a few spade tricks, sure. BUT you only need 7 tricks, so you can afford it. So reason 1: barring bad luck 1NT is going to make.
- 2♦ is likely to make too, though it may not if partner has a doubleton diamond. It gains you nothing, though, because like 1NT, 2♦ scores you 90. One more trick – same score. Better to stay in 1NT, then, where you have the chance of an overtrick.
- You can't play in 2♦ anyway! Everybody plays transfers, these days, so 2♦ is a transfer to hearts! You'll have to go up to 3♦, which will be very dodgy if partner's a minimum with poor diamonds.
In other words, if you embark on a search for a diamond contract, it will probably gain you nothing, and may well end in utter ruin. It's worth looking at the possible scores in a little more detail:
1NT making (90) is a very likely outcome. There's also a chance of an overtrick for a very profitable 120.
2♦ (the impossible contract) making will gain you 90. Even if you make an overtrick, your 110 is not as good as 1NT+1. To beat that, you need to make a nigh-on impossible TEN tricks in diamonds (130) – ain't gonna happen.
So pass!
NOTE: Swap around the two red suits on this hand and the situation is totally different. Why. Firstly, because 2♥ is worth not 90 but 110 – 20 more than 1NT making. Secondly, because it's a contract it's possible to reach: you simply transfer partner to hearts and then pass. And thirdly, an overtrick in 2♥ gets you 140 – again, more than an overtrick in 1NT (120). So I'd go for the heart suit every time.
In Box and Bath
One pair in Box crashed two down in 3♦, with everyone else in 1NT or 2NT, generally making more tricks than they were entitled to!
Half the pairs in Bath agreed with me and played in 1NT (plus one pair in 2NT and another optimistically in 3NT), generally making fewer tricks than they were entitled to. The remaining two somehow got to 2♦ (once by West!) and made it, one with an overtrick for a very good score. Thus proving my analysis above hopelessly wrong.
I'd still pass 1NT, though.
|
|
|
|
| HOTW 27 Apr 2016 | When partner preempts ... |
Show Detail |
When partner preempts ...
The purpose of preempting is, of course, to keep the opponents out of their best contract, but sometimes it's not the opponents but the preempter's partner who has the strong hand. On this deal sitting West, you have a very pleasant 15-count opposite your partner's opening 3♥. Do you bid 4♥? 3NT? Or do you pass?
Ideally, you'd like to know whether your partner is a minimum 5-6 points or a maximum 8-9, but that's tough – you don't. So let's speculate.
Imagine you're in 4♥. You have a 9-card fit, and partner will surely have the ♥A or ♥K, so you're going to make at least 6 heart tricks. You have a further 3 tricks in your hand, and various chances for more. Just the ♦J in partner's hand would do the trick. Or a conveniently positioned spade or club honour. Or she might have ♥AK and nothing else, which will still give you 10 tricks. So 4♥ is looking good. And for the same reason, we won't be passing.
What about 3NT? If you can make 10 tricks in no trumps, that will net you a better score than 4♥. But that's a big 'if'. Remember that partner is weak. She'll have lots of heart tricks, sure, but in NT you can't be sure that you can ever get to them. In hearts, East's hand is guaranteed to be worth lots of tricks. In NT, who knows?
Have a look at the full deal. 4♥ is a doddle, the 10th trick coming either from the ♠Q (lead low towards it from dummy) or a second trick in diamonds (lead towards the ♦KQ, twice if necessary).
But no trumps is a disaster. On a low club lead from North, it starts well enough, with a trick for East's singleton ♣Q. But then it starts to unravel. South (who can count to 13) wins the second – NOT the first! – heart trick and leads her ♣J, returning her partner's lead. Bye bye West's last club stop. And now how is declarer to get over to all those lovely heart tricks in dummy? She can't. The best she can do is lead a low spade towards the ♠Q and hope. Sadly, North goes up with her ♠K and reels off a further FOUR club tricks. At some point, South will signal for a diamond lead, and her ♦A will be the 7th trick taken by the defence, for 3 off.
There's a clear moral here: if partner preempts, it's safer to stay in a trump contract.
In Box and Bath
In Box, half the tables were in 4♥, two stopped in 3♥ (pessimists!) and just one pair was in 3NT (going only 1 off, so the defence must have slipped up somewhere).
In Bath, 9 of the 11 tables reached the heart game, one stopped in 3♥ and again just one pair played in 3NT. This time the defence was merciless and they went 3 off – lovely!
|
|
|
|
| HOTW 13 Jan 2016 | Too strong to open 1NT |
Show Detail |
Too strong to open 1NT
This hand's an opportunity to revisit a couple of important bidding fundamentals. West has a balanced, very 'notrumpy' hand, but can't open 1NT because she's too strong. What to do? The standard procedure is to open an appropriate suit and then (assuming partner responds in a different suit) rebid no trumps at an appropriate level. Fine, but what are these two 'appropriates'?
First, the appropriate suit. It's a pretty simple rule:
- With two 4-card suits, if they're hearts and spades open 1♥. Otherwise, always open the HIGHER RANKING of the two suits.
So here West opens 1♦ – no matter that the clubs are nicer.
OK. East responds 1♥ (note in passing that, unlike the opener, responder always bids her 4-card suits up the line – which makes it easier to find a fit).
And now West needs to rebid NT, the appropriate level being ...? Here's the standard Acol answer:
- With 15-16 points rebid 1NT (or the lowest level available)
- With 17-18 points rebid 2NT
- With 19 points rebid 3NT (even if partner is a minimum 6 points you have enough for game).
So here West rebids 2NT. And East? She reasons 'OK. Partner has 17-18 points. I have 8. That's 25-26 – enough for game.' And so the final contract is 3NT.
So you now have the means of dealing with balanced hands of ANY strength. With 12-14, open 1NT. With 15-19, see above. With 20-22 open 2NT ... and if you're lucky enough to hold 23+ you'd start with 2♣.
In Box and Bath
Big discrepancies between bidding and play in Box: almost everyone ended up in 3NT, but only one declarer made 9 tricks! In Bath, by contrast, more pairs failed to bid game, but more than half made the 9 tricks.
If you click on 'Show all hands' you'll see that 9 tricks are there for the taking. You have 3 spade tricks, 3 heart tricks (you can finesse the ♥Q and they split 3-3, so you only have to lose one heart) and 4 club tricks (as the ♣Q is in the right place). But in practice, the opposition are eventually going to twig that your diamonds are rubbish and so will end up with 4 tricks in all.
If they don't find diamonds, mind, you'll make an overtrick, as one declarer did in Bath. Another good reason to open your weak diamond suit instead of your whopping strong clubs – you might well deter the opposition from leading them!
|
|
|
|
| HOTW 02 Dec 2015 | Up the line (1) |
Show Detail |
Up the line
Everyone knows (you do, don't you?) that when looking for a fit, responder bids 4-card suits 'up the line'. So on this hand, with 4 of each major, you'd respond to partner's opening 1♦ with 1♥. Wouldn't you? Even though it's about as rubbish as a 4-card suit can be?
Yes! 1,000 times yes!
Imagine for a moment that your partner has 4 hearts and an ordinary opening hand and you respond not 1♥ but 1♠ (Well, my hearts were rubbish, partner). All opener can do now, not being strong enough for a reverse into 2♥, is rebid 2♦. Now what do you do? You're probably best to pass. Or if you're feeling brave, try 2NT. The end.
And all the time you have a 4-4 heart fit and can make GAME in hearts. Take a look at North's hand now and see for yourself. And whose fault will it be that you've missed game ...?
Now rerun it responding 1♥. With partner's 6-loser hand and your 7-loser hand, one way or another you're easily going to find your way to 4♥ and happiness.
As it says on the much underread Holy Grail article on the club notice board: Don't conceal a 4-card major, even if it's 'rubbish' ... or words to that effect. And this hand shows exactly why.
The play
It ain't easy, and there are various options open to declarer. I fancy trying to set a few things up BEFORE clearing trumps, and one attractive option is to lead a low club EARLY in the play hoping East has the ♣A. If she doesn't play it, you get a free trick (thanks very much) and if she does, your ♣K is now good and can be used to discard the spade loser from North's hand. And if you do happen to risk the diamond finesse, you could end up with 11 tricks. But hey - no point in playing like a genius if you're not in game to start with!
In Box and Bath
4 of the 7 pairs in Box bid and made 4♥ - well bid and well played too. In Bath, 9 out of 13 pairs were in 4♥ (some with overtricks, two going off), two pairs ended up in a 7-card spade fit and the other two were in 2♦. Yuk. That's what comes of concealing your 'rubbish' 4-card major.
|
|
|
|
| HOTW 23 Sep 2015 | It's that 4-4-4-1 again |
Show Detail |
It's that 4-4-4-1 again
Several Souths were unsure what to open on this hand after East's opening pass. There are various options, but I find the standard ACOL the most satisfactory as it guarantees that you will not have to rebid your opening suit and thus lie to partner. It goes like this:
| With a middle-ranking (or RED) singleton, open the suit below the singleton. |
| With a top- or bottom-ranking (BLACK) singleton, bid the middle-ranking of your 3 4-card suits. |
Here, then, with a singleton spade, South should open 1♦.
North's response, after West also passes, is now crucial. Remembering that when responding we bid 4-card suits up the line, she should bid 1♥. If instead she responds 1♠, bang goes your chance of ever finding your 4-4 heart fit – you'll probably end up in 1NT, which is not your best contract.
South will probably invite to game at this point with a raise to 3♥, which North will politely refuse with a pass, and declarer should have no trouble making 9 tricks (4 trump tricks, 3 diamonds and a couple of spade ruffs – and maybe even the ♣K if the clubs behave). As it happens, the clubs don't behave very well, and there's a chance you could go off in 3♥, but that's nonetheless the contract you should be in.
In Box and Bath
Only two pairs in Box ended up in hearts, though one of those bid and made game – well done indeed. In Bath, they were ALL in hearts (albeit in everything from 2♥ to 5♥, with varying degrees of success) – but at least they were all in the right suit!
Note: There's now an A4 version of the above 4-4-4-1 table, plus a few more details, on the Club notice board.
|
|
|
|
| HOTW 19 Aug 2015 | 'We're in game ...' |
Show Detail |
'We're in game ...'
You're sitting West, you hold 16 points and the title represents the first thing that comes into your mind when your partner opens 1♠. A vital thought, and one that gives you a unique responsibility – one that I bang on about every week. It's up to YOU to keep the auction going until game is reached. Why? Because YOU know that you're in game but your partner DOESN'T.
As you don't yet know which game is best, you need to exchange a bit of information, and your first bid presents no problem. 2♦ shows your longest suit and allows partner to describe her hand further. It's also FORCING, so there's no danger of partner passing. And partner now bids 2♠.
No surprises there, then. Partner has an ordinary opening hand with at least 5 spades. It may not look like it, but you are now staring at a big red sign saying DANGER.
Danger? What danger? Well, supposing you bid 2NT. With an ordinary opening hand (which you know she has) partner will PASS. So much for your unique responsibility to keep things going until game is reached. 2NT shows 10-11 points while you actually have 16. You've missed an unshakeable game and, sadly, it's all your fault.
Instead, you must bid game yourself – you're the one that knows game is on! Bid 3NT. Game. That's it. Responsibility discharged. Phew! Now you can sit back and enjoy taking at least 10 tricks (11 on a heart lead), happy in the knowledge that you've bid to game. Much more fun than taking 11 tricks in the glum knowledge that you should have bid game and didn't.
In Box and Bath
Four of the seven pairs at Box reached 3NT - all credit to them. But three didn't, and if you were sitting West in one of those pairs, you need to read this article carefully. And take a look at the notice on the club board entitled How to avoid missing game.
In Bath, every pair reached game. As you must when partner opens the bidding and you have a 16-count.
More advanced thoughts
A more ambitious West might even sniff a possible slam here. An alternative to 3NT would be 3♣ – a new suit at the 3 level, forcing to game. This would allow East to show her 3-card diamond support with 3♦, and might eventually lead to a difficult but makeable 6♦ slam.
No, I wouldn't have tried it either and nor did anyone in Bath. For the moment, we should all be content with ensuring we don't stop short of a rock-solid game.
|
|
|
|
| HOTW 01 Jul 2015 | 1H or 1NT? |
Show Detail |
1H or 1NT?
What do you open holding a balanced 5-3-3-2 hand with 12-14 points when the 5-card suit is a major - like West's hand on this deal?
There are three schools of thought (aren't there always?):
- Some (including one A Robson) will ALWAYS open 1NT. This is fine except you will sometimes miss a 5-3 fit in the major.
- Some will ALWAYS open 1 of the major. Again, fine, except if the suit's rubbish and you're forced to rebid it (as you would be here, after a response of 1♠).
- For the rest, it will depend on the quality of the suit. If it's rebiddable (eg AKxxx, AQ10xx), open the major. If not (as here) open 1NT instead.
Here, opening 1NT, it's relatively easy for EW to reach the best contract of 3NT. Holding 4 spades, East tries Stayman, South interferes with 2♠, and East can then confidently bid 3NT, knowing that the spades are stopped.
As it happens, opening 1♥ also works nicely. E responds 1♠ (thus silencing South), W rebids her awful hearts - 2♥ (yuk), but East is strong enough to force game with 3♦, enabling W to bid 3NT.
My preference is with the last of the three groups. I don't want to miss a 5-3 fit, but nor do I want to have to rebid a rubbish suit like Jxxxx. So I open 1NT.
In Box & Bath
There's no question that Bath did much better than Box on this one. 9 out of 10 EW pairs in Bath ended up in 3NT, whereas in Box just one pair was in 3NT - and they were the only pair to reach game! Not really good enough when East holds 15 points opposite an opening bid. As it says on the notice board: 'If you know game is on, bid it yourself or make a forcing bid - don't make a bid that partner can pass.' :-)
|
|
|
|
| HOTW 03 June 2015 | Cherchez la major fit |
Show Detail |
Cherchez la major fit
I was rather hammering one particular message this morning in relation to a number of hands, viz: The first aim of any auction is to find a major fit. This hand shows an easy way to find one.
What are West's thoughts when partner opens 1♠? The first one is that we need to end up in game. 13 points opposite an opening hand simply shrieks 'Game!' at you. But which one? We don't know yet, but keeping our 'first aim' in mind, we're hoping that we have a major fit in spades. And we must also make a note NOT to make any bid below game that partner can pass: we know we're in game but partner doesn't, so it's up to us to keep the auction alive while we look at the various options.
How to find out, then, if partner has 5 spades? Easy. Simply make a bid in a different suit and see what partner says next. Bid 2♣ (not 2♦, because responders bid 4-card suits 'up the line'). Before we go on, consider how informative that 2♣ bid is. It tells partner
- I don't have 4 spades
- I do have at least 4 clubs
- I also have at least 10 points because I've responded at the 2 level.
Oh, and it's forcing, too, so partner has to bid again. Not bad to be going on with.
And partner now bids 2♥. Which means that she has at least 5 spades and at least 4 hearts. Problem solved. You've found your major fit and can now bid 4♠. Game. Don't bid 2♠ (weak preference) or 3♠ (invitational). Bid 4♠. Game. Don't make a bid below game that partner can pass.
You're probably wondering what all the fuss is about. This is all obvious, isn't it? Well ... actually, no. One West wanted to respond 2NT (an underbid, as 2NT shows just 10-11 points and you have 13) and another was considering 3NT. The problem being that if you make either of these bids, you're never going to find your major fit.
It sometimes happens, of course, that you can take the same number of tricks in NT as you can in the major, and in those cases, you do better in NT (by 10 points). But most of the time, playing in the major fit will yield an extra trick. As a matter of fact, the electronic expert Deep Finesse tells us that you can make 10 tricks in either on this hand – but in both Bath and Box (with the exception of one lucky person who made 3NT +3) declarers did rather better in 4♠ than they did in 3NT.
The Holy Grail
The article of this name on the club notice board is well worth a look – and is also attached here. Click on the title of this article if you'd like to take a look. And in your next auction (and all subsequent ones) remember that you're searching for the holy grail of a major fit.
|
|
|
|
| HOTW 04 Feb 2015 | Giving partner the choice |
Show Detail |
Giving partner the choice
If you feel you don't really understand what transfers are all about, this hand provides a simple and useful example. The point about transfers is that they give you TWO chances to describe your hand: first the transfer bid, which tells partner about your 5-card major and then (after partner has completed the transfer) you get a SECOND bid, which you can use to show your strength. Follow North's train of thought on this deal.
South opens 1NT, showing a balanced 12-14. North's thoughts will go something like this:
I've got a 15-count, so clearly we're going to be in game. But which game?
3NT might be the best contract, but if partner has 3+ spades, then 4♠ will be better.
It's all a question of who knows what. North knows about her 5-card spade suit and that game is on, but doesn't yet know how many spades South has got. South can see her spades as clear as daylight, but has no idea what North holds. Time for North to start telling her:
OK. First I'll tell partner about my spades, and then I can show my strength.
North bids 2♥ – a transfer – and South (perforce – whether she wants to or not!) completes the transfer with 2♠.
Half way there – now to tell her the good news about my strength.
I must make sure I bid some kind of game because only I know that game is on. But I
can't bid 4♠ because I don't know if we have a major fit or not. Only partner knows that.
So my next bid has to be 3NT.
Perfect. South now knows that North has game-going points and exactly 5 spades. So far she's just done what she's been told, but it's now up to her to decide on the final contract. And that's dead simple: if she has only 2 spades, she passes and the contract's 3NT. But with 3+ spades, she'll prefer to play in 4♠ – and with 3 spades that's just what she does.
Notice the crucial negotiation going on here. North CAN insist on game, because she knows that game is on. But she CAN'T insist on spades, because she doesn't know how many spades her partner has. By transferring to spades and then bidding 3NT, she's giving her partner the choice.
|
|
|
|
| HOTW 28 Jan 2015 | Two wrongs ... |
Show Detail |
Two wrongs ...
Playing Acol with a weak (12-14) no trump, the above should have been your auction on this board, the contract being 1NT by WEST.
At a couple of tables, the 1NT was played by EAST, meaning that the auction (presumably) went: 1♦ - Pass - 1NT - all Pass. Not disastrous in this case, as it happens, but it's interesting that the bids by both West and East are wrong. If you're not sure why, have a think about it before reading on.
OK. West's bid. West holds a balanced 12-14 count and should therefore open 1NT. 5-3-3-2 doesn't seem at first glance to be 'balanced', but in fact it's just ONE card different from 4-3-3-3, the flattest of all distributions. If the 5-card suit is a minor (as here) you should ALWAYS open 1NT. Opinions differ when the 5-card suit is a major: I tend to open the major suit if it's a good, rebiddable one (e.g. ♥AQJxx) and 1NT if it isn't (e.g. ♥K10xxx). But here it's a minor suit, so no argument: open 1NT.
What about East? Given an opening 1♦ bid, what should East respond? Obvious, isn't it? The answer's 1♥. A 1NT response would deny a 4-card major – and you have one: hearts. So bid it. Simple. West will then have to rebid her diamonds – 2♦ – and that will be the end of the auction.
The underlying reasoning here is the pecking order laid out in our Holy Grail article (on the notice board): a major fit is best; then NT; and a minor only as a last resort. So with 5-3-3-2 prefer 1NT to the minor; and when responding, do not conceal a 4-card major if you can help it.
That last point is worth a couple of sentences more, as there are oodles of very experienced players out there who would respond 1NT as East instead of 1♥. 'Well, partner, it was such a rubbish suit – Jack high. Wasn't worth mentioning.' Which goes to show that being 'very experienced' doesn't always count for much. What if partner has something like:
♠84 ♥AKQ9 AJ1075 ♣84 ?
If East responds 1NT, you've just missed a 4-4 heart fit. With just 14 points, West isn't strong enough to reverse into 2♥, so will rebid 2♦ – and you'll be scoring 110 for 9 tricks in diamonds instead of 140 for 9 tricks in hearts. A bottom. Worse than that – a deserved bottom.
So a useful hand, revealing two important bidding basics.
Deep finesse, you may have noticed, offers the same score whichever contract you play in: 90 for 8 tricks in diamonds and 90 for 7 tricks in NT. But in practice, there's a good chance that you'll make at least 8 tricks in NT for 120 (which beats even the score for making nine tricks in diamonds) ...
The play in 1NT
You'll get either a low club or a low spade opening lead from North. If it's a club, you'll get in on trick 1 (with your ♣Q) and if it's a spade, it'll probably be trick 3 (with your ♠J). Whichever it is, your FIRST job is to set up a couple of heart tricks by forcing out their ♥A. If you get the diamonds right, they're going to make just 3 spade tricks plus the ♥A and the ♣A, leaving you with 8 tricks (5 diamonds, 2 hearts and a spade or a club). More if they defend badly.
In Bath
Experience evidently counts for something in Bath, as 9 out of the 10 tables played in 1NT by West. Only 1 of the 1NT declarers made the minimum 7 tricks. The others made 8, 9 or in one case a magnificent 10. I blame the defence.
|
|
|
|
| HOTW 03 Dec 2014 | It's down to you! |
Show Detail |
It's down to you!
It's your bid. Have a look at the auction so far, which began with a weak opening 2 by South.
- What do you think your partner holds?
- What about North?
- What will you bid?
Well, partner's double is for take-out. He has opening points and promises support for all the other three suits – and so should have at least 4 spades. (Alternatively, he might have a stronger hand with a good minor suit – in which case he'll tell you about it on his next bid – but for the moment you take it as an ordinary takeout double.)
North is just shoving her oar in trying to get in the way. She's quite weak (as you can tell by adding your 14 points to your partner's 13+ and opener's 6-9 points and seeing how many are left for North).
So what do you bid? The important thing to realise here is that you know far more about the situation than your partner does. Crucially, you know that you have game-going points, but your partner doesn't. It's therefore down to you to make sure you end up in at least game. As it says on the notice-board: If you know game is on, bid it yourself or make a forcing bid. Don't make a bid that partner can pass. In other words, don't bid 3♠. With ordinary opening points, partner will pass and you'll miss game. You must bid game: 4♠.
And as it happens, you make all 13 tricks (have a look at all the hands). All you have to do is clear trumps and take the diamond finesse, which works as South holds the ♦K. You've missed a slam, albeit one that's quite difficult to bid, but never mind – at least you haven't missed game!
In Box and Bath
With a bit of help, most Box pairs got into 4♠, but not everyone made 13 tricks: next time take the diamond finesse! One pair let NS get away with 4♥, going 3 off for a very cheap -300. Three things here:
- NS should never have been in 4♥, because NS are vulnerable, and North can tell that EW have LOTS of points and are going to DOUBLE them. They're likely to go at least 3 off for something ghastly like -800 points.
- If NS are rash enough to bid 4♥, East must either carry on to 4♠ or else DOUBLE the 4♥: as EW are known to have at least 27 points, the contract has little chance of making. Don't let them get away cheaply!
- If the vulnerability were the other way round (EW vulnerable and NS not), NS would be quite right to go straight to 4♥ to make things as difficult as possible for EW. (4♥ 3 off doubled non-vulnerable only costs 500, and a vulnerable 4♠ would be worth 620.)
In Bath, 11 out of the 12 tables reached game and 3 managed to bid and make a slam. Amazingly, one NS pair were allowed to go miles off not in FOUR♥ but in FIVE♥ UNDOUBLED: the mind boggles.
|
|
|
|
| HOTW 26 Nov 2014 | 3NT bid and made |
Show Detail |
3NT bid and made
This hand provides a good illustration of the 'Holy Grail' principle – you're looking for a major fit (the Grail); failing that, NT is next best; and as a last resort go with a minor.
The auction
The auction here is excellent: it ensures that a major fit will be found if there is one and ends up in the next best place. It's worth a look:
- West opens her longest suit: 1♣
- East shows her hearts: 1♥
- West doesn't have 4 hearts, but has a major suit of her own, which she now bids: 1♠
- East now controls the fate of the hand. There still might be a major fit (West could have 3 hearts) but if not, NT is worth a try. Game might be on, too, as East has a very nice 10 points and West can easily have up to 15. It's up to East to invite her partner to game. But how? There are two possibilities. One is 3♣ – a delayed raise showing 3+ clubs and 8 losers or 10ish points. The other is 2NT, showing a balanced 10-11 points. I think 3♣ is marginally better as it gives more accurate information about East's hand – 2NT would tend to suggest some kind of a stop in diamonds. But either is fine – and MUCH better than the alternative, weaker bids, as we'll see below.
- West can now calculate that game is on (15 + 10 = 25) and with a diamond stop bids 3NT. With 3 hearts, she would instead make a 'delayed raise' of partner's major suit – 3♥ – just in case there's a 5-3 major fit, but because she only has 2 she's happy to bid the NT game.
Can't stress the importance of East's invitational 3♣ (or 2NT) enough. The alternative 2♣ – a 'weak preference' of partner's first-bid suit – will be passed and so game will be missed. As it will if East chooses to rebid her hearts: 2♥ is wrong on two counts – it shows a weak hand with 6 hearts and East has neither of those. And the weaker 1NT (showing a maximum of 9 points) also leads nowhere. All of these timid alternatives could be made with just 6 points and deserve to get passed – East is a whole Ace stronger than that and must invite.
(See also the Postscript below.)
The play
How does it go? It's a doddle, actually. You have 2 tricks each in the majors, plus a diamond trick ... so all you need to do (provided the clubs split kindly, which they do) is force out the ♣A and clubs will provide the other 4 tricks you need.
On a spade or heart lead, you win, switch immediately to a club to force out the Ace, and you're home and dry. Things are trickier on a diamond lead – more likely, as it's the unbid suit. You hold up for one round (just in case the player with the ♣A happens to have only 2 diamonds), then switch to clubs as above. Luckily, the opponents' diamonds are 4-4, so you lose just 3 diamond tricks and one club.
You just have to avoid trying to be too clever – if you start playing around trying to develop extra tricks in hearts you're going to lose an extra trick and you'll go off. Just concentrate on forcing out the ♣A: 2 + 2 + 1 + 4 = 9, and that's good enough.
In Box and Bath
Things didn't go so well for EW in Box. Only one pair found 3NT and they went off. Never mind; at least they got to the right contract, which is half the battle.
They didn't do much better in Bath. Only 4 out of 10 pairs bid to 3NT, the rest floundering in part scores like 3♣ or 2♥. But 3 of the 4 game declarers made their contract and one even made overtricks – well done them!
Postscript My thanks to Bill Nadel, who has suggested another good alternative for East's 2nd bid: 2♦ – '4th suit forcing' – which asks West to say more about her hand. I didn't consider this because I usually play FSF as forcing to game and so requiring more than East's holding of 10 points. But in normal Acol, it's only forcing for one round and so would be an excellent bid here. The only downside, as Bill points out, is that if West has both a diamond stop and 3 hearts, she'll probably go for the NT option and a 5-3 heart fit might be missed. But immensely superior to the other weaker alternatives mentioned above.
|
|
|
|
| HOTW 05 Nov 2014 | Supporting partner's suit |
Show Detail |
Supporting partner's suit
What do you do when partner bids your second suit before you do? Well, you support it, of course – especially if it's a major (as here).
So what would you bid here? 2♠, 3♠ or 4♠?
The answer's not difficult, and depends simply on the strength of your hand, as measured by your points and (because you now have a fit) on your losers. What you have to bear in mind is that partner could be anything from a magnificent 23 points (intending to surprise you in her next bid) right down to a miserable 5-6 points with 4 little spades. You don't know yet. So all you can do is tell partner what you've got so that she can decide what to do next. My (pretty obvious) guide would be:
- With an ordinary opening hand, say 12-15 points and 7 losers, raise to 2♠.
You may have less than half the points, but your fit means that you have a good chance of making your contract – and if they've got (say) 23 points between them, you're quite happy to go 1 off.
- If you're a bit better, say 16, 17 or a poor 18, and with 6 losers, raise to 3♠.
This is an invitation to game. With a minimum, partner will pass. But if she's got a bit more (say 9+ points and/or 8 losers) she'll carry on to game.
- If you're strong, with 18-19 points and just 5 losers, go straight to game: 4♠.
You should be OK in game even if partner is a minimum. And if she's got an opening hand herself she'll start exploring for a possible slam.
So what's your decision here? According to the above, you should bid 3♠, inviting partner to game. And that seems about right. You have 17 points and 6 losers. If partner is a miserable minimum, you won't be making 10 tricks. But in this case, as you'll see if you click on 'Show all hands', South has a nice 10-point, 8-loser hand and will accept your invitation to game and bid 4♠.
Does it make?
It looks reasonable at first glance, doesn't it? You've got 5 trump tricks, 3 diamond tricks, and (with luck) two club tricks: it all depends where the ♣A is. With 27 points between you, it's certainly a contract you should be in, anyway.
But bridge can be a cruel game. Have a look at West's hand and decide what he's going to lead. Then predict the way you think it'll go before clicking on ...
What happens?
|
| Show Answer |
West nastily leads his singleton club. You go up with your ♣K, but East wins with the ♣A and leads back a club which West ruffs. Two tricks gone.
West would love another ruff, but how to get his partner the lead? He leads his ♥A and is delighted when his partner plays the ♥J (a high card – positive signal – lead another one, please partner).
West therefore continues with a further heart. East wins with the ♥K and leads a 3rd club for West to ruff with his remaining trump. Five tricks gone.
So. Bad luck this time, declarer. But don't despair. 9 times out of 10 with 27 points and a major fit, you'll make game. Besides, this is duplicate, so everyone's in the same boat.
How did they do in Bath?
Most NS pairs were (rightly) in 4♠, mostly going 2 off. One pair, who abjectly subsided in 2♠ and also made 8 tricks, got an utterly undeserved top. But console yourself that the other 9 times out of 10 they'll be scoring a richly deserved bottom! |
|
|
|
|
| HOTW 08 Oct 2014 | A simple change of suit |
Show Detail |
A simple change of suit
In the auction you're trying to find the best contract. You know what's in your own hand, and you're trying to find as much as you can about partner's so you can decide where to be. Partner's doing the same. You're giving information and receiving it.
As you know, this process can take several bids by both players – there's often a lot to say! – so there has to be a way of keeping the auction 'alive' so that one partner doesn't PASS before the appropriate time.
It's for this reason that Acol (and other bidding systems) have this basic unbreakable rule: Responder's initial change of suit is forcing for one round. In other words, if partner opens one of a suit and you bid a different suit, partner has to bid again. *
On this hand, that's exactly what you're looking for. Your partner has opened a diamond and you have a fabulous 21-count. You want to be in a slam – but which slam? You don't know yet. You need more information about partner's hand. And the best way to get that information is to get partner to bid again. How? You've got it – a simple change of suit. 1♥.
What? Just 1♥? But I need to show partner how strong I am!
Indeed you do, and at the appropriate time you will. But this is the moment not for handing out information but receiving it. When you know more you can do all the jumping around you want.
Partner's rebid tells you exactly where you want to go: she raises you to 3♥. Great. You've found a fit. Now all you have to do is decide whether you want to end up in 6♥ or 7♥. At this point you can start throwing your weight around a bit: bid 4NT (RKC Blackwood) and you find out that partner has both missing Aces, but doesn't have the ♥Q. So you're content to stop in 6♥ (or you might decide that 6NT is a better bet because of the extra 10 points – see the recent Daft Duplicate article on the Beyond Basic Bidding Improvers' page).
You take the point: initially a simple change of suit is sufficient to ensure that partner will bid again, thus giving you the information you need to know. It's the most important single feature of Acol you'll ever learn.
* There's only one situation in which opener is permitted to PASS partner's change of suit, and that's when partner herself is a passed hand. As an example, let's say that partner passes initially and you hold ♠ AJ83 ♥ K4 ♦ AJ972 ♣ 86. You open 1♦ and partner responds 1♠. You've found your fit, but there's no point in going any further because there's no prospect of game (partner having a maximum of 10-11 points). So you pass.
|
|
|
|
| HOTW 10 Sep 2014 | Slam? Not a chance |
Show Detail |
Slam? Not a chance
Imagine sitting North with this pleasant 17-point holding and partner opens 1♠. Immediately that little 'Slam?!' lightbulb pops in your head.
Why? Well, for one thing you have 17 points opposite an opening hand! But think also of the actual cards partner holds. The significant cards you're missing are the ♥A, ♦K and ♣AK. All partner can have in trumps is ♠QJ, so she's got at least 9 points elsewhere. So it's likely that she holds 3 of those 4 significant cards. Which is enough for a slam. (Sure, you haven't agreed spades as a suit yet, but you do know that one way or another you're going slam-hunting.)
Here, though, partner has opened a pre-emptive 3♠. Non-vulnerable, that shows a 7-card suit and 5-9 points. How does the slam look now?
The answer is: very unlikely. Why? Same as above. Partner surely holds the ♠QJ, but that leaves her only 2-6 points in the other three suits. So how many of those vital 4 cards we identified earlier (♥A, ♦K, ♣AK) has she got? Not enough! At the very most she can only hold 2 of them.
So no little slam lightbulbs in this occasion. Just reach for the 4♠ card in the bidding box and be content with game.
As it happens, you can't even make game, let alone a slam, on this hand, as outside trumps partner has only the ♦Q. Have a look at all four hands – you're solid in trumps, but the opposition can make 2 clubs, 1 heart and a diamond.
Not that 4♠ going one off gives NS a bad score – even doubled – because EW can make 4♣, which is worth more.
What happened in Box and Bath?
Most pairs ended up in 4♠ – and too many were allowed to make it!
As a postscript, imagine what you would lead sitting West. Other things being equal, leading from unsupported honours is generally not a good idea, so I'd lead either a trump or a club. The one disastrous lead is a small diamond: South will let it run round to her Queen and EW can say goodbye to their hopes of a diamond trick: 4♠ bid and made!
|
|
|
|
| HOTW 03 Sep 2014 | Why pre-empt? |
Show Detail |
Why pre-empt?
'With a 7-card suit and less than opening points, pre-empt: open 3 of your suit."
But why? The answer is that it can make life difficult for your opponents. On this hand, for example, you're sitting South, East opens with a pass, you also pass and West opens 3♦ .
Your partner, North, doubles (asking you to bid your best suit) ... and East raises his partner to 4♦. What do you bid? You have 3 choices:
- PASS. East's bid means that you no longer have to bid – and with just 6 points you might be content to reach for the green card. But might you be missing something?
- 4♥. Well, partner is promising both majors ... isn't she? Mm. But supposing she only has 3 hearts ...? And am I strong enough?
- 5♣. Partner's asked me to bid my best suit, and clubs is certainly that. But at the five level ...?
Difficult, isn't it? Exactly the effect that EW intended with their pair of preemptive bids.
On this hand, as it happens. 4♥ is the contract to be in, as you'll see if you click on Show all hands. 5♣ goes 2 off. And they can make 7 (though in practice probably 8) tricks in diamonds. Passing isn't necessarily disastrous, as partner has another bid and can double again to force you to bid.
But the main point is that EW's preemptive bidding have forced you into a guess – and guesses are often wrong.
Suppose East passes instead of opening 3♦? North then opens 1♥ and 4♥ will then be a certainty. The preempt gave EW a chance for a good result.
So did it work? What happened on the day in Box and Bath?
What happened in Box?
Three of the six Wests didn't open 3♦ (because North ended up in 4♥, meaning she was allowed to open 1♥ in the first place). Two Souths ended up in 4♥ (so the bidding was something like the auction above). And one West was allowed to get away with 3♦ – which she made for a huge top! So the preempt worked one time in 3 (though sadly 3 of the 5 NS pairs went one off in 4♥).
And in Bath?
All over the place. As in Box, a few Norths and a few Souths found 4♥, but only two made it. Four NS pairs ended up playing in 4♣, with varying fortunes, and one North went 4 off in 3NT – ouch! Inexplicably, one EW pair were allowed to play in 5♦ undoubled – c'mon guys, if the opposition are going to sacrifice and you have an 18-count including ♠A, ♥AK and ♦Kxx, the least you can do is double it.
The general drift, then, is that pre-empting forces the opposition to make decisions without having had the benefit of a nice conversational auction. It forces them to guess, and that can often mean a good result for you.
|
|
|
|
| HOTW 18 Jun 2014 | Avoiding a hammering |
Show Detail |
Avoiding a hammering
Here's an useful rule to have in your armoury:
If partner opens 1NT and you have a 5-card major, make sure you share that information.
Sometimes you'll mention it en passant, so that with 14 points and 5 spades (for example), you'll transfer partner to spades and then bid 3NT – giving her the choice of playing in 4♠ (if she has 3+ spades) or 3NT (if she only has a doubleton).
But very often (if you have 10 points or fewer) you won't be going anywhere further – and in that case just transfer partner to the major and then PASS. It's still almost always better play in 2 of the major than in 1NT – even if partner has just a doubleton.
And when you're very weak (as here, with just 3 points) it's all the more important to transfer into the major.
Look at the situation. Your partner has just 12-14 points, and you have 3. The opposition have a minimum of 23 points and could easily have game. You're going to get hammered in 1NT. Fortunately, you have 5 hearts, so you bid 2♦ (a transfer to hearts) and then pass partner's 2♥ response.
So that's one reason to transfer to hearts: 2♥ is likely to go off by fewer tricks than 1NT. But there's another reason too, which this hand illustrates beautifully.
Suppose West has 16+ points (quite possible after East's pass). She's going to double 1NT for penalties, and now East will know about his partner's strength and they can have fun tormenting you with doubles or perhaps even find game themselves. By initiating a transfer, you can get in the way – and that's exactly what happens. Have a look at the whole deal.
Poor old West has a balanced 16-count. She could have doubled 1NT (for penalties) but she hasn't got a bid over 2♦. Nor can she make a take-out double over your partner's 2♥ response, because she hasn't got the 'other 3 suits' – the only suit she has is 4 hearts to the 9! So she has to pass and NS get to play in 2♥, going just one off for -50 – not bad when the opposition have a combined count of 25!
Postscript – new to transfers?
If you aren't familiar with transfers and how they work, click on Level 1 in the main menu and check out the article You've now completed Lesson 7, which gives a basic explanation and some useful practice.
|
|
|
|
| HOTW 21 May 2014 | Forcing your way to game |
Show Detail |
Forcing your way to game
If you know game is on bid it yourself or make a forcing bid.
Don’t make a bid that partner can pass. |
You'll have seen this as part of the How to avoid missing game notice at the club. A forcing bid is one that requires you to respond. Conventional bids such as opening 2♣, or 2♣ Stayman or transfers after 1NT, or 4NT Blackwood are forcing – you won't be popular if you pass any of them. But it starts much simpler than that. After partner opens 1 of a suit, any change of suit is forcing (so if she opens 1♦ and you respond 1♠, she has to bid again), and so is a voluntarily bid new suit at the 3 level. There are others, too – reverses, 4th suit forcing, jump shifts ... – but none of them feature on this hand. Talking of which ...
With a minimum 12 points, West opens her 5-card suit: 1♠. North passes.
Immediately, East knows something that West doesn't know – game is on. Partner has opened, and he holds 14 points. It's therefore up to East to ensure that the auction doesn't die below game. He can't 'bid it himself' because it isn't clear yet what the best game is, so instead he makes a forcing bid. A simple change of suit is enough: 2♥ (not 2♣ – with two 5-card suits, responder bids the higher-ranking one first).
South passes, and all West can do is rebid her spades. She doesn't like rebidding such a thin suit, but she has to bid something, and 3♦ would show a much stronger hand – so 2♠ it is.
Back to East. It still isn't clear what the best game is, so he has to find another forcing bid. 3♣ is the obvious solution. A new suit at the 3 level is forcing (actually, it's forcing to game, so from this point, neither player may pass before game is reached – handy).
And it's finally clear what the game contract should be. West doesn't like hearts, her partner doesn't like spades, they both have clubs ... but now West's diamonds (that she couldn't show earlier) come into their own. They're good enough for West to call 3NT. The right contract has been reached, and all because East has insisted, via his two forcing bids, that the auction continue.
How does it play?
Have a look at the NS hands. Poor old North will doubtless lead a diamond (the 'unbid suit'), and in doing so gives tricks away. If he leads the ♦K, West wins, and leads another diamond, forcing out North's ♦Q and now has a further two diamond tricks. And if instead North starts with his '4th highest' ♦5, West pops up dummy's ♦J and sneaks an extra trick that way. Then it's plain sailing with 5 clubs, 2 hearts and a spade, for 10 or 11 tricks. Lovely.
('Why 3NT? Why not 5♣?' Because if all goes well (and it looks as if it will), it's much easier to make 9 tricks in NT than 11 tricks in clubs, and NT scores more per trick than clubs. In this case, 5♣ makes, sure, for 600, but 3NT makes at least 10 tricks for 630, which is way better.)
And in Bath?
The mind boggles. Fewer than half the pairs were in 3NT, one pair played in 5♣, and apart from one oddball 6♦ contract (going 3 off), no-one else was in game. Final contracts included 3♣, 4♣ and, incredibly, 2♥ – presumably West had decided she didn't like her 3-Ace hand and decided to pass her partner's forcing 2♥ response. And yet, following simple, basic precepts, it's so easy to find the right place to be ...
|
|
|
|
| HOTW 09 April 2014 | An inviting hand |
Show Detail |
An inviting hand
Very inviting, in fact. You have a delicious 20-count with a void in opener's suit. Never mind that partner started things off with a pass. North's 1♦ opener gives you a perfect opportunity for a takeout double. South passes, your partner bids 1♥, North passes ... and it's back to you. What do you bid?
Well, before you get too excited, you have to remember that (with an exception we'll look at later) your takeout double requires your partner to bid. Even if she has zero points, she has to find a suit to bid.
A second thing to remember is that with 8+ points, she'll jump – so with 4+ hearts and 8/9 points, she'll respond not 1♥ but 2♥. With 10/11 she'll respond 3♥, and with 12/13+ she'll go straight to 4♥. (All of which makes sense, since you've shown an opening hand yourself.)
So you know two things about your partner's hand: she has hearts, and she has 0-7 points.
So back to your hand. Many players will now simply punt game – 'What the hell? I've only got 3 losers with hearts as trumps, so let's go for it!' – and I would have been tempted to do that myself. But then again, if partner really does have nothing or nearly nothing, you may find yourself continually leading away from your strong hand and could easily lose 4 tricks.
The best strategy in this situation is to invite. An invitation essentially means 'OK. You've told me certain things about your hand. So are you a minimum? Or have you got a bit more than that?' or alternatively 'Are you towards the bottom end of the point range for your bid or towards the top end?'
So you bid 3♥. And if partner's towards the bottom of the range she's shown – 0, 1, 2, 3 points – she'll pass. But if she's towards the top end – 5, 6 or 7 – she'll raise you to game. And on this occasion she has 5. A pretty ropy 5, it has to be said, but still 5 points more than she's promised you thus far. So 4♥ it is.
Click on Show all hands, and you'll see that you make game comfortably. As luck would have it West''s ♠Q provides the crucial entry so that she can 'catch' North's trump King with a finesse.
Converting a takeout double to penalties
This is the exception I mentioned earlier. If partner makes a takeout double and you have a fistful of opener's suit, you might decide that you'll do better to try and get them down doubled, rather than being in a contract yourselves. In this case you can pass your partner's double – 'converting' it into a double for penalties.
Here, West may be tempted to do just that, as she has SIX diamonds to the J10. That's probably 3 trump tricks for West ... but that still leaves East needing to take FOUR further tricks in order to take NS one off in 1♦ doubled. Maybe ... maybe not. Up to you!
And in Devizes ...?
Only two of the 7 EW pairs reached game in hearts. Four others stopped in part-scores. And one 'converted' the double, leaving NS in 1♦ doubled. This duly went 2 off for a 500 penalty, but this wasn't as good as the 620+ for game in hearts.
But hey – if you missed game, take heart. You're in good company. That was a good bunch of players competing in Devizes.
|
|
|
|
| HOTW 12 Mar 2014 | Transfers at work |
Show Detail |
Transfers at work
I've often seen learners initiate a transfer over partner's opening 1NT and then sit wondering what to do next. What should happen, of course, is that you should always decide on your next bid BEFORE you embark on a transfer – and very often it's exactly what you would have bid if you hadn't had a 5-card major.
This hand is a great example of the power of the transfer. With not quite enough points to open, you pass and partner opens 1NT.
Now then. Are you in game or not? And will it be in hearts or NT? You don't know yet, so you need to set about describing your hand to partner. Without the 5 hearts, you'd simply raise to 2NT ('Pass if you're minimum, partner, and go to game if you're maximum.') So THAT's what you're aiming to bid. But en route you can initiate a transfer into hearts, so that partner knows you have 5.
Simple, isn't it? You're aiming to bid 2NT, but first you're going to tell partner about your hearts.
This is how it goes: you bid 2♦, partner completes the transfer to 2♥ and now you bid 2NT. In two bids, you've just described your hand perfectly: 'I've got a raise to 2NT and exactly 5 hearts.'
And that's it. You've done your job, and now it's up to partner to decide on the final contract. She has 4 choices: pass, 3♥, 3NT or 4♥. On this occasion, she chooses 3♥. What do you think she's got? Make a decision, then triple click below for the answer.
She's got at least 3 hearts (because she prefers them to NT), but she's minimum points.
Now check out the full deal, and you'll see that you've reached exactly the right contract: you're going to lose a heart, plus a trick to the ♠K, and (provided East switches to clubs, leading through dummy's ♣Kx ) two clubs – 4 tricks in all, leaving you nine. (This is a good illustration, by the way, of why West should NOT bash out her ♣A at the first opportunity – it gives NS a 10th trick!)
So how did they do at Bath? Most tables ended up in 3♥. Two pairs (inexplicably) stopped in 2NT and a further two punted 4♥ (both going one off).
|
|
|
|
| HOTW 12 Feb 2014 | Delayed raise |
Show Detail |
Delayed raise
Situations like this come up frequently. North has a balanced hand but with too many points to open 1NT, so bids a suit – 1♥ in this case – intending to continue with a NT rebid. With 10 points, South manages to scrape up a 2♦ response and North duly bids 2NT.
This position (as you'll recognise, because I bang on about it all the time) is forcing to game on both players. Why? Because North has 15+ points for her NT rebid, and South has 10+ for her 2-level response – giving the partnership 25+ points, which is enough for game.
So no problem, then – South just bids 3NT and that's the end of it. Yes?
Well, no. You aren't yet sure that 3NT is the best contract, are you? You didn't raise partner's hearts because you don't have 4 of them – but you do have 3. And it's quite possible that partner started off with 5 hearts, in which case 4♥ is likely to get you a better score.
So, just in case you are sitting opposite a 5-card heart suit, bid 3♥. This 'delayed raise' can only mean one thing: 'Partner, we're probably going to end up in 3NT, but I thought I ought to tell you that I have 3 hearts, just in case you have 5.'
There's no danger of partner passing this (as we both know we can't stop below game), and North now has the choice of 3NT or 4♥. In this case (have a look at the whole deal) partner happens to have only 4 hearts and settles for 3NT after all. But offering her the choice has cost you nothing and on another occasion will pay dividends.
Simple stuff – but effective and risk-free. The general principle is that a delayed raise, when bid freely, as here, shows one card fewer than an immediate raise – in this case, 3 hearts instead of 4.
|
|
|
|
| HOTW 30 Oct 2013 | Gems in the dustbin |
Show Detail |
Gems in the dustbin
Bridge is all about making inferences and acting on them – and there's often plenty of information for the gleaning even early on in the auction.
East has chosen to open 1♦ with this powerful 20-point hand, and I agree with her. 2NT isn't a good description of the hand, and 2♣, though perfectly reasonable, could get messy if partner replies 2♦. The danger is, of course, that partner might pass 1♦ – but in that case game probably isn't on anyway.
So. South passes and West trots out 1NT – the 'dustbin' bid. A pass from North and it's your bid. What do you say?
The right bid's there for the taking if only you take the time to think about what partner's telling you. Sure, he's got 6-9 points. Fine. That tells you you should be looking for game. But what else is his 1NT telling you? Think about it before reading on.
Well, as your partner is far too good a player to conceal a 4-card major, you can conclude for a start that he has at most 3 cards in each major suit. You can also assume that if he had 4 diamonds he'd raise your diamonds ... so he can't have more than 3 diamonds either. So that means ...
... that he must hold at least 4 clubs – and very likely more.
Which gives you your answer: you have a combined holding of 25-28 points, with plenty of clubs in partner's hand to balance your own shortage. So 3NT it is.
Have a look at partner's hand now. In NT, you have tricks coming out of your ears – 11 if you take the diamond finesse, 10 if you don't. A couple of further points:
- Were you tempted to rebid 3♦? Why? Partner is almost bound to pass after his 1NT response, and you'll have missed game. Yuk.
- Would you feel safer in 5♦ (which is a game contract, at least)? Well, even if it makes (which it does) you've got a bad result, because 3NT +2 is worth 60 points more. Yuk again.
So the lesson here is: think about it. Don't bid on auto-pilot. There's information waiting to be inferred if you only take the trouble to infer it.
And in Bath?
As it happens, they were pretty good at inferring. 8 out of 11 pairs ended up in 3NT, mostly played by West. Two ended up in the inferior 5♦ (one going off for an absolute bottom!) and just one pair stopped in 3♦.
|
|
|
|
| HOTW 25 Sep 2013 | Too flat |
Show Detail |
Too flat
After three passes, your partner opens 2NT, showing 20-22 points. What are your thoughts?
It boils down to two questions:
- Do you want to look for a 4-4 spade fit via Stayman? and
- Do you want to try for a slam?
To the first question, I'd answer probably not. You're an entirely flat 4-3-3-3 and even if your partner has 4 spades you're not likely to make any more tricks than in NT – and without that extra 10 points that no trumps brings 4♠ will get a poor score.
The second one's a closer-run thing. Opposite a maximum 22-point opening, you'd have a combined 32 points – technically not quite enough for 6NT – but it's worth stopping to consider if you're holding a 'good' or a 'poor' 10 points. In your favour, you have good 'intermediates': you have two 10s (together worth maybe ½ a point) and one has a 9 to go with it. But against that, the hand's simply too flat. Give it a bit more shape (say, ♠ 53 ♥1062 ♦AQ1095 ♣A73) and you might generate your 12th trick in diamonds. But as it is, a flat 10½ ain't quite enough. So bid 3NT and take your 11 tricks.
Q Supposing you did have 11 points or a shapely 10. How do you go about inviting partner to the slam?
A Bid 4NT. This has nothing to do with Blackwood (which is used when you've agreed a TRUMP SUIT). Rather, it's a quantitative bid, which means: 'Partner, if you're a maximum, please bid 6NT. If not, pass.' In other words, it's pretty much the same idea as a raise from 1NT to 2NT ('Bid game if you're a maximum, pass if you're not.') Handy.
What happens here?
Partner turns out just to have a 20-point minimum anyway and you can make just 11 tricks, as predicted. In Bath, no-one was tempted to look for the slam, as the whole room without exception played in 3NT, nearly all making 11 tricks – and no-one making 12.
But sooner or later you'll want to try for the slam – and a direct raise to 4NT (it works over 1NT as well as 2NT) is a useful way of asking.
|
|
|
|
| HOTW 21 Aug 2013 | Calm down! |
Show Detail |
Calm down!
It isn't often you get dealt a 10-card suit – it happens once every 60,000 hands or so – and it's easy to get over-excited or even to panic. But hey – in the end, it's just another hand which needs to be thought through.
Your partner opens 1♦ and West passes. You're pretty sure that you want to play the hand in spades, certainly at game level – but maybe higher. What do you bid?
It's tempting to go bananas and go jumping all over the place, but a jump to 2♠ shows a seriously 'pointy' hand (which you don't have), whereas leaping to 4♠ would be a strong suggestion to partner that she should pass.
What you really want to do is to find out more about partner's hand. And one of the key features of Acol is that a change of suit after partner's opening is unconditionally forcing – partner has to bid again. So it's quite sufficient for the moment to forget the extra 6 spades in your hand and simply respond 1♠.
And partner's rebid is 2♣. Not dramatic enough to get you reaching for 4NT (Blackwood wouldn't help much anyway, 'cos you wouldn't know whether one of partner's Aces was in your void suit diamonds). So you now bid 4♠.
And now it's up to partner. If she's sitting there with a couple of Aces, she might well try Blackwood herself, but if not, she'll pass – and with just one Ace that's what she does.
If you have a look at the hands, you'll see that you're missing THREE Aces (including diamonds), so you'll make 11 tricks. True, if East leads his ♦A you'll end up with 12 tricks: you ruff, then throw away your losing club on your ♦K. But with Aces missing in two critical suits, it's not a slam you want to be in.
The message? This is yet another hand where a simple change of suit does the job: it enables you to find out more about partner's hand cheaply, before the bidding gets too high. There's plenty of time to get excited later, if partner's response warrants it – and here it doesn't.
And in Bath ...?
Half the pairs sensibly stopped in 4♠ or 5♠. Four others punted a seriously foolhardy 6♠ (What? with 3 Aces missing?): just one made it, when East made the fatal diamond lead.
And one pair, who got into all sorts of a mess with an auction that began 1♦ – 4NT, ended up in 7NT doubled (well, you would double, wouldn't you, with 3 Aces?) going a massive 6 off for -1700. Should have stayed calm!
|
|
|
|
| HOTW 03 Jul 2013 | Try a trial bid |
Show Detail |
Try a trial bid
With increasing reliance on counting losers, it's easy to miss one of Acol's most useful tools: the trial bid. Take this hand. You have a stronger-than-minimum opening 1♥, and partner raises you to 2♥. Many players will leave it at that: I have 6 losers, partner has 9, so we can only make nine tricks ... Pass.
Well, maybe not. It's also to do with where partner's strengths are and whether your hands 'fit together' well.
Looking at your hand, the trumps are probably fine (you have 9 between you), and you aren't worried about losing too many tricks in spades or clubs. But the diamonds ... hmm. If partner has 3 or 4 small diamonds, that could be expensive. But if she has good (or very few!) diamonds you could be making game.
Enter the 'long suit trial bid': in this case 3♦. After a raise to 2 of a major this means: 'I'm a bit stronger than I might be here, partner, and I'd like to be in game if possible. Only I'm a bit worried about diamonds. Can you help me out? Or maybe you're a maximum anyway?'
If she has something useful in diamonds, or a maximum, West will bid 4♥. but if not she'll sign off in 3♥.
So what happens here? Well, West has a maximum 9 points, including a handy K10x in diamonds, so she raises to 4♥ – which makes, as you'll see if you click on Show all hands. Sure, failing an opening club lead, you need the club Ace to be in the right place – which, happily, it is, and 4♥ is a good place to be.
Postscript
This is a useful reminder that while counting losers is a useful tool it ain't the be-all-and-end-all of hand evaluation. Points count too – and so does the 'fit' between the two hands. If you haven't already, add trial bids to your armoury.
In Bath, where maybe too many pairs used losers to dismiss the possibility of game, only 3 of 11 pairs found 4♥, and they deservedly reaped a profitable joint top.
|
|
|
|
| HOTW 12 Jun 2013 | 'Super-accept' |
Show Detail |
'Super-accept'
It's so easy to miss game on holdings like this one. North opens 1NT, South transfers to hearts (via 2♦), North accepts the transfer by bidding 2♥ ... and South, reckoning Well, I have got 6 hearts, but I've only got 10 points, so even if my partner is a maximum 14 we haven't quite got enough for game – best to leave it there passes – end of auction.
Fine, except that you can make 11 tricks with hearts as trumps – and no-one in Box reached game!
Margaret would have found the answer for herself if I hadn't got in the way: when her partner bid 2♦, she was thinking Hang on a minute – I have FOUR hearts here with partner and I'm also a MAXIMUM, so shouldn't I let partner know? Dead right, Margaret: with four of partner's major and a maximum 14, you can super-accept – that is, respond 3♥ instead of 2♥. Partner now has a much clearer picture of your holding and on this deal, at least, will surely bid game.
A couple of further points:
- But I thought you needed at least 25 points for game? Well, yes, you do in NT. But here, we're talking about a suit contract, which may need fewer points (which is why we use 'losers' as well as points to evaluate non-NT hands). So it's certainly worth exploring for game in hearts here.
- Actually, I think with 10 points and 6 hearts, South should make a game invitation anyway – even if partner doesn't super-accept. Opener might have three hearts and maximum points, so it's well worth inviting with 3♥ just in case. No danger involved, as you're surely going to be worth 9 tricks in hearts.
- The danger with super-accepting, of course, is that partner might be sitting there with three points and five rubbish hearts and be running for cover. Well, in that case, the opposition might have game on themselves, so your super-acceptance will certainly throw a spanner in their works, and in any case you're unlikely to go more than one off.
Conclusion: If you open 1NT and partner transfers you into a major and you have 4 trumps AND a maximum, then super-accept.
PS They certainly know their super-accepting in Bath: eight of the nine tables found game in hearts – though two EW pairs sacrificed in 4♠ for an even more gruesome score (it should go four off doubled!)
|
|
|
|
| HOTW 15 May 2013 | The Rule of 15 |
Show Detail |
The Rule of 15
You're sitting South and the other three players have passed. If you pass, the hand will be passed out ... but you don't quite have a normal opening bid. What to do? If you pass and you have a contract on, you'll get a poor score. But if you open and they end up making a contract instead, it'll be equally disastrous. Help!
Enter the Rule of 15, which is designed exactly and exclusively for this situation: for 4th in hand after three passes. It states:
| Add your point-count to the number of spades in your hand. If it comes to 15 or more, then you should open the bidding. |
Weird, eh? Why would that be, then? Well, it's because each pair is likely to have roughly half the points (think about it!), so the resulting contract is going to be a part-score, probably at the 2-level. It follows that the higher-ranking your suit fit, the more likely you are to win the contract (inasmuch as 2♥ or 2♠ outranks, say, 2♦). As spades are the highest-ranking suit, the more of them you have the more likely you are to become declarer.
So what happens here? You have just 11 points, and it's tempting just to pass. But apply the Rule of 15: you have 5 spades, so your count is 11 + 5 = 16. You should therefore not pass, but open 1♠.
And then? Have a look at the other hands. All sorts of things could happen, but the bottom line is that while EW can make 3♦ (pretty good with only 18 points), NS can make 3♠ – the higher-ranking spades can outbid the lower-ranking diamonds.
Which means that a passed out hand is a great result for EW and horrible for NS.
Finally, imagine the South hand with spades and diamonds swapped over:
 8 3 8 3  K 9 7 ♦ A J 10 4 2 ♣ K 3 2 K 9 7 ♦ A J 10 4 2 ♣ K 3 2
Now your Rule of 15 count is only 11 points + 2 spades = 13. You pass. And rightly so, because EW have probably got a spade fit and will be able to outbid you and pinch the contract. Better from your point of view that the hand should be passed out.
So there you have it. Yet another 'Rule of ...' but one that's easy to remember and apply and well worth adding to your arsenal.
|
|
|
|
| HOTW 17 Apr 2013 | Weak Stayman again |
Show Detail |
Weak Stayman again
Why are learners taught that 'you need at least 11 points to use Stayman' over partner's opening 1NT? Because if you find you don't have a major fit, you may have to end up in 2NT, so you have to be strong enough just in case. Try this:
♠ A 10 8 7 ♥ 7 6 4 2 ♦ 7 2 ♣ K 8 7
Suppose you try Stayman and partner responds 2♦, meaning 'Sorry, no 4-card major' ... what do you do now? You can't pass (!), you haven't got a major fit, so all you can do is bid 2NT – and you aren't strong enough. You've dug yourself into a hole!
But change just one card to get today's hand and you have a completely different situation. If partner has 4 hearts or 4 spades, you're happy to pass ... but if she hasn't and bids 2♦ you now have somewhere to run to: 2♠. Your 5-card spade suit makes all the difference. (In fact, if you hadn't had 4 hearts as well, you would quite happily have transferred partner to 2♠ and passed.)
So here's a very useful extra use for Stayman: with 5-4 in the majors and a WEAK point holding (anything down to 0 points!), bid Stayman and if it doesn't work out sign off in your 5-card major. End of auction.
How does this hand turn out? As it happens, partner has 4 spades, so you end up in spades anyway and make a comfortable 8 or 9 tricks.
Postscript: what if I'm stronger?
With a stronger hand and 5-4 in the majors, you don't use Stayman at all. Instead, transfer partner into your 5-card major and then bid the other major. That way, partner will know your shape exactly – and that you're stronger – and can act accordingly.
|
|
|
|
| HOTW 27 Mar 2013 | The Holy Grail |
Show Detail |
The Holy Grail
The Holy Grail in a bridge auction is to find a major fit. That's why Acol is built the way it is - to make it as easy as possible to find an 8+ fit in hearts or spades. Failing that, look for a no-trump contract, and if all else fails make do with a minor.
Which is why you should never conceal a 4-card major after partner opens one of a minor suit. Even if it's a rubbish suit. And even if you have a super fit for partner's opening minor.
Here partner has opened 1♣ and you have 4 clubs - a fit. But you also have 4 spades. So your first response must be 1♠, just in case partner has 4 spades too.
If partner ignores your spades and simply rebids 2♣, fine - you haven't got a major fit, so you can now raise her to 3♣, in the hope that she'll now make some kind of no-trump try. But as it happens, partner does have 4 spades: she jump raises you to 3♠, inviting to game and with 10 points (and a double fit in clubs and spades) you raise to 4♠, which makes comfortably, as you'll see if you click Show all hands.
Other hands
This kind of thing happens time and again. In fact, there are TWO other hands in the 14 we played last Wednesday where the same issue arises: in both boards 2 and 4, West opens 1 of a minor, EW have a minor fit ... and East has four hearts. They're not very good suits (one is 10xxx and the other Jxxx), but it matters not a hoot. East has to show his 4-card major. As it happens there isn't a heart fit in either case, but the heart bid helps the partnership find 3NT, which makes on both hands (unlike game in the minor, which doesn't).
So if partner opens 1 of a minor, by all means support it provided you don't run the risk of missing the Holy Grail of a major fit.
|
|
|
|
| HOTW 27 Feb 2013 | Down to you |
Show Detail |
|
Down to you
You're West, and this has been the auction so far. What do you make of it?
It's no secret that with a strong minor holding, it's nearly always best to try for no trumps, rather than the minor suit as trumps. Why? Because you don't need as many tricks for game, and because NT scores much more than the minor suit, whether you're in game or not. (You need to make 10 tricks in clubs, for example, to beat the score for 8 tricks in NT.)
The only exceptions are (1) when you might make a slam in the minor and (2) when NT is too dangerous (because you lack cover in a suit).
So ... let's apply that here. Are you going to make a club slam? Surely not. Partner is a passed hand, so has no more than 11 points. You probably won't make 11 tricks, let alone 12.
So on to point 2: is it too dangerous? At first sight, it looks like it. You have nothing in diamonds or hearts ... so supposing they lead a heart?
Now. Think about your partner's bid. She's responded at the 2 level, so has 10-11 points (no more, because she passed originally). You have all the points in clubs. North has bid spades and you have the King: partner is unlikely to have more than the ♠J, if that. So she's got 10 points in the red suits. Add to that the fact that South doesn't have much, and it's extremely likely that partner has stops in both red suits, not just diamonds.
So NT is safe enough.
Now then ... how many tricks? Well, if North leads her best suit (which she’s very likely to), she's going to be leading round to your ♠K, so that's one trick. Then you can count 7 club tricks in your own hand ... leaving partner to provide just one. It will have to be an Ace, because once you've taken a trick with your ♠K you don't want to lose the lead again.
So take a deep breath, out with the Stop card and bid 3NT. North leads a small spade ... and down goes dummy (click to see!) and you've made 9 tricks off the top, as partner has the ♦A (as well as the expected vital heart stop).
Lessons
There are two important ones.
- It wasn't 'lucky' that your partner had a heart stop. You worked it out from the auction and your own holding. The odds are way over 50% that hearts are safe. And even if they weren’t, there are strong reasons for expecting a spade lead – which is just perfect.
- YOU are the one who knows that game is on. Your partner doesn't. So it's no good bidding 3♣ to tell partner about your lovely clubs, as she will probably pass. If you want to be in 3NT, it has to be bid by YOU - RIGHT NOW. If you know where you're going, go straight there. Don't risk being passed out.
At Marmaris
Back in Turkey, the hand was played at 20 tables. 9 pairs played in 3NT, making 9 or 10 tricks, and one other pair was in 5♣, making 11 tricks. Nearly all of the others ended up stranded in a miserable 3♣ or 4♣, for a poor part-score. Why oh why didn't they bid 3NT?
But the top score for EW came when South for some reason bid 2NT (in response to partner’s takeout double?). West doubled for penalties and, being on lead, started with her ♣A … and took 11 tricks, for 6 down, doubled vulnerable: 1700 points. Lovely!
|
|
|
|
| HOTW 10 Oct 2012 | Trust your partner (again!) |
Show Detail |
Trust your partner (again!)
You're sitting East and North starts the auction with a pass. With two suits of unequal length (neither of them particularly thrilling!) you open the longer one: 1♥. South passes, your partner responds 2♦ and North passes again.
What do you bid now?
It would be nice to show your spades, wouldn't it? At a stroke your partner would know that you have at least 5 hearts and 4 spades and you can go on from there ... but to where?
The bid you're considering – 2♠ – would be a reverse*, showing 16+ points and forcing for one round: in other words, you'd be forcing the auction to the three level without having found a fit. And that could lead to all sorts of difficulties.
Unpalatable though it is, you should draw in your horns and simply rebid your yucky heart suit: 2♥.
'But hang on!' I hear you cry. 'Partner might pass 2♥. I know from her 2-level response that we've got at least 24 points between us. We might miss game!'
Which is where the title comes in. Partner should be aware that even though you've made a simple rebid, you could have up to 15 points – or even a really grotty 16. Unless her 2♦ bid was a bit dodgy, she really ought to bid again just in case you have enough for game between you. And if she does happen to have 4 spades (having rightly decided with 10+ points to show a 5-card diamond suit first) her very next bid will, of course, be 2♠ – so there's no danger of missing a 4-4 spade fit.
So what happens here?
As you'll see if you look at all the hands, whether or not you reverse in this particular case doesn't matter a hoot, because partner has 11 points and 3 hearts and either way you end up in 4♥ (which can make despite a nasty 4-1 heart split).
And that's the problem: very often in bridge you can make a bad bid and everything turns out fine and dandy – sometimes even better than that! – and so bad habits are perpetuated. 'See? It worked, didn't it?!' But in the long run it's a losing strategy. Better by far to bid properly and trust your partner.
* A reverse is a rebid that may force partner to the 3 level in choosing between your two suits.
In the sequence 1♥ - 1♠ - 2♦ partner can choose between your suits without going beyond 2♥. This is the normal order.
But if you bid your diamonds and hearts in reverse order: 1♦ - 1♠ - 2♥ partner cannot now show a preference for diamonds without going to the 3 level.
Because this might be dangerously high, you need a stronger hand – 16+ points – to reverse. And because you're stronger, partner isn't allowed to pass next time: a reverse is forcing for one round. |
|
|
|
|
| HOTW 29 Aug 2012 | Weak Stayman |
Show Detail |
Weak Stayman
Stayman is an immensely useful convention that allows us to find a 4-4 major fit after a 1NT opening. If you have a 4-card major (or maybe two!), you bid 2♣ and partner shows 4 hearts or spades by bidding 2♥ or 2♠ respectively or, with no 4-card major, bids 2♦.
There are dangers, however. What if partner opens 1NT and you hold something like this?
♠83 ♥K765 ♦J52 ♣AJ87
You might have a 4-4 heart fit, but it's not a good idea to use Stayman to find out. Why not?
Well, if partner responds 2♥ (showing 4 hearts) fine: you pass. BUT ... if she responds 2♠ (showing 4 spades) or 2♦ (showing no 4-card major), what happens next? You have nowhere to run to except 2NT – and with only 9 points you aren't strong enough to bid 2NT ... and you're up a particular kind of creek without a paddle.
For this reason, you may have been told that 'you need at least 11 points to use Stayman'. Well, that's often true – but not always, and it certainly isn't on this hand. Before we go there, bear with me and consider how you'd respond with this 7-point hand:
♠AQ1085 ♥865 ♦102 ♣J62
Well, you might make 1NT, but with a 5-card major you'd rather play in spades. So you transfer partner to spades and pass. Sure, partner might only have 2 spades, but you'd still feel more comfortable in a 5-2 major fit than in no trumps.
Now look at today's hand, which is only one card different:
♠AQ1085 ♥10865 ♦2 ♣J62
But what a difference one card can make! Now there's not one but two possibilities that might be better than 1NT: 2♠ as above or (if partner happens to have 4 hearts) 2♥. And this time, you're perfectly safe to use Stayman to find out. Why? Because this time you have other safe places to run to other than 2NT. Let's say you bid a Stayman 2♣ . Let's look at opener's possible responses and what happens:
- 2♠ (showing 4 spades). Lovely – pass.
- 2♥ (showing 4 hearts). Again, lovely – pass.
- 2♦ (no 4-card major). Never mind – we'll revert to plan A and simply sign off in 2♠ (which is where we would have gone anyway if we hadn't had 4 hearts as well).
We need to adapt our rule: if partner's 'wrong' response to a Stayman enquiry means that you're going to end up in 2NT, then make sure you have 11+ points before you use it. BUT if you have a cheaper alternative refuge (e.g. a longer-than-4-card major, as in this case) then you can go ahead and use Stayman.
What about this hand?
As it happens, opener has 4 spades, so the red-suit major turns out to be a herring and the auction ends in 2♠ . But it might not have done, and it was worth using Stayman just in case the heart fit was there. But because you also have 5+ spades, there was no danger of having to end up in 2NT – and so no problem with using Stayman with less than 11 points.
And finally, just for fun: there's one other kind of hand where it's OK (nay, essential!) to use Stayman with a weak hand. Any ideas? Click below for the answer.
|
| Show Answer |
Answer
When you have both majors AND diamonds. Something like this:
♠ Q1085 ♥10865 ♦Q10982 ♣
Do you get the point? You really don't want to play in 1NT because you'll be slaughtered. So use Stayman, and pass whatever partner says in response. It simply must be a better option!
|
|
|
|
|
| HOTW 15 Aug 2012 | 5-3-3-2 is balanced |
Show Detail |
5-3-3-2 is balanced
This often comes as a surprise to learners in bridge classes. How can a hand be balanced with a 5-card suit? Well, the answer is: very easily!
Look at it this way: the most balanced hand you can have is 4-3-3-3. Now switch just one card to another suit and it might become 4-4-3-2. Or you might end up with 5-3-3-2. Both of these shapes are only one card different from the most balanced hand you can have. And that's my working definition of balanced:
4-3-3-3 or just one switch away from it.
The EBU's definition – no more than one doubleton, and no singletons or voids – amounts to exactly the same thing. Which gives us three, and only three, balanced shapes – the ones we've just listed.
So if I've got 12-14 points and a 5-3-3-2 hand, do I open 1NT or 1 of the suit?
That depends on whether your 5-card suit is a major or a minor. A frequent theme of these articles is that we'd normally prefer to be in NT than a minor suit: not only do NT score more, but it's easier to make 9 tricks (game in NT) than 11 (game in a minor).
So on this hand, open 1NT. Your diamond suit isn't particularly good, but even if it were ♦AKQxx, you should open 1NT. Make it an unbreakable rule:
With 12-14 points, a balanced hand with a 5-card minor, always open 1NT.
Look at it another way: if you open 1♦ and partner bids (say) 1♠, you now have to find a rebid, and the only one you have is 2♦. Does that really give partner a good picture of your hand? If you open 1NT you've summed it up perfectly in just one bid, leaving partner in charge of the auction.
OK, so what if the 5-card suit's a major?
Well, you'd rather be in a major than NT, so you don't really want to conceal a 5-card major. Say you have 5 hearts. My own preference is to open 1♥ if it's a decent suit (i.e. one I think is worth rebidding). But if it's pretty manky collection (e.g. K9753) I'll probably open 1NT and hope for the best.
Remember that all this only applies to balanced hands with 12-14 points:
- With an unbalanced hand and 12-14 points you'll always open 1 of a suit.
- With a balanced hand and 15+ points you'll open 1 of a suit intending to rebid NT next time.
So how does this hand go?
Simple. 1NT from North, which South raises to 3NT. No danger then of ending up in diamonds.
(As it happens, South has an excellent balanced hand and should be able to steer the contract towards NT anyway, as happened at 3 tables in Box. A couple of tables went the diamond route, however, and ended up in 3♦, which makes but nets a poor score.)
|
|
|
|
| HOTW 27 Jun 2012 | The joy of stats |
Show Detail |
The joy of stats
A simple question this week, but one that gave players problems in both Box and Bath.
Sitting West, how do you respond to partner's opening 1NT?
A natural response is something like: 'I'd like to be in 3NT, but I'm worried about the hearts. Supposing my partner hasn't got a heart stop? I know – I'll bid 2♣ (Stayman) and if partner shows 4 hearts I'll know it's safe to bid 3NT.' And on this hand, as it happens, partner does bid 2♥ and you make 3NT with an overtrick.
I agree that this seems sensible enough, but it's actually not a very good idea. Why not? Well ...
- ... for one thing, what do you do if partner doesn't have four hearts? Sign off in 3♦? You have game-going points with a good 5-card suit and fantastic intermediates: you want to be in game, not a part-score contract in a minor suit.
- Secondly, what if partner has 4 hearts and 4 spades? She'll show her hearts and then when you bid 3NT will conclude (quite reasonably) that you must have four spades (why else would you use Stayman?) ... and so will bid 4♠, leaving you in a game contract with a 7-card fit.
- A third reason is that the less information you give the opposition the better. Swapping information with partner can, of course, be vital, but your conversation can be overheard by the opposition. In this case, as it's actually unnecessary to exchange any information, the best response is 3NT. This gives the defence nothing to go on at all: if they're to find the killing opening lead, it'll be without any help from you!
To sum up: simply bid 3NT, the only game contract available to you. It has a very good chance of making. Most of the time, partner will have a heart stop (as here) and even if she doesn't they have to find the right opening lead, and even if they do, the suit might be blocked (or they might play it badly or their hearts might be 4-4) so that they make 3 or 4 tricks and then have to hand the lead back to you. Or put another way:
You'll only go off if (1) partner has no heart stop and (2) they find the right opening lead and (3) the suit isn't or doesn't get blocked.
Bring on the stats
If you're not convinced, here's the result of some magic computerised number crunching (many thanks to Taf Anthias for this):
I ran a simulation of 5000 deals with this hand as W opposite a
balanced 12-14. 3NT by E made 71% of the time when S led his
longest suit. If S magically chose the best theoretical lead from
his hand every time, he would keep this down to 64%.
And you may be reassured to know that your partner had at least 4 hearts on 52% of those deals.
For a hand on the same lines, check out The usual story, from 11 April 2012, further down this Page.
|
|
|
|
| HOTW 20 Jun 2012 | Intermediates |
Show Detail |
Intermediates
This week's hand builds directly on the theme of last week's article (Wot? Not 1NT?, below) ...
... where the main point was that it's often more positive to raise partner's 1♥ or 1♠ to the two level with decent 3-card support, rather than bid the 'dustbin' 1NT. This hand is a case in point: with 8 points and a very nice ♠ KJ9, North does better to respond ♠ 2 than 1NT.
So what do you make of your partner's second bid: 2NT? Why would she bid NT once you've agreed a major suit?
Well, for a start, she knows that you might only have 3 spades, as indeed you have! So she's probably only got 4 spades, and her bid must mean something like:
OK, partner, I've got a nice balanced hand here, with only 4 spades. I doubt that we'll make 10 tricks in spades, but if you've got more than a minimum for your bid, we might have enough for 9 tricks in no trumps.
In other words, it's an invitation to game, either in NT (if you're balanced, with maybe only 3 spades) or maybe in spades (if you have a maximum and at least 4 spades), and it offers you 4 choices:
- pass (weaker, preferring NT)
- 3♠ (weaker, preferring spades)
- 3NT (stronger, preferring NT)
- 4♠ (stronger, preferring spades)
So you have two choices to make. Do you prefer NT or spades? And do you go to game or not?
What's your bid? Make a choice before reading on!
The first bit's easy: with only 3 spades, you prefer no trumps. But do you pass or bid game? Not an obvious choice: with 8 points, you're midway between a minimum and a maximum ... so how to decide? Do you upgrade or downgrade your hand?
The answer is to look at your intermediates. Your ... um ... what? Intermediates are the cards between your serious AKQs and your rubbish 234s, and in no trumps they can make all the difference. On this hand, they're about as good as they can get. You have not one but two 1098 sequences, and an extra 9 and an 8 as well: with your A, K and J that's 11 of your 13 cards are 8 or better. So 3NT it is.
The play
Given the (likely) heart lead, the play's a doddle, as you can see if you click to show all hands. All you have to do is force out the spade Ace (immediately, while you still have a stop in diamonds!), and you have three spades, two hearts, one diamond and four clubs (yes, the clubs are a friendly 3-3 split) for 10 tricks.
In Box and Bath
Only one pair in Box found the 3NT spot, but I hope that after reading this you'll all get there next time (should do, really, as you have 26 points between you). In Bath they did better, with 11 out of 13 pairs bidding and making the no trump game.
The main message: if you're not sure whether to count your hand as a minimum or a maximum for a no trump contract, check out your intermediates.
|
|
|
|
| HOTW 13 Jun 2012 | Wot? Not 1NT? |
Show Detail |
Wot? Not 1NT?
We all know about the 'dustbin' 1NT: you don't have 4 of your partner's suit and aren't strong enough to show your own suit at the 2-level, so all that's left is 1NT. And this works pretty well most of the time.
Trouble is, unless partner's shapely or pretty strong (16+), you're going to get left in it and it isn't always the best place to be.
For this reason, if partner opens 1 of a major and you have decent 3-card support, many players will prefer a more positive but slightly dodgy raise to the 2-level to the more negative 1NT. Here's a case in point. South has three decent hearts – ♥KJ7 – and an outside Ace, so even if partner has only 4 hearts you're likely to survive a 2♥ contract.
Why only a major? Two reasons: first of all, if partner's opened a minor and you don't have a 4-card major yourself, then you probably don't have a major fit and so NT is the best place to be anyway. And second, a raise to 2♥ (or from 1♠ to 2♠ ) makes it more difficult for the opposition to poke their noses in: they can no longer bid 2♣ or 2♦, for a start.
How does it pan out here?
2♥ vs 1NT
Well, if NS do end up in 1NT , they're in deep trouble. West will lead a diamond and EW will end up taking 5 diamond tricks on the trot, followed by 3 spade tricks: 2 down.
2♥ is a different story: the worst that can happen is that EW take three spade tricks off the top followed by the ♦AK, and then NS come in, clear trumps and take the rest (the ♠10 now being worth a trick).
And if they fail to cash all their winners immediately, it gets even better, because you can set up your clubs for an overtrick or two. How's it done?
Setting up the clubs
Care is needed.
- To minimise the risk from a bad club split (5-1), you first take two rounds of trumps, ending up in your hand and leaving a top trump in dummy. That means that only one trump is still out, and so if someone's short of clubs they might not have a trump left to ruff with.
- Now cash your ♣KQ, hoping you don't get ruffed. See why you left that big fat trump in dummy? You can now ...
- ... use it as an entry to dummy's remaining clubs. So cross to dummy with a trump (thus also removing the defence's last trump) and
- Cash your ♣A, smiling (inwardly) as the last two clubs come crashing down.
- And now you can cash two remaining club tricks ...
... ending up with 10 tricks, and leaving the opposition wondering how they failed to cash the first 5 tricks when they had the chance.
In Box and Bath
Everyone in Box ended up in hearts, though the defence was too good to allow any overtricks. In Bath, only 2 out of 13 NS pairs ended up in 1NT (going off in both cases!) and the rest were all in hearts. The Bath defence was clearly lacking, as 3 pairs managed 10 tricks by setting up their clubs (as described above). Well done them!
2018 UPDATE
What I failed to say back in 2012 (because I didn't realise it!) is that choosing between 2♥ (say) and 1NT should depend less on the quality of your 3 trumps and more on the SHAPE of your hand:
- With a totally FLAT 4-3-3-3 shape you're unlikely to be able to make a ruff with one of your three trumps, so respond 1NT – reflecting the total 'flatness' of your hand.
- But with any kind of SHORTAGE in your hand, you may be able to ruff something for an extra trick, so raise your partner to 2♥. On this hand, with a doubleton diamond, you're better to raise to 2♥ than respond 1NT. (As it happens, you don't get the ruff, as partner also only has two diamonds, but you get the idea!)
|
|
|
|
| HOTW 16 May 2012 | If you don't look ... |
Show Detail |
If you don't look ...
... you don't find. Here, East has to bid up so as not to miss game in spades.
The auction
West has only 11 points, but with two decent 5-card majors is happy to open 1♠. North's 2♣ overcall takes away East's intended reply, but no matter – she has a second 4-card suit, so bids 2♦, showing at least 10 points.
South passes again, so West shows her second suit: 2♥. North passes this time, and it's up to East. Partner's now shown 5 spades so you have a fit, but do you bid 2♠ or 3♠?
It's tempting just to bid 2♠, isn't it? After all, you've already told partner you have 10 points, so now it's up to her ... But hang on a minute: bidding 2♠ now looks very much like a weak preference bid, holding something like ♠J4 ♥Q85 ♦AK985 ♣543, maybe. And East is much better than that: she has three good spades (including two honours) and only 8 losers. Surely she must invite game with 3♠.
And so back to West. With just 11 points I can't see her inviting game over 2♠, but over 3♠ it's a no brainer: with a singleton and just 6 losers she raises to 4♠.
The play
All right, I own up. If they start with the ♣AK and lead clubs at every opportunity, it's not easy to make this contract, as you can get cut off from your heart winners (as I did when I played it at Box!) But I still think 4♠ is the right spot: you potentially have 5 spade tricks, 4 heart tricks and (if the ♦A is right, which it probably is on this auction) a trick in diamonds.
In Bath, half the EW pairs got into the spade game, and of those about half made the contract (though one pair managed to go 3 off!).
|
|
|
|
| HOTW 11 Apr 2012 | The usual story |
Show Detail |
The usual story
Your partner opens 1NT and you're sitting South. East passes. What do you bid?
My thoughts go something like this:
I've got 11 points and a 6-card minor suit. If partner has a maximum we
theoretically have enough points for game: 25 points. But which game?
Certainly not 5♣. My partner's balanced and I'm as balanced as I can be other
than the 6-card suit, so we simply don't have the high cards to hope to make
11 tricks in clubs. (A major would be different - 10 tricks is much easier than 11!)
So the only denomination we can hope to make game in is no trumps.
So I bid 2NT and my partner, with a maximum 14, raises to game.
It's the same old story, and nicely illustrates the mantra: prefer a major to no trumps, and prefer no trumps to a minor.
But does it make? Click on Show all hands to find out.
The play
Well, technically it doesn't. You're missing a lot of aces and are vulnerable in diamonds as well as spades. You've got 6 club tricks, sure, but even if you force out the heart Ace that only gains you two tricks, so you'll then have to lose the lead AGAIN to make your ninth trick.
But what actually happens? You're way off on a diamond lead: they force out your diamond stop and end up making four diamond tricks in addition to their 2 other aces.
But you're not going to get a diamond lead from an East who has two decent four-card majors, and although a spade lead also takes you off, in fact East is probably going to plump for her 4th highest heart (hearts being her best suit). If that happens, you're home. How do you play it? (Triple click on the text below when you're ready.)
You simply win the trick cheaply (e.g. with the 9) and CONTINUE WITH HEARTS IMMEDIATELY. This guarantees you two further heart tricks and your contract. As it happens, they'll probably switch to spades or diamonds when they get in, which will donate you an overtrick.
In Box and Bath
The moral here, however, lies in the auction rather than the play: don't let the prospect of a part-score in a minor blind you to the possibility of game in no trumps. Sure, it might not make, but you should be in it, nonetheless, because it offers you the best prospect of a good score. Witness the results today in Box: three pairs were in 3NT, one going off (I suspect this was because of a diamond lead prompted by a disgracefully frisky 3♦ overcall!) but the others making, one with an overtrick. The fourth pair were led astray by all those clubs and ended up in 5♣ going one off.
When the score finally appears for Bath, it'll be interesting to see how it went there. Betcha no-one was in clubs ... Hmm, on the other hand, who knows ...?
STOP PRESS Turns out that in Bath all 12 tables were in 3NT. Four went off, four made exactly and four made overtricks.
|
|
|
|
| HOTW 08 Mar 2012 | What's your rebid? |
Show Detail |
What's your rebid?
Whenever you open 1 of a suit, always ask yourself what you will rebid if partner responds with a change of suit. In other words, before you make your first bid, decide on your second.
For one thing, it can help you get your first bid right. On one recent hand in Box (not the one shown), a player holding a 2-4-3-4 distribution opened 1♥ and after partner's 1♠ then decided to bid 2♣ . Trouble is, this tells partner that she started with 5 hearts ... and she hadn't. She only had 4. So she couldn't rebid her hearts either ... She finally realised that she had no rebid, and the reason was that with 12-14 points she should have opened 1NT in the first place. Fine in Box on a Wednesday morning, as we can rewind, but not in a posh 'proper' bridge club. So tip 1: plan your rebid before your hand goes anywhere near the bidding box.
Tip 2 is simplicity itself: having done the preparatory work, remember to implement it at your second bid. In the auction shown, South holds a balanced hand and would like to open 1NT, but with 15 points can't. She rightly opens 1♥, intending to bid NT if her partner changes the suit: this will describe her hand perfectly as balanced with 15-16 points.
When partner duly bids 1♠ , therefore, don't be tempted to 'show your second suit': partner will think you have 5 hearts and might raise you to game in a 7-card fit – yuk! Simply proceed according to plan and rebid 1NT. Now partner knows what you really have got, and with 11 points will raise you to game.
Should North worry about her singleton heart? The short answer is No: for a start, partner bid them, which is likely to inhibit a heart lead from West. And if West does lead a heart, that's likely to promote a heart trick in partner's hand. As you can see, as the cards lie, NS should make 10 tricks in 3NT.
Other responses from North
Hang on a minute, though. Suppose North doesn't bid 1♠ . What then? Let's have a look. If North responds ...
- ...1NT, showing 6-9 points, PASS. Even if she has the maximum 9, you haven't got enough for game.
- 2♣ or 2♦: well, that's the same as 1♠, isn't it – a change of suit. Bid 2NT, which still shows 15-16 over a 2-level response. Note that you are both committed to game at this point, as you both know that you have at least 10 + at least 15 points! (Don't be tempted to raise partner's clubs: your planned NT rebid describes your hand better, and 3NT is easier to bid and make than 5♣).
- 2♥: PASS. Although you have good values you have a balanced, 7-loser hand and are unlikely to make game.
- 3♥: You're better than a minimum, so bid game.
In Box and Bath
The singleton heart didn't cause any problems in Box: everyone got to 3NT and everyone made at least 10 tricks.
In Bath it was a similar story: everyone was in 3NT (not a single pair was tempted by the club game) and all made. Maybe the defence was tighter in Bath, though, as nearly half the pairs were restricted to 9 tricks.
|
|
|
|
| HOTW 09 Nov 2011 | In passing |
Show Detail |
In passing
One way of thinking of transfers over 1NT is that they allow you to mention a 5-card major suit in passing. In other words, decide what your normal response would be and simply insert the transfer bid en route.
This week's hand illustrates the point nicely. After three passes, North opens 1NT and the bidding comes round to you, South.
You have 11 points, so you want to invite partner to game by bidding 2NT. But you also have 5 spades and don't want to miss a possible 8-card spade fit.
If you're playing transfers, that's a doddle: you bid your 2NT, but on the way you mention your spade suit via a transfer. The message is:
'I've got 11-12 points here, partner, but I thought I'd
tell you that I also have 5 spades in case we have an 8-card fit.
That's me done - over to you!'
North can now choose the best denomination (spades if she has 3, NT if she only has 2) and the best level (game if she's maximum, part-score if not).
Here the decision's pretty clear: North wants to be in spades, but with a minimum 12 points hasn't enough for game and so bids 3♠ .
And that's it. With an 8-card spade fit and a combined 23 points, exactly the right place to be.
The point being? Well, you often see responders dutifully going through a transfer ... and then wondering what to do next. Something that's so easily avoided: all you have to do is think of what you would bid if you didn't have a 5-card major and that's the bid you make once the transfer's complete.
In Box and Bath
So how did we do? Pretty well: all 3 pairs ended up in the right spot 3♠ , with two declarers making 9 tricks and one making an overtrick.
In Bath it was much the same, with around half the pairs making 9 tricks and half making 10. Except for one pair, who bid and made game for an undeserved top.
Undeserved? Well, yes. 9 times out of 10 you won't make game on a combined 23-count, so you shouldn't be in it. They made a profit this time, but the other 9 times they'll get a horrid and thoroughly deserved zero!
|
|
|
|
| HOTW 05 Oct 2011 | If you don't know ask! |
Show Detail |
If you don't know – ask!
OK. You've found a fit with partner and it's your bid. As we saw in last week's workshop, one of these statements will be true for you (and one will also be true for your partner – but it won't necessarily be the same one!):
- "I know we're in game."
- "I know we're not in game."
- "I don't know whether we're in game or not."
The first two are easy: you bid game or pass.
But what if you don't know? Again, the answer's easy: you ask! But it's surprising how often people don't, and how many game contracts are missed as a result.
Today's hand is a great example. When partner responds 1♠ to your 1 opening bid, you can only bid 2♣ . You're an Ace better than you need to be for the bid, but what else can you do? Jump-shifting to 3♣ would be an unconditional game-force, and if partner has a minimum you're in dead trouble. And a jump rebid of 3♥ requires a 6-card heart suit, which you don't have. So 2♣ it is.
Partner now makes a so-called 'weak preference bid' of 2♥. What to do? It's tempting to pass – partner may have 6 crummy points and 2 crummy little hearts. But equally, she may have 3 hearts and as many as 9 points, or anything in between.
In other words, you don't know whether you have game or not. So DON'T pass – that way you're guaranteeing that you don't bid to game. All you have to do is ask. That, if you like, is what the three-level is for: enquiring about game. So you bid 3♥.
What's going to happen now? Well, partner now knows that you're better than you might be. With a minimum, she'll pass (as she already knew you weren't in game). With a maximum, she'll go to game: either 4♥ or, with a heart doubleton and reasonable diamonds, 3NT. In this case, she bids 4♥, and you've found your game. But oh so easy it would have been to miss it.
12 tricks!
West leads the ♠ K and dummy goes down. If you look at the hands, you'll see that as the cards lie you make 12 tricks. The hearts break 3-2 and both the ♦K and the ♦J are conveniently placed for deep finessing ... so all you need to lose is a club trick.
Not a slam to be in (it only has a 20%-ish chance of success) – but not a game to miss either!
In Box and Bath
In Box, just the one pair got as far as game. No-one made 12 tricks, either – but every declarer made at least 10 tricks, so game is the right place to be.
In Bath two pairs missed game, seven played in 4♥, and three preferred 3NT. All made their contracts.
The lesson? Don't just assume that partner is minimum and pass. If you genuinely don't know if game is on or not – ask!
|
|
|
|
| HOTW 00 00 2011 | Kicking and screaming |
Show Detail |
Kicking and screaming
This auction features a nice example of the jump shift - a handy way of forcing the partnership to game when you've opened 1 of a suit with maximum points. It also has some nice conversational features. Let's have a closer look at West being dragged kicking and screaming towards a cold game contract.
East has 19 points with a great 6-4-2-1 distribution and opens 1♥. ('But what if partner passes?' I hear you ask. Well, in that case you probably haven't got game anyway, so no harm done.)
West has a wretched 6-pointer with just 2 hearts and 2 spades. She must respond as she has 6 points, so bids the only bid available to her: the dustbin 1NT.
East now shows his 2nd suit, but not by bidding 2♣, which East would pass like a shot. The point is that West has responded, and East therefore knows that because 19 + 6 = 25 they have to be in a game contract. West, however, doesn't know this, and must therefore be forced into bidding on. Enter the jump shift: 3♣. This is unconditionally forcing to game on both players, so everyone can now relax and concentrate on finding the best denomination, confident that partner cannot pass until game is reached.
So what does West do now? Partner has shown a game-going hand with at least 5 hearts and 4 clubs. So with good club support, she shows her preference by bidding 4♣.
East now bids 4♥. Why do that, do you think, instead of simply going on to 5♣? Well, he's already shown 5 hearts, so by bidding them again he's telling partner that he has not 5 but 6. 4♥ scores more than 5♣, so if partner has 2 hearts, the major is a better contract. And if not, she can always correct to 5♣ instead.
West does have 2 hearts and so, knowing they have a heart fit and are in game, is now finally allowed to pass.
And 4♥ makes comfortably, making 11 tricks on a heart or club lead.
How did we do?
Half and half. Half jump-shifted and thereby forced West to keep bidding, and half (I imagine) simply rebid 2♥, which West gratefully passed - gratefully until she watched her partner go on to make 11 tricks! You can't rebid 2♥ with East's hand - you're at least an Ace too strong.
And in Bath?
All over the place. Only 3 pairs bid the heart game. Two EWs ended up in 6♣ and 6♥, both going off, and the rest were all NS playing in spades, after a suicidally cheeky intervention by South. Well, it should have been suicidal, but two pairs were allowed to get away with 3♠ undoubled, going 2 off for a mere 100 penalty. Tut tut.
|
|
|
|
| HOTW 00 00 2011 | Don't miss game! |
Show Detail |
Don't miss game!
There's a club slam on here, but never mind that for the moment - let's just make sure that with a combined 27-count we don't miss game. Yes, I know, it's obvious when you see it, but 2 out of 3 pairs didn't get there, and the pair that did went off!
All you need to get to game is basic Acol and the inferences that it provides. Here it is, one bid at a time:
After 3 passes, East shows his longest suit first: 1♣, but makes a mental note that this doesn't convey all his strength: he's at least an Ace better than he needs to be.
West has good club support, but as a good Acol player knows that she mustn't conceal a 4-card major, so she responds 1♠.
East now has an opportunity to show that extra strength. 2♦ not only shows his second suit (guaranteeing at least 5 clubs, by the way) but it's also a reverse. With fewer than 16 points he would have to remain silent about the diamonds and simply rebid 2♣. But as things are, 2♦ is ideal: it shows his shape and strength in one efficient bid.
Which gives West all the information she needs. Her partner's reverse shows at least 16 points which, combined with her own holding of 10 points, comes to 26+. So West (but not East) knows that they have enough strength to bid game. Moreover, West also knows that it's usually better to be in 3NT than 5 of a minor, and with 1½ stops in hearts therefore goes straight to 3NT.
Note the 'goes straight to'. The crucial point here is that only West knows the combined point-count, so it's up to West to take the decisive action. For all East knows, his partner has a wretched 6-count, and he will probably pass any other bid: he has, after all, already shown the full strength of his own hand. So if West bids 3♣, East will pass. And if West tentatively invites with 2NT (why invite when you know you should be in game?) she again risks missing game.
The play
So West is in 3NT, and awaits a lead from North. She'd love a heart lead round to her ♥AQ, but as you'll see if you click 'Show all hands' the ♦J is more likely.
Again, you need only the basics and a little care to make a certain 9 tricks. Once you set up your clubs - even if you lose a trick to the ♣K - you have enough: 4 club tricks, 2 each in diamonds and spades and the heart Ace. But until you set up your clubs, you are three short.
Therefore, in the time-honoured way, you proceed immediately to establish the tricks you need while you still have stops in the other suits. Which means attacking clubs. So win the first trick, go over to your hand with the ♠K and lead your ♣J, intending to finesse. Unfortunately the finesse loses, but no matter: you now have your nine tricks whatever happens.
So what about the slam, then?
Well, with just 27 combined points it's a fairly unlikely one, but it can be reached if either player feels frisky. West could have tried a forcing 4♣ instead of 3NT, but I wouldn't because now we've gone beyond 3NT, which is probably our best contract. Equally, East could bid on (4NT?) after 3NT, but again, with only 17 points, why would he?
That said, you need only one of two finesses to work (hearts or clubs), which is a 75% chance *, so it's a good slam to be in. Note that you can't make 6NT, only 6♣: you need a ruff for your 12th trick.
And in Bath?
This was played on a Wednesday evening - so not so strong a field as usual - but they did pretty well. No one bid the slam, but 13 out of 16 pairs were in 3NT, making at least 9 or 10 tricks. There was also one 3♣ making 11 tricks, one 2♣ making 12 (alas!) and, astonishingly, one 4♥ by South undoubled making just 4 tricks - earning NS -300 and a near top. Doubled it would have gone for -1400 and a resounding bottom.
* If you're not sure why it's 75% and you'd like to know, ask me or Susie.
|
|
|
|
| HOTW 00 00 2011 | 3NT in your sleep! |
Show Detail |
3NT - in your sleep!
There's a simple but powerful lesson to be had from today's hand – albeit one you've heard many times before. It has to do with finding the right denomination for your contract. The order of preference is as follows:
- If you have an 8+-card major fit, you want to be in that major.
- If not, be in no trumps if possible ...
- ... and only end up in a minor suit as a last resort.
Why prefer NT to a minor? Well, two reasons. First, you need TWO more tricks (not just one) to make game in a minor suit compared with NT. And second, even if you CAN make 11 tricks in (say) diamonds, that STILL scores less than 3NT +1 overtrick.
So now place yourself in East's seat. Your partner opens a heart, North overbids 1♠ , and you bid what you would have bid anyway: 2♦. Pass from South, and partner now bids 2NT. So what does that show? Jot down an answer before reading on.
It's a NT rebid at the lowest level, so it shows 15+ points and a balanced hand.
North now passes and it's your bid. What do you say? The answer, as today's title has it, is 3NT – in your sleep!
Why's that? Well, for a start, you have 25+ points between you – enough for game in NT.
'But we have a huge diamond fit,' I hear someone objecting. 'Surely we should be in diamonds?' Um ... no, not really. Those diamonds are going to be worth lots of tricks in NT, too, and tricks in NT are worth more than tricks in diamonds. If you're still uneasy, try this:
Imagine that you had just 5 diamonds, having instead 3 cards each in the black suits. What would you bid then? 3NT? Sure you would. And those extra diamonds actually make the hand BETTER for NT, rather than worse. So what's happened to our principle that we only end up in a minor suit as a last resort? There's no last resort here. No trumps looks great! No need to end up in the minor suit, then.
And just in case you need one more reason (which you don't, but it's a killer, so read on): You have two little spades. If you're in diamonds, South will lead a spade (his partner's bid suit) THROUGH your partner, and that could be two tricks gone. Bad. In NT, on the other hand, it's North who will lead (probably) a spade, through your two tiddly ones TOWARDS your partner's spade stop(s). Much better. Yet another reason to prefer NT to diamonds.
The play
Now click on 'Show all hands' and have a peek.
First of all, what happens in NT? North leads a spade round to West's ♠ K, which wins the trick. West then plays out SEVEN diamond tricks, forcing poor NS to make all sorts of awkward discards, and then moves on to hearts, making AT LEAST 10 TRICKS. This not only scores more than game in diamonds, it scores more than making 12 TRICKS in diamonds. A clear favourite, even if 5♦ is making.
Now consider what happens in 5♦. South leads a spade (his partner will never play with him again if he doesn't) and North takes his ♠ AQ and ♣ A, putting the contract one down.
It's a no-brainer, isn't it? How come, then, that no-one ended up in 3NT at Box? Three pairs were in 5♦ (all going one off) and at the 4th table, EW were content to double a rather dodgy 4♠ sacrifice by NS.
The explanation is, I think, that it's very easy to be seduced by a long suit. To avoid that, let the order of preference at the top of this article be your guide, and end up in the minor only as a last resort. It would have served you well here.
And in Bath?
They're a wily lot down there in Twerton. Nine of the eleven tables were in 3NT, most making 11 tricks (and some 12). Only 2 tables were seduced by the long diamonds, and they got what they deserved!
|
|
|
|
| HOTW 00 00 2011 | Falling flat |
Show Detail |
Falling flat
Imagine you pick up this very uninspiring hand. It has 6 points (just enough to respond if partner opens) and it's the flattest shape you can get: 4-3-3-3.
Now imagine this auction. East, you and West all pass, and your partner opens 1♥. Pass from East, you unenthusiastically raise to 2♥, West passes and your partner now bids ... 3NT.
What's all that about then? You've agreed a major suit, and partner's jumping to game in no trumps. Why? What is his holding? How can we make sense of it?
Well, for a start partner must have enough points for game. You've shown a minimum of 6 points, so that marks partner with ... um ... 25 minus 6 = 19 points. Shouldn't be less. Can't be more or he would have opened 2NT. That explains the jump to game ...
... but why 3NT instead of 4♥? The only possible reason is that partner too is blessed with a very flat hand, no doubt exactly the same shape as you, and he's offering you a choice: do you prefer to play in 3NT or 4♥?
So the question now is: which do you prefer? Before you make up your mind, consider this question:
Why do players normally prefer to play in a major game (requiring 10 tricks) than in no trumps (requiring only 9 tricks)? There are two main reasons:
- It protects you if you have a weak suit. The defence can't run off all their (say) club winners because after a couple of rounds you can ruff in and stop them.
- In a trump contract, you can usually create an extra trick by ruffing in one hand or the other. So you'll usually make more tricks in a suit contract than in no trumps.
So it's safer, and the extra trick makes it worth more (420 for 4♥ is more than 400 for 3NT).
And now the crunch. Are you going to pass or bid 4♥? Why? Triple-click below when you're ready.
You pass. Why? Because playing in hearts won't be worth more tricks than playing in no trumps. You both have three clubs. You both have three diamonds. You both have three spades. How can you ever ruff anything in either hand?
OK. Have a look at the hands. Sure enough, partner has a totally flat 4-3-3-3 19-count, and you could find yourself struggling even to make 9 tricks. Fortunately, East is likely to lead a club, and if they don't immediately switch to spades you should have time to knock out the ♥AK, giving you three tricks in each minor suit, plus two heart tricks and the spade Ace.
Now imagine playing the hand in 4♥. Where's the 10th trick coming from? Answer: it isn't!
An alternative auction
With many players, the auction will be different, as (for some reason or other!) they like to open 2NT with a balanced 19-count. This makes things more difficult for you in the South seat, but essentially the same reasoning applies:
"My partner may have 4 hearts, or even 5 spades, so we may have an 8-card major fit. However, I'm flat as a pancake and can provide no ruffs for partner. So why go through the rigmarole of searching for a major fit when it probably won't gain us anything anyway? I know we have at least 25 points, so I'll simply raise partner to 3NT."
Postscript
What can we take from this hand? First, that a totally flat 4-3-3-3 (in either hand) is not the best holding for a successful trump contract. And second, just having a major fit does not in itself mean that it's the best place to play.
It also shows how a few moments' thought can help to make sense of a bid from partner that at first seems a bit off the wall. The jump to 3NT is a great way of offering you an important choice - and if you understand it and respond appropriately, you're on your way to a top.
Talking of which, let's see what happened at Bath BC. Well, they passed the test - just. Of the 13 North/Souths, seven made 3NT and six went off in 4♥.
|
|
|
|
| HOTW 26 Jan 2011 | 4441 and guess what? |
Show Detail |
4441 - and guess what?
After West's pass, North has to open with the horrible 4-4-4-1 shape. There are various ways of dealing with this. The normal Acol method is as follows:
- If the singleton is one of the 'middle-ranking' suits, (i.e. a red suit) bid the suit below the singleton.
- If the singleton is one of the 'end' suits (a black suit), bid the middle-ranking 4-card suit.
There are other approaches, but this one will do for now! So with a singleton heart, North opens 1♦.
East passes, and South decides just to bid 1♥ for now - it's a forcing bid, and it'll be interesting to see what North bids next.
It's a no-brainer for North. With no support for hearts, and a 4-card spade suit, the clear choice is 1♠.
Here's something to make a note of for future reference: normally, on such an auction, you'd expect North to have started with 5 diamonds and 4 spades, wouldn't you? And normally you'd be right. In all cases except when North started with 4-1-4-4. Worth remembering.
So what does South do now? If North does have 5 (or even 6?) diamonds and a heart void, then maybe diamonds would be better than hearts ... But partner could pass a heart rebid or even a heart jump rebid so ... I know. Let's do 4th suit forcing. Always a useful standby when you have plenty of points and haven't found a fit.
So South bids 2♣. We did a special session on this: bidding the fourth suit in an uncontested auction like this does not show (or deny!) clubs. Instead it simply asks partner to describe her hand further.
Which again is a no-brainer for North. With no 5-card suit to rebid and not even a doubleton in hearts, North now shows her third unbid suit: 3♣.
So now South knows what's going on. Well, knows-ish. North has either started with 4-1-4-4 and a singleton heart or 4-0-5-4 and a heart void. It's a toss-up, then between 3NT, which looks slightly dodgy with the spade singleton and 4♥, which looks rather safer.
So 4♥ it is.
Poor old North. She can support any suit but hearts, and guess what? Hearts it is.
The play
Have a look at the other hands. West will probably lead something harmless like a club. Counting up, South can see a loser in clubs, another in diamonds, and (with luck) just one in hearts. And as it turns out, 10 tricks present no problem, provided you play the trumps sensibly (leading dummy's singleton and finessing).
Here's a question to finish with: supposing West's opening lead is not a club, but a spade? How do you plan the play? Think about it and then triple-click below to check.
You take the first trick with the Ace, then immediately lead your ♠K and ♠Q, discarding the ♣Q5 from your hand. Now you no longer have a club loser and end up with an overtrick - and a probable top.
|
|
|
|
| HOTW 12 Jan 2011 | 15 + 10 = 25 |
Show Detail |
15 + 10 = 25
This week's hand carries a simple but useful message about bidding, for which the sum in the title forms a handy mnemonic.
When you have a balanced hand with more than 14 points, instead of opening 1NT you open 1 of a suit and rebid no trumps on your next turn. Normally, you'd rebid 1NT with 15-16 points and 2NT with 17-18 points. Your partner can then decide whether you have enough points between you for game - the magic 25 points. So the conversation goes something like:
1♦ from you: I've got diamonds and an opening hand.
1♠ from partner: OK. I've got spades.
2NT from you: Actually, my hand is balanced and I have 17-18 points. Have you got a couple of points to spare?
3NT from partner: Yes, as it happens I have 8 points, which gives us the magic 25 - enough for game.
or Pass: Sorry - just got the minimum 6 points.
But what if your partner responds not at the 1 level but at the 2 level, as in this week's hand? Now, as far as opener is concerned, all this careful negotiation is unnecessary: I've got 15+ points, partner has shown at least 10 by responding at the 2 level - so we have game! Fine - let's go straight there ...
But hold your horses - put that 3NT bid back in the box for a moment!
You can bid 3NT if you really want to, but actually 2NT will do just as well - and is actually a much better bid, whether you have 15, 16, 17 or 18 points. Why? Because your partner has access to the same information that you have: he has 10+ points, you have now shown that you have 15+ points, so partner now also knows that you have the magic 25 points. He therefore can't pass 2NT! This leads us to a useful rule which you should add to your bidding system:
| After partner's response at the two level, a rebid of 2NT by opener is unconditionally forcing to game. |
'Fine, but why not just go there straight away?' I hear you ask. 'It's obvious that we're going to end up in 3NT, so why hang about?'
Well actually, it isn't at all obvious. Take this week's hand and put yourself in East's position. Supposing you bid 3NT, a heart is led and partner puts down a dummy with 3 little hearts and Axx in spades? Wouldn't you rather be in 4♠? I would. But you're never going to find it if you go straight to 3NT. Try going 2NT instead. Partner can't pass, so there's no risk of missing game. But if he happens to have 3 spades, he can now bid 3♠, meaning "Partner, I think I should tell you that I have 3 spades, just in case you started with 5 spades over there and would prefer to be in spades instead of no trumps."
Or take another situation: West has a strong two-suiter in diamonds and clubs and is wondering about a minor-suit slam. He now has an opportunity to show his second suit without going beyond 3NT, just in case you're interested.
In both cases, rebidding 2NT instead of 3NT allows an extra exchange of information. Much of the time you'll end up in 3NT anyway, but if you do no harm has been done - and now and again you'll find a better contract that you would otherwise not have been able to find.
Postscript
As it happens, this is one of those hands where 3NT is the best place to be, as you'll see if you click on 'Show all hands'. But stopping off in 2NT and looking around is a good habit to acquire - provided that you both clearly understand that you're not going to stop short of game.
Well, actually, 3NT can easily go off to good defence, as the opposition can make 3 heart tricks, the ♦K and the ♠A. But at Bath BC it made more often than not, and it's the only viable game contract around.
|
|
|
|
| HOTW 00 00 2010 | ... but what happens AFTER the transfer? |
Show Detail |
... but what happens after the transfer?
We all know about transfers: if we have a 5-card major and partner’s opened 1NT, we transfer to the major … but then what happens?
The answer’s actually very simple, and it’s this: you do what you would have done if you didn’t have the 5-card major.
For example …
· You have 5 hearts and 5 points. Without the 5-card major, you’d pass. So transfer partner to hearts … and pass. You have more chance of making 8 tricks in hearts than you have of making 7 in NT.
· You have 5 hearts in an otherwise balanced hand and 11 or 12 points. Again, without the 5-card major, you’d raise to 2NT. So transfer partner into hearts and then bid 2NT. You’re saying ‘I’m inviting you to game in NT, partner, but I thought I ought to tell you that I have 5 hearts in case you prefer to play in that suit.’
· You have a balanced 15-count including 5 hearts. Without the 5-card major, you’d simply raise partner to 3NT, so again: transfer partner into hearts and then bid 3NT. Same as the last example except you’re sure that you want to be in game.
You get the idea: the transfer isn’t an end in itself. What you’re actually doing is passing or raising partner, but you delay doing this so that you can add en passant ‘Oh and by the way – I have 5 hearts.’
And so it is that this deal presents the simplest of tasks. Partner has opened 1NT and you have game-going points and 5 spades. So you first transfer partner into spades and then bid 3NT. ‘We’re in game, partner, but you may prefer to play this in spades rather than NT, as I’ve got 5 of them. Up to you!’
With 3 spades and a not-entirely-flat hand, partner duly bids 4♠ and you’re romping home with 11 tricks. Simple!
POSTSCRIPT
I agree with you – that isn’t the whole story. There are other ways the auction can go – in particular bidding the transfer suit again to show a six-card suit, or bidding a second suit when exploring for a possible slam … but in most cases the above will do the trick.
|
|
|
|
| HOTW 00 00 2010 | Restraint |
Show Detail |
Restraint
Nothing too startling about this board played on Wednesday. Just that it nicely illustrates a couple of features of Acol.
The auction
The auction is passed round to West, who has a very attractive 18-count full of Aces and Kings. Not a 2♣ opener (I don't see 8 playing tricks in any suit), so West exercises restraint and simply opens 1♠ and awaits developments. (Yes, I know, partner may pass, but if she does you probably haven't got game anyway.)
Now it's East's turn to exercise restraint. She'd like to show her hearts, but she has only 7 points - not enough. The disciplined response, therefore is 1NT, the 'dustbin bid'. Again, partner may pass, but if he does you probably don't have ... You get the idea.
At this point, West needs to flex his muscles. His partner has shown a minimum of 6 points (and in all likelihood has more), and surely game is on somewhere. Now we can't risk partner passing, so we have to make a forcing bid. The obvious choice here is 3♣. The Acol jump shift is strong; unconditionally forcing to game: and that really means what it says - partner may not pass until game is reached. It has the additional advantage of further describing West's shape: at least 5-4 in the black suits.
So what does East do at this point? She could support the clubs, BUT that would take the partnership beyond 3NT, which looks like the best spot just now, AND partner could still have 3 hearts. So now she can do what she wanted to do at the start and show her hearts: 3♥.
Which is just what West wanted to hear, as his hearts are the weak link. 3NT.
And over to East again. Hmm. Clubs are still looking a bit tasty ... I wonder if we've got a club slam on ... Oh, best not to risk it. Let's just settle for 3NT.
The play
South probably leads the ♦J (top of a sequence), and East (yes, it's East playing the hand, thanks to her 'dustbin' 1NT bid) must make a plan. What's yours?
Well, I can count a heart trick, two diamond tricks and two spade tricks. That's 5. As long as the clubs aren't 4-0 we've got 9 tricks.
And so, as ever in no trumps, you establish the tricks you need for your contract BEFORE you use up your stops in the other suits. You've lost one diamond stop already, so get going on those clubs right away!
You bang out the ♣A and ♣K and North, as good as gold, drops first the Jack and then the Queen, and you have 5 clubs tricks. Contract made with an overtrick.
The club slam
You'll have noticed in passing that you can, as the cards lie, make 6♣. So should East have gone looking for it? Well, it's not that good a contract, as it only makes if the clubs are 2-2 or there's a singleton club honour with North AND you play the clubs right. As things are, the clubs do break nicely, and declarer can happily cross-ruff away his hearts and spades and come to 12 easy tricks. So yes, maybe she should have had a look ... But if you then have to subside in 5♣, that's isn't going to be as good as 3NT with an overtrick.
Postscript
So how many found the slam in Bath BC? The answer is none. One pair found themselves in 4 spades (making 11 tricks) and every other pair was in 3NT, making 9, 10, 11 or 12 tricks.
Which was bettered in Box because at one table declarer made all 13 tricks. How I have no idea!
|
|
|
|
| HOTW 15 Sep 2010 | Collaborative effort |
Show Detail |
Collaborative effort
Here's a nice little bidding sequence following an opening 1NT. I'm assuming here that you're playing transfers.
North opens 1NT and East passes. You're sitting South.
Before you decide what you're going to bid, imagine having the same hand but with a small diamond instead of the ♦A. You've got just 8 points, and you don't like NT very much. When you've decided, triple click below to see what my answer would be.
You try Stayman, and pass any positive response. But if your partner bids 2♦, you sign off in 2♥. This is the way to deal with 5-4 in hearts and spades with a weak holding.
But you do have the ♦A, and that means you want to be in game. That calls for a different sequence.
What you do is to transfer your partner into hearts, and then bid your spades. So the auction goes:
1NT - 2♦ (transferring to hearts)
2♥ - 2♠ (showing that you have 5 hearts and 4 spades)
You're showing exactly the same shape as you were with the weaker hand, but this time the bidding sequence is forcing: partner can't pass it. How does he know? Well, because if you'd been weak with the same shape, you would have used Stayman instead (as in red above). So this is at least invitational, and it means:
'Partner, I have 5 hearts and 4 spades and I'm not weak. If you have 3 hearts with me or 4 spades with me, please bid 3♥ or 3♠ (or straight to game if you're maximum), but if you don't, we'll probably survive in No trumps, so bid 2NT - or 3NT with a maximum.'
With a middle-of-the-road 13 points but 4 hearts, North may bid 3♥ or 4♥ - my vote would be for 4, because he has one heart more than he needs, but whichever he chooses, South will raise to game (only 12 points, but against that only 6 losers and a club void).
What happens in the play? Well, there aren't any club losers and both the red Queens can be finessed, so declarer certainly isn't going off.
Of course, now I've said that I see that in Bath one pair did go one off. But of the others (all of whom found the heart game) two made 10 tricks, four made 11 and two made 12.
Postscript
On this particular deal it's easy to find game in hearts however you bid: Stayman will reveal the fit and you can then bid game.
But bidding as recommended will also find the best game whether North has 4 hearts or not. It's a great sequence because it divides up the labour. North knows what South's distribution is, so North can decide on what denomination they're in. South knows (roughly) North's point-count, so South can decide how high they're going. And together they get there. It's a collaborative effort.
|
|
|
|
| HOTW 02 Sep 2010 | Short & sweet |
Show Detail |
Short & sweet
Holding the West hand shown above, what do you bid over your partner's 1NT opening? Double click on the red bit below for the answer.
Answer: 3NT. In your sleep.
What are the alternatives? Let's look at a few.
2♦. This would be a transfer to hearts! If you aren't playing transfers, then it would be a weak take-out into diamonds, and weak you ain't.
3♦. This would be a good bid if you were 4 points or so stronger. It says 'I've got a decent diamond suit here, partner, and I'm interested in a slam'. Well, here you're not interested in a slam, as you've only got 25-27 points between you.
4¥ or some other funny conventional bid showing both minors. Even if you had such a bid, why bother? You're not interested in making 5 of a minor when you have a perfectly good game in no trumps.
So 3NT it is. The reasons:
- You have enough points for game
- You have no prospect of a major fit
- 3NT is worth more than 5 of a minor
- You probably can't make game in a minor anyway
- 1NT-3NT is an admirably uninformative auction. Even if you do have a weakness (e.g. in hearts) the opposition have to find it, and the auction is giving them no clues whatsoever.
The play
Have a look at all four hands. South will probably lead the 4♠ (his 4th highest). You sigh with relief (metaphorically, keeping a poker face, of course), as a heart lead would have left you in some difficulty, and play low, North's Ace taking trick 1.
Now, even if North makes the best play of switching to a heart, you're home. Count them up. How many do you make it?
I make it 9. The Ace of hearts (which you will take straight away - no point in holding up), two club tricks, five diamond tricks and the ♠K. Plus a 10th if you're brave enough to finesse for the ♠Q (a pretty safe bet, actually, after South's opening lead).
Postscript
Well done the pair that did reach 3NT on Wednesday (though how you managed to make 11 tricks beats me!)
At Bath, just to prove me right, 10 of the 13 pairs were in 3NT, all making, and pretty well all getting an opening spade lead. Two of the other three pairs ended up in manky part-scores (3♦+1, 4♣-2) and one went two off in 5♦. Yuk.
|
|
|
|
| HOTW 14 Jul 2010 | Trial bids: a shortage will do just fine! |
Show Detail |
Trial bids: a shortage will do just fine!
Just to recap what we covered in the session on major suit trial bids: after (say) 1♥ - 2♥ , a bid of a new suit (2♠, 3♣ or 3♦) says 'Partner, I think we may have enough for game, but I'm worried that we may lose a lot of tricks in this suit. Can you help me out?' 'Helping out' could mean holding some nice high cards in the suit (like KQx), but a shortage is just as good. Why? Because you can ruff the suit in dummy. This is an example of just such a hand.
The auction
Let's eavesdrop on North and South as they think their way through the auction.
North: I've got a nice 6-loser hand with 18 points and four cards in each major. I'll open 1♥, and see what happens.
South: I'm pretty weak - just 6 points - with 4 of partner's major. 2♥ is the right bid.
North: Hmm. We could have game here, if partner's got a hand that suits. I'm a bit worried about spades, though. If partner has 3 little spades, we've got a problem, as we're certain to have at least one loser elsewhere (partner can't have the ♥A, the ♦Q and the ♣A, can she?). We can risk going as high as 3♥, though, so I'm going to try a trial bid, to find out about partner's spades: 2♠.
South: Well, as I said, I'm pretty weak. But I can guarantee partner that we will only lose one trick in spades. And if that's all he's worried about, I have to go to game: 4♥.
You see the point. The singleton means that the partnership can only lose one spade trick: that's as good as having ♠KQ! Game it is.
The play
When I tried this hand out on the computer program Jack, East led the ♣10. So let's take it from there. Count your winners. Count your losers. How are you planning to play the hand?
Winners: You have two club tricks and two diamond tricks, and (assuming a friendly break) four trump tricks. Two more needed. Easy: ruff two spades in dummy. That makes 10 tricks.
Losers: one spade, one club and probably one diamond. Again, 10 tricks.
Plan: If I need to trump two spades, I have to have two trumps in dummy, so I don't clear trumps yet - otherwise I'll only have one trump left in dummy, which clearly isn't enough to ruff twice. So I plan to lead a spade as soon as I can to create a void, then ruff twice in spades, clear trumps and take my remaining winners.
So how does it go? West wins with the ♣A and returns the ♦10 (well, that's what Jack did). So you win with the ♦A, and lead a spade. Now you're out of spades in dummy. Let's say East wins and plays another club.
- You win in hand with the ♣K and lead a spade.
- Ruff that spade in dummy and go back to your hand with a small trump to the ♥K. (Yes, you could have led a diamond to the ♦K, but supposing someone started with a singleton in diamonds? The trump is safer, and still leaves you enough trumps in dummy.)
- Now ruff another spade.
- Right. That's the two spade ruffs done. So at this point you decide to play a second round of trumps. You cash your ♥A (both opponents following suit. Phew!). Now what?
- Well, if you're ever going to cash your ♣J (which is one of your ten tricks!), you will have to do it now, because you can't get back to dummy again. Problem is, there's still a trump out, so you have to hope that whoever has the last trump also has a club left ...
- Bad luck - West is out of clubs and ruffs with the ♥J. Dammit. You overruff with the ♥Q and stop to think.
- Hmm. You've already lost two tricks, and you're stuck in your hand with a losing spade and a losing diamond. What to do?
- Well, there's only one thing to do. Cash your winners and hope for the best. So you lead your ♦K ... and East drops the ♦Q! You've had a bit of luck after all! You can now play a low diamond to the ♦J, giving you your 10th trick.
Postscript
We have to separate the auction from the play here. ♥4 is the right contract to be in, whether it happens to make or not in this particular case. As things turned out, you were unlucky with the club distribution, but had a bit of unexpected luck with the diamonds, so you made it. Well played!
|
|
|
|
| HOTW 09 Jun 2010 | 5-3-3-2 is a balanced hand |
Show Detail |
5-3-3-2 is a balanced hand
Just one simple point from this week's featured deal: that South should open not 1♦ but 1NT.
We all know that you open 1NT with 12-14 points and a 'balanced' hand, and we're all happy that 4-3-3-3 and 4-4-3-2 qualify. That 5-3-3-2 is also balanced is not so obvious. Try thinking about it this way: the most balanced hand you can have is 4-3-3-3. Now move just one card from any of the four suits to any of the others. There are only two possible results: 4-4-3-2 and 5-3-3-2. Both are within one card of the most balanced possible hand, and both therefore qualify as balanced. (Other 'balanced-ish' candidates like 4-4-4-1, 5-4-2-2 or 6-3-2-2 are two moves away from 'most balanced, and so don't qualify.)
So you have a balanced 5-3-3-2. If the 5-card suit is a major, opinions differ as to what you should do. There are three schools of thought:
- Always open 1 of the major. (Really? Even if it's ♥J9743? So if partner responds in another suit, you'll have to rebid 2♥. Is that really a rebiddable suit?)
- If it's a decent (redbiddable) suit, open 1 of the major. Otherwise open 1NT. I play this with several partners and it works well most of the time (though you can miss a useful fit if partner happens to have, say, AKx in your rubbish 5-card major).
- Always open 1NT, however good your 5-card major. Andrew Robson advocates this. If you do play this, you really need a special version of Stayman so you don't miss a 5-3 major fit. I find the idea attractive, but don't actually play it.
Back to today's hand. Here the 5-card suit is a minor, so no agonising is necessary: just open 1NT. West will pass and North, with no 4- or 5-card major, simply raises to 3NT (sure, there are only 12 points, but the 'intermediates' are fantastic - two 10s and three 9s - making the hand well worth the raise to game).
What happens if you open 1♦? Well, one pair evidently did, and ended up in 3♦, missing game. With a minor fit, you're so much more likely to be worth 9 tricks in no trumps than 11 tricks in the minor that you should always explore no trumps first, retreating to the minor only as a last resort (or if a minor slam looks likely).
Even if you can find 3NT after a 1♦ opening bid, there are two other good reasons for preferring a straight 1NT-3NT auction:
- it gives the opposition very little information about your holding, and
- the opposition have less chance of interfering in the auction and thus sharing information about their own holdings.
With nothing to go on, West is pretty certain to choose a heart as an opening lead, leaving declarer plenty of time to establish his diamonds and make the contract. But supposing, in a different auction, East-West have discovered their spade fit? A spade lead from West takes the contract one off: ♠AK and another spade sets up the suit, and when East gets in with his ♦A he can take two further spade tricks. From South's point of view, silence is golden.
Postscript
Before the football starts, there's just time to look at what happened at Bath.
All the North-South pairs ended up in 3NT except for 1 pair in just 2NT (North having failed to factor in his wonderful intermediates), and all made 9 or 10 tricks, again with one exception: one pair made just 8. Did their auction, perhaps, start with 1♦?
|
|
|
|
| HOTW 28 Apr 2010 | Don't miss game with 27 points just describe your hand! |
Show Detail |
Don't miss game with 27 points - just describe your hand!
Funny how it goes. Bath City FC get into the playoffs, so Bath BC has nowhere to play on Tuesday 27th April, so instead of using those hands we ended up with last Thursday's. And a right awkward lot they were - it often being very difficult to judge whether or not to be in game.
One hand that didn't fall into that category was board 3, which has North (holding 15 points) responding to an opening bid by South. Simple, then, for North to guide her partner towards a game contract ... or so you would have thought. In the event, all three North-South pairs who played this hand ended up in a part-score suit contract holding only 6 trumps between them.
What went wrong?
Actually, this is one of those occasions when all you have to do is follow sound Acol guidelines and you end up in the right contract. Let's take it bid by bid.
South has an unbalanced 12 points. His opening bid is a no-brainer: 1♠.
North's response is also obvious: with 15 points and a strong heart suit, she bids 2♥. (Which, by the way, guarantees a 5-card suit in Acol. This is the only sequence that does: any other 2-level response, such as 1♥-2♣ or 1♠-2♦, only guarantees four.)
South is not thrilled at this point, because ...
- he can't support his partner's hearts
- he can't show his diamonds, as to do so would take the partnership to the 3 level (and would constitute a reverse), requiring a hand stronger by at least an Ace
- no-trumps are out (requiring a balanced hand and 15+ points)
- and a pass is absolutely out of the question: partner is showing a minimum of 9-10 points and may (as here) have a good deal more. Partner must be able to rely on him to keep the auction alive.
... but he has a perfectly sensible rebid of 2♠. His suit isn't great, but it has 5 cards, and 2♠ tells his partner exactly what's going on: fewer than 15 points, fewer than 3 hearts, and a 5-card spade suit. Just the job.
North is now in the hot seat. Bear in mind that the future of the board is in North's hands. It's North, not South, who knows that they should be in game, so it's up to North to make sure it happens. So what to do?
Well, first, what not to do. Don't bid 3♥. Why not? There are two reasons. First, it shows 6 hearts - you've already shown 5 by bidding 2♥, so bidding then again shows even more. And second, it's weak. It says "Sorry partner, I've got this long heart suit and I'm only any good with that as trumps. Let's leave it at that." In other words, if you bid 3♥, you're misdescribing your hand, and pretty well guaranteeing that you'll miss the game that you know you should be in.
The right bid (as is so often the case) is one that describes your hand further. At the moment, all your partner knows is that you have 10+ points and a 5-card heart suit. He doesn't know about your clubs, and he doesn't know about your strength. How to tell him? Simple - bid your second suit: 3♣. What does this say? First of all it tells partner you have game-going points ('A new suit at the 3-level is game-forcing'), and it also tells your partner that you are at least 5-4 in hearts and clubs.
I can see that you might be worried about sticking your neck out like this (as today's Norths clearly were), but there's little to be worried about. What are the likely outcomes?
- South may have a 6-card spade suit. In that case, he'll bid 3♠, and with your spade doubleton you'll be quite content to raise to 4♠. Game made.
- If not, South is 5-2 (or 5-1 or 5-0) in the majors, and is very likely to have either 4 clubs or 4 diamonds. In the former case, he can raise your clubs, and in the latter (or even with just 3 decent diamonds) he'll bid 3NT.
- In the very last resort, with 5-2-3-3 and no diamond stop, South can put you back into 3♥, knowing that you have a 7-card fit, which is better than nothing.
Faced with 3♣, South knows exactly what to do: he has the diamonds covered and so bids 3NT. Which is the only decent game contract for the partnership.
So there you are. Ignore the sirens tempting you to bid too high or too low or overstate your length: describing your hand is clearly preferable to misdescribing it! In this case, at least, bidding your hand in line with the system leads inexorably towards a happy ending.
Postscript 1
It turns out that more than one North 'felt' that 3NT would be a good outcome, but couldn't see how to get there, as their diamonds were too weak to risk it. That's precisely why 3♣ is a good bid: all you can do is tell partner you have clubs covered, and trust him to go for no trumps if he has the diamonds.
Postscript 2
So what happened at Bath BC? At 9 of the 11 tables, NS successfully reached 3NT, making 9, 10 or even 11 tricks. The other two tables went for 4♠, going one off: not ideal, but better than ending up in a 6-card heart fit.
|
|
|
|
| HOTW 21 Apr 2010 | Using a trial bid |
Show Detail |
Using a trial bid
There were lots of interesting slammy boards today, but I decided to pick one that illustrates a very useful everyday tool: the trial bid.
How do you reach game on the hand above, after West opens 1♥? People who count their losers religiously will say "Easy. East has 8 losers so responds 3♥, and West, with just 6 losers, raises to game." And why not? But not every East will want to go so high on a pretty flat and uninteresting collection with just 8 points.
At my table, not wanting to force my (possibly light-opening) partner too high, I responded just 2♥. And luckily West, as you can imagine, decided she wanted to explore things a little further.
Trial bids are designed for just such a situation: one of a major raised to two. Look at it from West's point of view: she has just two losers in the black suits - one in each - and is probably safe in hearts. But diamonds are looking distinctly dodgy. If partner has something grim like ♦Qxx (or worse), the defence are going to reap at least two tricks in diamonds - and possibly even a third via a ruff.
Enter the trial bid - 3♦ - which has a pretty precise meaning, namely: "I'm interested in game, partner, but I'm a bit worried about losing lots of tricks in this suit. Can you help out? Alternatively, are you a maximum for your bid, because if so maybe I can cope with a poor diamond suit. If your answer to either of these questions is 'Yes', please bid 4♥. If not, please sign off with 3♥."
I reckoned that my answer to both questions was 'Yes'-ish. I wasn't a maximum, but I was pretty near it, and with only two diamonds (including the probably very useful King) I knew we had two diamond losers at the very most, so 4♥ it was, and as you can see it makes comfortably, as the ♦A is with North. (Actually, we got a bit lucky, as North led a small spade away from her Ace, and so we didn't lose a spade trick at all, ending up with 11 tricks. As good an illustration as you'll ever see of why you shouldn't lead away from an Ace against a suit contract!)
So that's the trial bid. A handy little tool, and one that isn't used nearly widely enough.
Postscript 1
An interesting consequence arises from this. As the trial bid specifically addresses two questions - whether responder can help with a particular suit and whether he's minimum or maximum - we no longer need to use the rather clumsy further raise to 3 (e.g. 1♥ - 2♥ - 3♥) for either of these purposes. Instead, a 3♥ bid from opener focuses specifically on trump strength: "Partner, my trump holding is pretty ropy. If yours is strong, go on to game, but if yours is ropy too, pass!" Good, eh?
Postscript 2
Fine, that's the majors, then, I hear you say, but what about the minors? Why can't we have trial bids over 1♣ - 2♣ or 1♦ - 2♦ as well? And the answer is that we can and do, but they mean something rather different. We'll look at them another time.
|
|
|
|
| HOTW 10 Mar 2010 | Don't miss game (or better!) |
Show Detail |
Don't miss game (or better!)
Board 13 turned out to be unlucky for East-West, who all stopped short of game and then went on to win 11, 12 or 13 tricks in various minor suits. Game is cold in diamonds, clubs or no trumps, and there's an unassailable slam there too. But how to get there?
First of all, East must appreciate that she has a pretty strong hand, with good high cards and only 5 losers. Change the ♣J to the ♣Q and there's an opening 2♣ bid, showing 8 playing tricks. As it is, it's best simply to open 1♣ - but with a firm intention of showing the extra strength in a later bid.
South will no doubt scrape together a rather tepid 1♠, leaving West to bid ...what? Well, given the spades on his right, he probably has 2 spade stoppers, so 1NT seems reasonable. I can't see North resisting 2♠, which brings us back to East.
Now is surely the time to show the strength of the hand, and 3♦ fits the bill perfectly. It's a strong bid, an accurate description of East's shape, and it's forcing. Is there a danger that it might force the partnership too high? I don't think so. Partner has shown some values which, given the bidding of both North and South, surely can't be entirely in spades. One thing you can put out of your mind, though, is a possible fit in hearts: with 4+ hearts, West would have doubled the 1♠ overcall. This is what might be going through East's mind:
- If partner has 4 diamonds he'll bid 4♦ (or maybe jump to 5♦).
- If he fancies no trumps but is worried about hearts, he'll bid 3♥, and then I can bid 3NT.
- Failing all else, he can take refuge in 4♣.
In the event, West bids 4♦, leaving the door open for East to try Blackwood if she fancies it. And why not? Any response above 5♦ will mean they want to be in a slam in any case. So 4NT it is, and West replies showing 1 key card (the ♦K). At this point, East has to make a decision: to stop in game, or go on? As it happens, 12 tricks in diamonds are cold, but I can quite understand East subsiding in a mere 5♦, as there could easily be a loser in hearts and another in diamonds. What you don't want to do, though, is stop short of game.
The play
This hand is a good illustration of the well-known fact that if you have two 8+-card fits, one being 4-4 and the other not, the 4-4 fit is usually better as the trump suit (even if the other suit has more cards in it).
Why should that be? Well for one thing, when the trumps are 4-4 ruffing in either hand gains you tricks, whereas with an unequal trump holding (e.g. 5-3) you only gain tricks by ruffing in the shorter trump hand (because the trumps in the long hand are already worth a trick each). And for another, once you've cleared trumps and set up your unequal side-suit, you can lead it out, discarding losers from the other hand.
Imagine this hand in clubs. You have six trump tricks plus 4 diamond tricks and the Ace of hearts. 11 tricks, and no way to avoid losing two tricks in hearts (well, in this case you're a bit lucky in that South is holding the ♥KQ doubleton - but still, to get 12 tricks you need that bit of luck plus the ♣Q to be in the right place, under your ♣AKJ.)
Now play it in diamonds. You have the same 11 tricks as in clubs, PLUS a couple of spade ruffs in East's hand (on a spade lead), giving you 13 tricks. Or 12 tricks even if the ♣Q is wrong. Sure, you can ruff spades if you're in clubs, too, but it gains you nothing as you'll be trumping with cards that are already winners. It's the 4-4 fit in diamonds which enables your ruffs to be extra tricks, giving you 6 trump tricks instead of just 4.
So how did you do compared with Bath the night before? Not so very badly, actually: 5 out of 12 East-West pairs stopped in 3♣ or 3♦, 3 bid and made 3NT, and a further 3 reached a minor game. Only one pair bid 6♦, which earned them an absolute top.
Everyone in a minor suit made 12 tricks, except one who made all 13 - and they had stopped in 3♦. Just goes to show.
|
|
|
|
| HOTW 16 Dec 2009 | Showing shape opposite a 2NT hand |
Show Detail |
Showing shape opposite a 2NT hand
A nice deal, this, with lessons for both bidding and declarer play, and an opportunity to make bucketloads of overtricks.
With 21 points, some Easts will open 2NT, while Benjamin players will open 2C and then rebid 2NT over partner's 2D relay.
It's clear to West that game (at least) is on, but which one? The first priority is to tell partner about her 5-4 shape in hearts and spades. Easily done: bid 3♦ to transfer to hearts (East duly bidding 3♥ as instructed) and then bid 3♠. Message: Partner, we have enough points for game, but I should tell you that I have 5 hearts and 4 spades. East, having neither 3 hearts nor four spades, now signs off in 3NT.
Detour What, someone asked, do you do if it's the other way around, i.e. if West has 5 spades and 4 hearts? If you transfer to spades and then bid hearts, you're already at the 4 level, and have therefore lost the possibility of playing in 3NT. Fortunately, there's a simple solution. Because we're playing transfers, we show a 5-card spade suit via 3♥, and opener then completes the transfer by bidding 3♠. This means that the direct response of 3♠ over 2NT isn't needed any more, it's a redundant bid - and many pairs therefore use it for precisely the purpose we're looking for: to show 5-4 in spades and hearts. All done in a single bid - and declarer still has room to sign off in 3NT if there is after all no major fit. Marvellous.
Back to this hand, and time to look at the play.
... and managing your entries in the play
South leads ♦2 against your 3NT contract, and down goes dummy. You're declarer. Count your tricks, think about where some extra ones might come from, and (crucially!) decide in what order you're going to do things. Only then click on the Answer button!
|
| Show Answer |
Has the diamond lead given you a trick? Well, not really, as you were always going to get 3 diamond tricks anyway holding AKJ10. South has probably led from Qxx2, so three diamond tricks is all you're going to manage.
What about other tricks? Well, you have 4 club tricks, bringing you up to 7, plus a definite spade trick - that's 8 - and probably 4 heart tricks if you manage things carefully. Hey, that's a small slam!
But how to do it? My first instinct was to play off ♣AK to unblock the clubs so that I could then cash the ♣QJ in my hand ... but hold on a minute. If I do that, how am I going to get to dummy to cash all those lovely heart winners once I've forced out the Ace? Might I not need one - or both? - of them as entries to dummy?
Let's think. Supposing I win the first trick in hand (with the ♦10, as it happens), and lead my ♥K. Supposing they don't play their ♥A? Now I lead my ♥Q - and again they hold up their ♥A. Now I haven't got another heart to lead, so I have to go over to dummy with a top club and lead the ♥J. OK. Let's say they take their ♥A now. I've now got two heart winners in dummy, and the only way I can get over there to cash them is my other top club.
So against the best defence, I do need both ♣A and ♣K as entries to dummy. I have to leave clubs alone and attack hearts immediately, at trick two. So how does it go?
trick 1: win a diamond trick in hand
trick 2: lead ♥K (♥A not played)
trick 3: lead ♥Q (♥A not played again)
trick 4: out to dummy with ♣A
trick 5: lead ♥J (♥A appears at last)
trick 6: win whatever South leads. Assuming it wasn't a club, then
trick 7: out to dummy with ♣K
trick 8: cash ♥10
trick 9: cash ♥6
trick 10: back to hand, which has 4 winners.
So. 12 tricks. Should you have bid the slam? Probably not. It's hard to bid (all 13 tables at Bath BC stopped in 3NT) and anyway 6NT goes off on a club lead.
Why? Because a club lead robs you of one of your entries to dummy at trick one. You can attack hearts, South holds off for two rounds, you use up your last entry to dummy (your 2nd club), lead your ♥J to knock out the ♥A ... and now you can never get back to dummy to cash your last two heart tricks. Better instead to try the spade finesse while you're still in dummy - which works and gives you 11 tricks.
|
|
|
|
|
| HOTW 14 Oct 2009 | Board 6 (The Auction) |
There were loads of interesting hands, but we looked at Board 6, as it offered an interesting auction and a bit of a challenge in the play.
West
♠ J 10 4 |
|
East
♠ A |
|
|
|
|
|
|
| ♥ A J 9 7 2 |
|
♥ 10 6 3 |
|
|
|
|
|
|
| ♦ A 3 |
|
♦ K J 9 8 2 |
|
|
|
|
|
|
| ♣ A Q J |
|
♣ 10 8 6 2 |
|
|
|
|
|
|
First, the auction. If you can persuade the opposition to be silent for once (as they are in this case), declarer and dummy are free to have a quiet and informative conversation, each bid adding to the picture that each has of the other's hand. What happens here, after East's opening pass?
West has a pleasant 17 points, and so opens 1 ♥ (intending to rebid 2NT, showing 17-18 points) over East's response.
What is East to say? She can't bid 2 ♦, as she has only 8 points, and it would be misleading to raise partner's hearts, as she only has three. But with 8 points she can't pass either. Thank goodness for good old 1NT, the 'dustbin' bid, which is East's correct response here.
Now West has to think again. Partner has shown 6-9 points, and has denied 4 hearts (or 4 spades, for that matter). If she's at the upper end of that point range, they should be in game. But how to find out? Answer: invite game by raising to 2NT.
Back to East. She's got nearly maximum points, so it looks as if game is on. She could just bid 3NT, but there's a better bid than that. Partner might easily have started with 5 hearts, and if he did, they have an 8-card fit, and 4 ♥ might well play better than 3NT. So it's a good idea to show her three hearts on the way by bidding 3 ♥. Now West can choose between 3NT and 4 ♥.
And West, who does indeed have 5 hearts, bids game in the major: 4 ♥.
Have another look at the auction as a conversation. It's a good example of how a pair use their bids to give a picture of their own hand and ask about their partner's.
{C}{C}{C}{C}
{C}{C}
|
West
|
East
|
|
|
[Pass] Hi. I'm afraid I haven't got enough points to open.
|
|
[1♥] That's OK. I've got an opening hand with at least 4 hearts.
|
|
|
|
[1NT] I've got 6-9 points, but I'm afraid that's about all I can say just now. I don't have four hearts - nor do I have four spades.
|
|
[2NT] Sounds promising. It might be enough for game, actually, as I've got 16-18 points myself (not 15 - that would only add up to 24 even if you had a maximum 9 points; and not 19, or I would have raised you to game straight away). So take this as an invitation to game if you're 8-9 points.
|
|
|
|
[3♥*] Thank you, partner. I accept your invitation. But just in case you have 5 hearts over there, I think I should tell you on the way that I do have 3 hearts. Your choice: no trumps or hearts!
|
|
[4♥] Well, as it happens I do have 5 hearts, partner, so hearts it is.
|
|
* Note that in bidding 3♥, East is accepting her partner's invitation to game. The bid is therefore forcing: West must not pass. If East had wanted to stop short of game, she would have refused the invitation in the first place and passed 2NT.
[Hang on a moment, I hear someone say: if West only had 16 points, that only adds up to 24 with East's 8 - not enough for game. So isn't East taking a bit of a risk here? Well, in a way, yes. But it's a very nice 8, isn't it? It's got a nice 5-card suit and a couple of 10s for No trumps, not to mention three handy trumps and a spade shortage if they end up in hearts. If bridge were just a matter of counting up to 25, it would get pretty boring pretty quickly. Here East uses her judgment and (quite rightly) upgrades her hand to a maximum and goes for game.]
[A discussion of the play can be found on the Declarer play (in a suit) page - at the bottom.]
|
|
|
|
|