|
|
| Board 04 Wed 17 December 2025 |
Show Detail |
Secret Santa
After North opens a weak 2♠, partner's 4NT overcall is offering you a gift-wrapped chance to play in a great contract. But which contract, exactly? What does her 4NT bid mean?
Let's first look at what it doesn't mean ...
- It isn't a natural bid - if partner wanted to play in NT, she'd bid two or three NT, not four.
- It isn't Blackwood either: you clearly haven't yet agreed a suit.
The bid's actually an example of what's known as an 'unusual no trump', which is all about the minor suits. * Partner has both minors, and is inviting you to choose the one you prefer. Seems odd at first, but when you think about it, it all makes sense. Overcalling 2NT would be natural, showing a balanced 16-18 points with a spade stop. Overcalling 3NT would also be natural, probably with a long minor suit as a source of tricks. And since partner wants to play in game, 4NT is a great way of both blocking them from bidding 4♠ and also inviting you to choose your preferred minor suit.
So, with your holdiing 5♣ it is.
The play
Looks as if you've underbid - if you're careful, 12 tricks are on offer. Whatever they lead, you can win the first trick, unblock your ♦K, clear trumps ... and just one diamond ruff is enough to dislodge their ♦Q
It's a bit tricky if they start with a spade, forcing you to ruff at trick 1. Then when they come in with a trump, if they lead another spade, forcing you to ruff again, you won't have enough entries left in the East hand to clear trumps and set up your diamonds. So ...
- Ruff their opening spade (leaving you with 4 trumps)
- Cash dummy's ♦K and lead a small trump to your ♣A (leaving you with 3 trumps). South drops the ♣K.
- Now cross your fingers and ruff a diamond in dummy. Both opps follow suit.
Now you're safe to continue clearing trumps, even if it takes 2 more rounds. Lead dummy's ♣J, losing to North's ♣Q. And the rest of the tricks are yours. Take a look at the whole deal.
On the night
On the posh night, no one bid the slam, which was just as well as none made 12 tricks. Most were in clubs (one was only in 4♣), but three NS pairs got away with 3♠.
In AP, all the suits were represented: two were in clubs, two were in hearts, two were in diamonds and one was in spades. Top of the EW results was 5♣ +1 - well played!
cj
* The 'unusual no trump' also comes up as an overcall over an opening 1-level bid of a suit. Some of you will be familiar with the Ghestem convention, which allows you to show a pair of 5-card suits. Over an opp's opening 1♥ or 1♠, an overcall of 2NT tells partner you have both clubs and diamonds and invites her to choose the one she prefers. Just like this hand, but at a lower level. The more traditional Michaels convention works in a similar way.
|
|
|
|
| Board 02 Wed 03 December 2025 |
Show Detail |
A simple auction
As we've been looking again at the basics of the auction, here's a hand where following the basic rules leads seamlessly to the best contract.
- After three passes, West opens her longest suit: 1♥.
- East can't support hearts and doesn't have 4+ spades. She does, however have both minor suits and 10 points - enough, therefore, to show a suit at the 2-level. As we bid 4-card suits 'up the line', she chooses the lower-ranking one (which is not necessarily the 'best' one!): 2♣.
- Should West now show her spades? Well, she's not (quite) strong enough to reverse into 2♠, and East didn't respond 1♠, so is unlikely to have 4 spades anyway. * With 15 points, I think it's best for her to rebid 2NT.
- Both players are now in a game-forcing situation (West has promised at least 15 points and East at least 10), so East simply raises to 3NT.
Things are looking pretty good for no trumps, and they're about to get better: because neither West nor East has bid spades, North decides that a spade lead is her best bet and leads the ♠4. You play low from dummy and South plays the ♠J ...
The play
What's your plan?
Let's count tricks. You can win trick 1 with your ♠K and once the ♠A has gone, you'll have a further 2 spade tricks. But just the one for now. Add to that 3 heart tricks (maybe more if you're lucky). And once the ♦A is gone you have three diamond tricks ... and (eventually) one club trick. Plenty. It's just a question of making your 9 tricks before they can make 5.
So win the opening spade lead with the ♠K and ... Yes. Attack the diamonds - a sure route to three extra tricks.
So at trick 2 you lead your ♦K (no, not a little one - get rid of the honours in the short holding first), and keep going until the ♦A appears.
If you get a spade back, you're home. If they lead a heart or a diamond, win the trick and force our the ♠A and you're home. If you get a club back it's a bit trickier, but your clubs should be good enough to stop them running away with lots of tricks.
On the night
On the posh night, apart from one declarer in 1NT, everyone was in 3NT. One declarer made 8 tricks, three made 9 and three made 10.
In AP, three declarers were in 3NT, making 8, 9 and 10 tricks, one was in 1♥ (!) and the other three ended up in spades.
Note 'Deep finesse' reports that 4♠ is a better contract than 3NT, but most of the time with a 7-card that won't be the case: it only works on this hand because the opps' spades happen to be split 3-3 - which, as we keep discovering; will happen only 36% of the time. 3NT is where you want to be.
cj
* It is possible, of course, for East to have 4 spades: she might have 5 clubs and 4 spades and just be showing her clubs first. In that case, instead of raising partner to 3NT, she will show her 4-card spade suit on her second bid, in case her partner also has 4. So if you do have a spade fit, you won't miss it.
|
|
|
|
| Board 09 Wed 26 November 2025 |
Show Detail |
Watch the pips!
The auction could have been more scientific, but with 19 points opposite partner's opening bid, South can be forgiven for punting the slam on her second bid. (Note, in passing, that she didn't go jumping all over the place on her first bid - a simple change of suit to 1♠ is sufficient to make opener bid again - partner might have, for example, have supported spades or even made a strong rebid indicating a likely grand slam.)
Anyway, here you are in 6NT, and things are looking pretty good. If the hearts behave themselves (ie no worse than 4-2 - a better-than-80% chance), you have 5 hearts tricks, then the ♠AKQ, ♦AK and ♣A - that's 11 tricks in all. So the question is ...
Where's the 12th trick coming from?
There are various possibilities. One is that the spades split 3-3 or even 4-2 (provided it's safe for you to lose the lead). Another is that the ♦Q is a doubleton (not very likely but a possible last resort), thus giving you a trick with your ♦J.
But we're getting ahead of ourselves, because exactly how it goes will depend upon the opening lead, which may make all the difference. Let's take a look at a couple of options.
- West leads the ♣8.
Excellent. Play it right and you've just made your contract without even trying. How does it go?
Just play low from dummy. If East plays low you win with your ♣J and that's your 12th trick. If she plays the ♣Q or ♣K, win with the ♣A, and you still have the ♣10 and ♣J to force out the opps' other top club, and again you have a 2nd club trick.
- West leads the ♠5.
Same thing! Play low from dummy. If East plays low, win with your ♠8 and that's your 12th trick. If she plays the ♠10 or ♠J, win the trick and use dummy's ♠9 to force out the other one and you have a 4th spade trick.
- West leads the ♠J.
Just as easy. Win it and lead a low spade towards dummy's ♠8 to force out the ♠10.
- West leads a small diamond.
Lovely! Again play low. If East plays low, your ♦J wins and that's your 12th trick. If she wins with the ♦Q, your ♦J will still become your 12th trick.
- West leads a small heart.
The only lead that doesn't give you the contract on a plate! You'll have to hope the spades break nicely, or failing that that the ♦Q is in a doubleton and will drop under dummy's ♦AK
So what happens? Take a look at the whole deal.
Most of the time, you'll get a spade or club lead, so that'll be fine. And on a heart lead? Well, the spades don't split nicely, but to make up for it West holds just ♦Q10 so your ♦J becomes your 12th trick anyway!
The lesson? There are two:
- Watch the pips! Those 8s, 9s and 10s are sometimes worth a trick.
- Playing low from dummy on an opp's lead, particularly in NT, can be profitable. Effectively, they're taking your finesse for you without you having to waste any high cards!
On the night
On the posh night, most were in 6NT. nearly all making. A couple bid and made 6♥. One went off in an ambitious 7♥.
In AP, most were in NT (though not all were in the slam) and most made 12 tricks. A couple of pairs were in 6♥ and 6♠, both going off.
cj
|
|
|
|
| Board 04 Wed 19 November 2025 |
Show Detail |
Hold on to your entry
Here's a nice 3NT contract to plan. First, a word about the auction:
With a 4441 distribution, West opens 1♦ * and over East's 1♠ response is able to rebid 1NT, showing 15-16 (or maybe 15-17) points. With 10 points herself, East knows that game is on, so offers West the choice between 4♠ (if she happens to have 3 spades) and 3NT. ** So 3NT it is.
North leads the ♥3 and South plays the ♥Q. You're sitting West. What's your plan?
You have seven top tricks (♣AKQJ and the other three Aces), so need just two more. The obvious candidate is diamonds. You have an 8-card fit, so if the opps' diamonds are split 3-2 and North happens to have the ♦K, you're home. So you win trick 1, lead a small diamond towards your ♦Q ... and hope that North goes up with the ♦K. Is that right? Well, there are a couple of doubts ..
- Shouldn't I be holding up at trick one?
No. North's ♥3 lead (you have the ♥2 in dummy) shows that she has just 4 hearts, so they can only take 3 heart tricks. Which is fine, provided the diamonds work out OK.
And there's another reason: if they take a couple of heart tricks and then switch to a spade, you're in big trouble.
- Shouldn't I cash the ♦A before I lead a low one towards the ♦Q, just in case the ♦K is a singleton?
Normally, yes, but on this deal you can't afford to. Later on, you'll have to cash dummy's ♣KJ and then get back to your hand to access the ♣AQ and the ♦A is your only remaining entry to your hand. So hold on to your ♦A.
So go ahead and lead your small diamond. As it happens, North plays the ♦K (she holds the ♦K2 doubleton) and whatever she does next you're home and dry. Take a look at the whole deal.
If you're lucky, she'll immediately cash her ♥K, which'll give you an extra trick with your ♥J, but if she switches to a spade - her best play - you're still home:
- Win with dummy's ♠A.
- Cash dummy's two clubs
- Cash three diamond tricks, ending in your hand ...
- ... and then cash your ♣AQ.
On the night
On the posh night, a couple of tables stopped in 2♦ (making 11 tricks) but all the others were in 3NT. Six made 9 tricks but one went 2 off.
In AP, there was one diamond contract and a couple of Wests somehow ended up in 2♠ ... but all the rest were in 3NT, making just 7 or 8 tricks.
cj
* With 4441: If you have 'three suits in a row' (as here) you open the middle-ranking of the three suits. Otherwise you open the suit below the singleton.
** There are more sophisticated ways of finding out whether partner fancies being in spades, eg Checkback Stayman, but in a basic system 3♠ does the job quite adequately.
|
|
|
|
| A random board in November 2025 |
Show Detail |
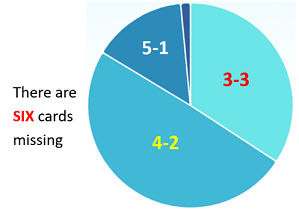
Six cards missing ...
As soon as your partner opens 1♥, you know you're in game - but what game? You show your spades and partner rebids 2♥, promising an ordinary opening hand with 5+ hearts.
You're strong enough for a (game-forcing) 3♦ bid, at which point partner gives you a 'delayed raise' in spades ('I couldn't raise your spades immediately, but I have 3') and now you've found your fit you continue to game: 4♠.
West leads the ♣A, down goes dummy, and it's time to make a plan for 10 tricks ...
Making a plan
You're going to lose two club tricks and one diamond trick, so the aim is not to lose more than that. The key suit is going to be diamonds: you have seven of them and the opps therefore have six. How are they likely to be split? If you're lucky they'll be 3-3, which will mean that once the ♦A has gone (and all of the opponents' trumps!) all the remaining diamonds in your hand will be 'good'. But - see the chart at the end of the article - they're more likely to be split 4-2. In which case you're going to need to ruff a diamond in dummy to 'set up' your diamond suit.
OK. It's a plan! Now - how does that affect your clearing trumps? Clearly you can't clear trumps before you ruff the diamond in dummy, because dummy only has three trumps. So best to get straight in there with the diamonds. How does it go?
- West wins trick 1 and leads a small club through to East's ♣KJ, and you ruff the 3rd round of clubs.
- Now you lead a small diamond to the ♦J, which loses to East's ♦A. East now leads a trump, which you win in dummy.
- Crunch time: you cash the ♦K, and both opps follow suit - the diamonds are no worse than 4-2, then. Now ruff a small diamond in dummy. One opp shows out - so the diamonds were 4-2, not 3-3.
- Now you've followed through the plan, it's time to draw their remaining trumps. Cash dummy's last trump, then back to hand with the ♥A, one last round of trumps ...
- ... and your remaining ♦Qx are both good. 4♠ bid and made.
Note that you don't want to start with a couple of rounds of trumps 'just to make things safer' - when the opps come in with their ♦A they might lead their last trump, and then bang goes your diamond ruff in dummy.
On the night
Sorry - I don't know when or where this hand was played, so no results to share!
cj
Here's a pie chart showing the likelihood of six missing cards splitting 3-3, 4-2, 5-1 and (heaven forbid) 6-0
|
|
|
|
| Board 11 Wed 05 November 2024 |
Show Detail |
100% safe
In the light of yesterday's seminar on declarer play in a suit, here's an extra practice hand that came up in last week's AP (and was originally played in last Tuesday's Open Pairs).
Never mind how you got there: you're in 6♠ and West has led the ♦K. According to our outline plan (see bottom), our long trump hand (and boy is it long!) has two losers in diamonds and one in clubs - that's 2 too many.
Is there a 100% safe way to make your contract?
Well, you could arrange to ruff a diamond by giving the opps a diamond trick and then taking your ruff. But that only gets rid of one loser - so in order to avoid two losers the club finesse has to be right. Not 100% safe then.
100% safe
The safe route is dead simple:
- Clear trumps (no reason not to)
- Cash your ♥K. This clears the way for you to ...
- ... cross to dummy with the ♣A (ignoring the finesse) ...
- ... and discard two of your three losers on dummy's ♥AQ.
Job done. You have 7 spade tricks, three heart tricks and the two minor aces. (Which you always had, of course! A simpler route to 12 tricks on this deal might have been just to count your winners at the outset. Then it's just a question of taking them all in the right order: clear trumps. Cash the ♥K to unblock the suit. Then out to dummy ...)
Postscript the club finesse doesn't work. Take a look at the whole deal.
Moral Don't put your faith in finesses (chance of success 50%) when you have a 100% chance of success elsewhere.
On the night
In the Open Pairs game, seven Souths made 12 tricks, and two even (somehow) made 13.
In AP, results were more varied: two Souths made 10 tricks, two made 11, two made 12 and one (again, somehow!) made 13.
cj
An outline plan for suit contracts
From the point of view of the long trump hand:
-
Count the number of tricks you might LOSE
-
Think of ways to reduce this number
Note In order to do this, you may have to delay clearing some or all of the opps trumps.
|
|
|
|
|
| Board 10 Wed 29 October 2025 |
Show Detail |
♠ vs ♥
What would you open on this hand? 1♣? 2♣, maybe? We'll never know, as all three of the other players have shoved their oars in before you get your turn.
So what will you bid now? 6♥, probably - no doubt you're losing a spade trick, but surely nothing else: with no points in the minors, partner is odds on to hold ♥AK - and maybe even the ♠A as well ... so maybe 4NT (RKC Blackwood) would be better.
If you do use Blackwood, South responds 5♥ (showing two of the three missing keycards), so either way you're going for 6♥ ... and when you do, West bids 6♠! What now?
Double, presumably. You're not making 7♥ and they're surely not making any tricks other than in spades, so you should be in for a healthy penalty.
What happens?
Take a look at the whole deal.
Well, if only you'd known that partner has even fewer spades than you! You don't need to be Andrew Robson to take 13 tricks in hearts, do you? But a great deal and an interesting auction. Some points:
- I like South's 4♥ bid. Both she and East have an opening major preempt hand, so one or the other may be wanting to sacrificing in their suit. No harm in letting partner know about your hearts, then.
- West could raise her partner 'to the level of their fit' by going straight to 6♠, but there's no point in going that far unless NS actually find their slam. West can see they're likely to, since she has nothing other than 5 of her partner's spade suit. But she can always bid 6♠ later if necessary.
- Before bidding 6♠, West will be checking the vulnerability - it's only a worthwhile sacrifice if NS are vulnerable too. EW will be making 7 tricks - or possibly 8 with a ruff - for -1100 or -1400. Nasty, but a vulnerable 6♥ is worth 1430 for NS, so it's still a good sacrifice. As it turns out, there is a ruff available - in clubs, so -1100 is a bargain!
- It's a shame about 7♥, which is cold, but North can't possibly know that South is void in spades, so 6♠X-4 is a pretty decent result.
- If South doesn't bid her hearts, things are more difficult for North: West will raise to 4♠ and North will have to just punt something in clubs.
On the night
On the posh night, NS pairs were in 5♥, 6♥, 5♣ and 6♣ - nearly all making 13 tricks. Two Easts sacrificed in 6♠X, each making 8 tricks and earning more than 50%.
In AP, three NS pairs were in 6♥, one was in 5♥ and two others were in 5♣ - all but one making 13 tricks. At one table, East went two off in 4♠ undoubled for an absolute EW top - how did that happen?
cj
|
|
|
|
| Board 02 Wed 22 October 2025 |
Show Detail |
More than one chance
South leads the ♥J against your 4♠ contract and it's time to make a plan. You're clearly going to make your contract. You have 5 trump tricks, two hearts, one diamond plus a couple of diamond ruffs, so even if you lose 3 club tricks you're home and dry. But in pairs overtricks matter, so it's worth looking for extra tricks if you can. And on this hand you're almost certain to make 11 tricks, and have a couple of decent chances to make 12. What are your thoughts?
11 tricks After clearing trumps, you discard one of your three clubs on dummy's ♦A. Then, provided the opps' trumps split 2-1 (leaving you with three trumps in each hand) you can give up two club tricks and cross-ruff the rest.
12 tricks chance 1 Same as above, but you're leading a small club towards your ♣K, hoping that North has the ♣A. If she does, you only lose one club trick instead of two.
12 tricks chance 2 A different technique: setting up your side-suit. You have 7 hearts between you. If the opps' hearts split 3-3 (a 36% chance) all you have to do is cash your top hearts and ruff one heart, and you'll be left with two heart tricks in your hand, on which you can throw two of dummy's club losers. 12 tricks: 5 spades, 4 hearts, ♦A and two diamond ruffs.
Which way to go?
It costs nothing to go for 12 tricks, so let's clear trumps - they split 2-1 - and take it from there. What are you going to try? The club finesse or setting up the hearts?
No contest - the hearts. Why? Because if it doesn't work, you can still try for 12 tricks via the clubs option.
If you go for the clubs option first and it doesn't work, the opps are taking their two club tricks right now - too late to go for the hearts option instead.
How does it go? Take a look at the whole deal. The hearts do split 3-3, so after ruffing a heart you come back to your hand (via a diamond ruff) and discard two of dummy's clubs on the ♥7 and ♥5. You lose 1 club trick and the other 12 tricks are yours. The clubs option, however, doesn't work - so just as well you went for the hearts first.
On the night
On the posh night, nearly everyone was in 4♠. Two made 11 tricks, one made 13 (!) and the rest made 12.
In AP, everyone was also in 4♠. Two made 10 tricks, three made 11 and one made 12.
A note on the auction
Whereas East was declarer at 7 of the 9 tables in the BBO game, this was only true of one table in the AP match. At the other five tables, West was declarer. Players sitting East at those tables (and maybe a couple of Easts on the posh night!) should take another look at the 2nd of our Basic Bidding Themes, on opening 1 of a suit. East should be opening 1♠, not 1♥. They got away with it on this hand, but on other occasions it'll get them into difficulties.
cj
|
|
|
|
| Board 03 Wed 08 October 2025 |
Show Detail |
5-0 4-1 3-2 2-3 1-4 0-5
Doing the splits
Sitting North, you're declarer in 4♠, after East has made a 2♥ overcall. East leads the ♦A. What are your thoughts? As usual, you'll be looking at your winners and potential losers, and you'll be interested to see what East leads to the 2nd trick ...
It's all going to depend on the way the spades and diamonds split, isn't it? And on what East leads to the 2nd trick.
If the spades split 3-2 (which they will most of the time), you have 5 spade tricks. And if the diamonds split 3-2, you have 5 diamond tricks too - potentially. In addition to the ♣A and (eventually) a heart trick. Meanwhile, though, you have a diamond loser, two club losers and one (maybe two) heart losers. How are you going to manage ...
(a) ... if East leads a small diamond to trick 2? (b) ... if East leads a trump to trick 2?
(a) How annoying! You can win the trick, but now you can't clear trumps and get into dummy to cash all those lovely diamond winners. But provided the trumps behave themselves (by splitting 3-2) you can make your contract. How?
- After winning the trick, lead dummy's singleton club to your Ace and ruff a club.
- Back to hand with a trump and ruff your last club with dummy's last trump. Now what?
- Lead a heart to your ♥K. East will win but whatever she leads now you can win the next trick in your hand. Now cross your fingers and play two more rounds of trumps and if the trumps are 3-2, you'll have made your contract - you have to concede a 2nd heart trick at the end.
(b) Why would she switch to a trump? Precisely to avoid situation (a)! She can see the singleton club and wants to reduce dummy's ruffing power. And indeed she has scuppered your plan to ruff two clubs. But another, delicious possibility has just arisen. If only the spades and diamonds both split 3-2, you're heading for a great score, because you still have a diamond to get to dummy's long diamond suit:
- Cash three rounds of spades, eliminating the opponents' trumps.
- Lead a small diamond to dummy's ♦K, and if everyone follows ...
- ... you have a further four diamond tricks, on which you can throw whatever you like from your hand ...
- ... leaving you with just one further loser, and 11 tricks.
But do these plans work? Are both suits splitting kindly as required? Take a look at the whole deal ... and yes they are. Congratulations! 
On the night
On the posh night, nearly everyone was in 4♠. Some went off, but only if East led a trump as opening lead. All the declarers who got the ♦A lead made 11 tricks.
In AP, everyone was also in 4♠, but only one declarer made it. The four declarers who got the ♦A lead all went off.
Points to take from the hand
- Whenever you have a short suit in dummy, consider whether you want to ruff losers in that suit before you clear dummy's trumps.
- If East continues with a 2nd diamond, you can forget about setting up your diamonds: it will use up all dummy's trumps to clear the opps' trumps, so you can never get back to dummy.
- You can't always make a definitive plan at trick 1. As we've seen, whether we use Plan A or Plan B will depend on what East leads to the second trick.
- In an ideal world, of course, East would switch to a club at trick 2. This allows you to combine Plans A and B: you can get your club ruffs, clear trumps and cash endless diamonds, discarding all your hearts. 12 tricks!
cj
|
|
|
|
| Board 09 Wed 01 October 2025 |
Show Detail |
Heads you win, tails you win
Never mind how you got there - you're sitting East, declarer in 4♥ and South leads the ♣6. What's the plan?
It's looking pretty good, isn't it? You have 6 trump tricks and three more top tricks and you have possibilities for a 10th trick in both clubs and diamonds. The downside is that you have four potential losers: two in spades and one each in clubs and diamonds. The aim is, therefore, to make your 10 tricks before they make four.
Avoiding 4 losers
OK. Here's a half-thought-out plan:
I've got a finesse position in both diamonds and clubs, and to make my 10th trick, I only need one of those finesses to work. I remember my teacher telling me that the odds of bringing home at least one of two finesses is 75%, which seems pretty good, so I'm going for it. Win trick 1, clear trumps, then take the finesses and hope that one of them brings home the extra trick. Or I might even decide to take the club finesse at trick 1. Why not?
Why not? Because if both finesses are wrong, you've just let them take you off. Imagine what will happen: North wins with the ♣Q, they cash their 2 spade tricks (trapping dummy's ♠Q in passing) and then South's ♦K will provide the defence with the setting trick.
Back to the drawing board. Can we do better? Yes! Take a closer look at the diamonds. Dummy has ♦QJ2 opposite your ♦A7. What happens if you lead the ♦Q, intending to finesse? If it wins, you're home. If it loses, you're left with two diamond winners. That ♦J is now your 10th trick.
Let's play it through in our head to get it straight:
- Win trick 1 in dummy.
- Clear trumps in 2 rounds, ending in dummy (assuming the trumps split 2-1).
- Run the ♦Q. Say it loses to South's ♦K and the defenders now take their two spade tricks and then lead ... it doesn't matter what.
- Win the trick and cash your ♦A, then ...
- ... get back to dummy (with a top club or a trump) and cash the ♦J, discarding your 10♣ ...
... and you have 10 tricks, even if both finesses are wrong. Why be content with a 75% chance when you can have 100%?
And we were able to set up this 100% certainty without peeking at the opponents' cards. Do feel free to peek at them now!
On the night
On the posh night, everyone was in 4♥ and everyone made it - one declarer somehow even managed an overtrick.
In AP, everyone was also in 4♥, but only three declarers made it. Four went one off.
Points to take from the hand
- Make your plan before you play a single card. On this deal, playing the ♣10 from dummy on the grounds that 'I might as well take the club finesse now' will cost your the contract.
- Not all finesses are born equal: the club finesse gains you nothing if it loses. The diamond finesse sets up an extra trick whether it loses or not.
- There's nothing in your plan that requires you to delay clearing trumps, so it's good practice to get the opponents' trumps out of the way as soon as you possibly can - ie on tricks 2 and 3.
- A 100% chance is as good a chance as you're ever going to get, so go for it!
cj
|
|
|
|
| Board 14 Wed 24 September 2025 |
Show Detail |
Cross your fingers
What do you open on the South hand, after East's pass? With 8 spades, 4♠ is an option, but that's supposed to be a preemptive bid, and I think you're too strong for that. Partner hasn't yet had a chance to bid, and if she's got any two of ♥A, ♦A and ♠K you could easily be worth a slam. Best to open 1♠ and see what happens. Partner's 1NT response kinda scuppers the slam ambitions, so 4♠ it is.
West leads - well what does West lead? - and down goes dummy. Here are some of the actual leads made by various Wests. What are your thoughts?
- ♣4. A nice lead for you. You can win it and ruff a small club immediately in dummy. Home and dry. You're now only going to lose a heart, a club and a trick to the ♠K (unless it's a singleton).
- ♦A, Even better! You ruff it in hand, cash the ♣A and ruff a small club. While you're in dummy, you discard a loser (the ♥8, probably) on dummy's ♦K, come back to hand with a heart ruff, start clearing trumps ... and you're romping home with an overtrick.
- ♥Q. Potentially nice. You cover (of course!) with your ♥K, losing to East's ♥A, then cross your fingers that she doesn't switch to a spade. Any other lead allows you to discard a loser on dummy's ♥J and again you're home. But a spade switch is a double whammy: you now have no club ruff and no access to dummy's master ♥J.
- ♠8. If East holds ♠Kx, this is a great lead for you, giving you 8 spade tricks + two club tricks on a plate. But if West's leading from ♠K98, it's a killer: it removes your club ruff, leaving you with a spade loser, a heart loser and potentially two club losers as well.
Assume the worst
OK. That's either the ♥Q lead followed by a spade switch or West leading the ♠8 from ♠K98. Either way, that's no club ruff in dummy. What to do?
Your only hope now is to cross your fingers and hope the defenders make a mistake. You bang out trumps, duly losing a trick to West's ♠K, then continue relentlessly leading trumps until you have just one left. You're hoping, of course, to see some club discards, so that neither defender has as many as four clubs left. Then, right at the end, you cash your ♣AK and give them a club trick. If they're now out of clubs, you're home: you ruff whatever they lead and your last club will be a winner.
Will it work? Take a look at the whole deal: East and West started with 4 clubs each, so they'd both need to discard a club for you to make your contract. But you never know ...
On the night
On the posh night, everyone was in a spade game, though 3 ended up in 5♠, presumably after wondering about a slam. Popular leads were the ♠8 and the ♥Q. Most declarers made just 9 tricks, though one made 10 and two made 11.
In AP, everyone was in 4♠. A couple of Wests led the ♥Q, but no one found the trump lead. The ♦Q, which was led at two tables, is a great lead against a NT contract, but an absolute no-no against a suit contract! * Two declarers (♥Q led) went one off, three (♦Q, ♣4, ♦A led) made it and one (♦Q led) made an overtrick.
cj
* We've come across this before: don't lead away from an Ace vs a suit contract. Imagine South's red singleton was a diamond instead of a heart. Wouldn't you have felt daft if declarer won trick 1 with dummy's ♦K?
|
|
|
|
| Board 13 Wed 17 September 2025 |
Show Detail |
A little thought experiment
Sitting North, you're declarer in 3NT, after a routine auction featuring a Stayman enquiry from partner. It looks as if you're going to have no trouble making your contract - maybe with overtricks. How many top tricks do you have? And where might any extra tricks be coming from?
Well, you've 8 tricks off the top (♠AK and AKQ in each of the minor suits) and if the diamonds break 3-2 you'll make an extra two diamond tricks - and a fourth club trick as well if the clubs break 3-3 (or an opp is kind enough to discard a crucial club on one of your diamonds).
Your weak spot (there always is one!) is, of course, hearts ... and you're not surprised when East leads the ♥4. What happens next?
What's the plan?
This, as the books rightly tell you, is the time to make a plan, and we've already made a plan of sorts. You'll cash your ♦AKQ, hoping for a 3-2 split and if that works, continue with your last two diamonds, hoping to see some club discards and then cash your clubs, hoping for a 4th trick there. If the diamonds don't drop (if they're 4-1, say), you'll probably donate them a diamond trick and then your 5th diamond will become a certain 9th trick.
But that's for the future. Right now, you've got a more pressing matter to attend to: how do you play to the first trick? Crucially, do you play the ♥K from dummy or do you play low?
Use your imagination
At first sight it looks as if you have to make a guess. Put up the ♥K, say, in the hope that East's led away from the ♥A. Or play low in the hope that East's led away from the ♥Q.
No, it isn't a guess. One of the above choices is potentially disastrous and the other's 100% safe. All you have to do to decide which card to play is to picture how things might go on the next trick in either case - with an eye on the worst case scenario. Have a go. It's not difficult.
OK. Imagine you play the ♥K. In the worst case, West will win with the ♥A and lead back a small heart ... and East will have the ♥Q10, which is a death sentence for your ♥J. That's the first four tricks lost, then.
Now imagine playing low from dummy. What happens? Well, if West doesn't win the trick, you win it yourself with the ♥J. And if West does win it, it'll have to be either with the ♥A or the ♥Q. Yes? Either way, you're safe: if she wins with the ♥A, dummy's ♥K's good. And if she wins with the ♥Q, you have the ♥K and the ♥J left, to cope with their ♥A. Whichever of these three things happens, you now have a heart trick - that is, you're guaranteed to make your contract no matter how badly the diamonds and clubs split.
So guess if you have to, but only when you have to! Here you can make a 100% safe decision simply by playing the trick through in your head before you play a card.
How does it go?
Take a look at the whole deal. It turns out (as it often will!) that it doesn't matter how you play to the first trick, as West holds both the ♥A and the ♥Q. But there are many many hands where that little 'thought experiment' will play handsome dividends. And not only when you're declarer. Just getting in the habit of imagining how things might turn out before reaching for a card will improve your all-round game no end. An Einsteinian IQ not required.
On the night
On the posh night, only 6 of the 9 NS pairs were in 3NT, making 9, 10 or 11 tricks. The lead was either a heart or a club.
In AP, nearly everyone was in 3NT, making 8, 9 or 10 tricks. The opening lead was either ♣4 or ♠4.
cj
|
|
|
|
| Board 17 Phil Cooke Trophy 11 Sept 2025 |
Show Detail |
Avoiding losers ... and adding winners
By way of a change, here's a hand that came up in last Thursday's Phil Cooke Memorial Trophy game.
The auction's pretty standard: after East's 1NT rebid, 4♥ seems the obvious contract, so West just bids it. It's worth noting in passing, though, that just because West has a good, long suit, that doesn't mean that she has to go leaping all over the place at her first bid: a simple 1♥ is sufficient to make her partner bid again, and the 1NT tells her all she needs to know, so she now goes straight to final contract.
Given the right lead, a slam looks at least possible, so let's see if we can make 12 tricks. What are your thoughts if North leads the ♦4?
It's always worth checking potential losers and winners, so before we play a card, let's do that.
Losers ...
Losers first. I make it four, potentially.There's a club loser. A diamond loser. Maybe a trump loser. And a spade loser (if South holds the ♠K).
That seems a lot. Can we avoid any of them? Yes! Which ones? And how?
- The club loser's unavoidable ...
- ...but we can avoid the diamond loser by ruffing declarer's third diamond in dummy. You have to do this, of course, while you still have a trump in dummy!
- There's only one situation in which a trump loser is inevitable, and that's when North holds all three outstanding trumps. If they divide 2-1 the ♥Q drops harmlessly, and if South holds all three, a simple finesse from dummy will catch the ♥Q. You will of course cash the ♥A first, to see how the land lies.
- The spade finesse will fail if South holds the ♠K, but who needs a finesse? If you lead the ♣Q before you touch spades, you can discard your ♠Q on dummy's ♣K.
... and winners
Which brings us to winners. Assuming the trumps are kind, you have 7 heart winners, two diamond winners, the ♣K (after knocking out the ♣A) and the ♠A. That''s 11 in all. Add to this a possible diamond ruff and you have 12 tricks.
It only remains to put all that together in a sensible order.
Planning the play
After winning trick one, it makes sense to test the trumps. If they're satisfactory, we can get on with all those little jobs we identified earlier.
- At trick 2, then, you lead a heart to the ♥A and North shows out. That's fine, though. We can catch the ♥Q by finessing. And sort out our diamond ruff at the same time ...
- ... so you lead a diamond to dummy's ♦K and lead another small heart, finessing as necessary ...
- ... leaving the lead in your hand, and you're ready for the diamond ruff: lead your last diamond and ruff it with dummy's last trump.
- Everybody follows, and now it's time to set up that club trick: a low club to your singleton ♣Q, won by North's ♣A
- Now it's job almost done - except that you have in the forefront of your mind that South still has a trump that you'll clear as soon as you get back to your hand.
- So what does North do now? If she leads a diamond, you ruff in hand, clear the trump, go out to the ♠A, dump your ♠Q on dummy's ♣K and that's 12 tricks ...
- ... and if she leads a club, play low in dummy and ruff in hand as above. Then clear the last trump, etc. 12 tricks again ...
- ... and if instead he leads a spade, you have to do it the other way round: win with the ♠A and cash the ♣K (discarding your ♠Q) ruff something to come back to hand and then clear South's last trump. Still 12 tricks.
Take a look at the whole deal.
On the night morning
Eight of the nine pairs were in 4♥, the other having (strangely) stopped in 3♥. None of the declarers in game, however, made 12 tricks. settling instead for 11 or even 10. But well played (if not well bid) to the pair in 3♥, as they made 12 tricks.
Notes on the play
- The play's a doddle if only the trumps split 2-1. Two rounds removes all the trumps and you still have one in dummy for the diamond ruff. Plain sailing.
- As it is, you need to exercise a bit of care to get the diamond ruff done before you clear South's last trump.
- Finesses are a great way of avoiding losers, but they tend be around a 50% chance, making them a bit of a last resort. If you have a near-100% chance, like discarding the ♠Q on dummy's ♣K, prefer that! As it happens, the spade finesse does work, but on another day ...
- Before you start banging out cards, you have to make a plan (even if it has to be tweaked in mid-stream, as here). On Thursday evening 4♥+2 would have scored you a well-deserved top.
cj
|
|
|
|
| Board 09 Wed 03 Sept 2025 |
Show Detail |
It's now or never ...
As with most bridge hands, there are two aims on this one: to get to the best contract and then to get the max number of tricks.
The auction
It often happens that an opp's overcall helps rather than hinders us in finding the best place to be, and after your partner's 1♦ opening bid, East's 1♥ overcall does just that.
First you want to be sure you don't have a major fit, so you X (the negative double, showing exactly four spades *).
Then, when partner rebids clubs, it's a choice between no trumps and trying for game in diamonds. As you know, no trumps is worth much more per trick than a minor suit contract, so if it works it's the place to be. And here things are looking good. East has at least 5 hearts, so it looks as if your hearts are worth 2 stops sitting behind her, and you've surely got at least 5 diamond tricks, so you go for 3NT (sure, you only have 12 points, but they're all working in your favour).
That's the first part of the job done, and it only remains to get as many tricks as you can ...
The play
West leads the ♥7 (which looks like top of a doubleton, maybe even a singleton) and dummy goes down. East plays the ♥J and you win with your ♥K. What's the plan? What do you play at trick 2?
Normally you'd be looking to set up some extra tricks in order to make your contract, and the general rule for that is that you do it now, while you still have stops in the other suits ... but you don't need to do that, do you, as you already have 9 tricks - the heart trick you already have, six diamond tricks and two spades. There's also a club trick to be made, of course, if you force out their ♣A, but that can wait till later ... or can it? Do you set up your club trick now or take your 9 tricks and then do it?
You have to do it now. If you don't, you'll never make your 10th trick. Fast forward to the end of your 9 tricks. You've taken the ♠AK and banged out all your diamonds - making your contract - and then you lead your ♣K. What happens? They take the ♣A, followed by their two hearts tricks, the ♥A and ♥Q and they'll finish off with the ♠Q (because you've used up your spade stops). Nine tricks for you and four for them.
Now try it again, leading the ♣K at trick two. What happens? They can take their ♣A, then their ♥AQ ... and that's all!. You have every suit covered - you have the top spade, top club and top heart as well as all the diamonds. Whatever they lead you win and this time you have the ♣Q set up to take your 10th trick. Better by a trick.
On the night
On the posh night, just 3 tables were in 5♦, all making, one with an overtrick, but four found the best spot, 3NT, mostly making 10 tricks for a better score.
In AP only one table found 3NT. The others were mostly in 5♦ (there was also a 4♦ and a 3♦) - all making 11 or 12 tricks. The 3NT+1 scored 100%.
The scores
It's worth reiterating why 3NT (provided it makes!) is a better place to be than 5♦. Firstly, you need fewer tricks to make the contract, but secondly, it's so much easier to get a top score. Just 10 tricks in no trumps scores better than even 12 tricks in diamonds.
But for 3NT to score better than 5♦ you need the overtrick. Making just 9 tricks in 3NT scores no better than making 11 tricks in 5♦ - so lead that club at trick 2!
cj
* See Basic Bidding Themes 7 part 3: in this situation, you X to show 4 spades and bid 1♠ if you have more.
|
|
|
|
| Board 14 Wed 27 Aug 2025 |
Show Detail |
Declarer's dozen
As you'll hear if you come along to one of the upcoming autumn seminars, the primary route to successful declarer play lies (along with counting!) in making a plan. And in case of suit contracts, that you need to clear trumps at the first opportunity unless there's a good reason not to.
How does that pan out on this hand? South leads the ♣2 against your 4♠ contract. North wins with the ♣K and switches to the ♦8 and you win with the Ace. What's the plan? And what happens at trick 3?
The plan
First impressions are good. You might lose a trick to the ♠K, depending on where it is, but you have a good chance of taking the rest. You can ruff your club loser in dummy, and if the hearts split 4-3 (which is more likely than not *) one heart ruff will be enough to 'set up' the suit. So you're planning to make two ruffs in dummy. Should you do that before or after drawing trumps? Well, you have 4 trumps in dummy, so you can afford to at least check out the opps' trumps. In which case, you should do it now.
You lead a small spade, and South comes up with the ♠K. You play dummy's ♠A and North follows suit. What does that suggest? That the ♠K was a singleton, and that North therefore has ... two spades left. Hmm. So what happens next?
Well, if you carry on and clear North's trumps, you'll only have ONE trump left in dummy for ruffing, and you need TWO. So how are you going to manage the next few tricks?
You need to come back to your hand, ruff your club, then back to your hand again and ruff a little heart and then get rid of North's last trump(s). And a sensible of doing that is ...
- ... come back to your hand with a spade, leaving North with just ONE trump, and ruff your club.
- Now come back to your hand with a heart and ruff a small heart with dummy's last trump. All good so far. Now to get rid of North's last trump. How to get back to hand for a 3rd time?
- Ruff a diamond. Now a third round of spades and the trumps are cleared.
It only remains to cash your remaining top hearts and hope the opps have none left when you lead your lowly ♥7 at trick 13. And, as you'll see if you check out the whole deal, the hearts were 4-3 and it's 12 tricks to the good guys.
Fast forward
For an effective plan, try to 'play out' in your mind how things might develop as the play goes on. You need to know what you're trying to achieve (here, setting up the hearts and ruffing a club) and as far as possible how you're going to get there (on this hand, working out how to get back to your hand often enough to take your ruffs and finish clearing trumps). And be prepared to adjust your trump-clearing plans if the need arises (in this case, to retain enough trumps in dummy for both of your ruffs)
It can seem daunting for a while, but with a little practice it'll come, and you'll wonder how you got by without making a plan.
On the night
On the posh night, most players were in 4♠ or 5♠, though a couple reached 6♠. Just three pairs made 12 tricks.
In AP, of the five pairs in 4♠, three made 11 tricks and two made 12. One pair somehow ended up in 4♥ instead and made 12 tricks - how I have no idea!
Slam?
You may be wondering whether EW should be in a slam and if so, how they'd get there. If not, skip this bit!
The short answer, I think, is no, they shouldn't, because they're missing two key cards - the ♣A and the ♠K. If West responds to East's opening 1♠ with 4♣ (this is a splinter bid, agreeing spades as trumps and promising a singleton or a void in clubs), East might well be wondering whether a slam might be on (as it limits the club losers to a maximum of one). She just needs to know whether her partner has at least two of the missing keycards, and maybe the ♠Q as well, so will probably bid 4NT - RKC Blackwood. When West responds showing just one keycard, East will sign off in 5♠, as happened at two tables on the posh night.
cj
* When there's an odd number of cards missing in a suit, the odds are that they'll split kindly for you. The chance of the opps' 7 hearts splitting 4-3 is around 62%
|
|
|
|
| Board 02 Wed 20 August 2025 |
Show Detail |
Watching the pips
Sitting West, you have a very nice 2♣ opening (game-forcing, nothing - as it happens! - to do with clubs), but as luck would have it, South shoves her oar in after two passes with a weak 2♦ opening. You could just punt 5♣ (or even 6♣ if you're feeling lucky), but better to X first in case you have a heart fit. North now jumps in with 4♦ no doubt bidding 'to the level of their fit') ... and your partner now bravely bids 4♠ ... What to do?
Well, partner has some points, but she won't have 6 spades (or she would have opened a weak 2♠), so clubs are safer. Again, you can choose between 5♣ and 6♣, but it looks as if you have possible losers in diamonds and spades ... and maybe even the ♣Q ... so 5♣ it is.
The play
Conveniently for you, North leads the 5♣, and dummy's ♣9 draws South's ♣Q. One more round of clubs is sufficient to remove the opps' remaining trumps.
What now?
You're certainly making your contract, but as always it would be nice to get an overtrick. With a potential loser in both diamonds and spades, what's the plan? There are two possibilities:
- One is to hope that North has the ♦A and lead a small diamond towards dummy's King. If it works, you can later discard your small spade loser on the ♦K. The chances are 3-2 against it, as South has 6 diamonds to North's 4.
- The other is to cash your three top hearts, in the hope that the missing hearts are split 3-3. Again, the chances are again against it other things being equal, they'll be 3-3 only 36% of the time, and if South's long in diamonds, North's likely to hold more hearts ...
Leaving aside for the moment the question of which is better, let's say you go for the hearts. Your Ace draws the ♥4 and the ♥10. Then the King, which draws the ♥6 and ♥J. Then your ♥2 to dummy's ♥Q and South shows out. Dammit! They aren't 3-3 North still has a heart! But of course that doesn't matter a jot, if you've been watching the pips. South has played her ♥J and ♥10, so dummy's ♥9 is the master heart: you can safely lead it, discarding your ♠4 or ♦8, North's ♥8 will fall helplessly to the table and you have 12 tricks.
Of course, you really should have started with the diamond option, not the hearts. Why's that? If you're not sure, see * below.
On the night
On the posh night, three pairs were in 6♣, two in 5♣ and one in a measly 4♣, all making 12 tricks. A couple of pairs ended up in 4♥, which also makes 12 thanks to the lucky heart configuration in the opps' hands.
In AP, there were two pairs in 5♣, one in 3♣ and one in 3NT, all making 11 tricks. One NS pair went 4 off in 5♦X for -800 too expensive.
Playing tip When you're clearing a suit like the hearts on this hand, you're keeping a count of who's following suit anyway, so you might as well count the pips at the same time, or you might not realise you've ended up with a winner!
cj
* Why should you try the diamonds first? Because then you get two chances at the extra trick, not just one:
- What happens if you lead your ♦8 towards dummy's ♦K? If North holds the A♦, it's job done she either takes it now or not at all. If not, you've lost a diamond trick. Never mind now you can try the hearts (preferably after banging out most of your trumps in the hope that the opps will discard a heart or two).
- But what happens if you start with the hearts, as we did here? If it works, fine. But if it doesn't work (say North holds ♥Jxxx or ♥10xxx) you end up in dummy. Sure, you can get back to your hand by ruffing a heart, and you can then lead your ♦8 towards dummy's ♦K ... but even if works (and North wins with her ♦A) you then can't get back to dummy to discard your spade loser on the ♦K. North will now lead a spade (she'd be daft to lead a diamond!) and now you've got to make a correct guess to get your overtrick.
|
|
|
|
| Board 14 Wed 13 Aug 2025 |
Show Detail |
X-ray glasses (again)
This is one of those hands that play themselves. First a quick look at the auction:
- West has 12 points, but doesn't have a bid over South's opening 1♥: not the right shape for a X, no 5-card suit to overcall and a whole King short of the required points for a 1NT overcall. So - for the moment - Pass.
- North passes too - less than 6 points there, then.
- East has just enough points and just enough suit quality to keep the auction going with a 1♠ overcall ...
- ... but an undeterred South comes in again with 2♣. Decent hand, then.
- And now a chance for West to show her strength: 2♥ is a UCB * showing a good raise in partner's spades.
- North now chips in with a raise to 3♣, promising 4 clubs but not much else.
- And East, who overcalled on the very minimum possible holding, signs off in 3♠.
North leads the 2♣ against East's 3♠ contract, down goes dummy and it's time for East to plan the play ...
The play
You're in no hurry to play your ♣A. You know both opps have plenty of clubs and what if South has (very unwisely) led away from the ♣KQ? So you play low from dummy, North wins with the ♣Q and switches to the ♦Q. What now?
Well, you can pretty well see both of their hands now, can't you? North, who passed her partner's opening bid, has shown up with two queens already, so can't have any other points, except for maybe the ♦J. Which places the crucial ♠K and the equally crucial ♥AQ with South, giving you a finessing paradise.
- Win with the ♦A and lead your ♠Q from hand, playing low from dummy if South doesn't cover with her ♠K.
- When trumps are cleared, go back to hand with a club ruff or a trump and lead a low heart, finessing the ♥J ...
... and it all works like clockwork, as you'll see if you check out the whole deal. You end up with 10 tricks, having lost just one club, one diamond and one heart. In a way it's a pity you weren't in game, but for goodness' sake you only have half the points and +170 is a pretty good result.
On the night
On the posh night, most contracts were in spades (five in 3♠, one in 2♠ and one in 4♠) mostly making 10 tricks - the 4♠ one only made 9, and one declarer made 11 after the unwise opening lead of A♥. One South went 2 off in 1NT and another 2 off in 3♥X.
In AP, the bidding was more restrained: 2 Easts in 3♠ and two in 2♠ (making 8, 9, 9, and 10 tricks); a couple of NS club contracts going off; and a solitary 1♥ by South, going one off.
cj
* Unassuming cue bid. After an overcall, any direct raise of partner's suit is weak and distributional. To show a sound raise (10+ points) you instead bid the opponent's suit. In our HOTW just a few weeks ago (Showing your strength, 23 July 2025), we saw an UCB by opener's partner to show a good raise. Here, it's the overcaller's partner instead. If the opp has bid two suits, as here, use the first-bid suit for your UCB.
|
|
|
|
| Board 15 Wed 06 August 2025 |
Show Detail |
Pecking (and playing) order
Here's an auction that looks a little odd until you revisit our 'Holy Grail' pecking order list: ideally, find a major fit; failing that, NT; and failing that, settle for a minor.
When partner responds 2♣ to my opening 1♦, I'm pretty certain we haven't got a major fit (unless she's got a very shapely hand and is just showing a 6-card club suit first ...). No trumps, on the other hand, is looking very promising. We've got the minors covered and I've got stops in both majors, so I'm rebidding 2NT. I know partner won't pass, as we're now both committed to game, and if she does have some weird distribution or wants to look for a slam in diamonds or something, she can let me know now.
But with her balanced 10-count, she's just raising me to 3NT. Everybody passes and West leads the ♣2. What's the plan?
Finesses
It's looking good, isn't it? We have at least 5 tricks in diamonds 6, if the finesse works, plus 4 tricks elsewhere in Aces and Kings, so what do we play and when?
The first priority is to set up our main source of tricks diamonds via a diamond finesse from dummy (we will lead the ♦9 so that we can repeat the finesse if it works).
And, as always, we should do that ASAP while we still have stops in all the other suits.
Meanwhile, we have another possible finesse to think about: the one we're being offered at trick one: do we go up with the ♣A or risk finessing the ♣Q, in the hope that West led from Kxx(x)?
Avoiding danger
As always with a finesse, part of the plan is to think about what might happen if it fails. If we try the club finesse and our ♣Q loses to the ♣K, that's OK, isn't it? Well, maybe. They're not going to run us out of clubs just yet, but East might have other ideas. Suppose she wins with the K♣ and switches to a heart? Our weakest suit. We'll have to hold up for a couple of rounds (in the hope of running West out of hearts), then win the Ace and then (finally!) take our diamond finesse ... and if that now loses, you've already lost four tricks, and if West holds the remaining heart, you're one off! *
Instead, let's play it safe. Win the opening lead with the ♣A and finesse your ♦9 immediately, while you still have the hearts stopped.
How does it go? Take a look at the whole deal. It turns out that you could have taken the club finesse after all, as West holds the ♣K. And she holds the ♦K as well, but that doesn't matter, because you're still safe in hearts. And with luck you might still make an overtrick - eg if West is daft enough to cash her ♣K before switching to a heart.
But overtricks aren't everything better to end with a safe 9 tricks than to end up with 8 in the search for 10.
What happened on the night?
Interesting differences in the bidding: in AP, all of the 3NT contracts were by North, suggesting that the bidding went 1♦ 2♣ 3♦ and North having to punt 3NT without a heart stop. On the 'posh' night, by contrast, 6 of the 8 pairs in NT were South as in our auction here. The no of tricks taken varied enormously, from 8 (by one 'posh' declarer), through 9 and 10 to 11 (by one other 'posh' declarer). All the AP players made their contracts.
Only 3 pairs overall ended up in a diamond part-score contract.
cj
* Unlikely, I know with 4 or 5 hearts, West would surely have led a heart to begin with. But you never know ...
|
|
|
|
| Board 09 Wed 30 July 2025 |
Show Detail |
Another day, another NEGATIVE X
Here's one of those (very common!) hands where the two sides are scrapping for a part-score - and which happens to dovetail nicely with our latest BBT * topic: the competitive auction.
With 13 points and a 1-4-4-4 distribution you open 1♦ ** and South overcalls 1♠. Your partner now doubles - what does that mean?
The negative double
It means that she has at least four hearts - and, of course, enough points to respond, say 6 on up. In other words, 'I would have responded 1♥, partner, but the overcall got in the way.'
This is a typical example of the negative double, which has been the subject of many previous HOTWs over the years. It works like this:
If partner opens 1 of a suit and there's an overcall, X by you promises at least four cards in any unbid major.
On this deal, the unbid major is hearts, so partner has at least 4 hearts, together with at least 6 points. At the moment, we don't know exactly how many hearts she has, or how many points - just as if she'd bid 1♥, in fact - but we do know that with a strong (10+) hand and 5 hearts she would have been able to bid 2♥ instead ... so she might be 'weak and 4', 'strong and 4' or 'weak and 5' ... but she's not 'strong and 5'!
So what happens next?
Just to be difficult, North raises her partner to 2♠ ... and it's your bid. What do you say? Well, you've only got 13 points, but they're a very good 13 points, with 3 Aces, and you've got a singleton in their suit, so 3♥ it is.
And now? Well, have a look at the whole deal and decide for yourself. The final contract could be 2♠, 3♥, 3♠, 4♥ or 4♠ ...
As it happens, you're going to make 3♥ and they're going one off in 3♠. Any further is too high (though 4♥ does make if you get really lucky).
The main point of this HOTW, though, is that if you're to find your fit and compete successfully on this deal, you need to use the negative double.
What happened on the night?
On the posh night, a lot of Easts were evidently faint-hearted, as 4 of the 9 tables ended up in 2♠. The other four contracts above came up once each, the highlights being one 4♠X-2 and one 4♥ making!
In AP, the bidding was more restrained: just one table in 2♠ and the other four in 3♥, two making and two going one off.
An expert view
This hand was originally played in an EBU Simultaneous Pairs match a couple of weeks ago. To see what the expert commentator has to say about board 9, you can access the EBU commentary here.
cj
* Basic Bidding Themes These are occasional articles emailed to AP players. The most recent are on dealing with an opponent's overcall (i) when you have a fit with partner and (ii) when you don't, as on this deal. If you'd like a copy of the current one, contact chris@boxbridge.com
** Which suit do you open with 4-4-4-1? The standard Acol method, which works well, is:
- If you have three 4-card suits in a row (ie if your singleton is BLACK, open the middle-ranking of your 3 suits.
- If you don't (ie the singleton is RED), open the suit below the singleton.
|
|
|
|
| Board 06 Wed 23 July 2025 |
Show Detail |
Showing your strength
Here's the makings of a short but perfectly formed auction involving an overcall from the opps. The thing about overcalls is that they're supposed to get in your way, but they can also be turned to your advantage. This is particularly true when the openers have a fit, as here.
Once North has overcalled 1♥ over your partner's 1♦ opener, any direct raise of her diamonds is essentially weak, so that there won't be much difference in point-count between 2♦, 3♦ or even 4♦: the higher raises will simply be more distributional (or, put another way, with fewer losers).
Once you reach the magic point-count of 10, however, your hand counts as stronger - ie at least strong enough for an uninterrupted raise to 3. In that case, instead of making a direct raise you bid the overcaller's suit, using the oddly named unassuming cue bid, or UCB, to show a decent, chunky raise. *
Here, then, you bid 2♥, promising partner at least 4 diamonds and at least 10 points. You're also, incidentally, denying any interest in a major (with 4 spades you would have used the negative double) and you're handily preventing South from raising her partner to the 2 level.
Which is exactly what your partner wants to hear. She has a very nice balanced 17 count with just 4 diamonds, including the ♠AKx and ♥AQx. So if you've got good diamonds plus at least 10 points (which will presumably be mostly in diamonds and clubs), she's going straight to 3NT. Which, as you'll see if you take a look at the whole deal, is the best place to be. **
How might it go?
You have nine tricks off the top - 5 diamonds, 3 spades and one heart - so you're not going off, but you're making at least 10 tricks on the expected heart lead, and if North instead decides to cash her ♣AK you get a 10th trick in clubs instead.
What about 5♦? Even if it makes, it won't score as much as 3NT+1 (just 600 instead of 630), but it doesn't, as you lose two clubs and a heart trick for one off. It's the usual story of NT being a better bet than a minor game.
What happened on the night?
On the posh night, 7 of the 8 EW pairs reached 3NT, all making 10 tricks. The other pair languished in 3♦.
In AP, two pairs reached 3NT, making 10 and 9 tricks. At the other 3 tables, EW played in 3♦ (x2) and 5♦, all making 10 tricks.
Conclusion
Those in 3♦ presumably made a direct raise in diamonds over the heart overcall, showing a weak hand, instead of the UCB, promising 10+ points. The results suggest that the UCB is alive and well amongst our posher members, and it's a weapon well worth adding to your armoury if you want to avoid missing game.
cj
* Here are a couple of useful HOTWs on the subject of the UCB. They can be found here.
- Two kinds of raise (January 2016)
- The UCB (again) (April 2016)
** So what happens here if there isn't a heart overcall? In that case, you would raise directly to 3♦, showing a chunky, 10-point-ish diamond fit with no interest in any other suit. And with her balanced 17-count and the majors well stopped, partner will again convert to 3NT. Which is exactly why we use the UCB after an overcall: I would have raised you to at least the 3-level, partner.
|
|
|
|
| Board 14 Wed 16 July 2025 |
Show Detail |
A spanner in the works
What are your thoughts sitting South when your right-hand opponent opens 1♠? I'm thinking that between us, my partner and I have probably got a decent fit in at least one of the minors - and that the same doubtless applies to the opps in at least one of the majors (though either is going to split badly, as you don't have any to speak of!). So what to do?
You could just overcall 2♦ and then, if they get into a major game, bid 5♣, giving partner a choice of 5♣ and 5♦. Trouble is, 2♦ isn't going to stop them sorting out their major fit.
Another possibility, for those who play the Ghestem * convention, would be to bid 2NT, which promises at least 5-5 in the minors and invites partner to pick the one she prefers. Nothing wrong with that, except that - like 2♦ - it still leaves room for them to negotiate in the majors.
A more pre-emptive option might be to go straight to 5♦. If West has hearts but not spades, she's going to have to show them at the five level. And even if she has spades with her partner, 5♠ might be beyond her comfort zone.
Of course, you're taking a bit of a punt here. If partner is short of diamonds (eminently possible!) and has decent clubs, you'd obviously rather be in clubs. Wouldn't it be nice if you could show both minors and at the same time stop them bidding 4♥ or 4♠, all in one bid? Well, as it happens, you can - but we'll come back to that at the end.
Meanwhile, let's see what happens if you bid 5♦ - take a look at the whole deal.
How might it go?
Well, it turns out that East has a huge 20-count, but chose to open 1♠ instead of 2NT because of her singleton ♦Q.
What is West to say over 5♦? She has loads of hearts, but that's irrelevant, really, because she also has 4 spades. Only 4 points, but at the same time only 6 losers. In her seat I'm saying 5♠ ...
Which brings us to the crucial bit. Does North raise her partner to 6♦? Probably not, because she's flat and weak - though she does have 4 diamonds. But that doesn't stop a frisky South from now bidding 6♣, giving partner a choice of minor suits. And, doubtless with a sinking heart, North will bid 6♦.
And in that case, does East, with all those high cards, now punt 6♠? It's a real nail-biter.
As things lie, EW can make 5♠ but not 6♠ (and 5♥ but not 6♥ - unless played by East, which it won't be). In 6♦ (which will be doubled for penalties!) South can make 10 tricks, but only if West leads her singleton ♣3 for a ruff; if she leads her partner's suit - spades - South can make 11 tricks. So 6♦X will go for -100 or -300, both a great score compared with EW getting 450 for 5♠ making.
What happened on the night?
On the posh night, most of the above possibilities happened: one lucky South was doubled in 5♦ and made it; one lucky East was left in 5♠ and made it; three NS pairs went either 1 or 2 off in 6♦X; and one unlucky East went 1 off in 6♠.
In AP, three EW pairs were allowed to make 4♠ or 4♥, and another made 5♠. One NS pair went 1 off in 6♦X, for an outright top - well bid!
cj
* A couple of recommended HOTWs for the Ghestem convention. Go here and pick the following titles (in the order below)
- Showing a 2-suiter with Ghestem (August 2016)
- An unusual no trump (November 2019)
-
Postscript: an alternative overcall for South
|
| Show Answer |
It's worth knowing that bidding NT is often used to show the minor suits. If there's a situation where a no trump bid can't be natural, then that's what it's likely to mean. It's called the unusual no trump.
Here, South's most preemptive overcall is not 2NT - which we've seen would promise the minors but doesn't put a big enough spanner in the works - but 4NT. Seems odd at first, but when you think about it, it can't be natural, can it? With a strong balanced hand with a spade stop, South would say 3NT, not 4NT.
So what can 4NT mean? Well, it's not natural and it sure ain't Blackwood ... so it must be the unusual no trump, promising both minors and offering partner a choice between 5♣ and 5♦.
The beauty of it that it offers a choice of minors (and North will feel much more comfortable knowing that they have a fit in both minors, not just one) but it also forces EW up beyond 4♠.
It won't come up that often, but when it does it's worth its weight - and will lead you unerringly to 6♦, where you want to end up.
PS For a further example of the unusual NT, this time as an overcall over an opp's 1NT opening, go here and pick Minor Choice (March 2018) |
|
|
|
|
| Board 05 Wed 09 July 2025 |
Show Detail |
Just in case
Here's a situation that comes up time and time again. Your partner opens 1♠ and with 10+ points you're strong enough to show your lowest 4-card suit: 2♦. Your partner now bids 2NT. What do you say now? Why? Pick from the list:
(a) Pass (b) 3♥ (c) 3♠ (d) 3NT
Well, the one thing you mustn't do is pass. Both of you should be aware that you're in a game-forcing situation: your partner's NT rebid promises at least 15 points (she might even have as many as 19 - see below) and your 2♦ response promises at least 10, so you both know that you have at least 25 points between you and therefore should be in game.
OK. What about showing your 4-card major, then? 3♥? Well, you could, but it would be a waste of time, as partner can't have 4 hearts. Why not? Because if she had 5-4 in spades and hearts, she would have rebid 2♥ instead of 2NT. And if she had 4-4 in spades and hearts, she would have opened 1♥ in the first place.
That said, concentrating on possible major fits is always a good idea. So what about 3♠? With only 3 spades, you didn't support spades to start with, but if your partner has 5 spades, which she might well have, she'll want to know that you have 3, as with a spade fit 4♠ is likely to do better than 3NT ...
... which is why 3♠ is a better bid than 3NT: if there's a possible major fit, check it out - don't just give up and go for no trumps.
But what if she passes 3♠? you may ask. Well, she won't, will she? We've just agreed that 1♠ - 2♦ -2NT is a game-forcing sequence on both players.
So you bid 3♠ and, as you'll see if you look at the whole deal, with a 5-card spade suit, partner raises you to 4♠.
What happens?
In 4♠ you're going to lose one heart, one diamond and one club - there are no spade losers, as East's ♠Q drops harmlessly. Contract bid and made.
In no trumps, it's a different story. West will lead her 4th highest club - the ♣6 - and EW will eventually come to 5 tricks - 4 clubs and the ♦K - taking the contract 1 off.
Points to take from this hand
- In this situation, South's 2NT rebid could be anything from 15 to19 points. So many? With 18 or 19 surely she goes straight to 3NT? Well, no. If she's got 5 spades, she'll still want to preserve bidding room just in case her partner has 3 spades. If she goes straight to 3NT you'll never find your spade fit. And because 2NT is game-forcing anyway, there's no danger of missing game.
- A similar situation arises when responder is the one showing a major. Say you have a balanced 18-count with 4 or 5 clubs: you open 1♣, partner responds 1♥ and you rebid 2NT. If partner now bids 3♥, she's saying 'OK, partner, we're in game, but just in case you have 3 hearts, I'm telling you that I've got 5 of them. Please choose between 4♥ and 3NT.'
- All of this is just another manifestation of the bidding system's preference for playing in a major fit if there is one. You haven't got a 4-4 fit, but maybe you have a 5-3 fit. Same old same old - but on this deal it's worth the effort.
What happened on the night?
On the posh night, just 4 of the 9 NS pairs found 4♠, all making 10 or 11 tricks. 4 others were in 3NT, all going off. (Some of these might have been playing a strong {15-17} NT - if South opens 1NT it's harder to find the spade fit). And one somehow stopped in 1NT.
In AP, no one found game at all! Three pairs were in 2♠ or 3♠, all making at least 10 tricks, one was in 2♥ and one was in 2NT. Bid up, guys!
cj
|
|
|
|
| Board 02 Wed 02 July 2025 |
Show Detail |
Take the money
Here's an unusual situation. Sitting West, you've picked up an opening hand with a splendid spade suit ... and after your partner's opening pass, South opens 2NT, showing 20-22 points.
With at least half the points with the opposition, it would be dangerous to punt 3♠, so you pass (if possible without a significant pause), North raises her partner to 3NT ... and after a couple more passes it's your bid again. What do you do? And why?
Well, it's your lead, and with a bit of luck (ie if neither opponent holds ♠Jxxx) you're going to take the first 6 tricks, so it's very tempting to double for penalties. 3NTX-2 vulnerable will earn you a chunky 500 points.
Trouble is, you'll never collect it. Imagine South's hand: a balanced 20-count with not so much as point in spades. It's reasonable for her to expect some of her partner's 5+ points to be in spades, so she's quite happy to be playing in 3NT. But if you X her 3NT contract, it won't take her long to work out that you must have strong spades - why else would you double? - and she'll run for cover. With you holding all those spades, they must have a fit somewhere, and with all those points, they're probably going to make their 4♣ , 4♦ or (heaven forbid!) 4♥, whichever it is. A plus score for them, then, instead of a pretty iron-clad +200 for you.
So pass and take the money. If you go for the pot of gold, you'll end up with nothing.
Where do they go?
Take a look at the whole deal. I think you'll agree that if she's doubled, South will twig what's going on ... and will wriggle to get out of it.
She's got two choices: one is simply to punt 4♥ in the hope that her partner has hearts too. The other is to ask partner to pick a suit, via the little-used Redouble. *. With 5 clubs, North will bid 4♣ and NS will be on their way to +130 instead of -200. Thanks for the tip, opp!
What happened?
On the posh night, 5 out of the 6 pairs went 2 off in 3NT undoubled. The other pair somehow ended up in 3♦ - no, I've no idea how.
In AP, 3 pairs went 2 off in 3NT for -200 and one wriggled into 4♣ for a very nice +130, but the top NS score went to a pair in 2♥! There's no justice.
Nowhere to run to ...
So when should you double for penalties? Answer: when they've nowhere to run to. For instance:
- You've bid to a solid 4♥ after they've overcalled in clubs, and they bid 5♣ as a sacrifice. If you don't think they're going to make it, double. Where can they go?
- They've bid to what they think is a solid 4♥ (eg 1♥ - 3♥ - 4♥) and you're sitting there with 5 good hearts plus a few points (or partner's overcalled on the way). Again, they've nowhere to run to.
But when they're strong enough to find another place to play, as here, keep quiet and take the money.
cj
* If you're happy to play in a doubled contract, you'll usually simply pass and let things roll. This leaves the Redouble. as a way of asking for help: Get me out of here, please partner! Have you got a suit we can run to?
|
|
|
|