| |
- Hand Analysis
- Thursday, 19th September - Did you count to eleven? UPDATED 22/9/2019
- Tuesday, 17th September - Did you forget?
- Tuesday, 17th September - Did you get to the right contract?
- Monday, 16th September - An easy twelve tricks?
- Thursday, 12th September - An easy ten tricks?
- Wednesday, 11th September - Playing 3NT
- Tuesday, 10th September - Did you (or would you) reach the right contract?
- Tuesday, 10th September - A difficult hand for declarer
- Thursday, 5th September - Another useful gadget for your Bidding Armoury!
- Wednesday, 4th September - Sherlock Holmes visits Galway Bridge Centre...
- Tuesday, 3rd September - Did you make the most of your hand?
- Tuesday, 3rd September - What do you bid?
- Monday, 2nd September - Do you have 'Checkback' in your bidding armoury?
- Thursday, 29th August - An unusual suit play...
- Tuesday, 27th August - Did you wrong-side 3NT as declarer OR block the spades as a defender?
- Monday, 26th August - So, you executed a 'Squeeze' but maybe didn't realise it!
- Thursday, 22nd August - What a difference the opening lead makes!
- Wednesday, 21st August - So, have you a choice?
- Tuesday, 20th August - So, how would you play 1NT as North on the lead of a small club?
- Monday, 19th August - A no-hope contract...but did you give it your best shot?
- Thursday, 15th August - A flat board...Anyone for eleven (or even twelve!) tricks and a top?
- Wednesday, 14th August - Making 11 tricks on Board #16
- Tuesday, 13th August - Can you show 5 spades and 4 hearts opposite partner's opening 2NT?
- Monday, 12th August - An uppercut missed by the defense?
- Thursday, 8th August - Did you miss the Safety Play?
- Wednesday, 7th August - So, how to make 12 tricks on this board?
- Tuesday, 6th August - An interesting declarer play that arises from time to time
- Monday, 5th August - Did you listen to the bidding?
- Tuesday, 30th July - Planning ahead...
- Tuesday, 30th July - What a beauty...a trump promotion.
- Monday, 29th July - What a beautifully simple play...if only declarer could see it!
- Thursday, 25th July - A couple of hurdles for declarer to clear. Did you get caught?
- Wednesday, 24th July - Count to twelve... and two ways to do it!
- Tuesday, 23rd July - Do you know how to play unusual suit combinations?
- Monday, 22nd July - A time to duck...and a time to rise!
- Thursday, 18th July - What card do you play at trick one?
- Wednesday, 17th July - Planning ahead is really important...
- Tuesday, 16th July - Making nine tricks in spades...
- Thursday, 11th July - A simple 3NT? Not quite....
- Tuesday, 2nd July - Anyone for 13 tricks in 6S?
- Monday, 1st July - Are you happy to play 2S or do you prefer to make a game try?
- Thursday, 27th June - Did you, or would you, make 12 tricks?
|
| |
 Hand Analysis Hand Analysis |
Analysis of hands from Summer Club 2019.
Study the hand and read the introductory text before clicking on the 'Show Answer' button.
Hands are listed in chronological order with most recent at top of the list.
NOTE: If hand details are not shown click the 'Show detail' button at top of the relevant window.
Also, be advised that additional hands are being analysed and uploaded from EARLIER in the season, and will, initially at least, feature at the bottom of the list.
|
|
|
|
|
|
| Thursday, 19th September - Did you count to eleven? UPDATED 22/9/2019 |
Show Detail |
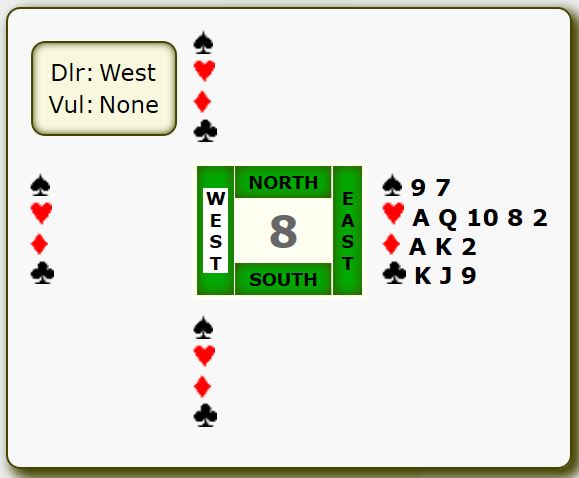
As West you find yourself declaring 4♠.
Study thew E/W hands above and, depending on the opening lead, plan your line(s) of play.
Click the Show Answer button below for an analysis.
|
| Show Answer |
If there is one thing that I have always counselled, time and time again, it is the absolute necessity of declarer pausing for thought when dummy is tabled and planning the play of the hand.
Board #14 is a case a classic illustration of this important aspect of declarer play.
As West you find yourself in 4♠
North will lead any suit except a trump!
Dummy is tabled and declarer assesses his chances and plans a line of play.
At first glance it would appear to be a simple hand to play. Declarer can count on six spades tricks (assuming trumps break 2-1/1-2, 1 x heart, 1 x club, and two club ruffs in dummy. A tidy ten tricks.
If the opponents haven't cashed their two top diamonds early in the defense there is even a chance for eleven or twelve trick or perhaps thirteen tricks. If the defenders have cashed their top diamonds then declarer will be restricted to eleven tricks....or maybe less!
So, win at the first opportunity. Note it could be unwise to finesse in hearts becasue defenders might win a trick with the ♥ K and then cash two top diamonds. And if the spades break 3-0/0-3 (unlikely but possible!) t...trmups break 3-0! You now have a trump loser which can be added to the two diamond losers. You cannot afford to lose any other trick.
So, how to proceed?
You are still in control and the contract is still 100% guaranteed (as long as South holds at least three clubs) and as long as you do not MISPLAY from this point!
You will still score 5 trumps in hand, ♥ A, ♣ A, and three club ruffs in dummy. That still comes to ten tricks.
BUT, you cannot afford South to gain the lead because then a spade continuation will limit the club ruffs in dummy to two thus leaving you short a trick for your contract unless you have established an extra heart winner in dummy.
Best to start by cashing ♣ A if not already played, and then ruff a club in dummy. Return to hand with a heart ruff and ruff another club in dummy. The contract is now safe EVEN IF South has no more clubs. Ruff another heart in hand and then lead the fourth, and last club, from hand and ruff with dummy's last trump.
Even if South overuffs, declarer will still secure ten tricks either via six trumps in hand, two aces in dummy, and two club ruffs OR five trumps in hand, 2 aces in dummy, and three club ruffs in dummy.
Note that once the spades break badly declarer needs South (the hand with the three trumps) to hold at least three clubs. If that is so then declare can safely ruff two clubs in dummy and can then ruff the third club and it matters not whether South overruffs or not!
It should also be pointed out that there are other layouts where the contract could make on a different line of play. If, for example, South holds only two clubs then the above line would fail whereas if South holds the ♥ K a ruffing finesse would establish dummy's ♥ J for a club discard.. HOWEVER, that line could fail if South holds only one heart (and not the ♥ K) becasue on the second heart South could discard a club and might subsequently be able to overruff dummy and return a trump thus restricting declarer to two club ruffs leaving him with a club loser in hand! Note that finessing the heart (either a straight finesse or a 'ruffing finesse') is a guess and only offers a 50% chance of success.
And of course declarer's approach can be dictated by the opening lead. If N/S fail to cash their two top diamonds declarer can use a 'loser on loser' play to discard a losing diamond from hand while establishing a heart winner. Note that this needs to be done 'safely'...,i.e. cash ♥ A and then lead ♥ Q and discard a losing diamond from hand if South fails to cover. Taking the heart finesse could see declarer lose three tricks in the red suits via a heart and two diamonds! Using the 'loser on loser' play limits the potential losers to two tricks...a heart and a diamond. In fact this play should be considered if the defense have not cashed diamond winners at the start of play. It will succeed wherever the defenders hearts break 4-3/3-4 or 5-2/2-5, i.e. 92.7%
Also, declarer's plan to ruff clubs in dummy will succeed where the outstanding clubs break 5-3/3-5, or 4-4, i.e. 79.8% Note that cashing two trumps before ruffing clubs would be fatal to this line of play.
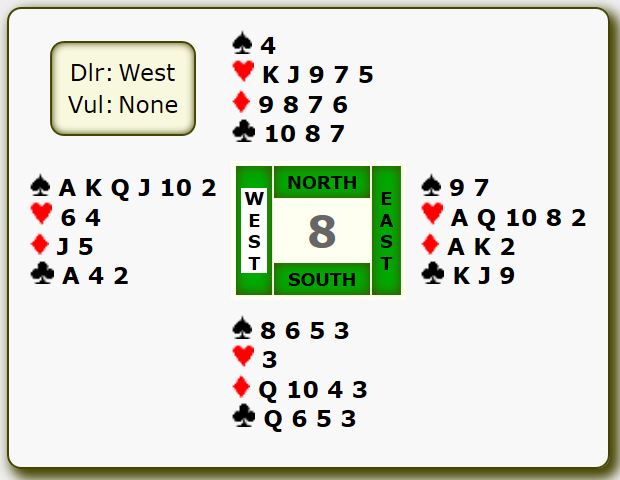
The full hand was:
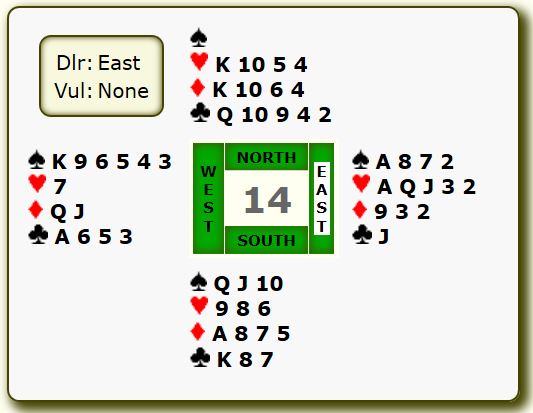
In summary:
a) If opponents cash two diamonds and continue the suit declarer can ruff in hand, cash ♣ A and ruff a club in dummy and then cash ♠ A and upon getting the bad news declarer will get to hand with a heart ruff and ruff a second club in dummy. Declarer can then ruff another heart in hand and proceed to ruff a third (and last ) club in dummy. This line will work when South holds three hearts and three clubs. Note that if South ruffs in then declarer should overruff and proceed as before. If declarer fails to overruff South could continue with a second round of trumps denying declarer of a subsequent club ruff in dummy.
b) If defenders fail to cash two top diamonds then declarer can afford to cash two trumps and take the ruffing finesse in hearts, discarding a losing diamond from hand. Declarer can then ruff two clubs in dummy and can also take a club discard from hand on dummy's established ♥ J. |
|
|
|
|
|
|
| Tuesday, 17th September - Did you forget? |
Show Detail |
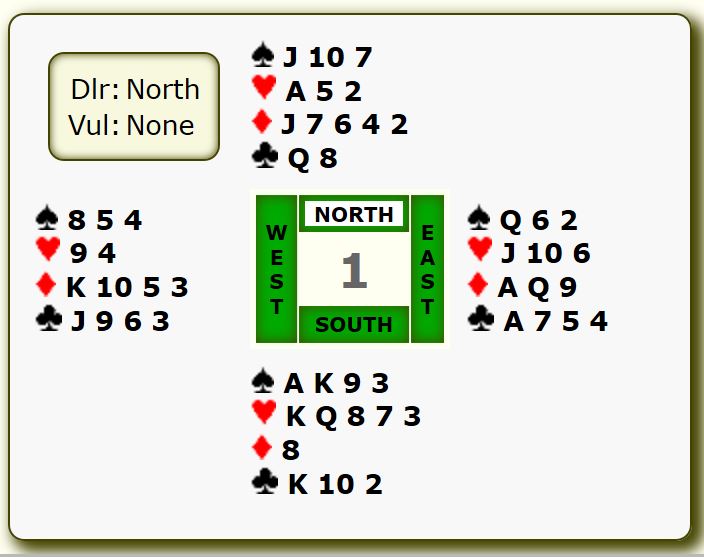
You find yourself as South declaring a heart contract after East has opened the bidding with a weak 1NT (12-14hcp) or 1♣ (12+ hcp)
Study the two hands above and work out you plan as to how to play the hand.
Click the Show Answer button below for an analysis.
|
| Show Answer |
Another interesting hand. East will probably open the bidding with 1NT (12-14hcp) or 1♣.
As South you decide to enter the fray! The only question is what do you bid?
A check of the travelling scoe sheeet suggests that the majority of Souths bid 2♥ and that was the final contract at seven tables. Two others bid on to the heart game...and two pairs played in NT.
Interestingly, all heart contracts, except one, were declareed by South. The one exception saw North as declarer, presumably where South's initial bid showed both majors!
Okay, bidding over... And now for the play. Of the nine tables where declarer played in hearts, only four made eleven tricks. Five others came up short and only made ten tricks.
How so?
Eye off the ball at five tables!
Declarer starts with five heart tricks, 2 spades, and perforce, one club trick.
A ninth trick can be secured by ruffing South's third club in the North hand. And of course this is unnecessary if the opening lead, by West, is a club which can run to South's ♣ K102 thus giving declarer two club tricks. BUT, if a club is not led then declarer should create a second trick via a ruff.
If a diamond is led then declarer can ruff the 2nd round and proceed to ruff South's third club in the North hand.
If the defense starts with a trump then again declarer should negotiate a ruff of the third club in the North hand before drawing even a second round of trumps.
The same applies if the defense start with a spade.
So, primary objective is to ruff South's third club in the North hand. Clearly this must be done BEFORE declarer draws trumps.
BUT, generating the club ruff only brings the total to nine tricks.
The tenth and eleventh tricks come from the spade suit because of the fortuitous lie of the ♠ Q in the East hand.
And this is where declarer must be careful...
After engineering the ruff of the third club declarer should cash two top hearts ENDING in the North hand, i.e. cash ♥ K (or ♥ Q) and then play a second heart to North's ♥ A.
Now declarer is in the right hand to play the first round of spade by leading ♠ J and letting it run if East plays low. If this wins then declarer can lead North's ♠ 7 intending to finesse the ♠ 9 in the South hand if East again plays low.
Note that it could be a mistake to lead the ♠ 10 after the finesse of the ♠ J wins becasue then you might be stuck in dummy and if you play a thirds spade one defender may ruff if the spades were originally divided 4-2/2-4 and the hand with the doubleton spade also held an outstanding trump!
South then draws the remaining trump(s) and claims eleven tricks.
Did you forget either of the following:
1) ruff South's third club in the North hand.
2) finesse the spade BEFORE drawing all outstanding trumps.
A well planned route to eleven tricks. As always, thinking ahead is the key to successful declarer play.
This was the full hand:
|
|
|
|
|
|
|
| Tuesday, 17th September - Did you get to the right contract? |
Show Detail |
Did you get to the right contract? Study the West hand and decide what you would do at your second opportunity to bid.
Click on the Show Answer button below to read a review of the hand.
|
| Show Answer |
This is a fairly common situation. You hold two four-card major suits and enough high-card points for game opposite partner's re-bid of 2NT which shows 17-18 hcp.
Opener is denying four-card heart support with his re-bid of 2NT.
But could he have four spades?
Yes, opener could be holding four spades. But if he bid spades having opened 1♣ he would be suggesting a five card (or longer club suit). With only four spades he re-bids NT, as in this instance.
So, how can w show our four card spade suit?
Simple...just bid it! Yes, bid 3♠ over partner's re-bid of 2NT. This promises four spades and does NOT show extra heart length. In other words we are showing 4♠ / 4♥ and enough points for game.
Partner will then either bid 3NT or 4♠. It's that simple.
On Tuesday evening only three of eleven pairs played a spade contract. One pair ended up in hearts and the remaining seven pairs played in NT.
Note that in NT declarer can be restricted to 9 tricks (East) or 10 tricks (West). The difference in tricks that can be made comes from the effect of a diamond lead from South or North respectively. Check it out!
BUT, in a spade contract declarer can make eleven tricks on any lead, from either defender!
This was the full hand:
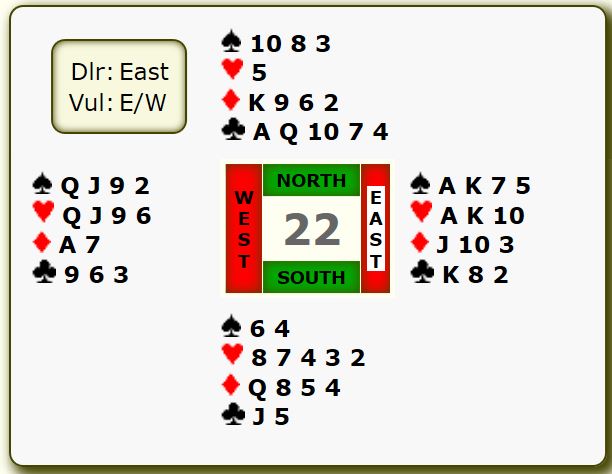
The play is easy. Win at the first opportunity, draw three rounds of trumps, cash four heart tricks discarding a club from the East hand and then lead a club towards dummy's ♣ K.
Subsequently you can ruff a diamond with the last trump in the West hand and a club can be ruffed with the last trump in the East hand.
That comes to 11 tricks... 3 spades, 4 hearts, 1 diamond, 1 club, and two ruffs. |
|
|
|
|
|
|
| Monday, 16th September - An easy twelve tricks? |
Show Detail |
This was a very interesting hand that presented declarer with an opportunity to execute a special play!
Most N/S partnerships ended up in 3NT but four settled for a club contract.
Study the N/S hands above and plan your play to score twelve tricks in a club contract.
Click the Show Answer button below for an analysis of the hand.
|
| Show Answer |
Four N/S partnerships played this hand with clubs as trumps of which one pair played in 3♣ and two others in 5♣. One pair bid to the optimum spot of ♣ but sadly failed to make the small slam. In fact two declarers made 11 tricks and the other two made 12 tricks.
All should have made twelve tricks...
Early in one's bridge career one learns about the 'finesse'...it seems so magical when it succeeds, as it will usually do approximately 50% of the times we deploy it!
Experienced players try and AVOID taking a finesse if there is a better option and this hand offered such an opportunity. The problem is to recognise it...and then take advantage.
So, what are we looking for? We are looking for an 'Endplay', a play which allows us to concede a trick to a defender who is then forced to make a return that will gift declarer a trick that he might not have been able to score for himself.
Let's look at this hand in more detail.
In this hand, with clubs as trumps, we can count 6 club tricks, 3 heart tricks, 1 spade trick, and 1 diamond trick. This total eleven tricks.
A twelfth trick could come from a successful diamond finesse... a 50% chance.
BUT, is there a better, GUARANTEED option?
Yes, there is.
Let's assume East leads ♠ K.
Win the opening lead. Cash ♣ K (in case West holds all three missing clubs). Play a second club to North's ♣ A.
Now play a heart to South's ♥ A.
Ruff a spade in the North hand and cash the ♥ K followed by ♥ Q on which you discard South's last spade.
At this point we can recap as follows:
- Opponents trumps have been drawn while we still have two in the South hand and three in the North hand.
- We have no hearts in either the North or South hands
- We have no spades in the North or South hands.
This is the N/S position at this point (remember clubs are trumps):
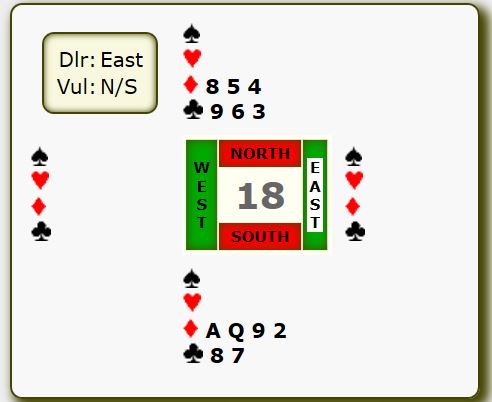
No, you can't see the defenders cards... but then it doesn't matter! That's the beauty about this play.
At this stage, many less experienced players (and perhaps some that are more experienced!) would lead a diamond from the North hand and finesse the ♦ Q when East follows with any card other than the ♦ K...and fifty times in a hundred the ♦ Q will win and declarer will end up with twelve tricks. BUT, fifty times in a hundred the ♦ Q will be beaten by West's ♦ K.
So, how can we improve on that?
Simple...study the diamonds that you can see in the North and South hands and note the important ones that the defenders are holding.
The misising diamonds that are significcant are: ♦ K, ♦ J, ♦ 10. The others are irrelevant.
Now let's note the diamond holding in the South hand: ♦ A Q 9 (the ♦ 2 is not relevant in this situation).
Let's say that you lead the ♦ 4 from the North hand and East follows with ♦ 3...
Resist the urge to 'finesse' the ♦ Q and simply cover East's diamond with South's ♦ 9.
Either the ♦ 9 will win (unlikely) or West will win the trick with ♦ K, ♦ J, or ♦ 10. If West wins with ♦ K then South's ♦ Q is established as a winner. BUT, if West wins with either the ♦ J or ♦ 10 he is now 'Endplayed' and must concede a winner to N/S on the next trick. Why so? Because either West returns a diamond into South's ♦ A Q or else must concede a 'Ruff and Discard' i.e. play a heart or spade on which declarer will discard a small diamond from the North hand and ruff in the South hand. North then has a single diamond while South has the ♦ A.
Note the important elements to this guaranteed situation are the following:
1) Opponents must be 'stripped' of their trumps and the other two suits must be eliminated (in this case spades and hearts) either by removing all cards in these suits from the defender OR playing the suits so that dummy and declarer have none left.
2) Declarer and dummy must have at least one trump in each hand. [Note: There are other endplay situations where this requirement may not apply.]
3) Declarer and dummy must have a holding in the fourth suit with which one opponent can be forced to win a trick and leave him/her with an option of returning the suit (to declarer's advantage) or concede a ruff and discard.
Okay, so you have got the hang of this 'endplay' technique and you now wonder what will happen if East plays the ♦ J or ♦ 10 on the first round. This is where the ♦ 9 comes in to play... You cover East's honour with the ♦ Q from the South hand and once again West is endplayed because now West will have to return a diamond into South's ♦ A 9 where there is only the ♦ J OR ♦ 10 outstanding...or concede a ruff and discard.
Sometimes, when you don't hold the ♦ 9 (or 9 in whatever is the fourth suit) you might still be able to effect an 'endplay' if East is asleep and fails to insert the ♦ J, ♦ 10 or ♦ 9 to PROTECT his partner from beng endplayed.
Note that there is another combination that can also be used: AJ10 in one hand or AJx opposite 109x or variations on a theme.
Keep your eyes open for situations that offer a possible endplay as opposed to relying on a finesse.
This was the full hand:
Note that the twelve tricks cannot be made by taking a first round diamond finesse. In this case the twelfth trick can also be generated form a slightly different endplay. Cash the ♦ A and then lead towards South's ♦ Q. This only works in this case because West holds a doubleton diamond and hence cannot return one and must concede a ruff and discard. |
|
|
|
|
|
|
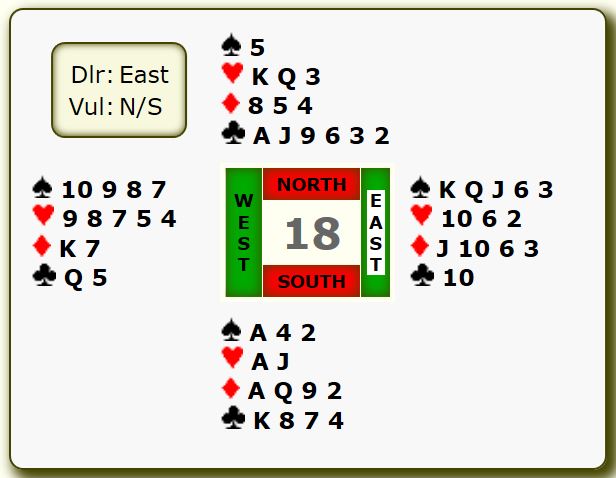
| Thursday, 12th September - An easy ten tricks? |
Show Detail |
As East you find yourself in a heart contract after North has opened the bidding, probably with 1♦ or maybe a Strong NT.
Study the hand and work out a plan before clicking on the Show Answer button below.
|
| Show Answer |
As East you find yourself in a heart contract after North has opened the bidding, probab;ly with 1♦ or maybe a Strong NT.
You bid hearts and duly reach 3♥ or 4♥ or ideally 3♥ x.
This is a sound contract...it's not often that you start with eight top tricks and clear lines for a ninth and even a tenth!
Note that the biddign already earmarks North with the bulk of the defenders high card point.
A diamond lead from South at trick one hands you your ninth trick irrespective of whether or not North covers with ♦ Q.
Also, any lead other than a trump hands declarer a clear route to a tenth trick...ruffing a club in dummy. BUT, note that the club ruff should be negotiated BEFORE drawing any trumps. So, win the diamond lead and play a club, from either hand. Regain the lead at earliest opportunity and play a second club.
Regain the lead again, cash ♥ Q and if both opponents follow suit then ruff your last club with dunmmy's ♥ K (its safe to do so because you have alreday identified that trumps ar no worse than 3-1/1-3)
NOW you must be extra careful to take the diamond finesse (this is your last tme in dummy!!!) if the third diamond winner has not previously been established. Otherwise draw trumps and claim ten tricks!
A spade lead by South at trick one is also not a problem. Finessing the ♠ 9 in dummy forces north to win with ♠ K adn leaves him with nothing to do other than return a turmp into dummy's ♥ K82 thus providing declarer with TWO entries to dummy via the ♥ K and ♥ 8. (try it if you're not sure about this...put the heart suit on kitchen table as per layout and check it out for yourself!). This gives you TWO options:
1) ruff out north's remainign spade honour
2) lead twice towards ♣ Q97 in order to establish ♣ Q as a winner
An initial club lead by South also permits declarer to subsequently lead towards his ♣ Q97 to establish ♣ Q as a winner.
A trumpo lead might seem to be the best for the defense but it also can be countered by declarer. Win trump in hand and finesse ♠ 9. North wins with ♠ K but is endplayed as before. A diamond switch can be let run to dummy's ♦ J. A trumps switch ultimately creates a second trump entry to dummy ...and a club switch eventually establishes declarere's ♣ Q as a winner.
So, all roads lead to victory. BUT remember that if the third diamond trick has not already been established, then the diamond finesse must be taken before using up dummy's last entry!!!
ALWAYS THINK AHEAD...
The full hand was:
|
|
|
|
|
|
|
| Wednesday, 11th September - Playing 3NT |
Show Detail |
How many tricks did you make (or would you have made) on this hand.
Study the hand above and declare 3NT by East on the lead of ♠5.
Give some thought to your plan before clicking the Show Answer button belwo
|
| Show Answer |
As East you reach 3NT after partner responded 1♥ to your opening bid of 1♣.
South will probably lead a small spade (the correct lead from four small cards is the second highest. This is so that partner can differentiate it from a lead from four cards heade by an honour!).
After assessing dummy and forming a plan you will play low from dummy and North is likely to play the ♠ Q although he should probably withold it if he can correctly identify partner's lead. Declarer might subsequently mis-read the spade layout and finesse into North, although it is not likely on this hand!
You win the opening lead in hand. What next?
You can count 4 spades and 2 diamonds on top and can force three additional tricks by way of 1 heart and 2 clubs. Also, you may be able to manufacture some extra tricks via the heart suit if you can find the ♥ J. You have a two-way finesse against the ♥ J, playing either South or North for the missing card. However entries to dummy are in short supply which might dictate playing South for the ♥ J.
There are several lines that declarer could pursue. Playing T/4 I might be persuaded to establish a quick trick in hearts before switching to clubs for the extra two tricks necessary to guarantee nine tricks and my contract.
But Pairs play is a different form of the game.
Note that a diamond lead could have been more problematic. And indeed a diamond switch could still prove to be a problem, particluarly if we were to misguess the location of the ♥ J.
Note how useful it would be to know which defender holds the ♦ Q. If North then it means we could finesse hearts into North who would not be able to switch to a diamond withour giving a trick to dummy's ♦ J. On the other hand, if we think South has the ♦ J then it would be in our interest to finesse a heart into the South hand who could also not switch to a diamond without giving a trick to dummy's ♦ J.
I am tempted to suggest running the ♥ 9 into the North hand and hope that if North holds the ♥ J that he continues the spade attack which will give me the tempo to continue hearts and establish two winners in the suit WHILST still holding TWO entries in dummy via ♠ K and ♣ Q104. Note that there is a definite entry via ♣ Q104 opposite ♣ KJ6 as long as you are caerful how you play the clubs from both hands! On the other hand perhaps South does hold the ♥ J in which caase I can establish three hearts tricks and will then be in a posiiton to establish two club tricks giving me a total of eleven tricks!
So, run the ♥ 9 at trick two and if it wins then continue with ♥ 7 adn repeat the finesse. As it turns out N/S are powerless adn we should be able to make eleven tricks by forcing out the ♥ A and ♣ A in that order.
Note the imprtance of establishing the heart winners before playing on clubs. If you play on clubs first you might establish the thirteenth club as a winner for the opponents BEFORE you have removed their ♥ A which might be the entry they need to cash the last club!
Timing is crucial in declarer play (and defense!). |
|
|
|
|
|
|
| Tuesday, 10th September - Did you (or would you) reach the right contract? |
Show Detail |
You hold the West hand above. Partner opens 2NT (20-22) or rebids 2NT after opening with a strong 2♣ or 2♦, showing 21-22 hcp.
Opponents pass throughout.
What do you do facing this bidding from partner?
Study the hand, contemplate your options, and decide your course of action before clicking on the Show Answer button below.
|
| Show Answer |
You are going to proceed to game but the question is...Which Game?
At eight tables the final contract was NT with seven declarers in 3NT and one in 4NT. All failed, making either 5, 6, 7 or 8 tricks.
One declarer ended up in 2♦ making exactly eight tricks.
Three declarers reached 4♥ making 9, 10 and 11 tricks respectively.
So, how should the hand be bid?
Once the decison is made to move onwards from 2NT it is simply a case of exploring the options and reaching the best contract.
This is not a decison that can be made unilaterally by either East or West. It requires an exchange of information between both partners in order to arrive at the optimum contract.
East has already started the process by showing his high-card strength. Now it's West's turn to show his shape and for East/West to explore possible major suit game options. Clearly the final contract is liklely to be 3NT, 4♥, or 4♠.
West needs to convey his shape and East needs to confirm a fit for hearts or spades or neither.
A lot depends on the 'conventions' that you play as to how you proceed.
Playing Transfers, West can bid 3♦ promising 5+ hearts. In most cases East will bid 3♥ and now West can bid 3♠ showing his second major. East can then choose from the three options and will then bid the appropriate game.
If not playing Transfers, West can simply bid 3♥, natural and forcing. East will then raise to game with 3+ hearts or can bid 3♠ with four+ cards in the suit or else bid 3NT.
A third option might be to use 3♣ as an enquiry for East to show his major suits. Over a 3♥ or 3♠ response by East, West can then raise to game. If East does not have a major it is important for him to bid 3♦ and NOT 3NT so that West can then show a five card major, in this case by bidding 3♥.
Note that partnerships that use 3♣ as a Baron enquiry for bidding 'suits' up the line could face a problem if East's only 4+ card suit is clubs because then they will respond 3NT thus missing out on the potential 5-3 heart fit. Better to use 'Transfers' or natural bidding in this case.
In all instances 4♥ should be reached. Note that this is the only makeable game.
A particular holding that can pose problems to bid opposite a 2NT opening is 5♠ / 4♥. One solution is to use the direct bid of 3♠ opposite a 2NT opening to show this specific nine card holding.
|
|
|
|
|
|
|
| Tuesday, 10th September - A difficult hand for declarer |
Show Detail |
A crucial, if not THE crucial, point in the play of a hand occurs when dummy is tabled. Many failed contracts can be traced back to lack of planning on the part of declarer. It is absolutely vital that declarere forms a plan as to how he will approach the play of the hand BEFORE playing a card from dummy at trick one.
This hand is a classsic example of that requirement.
As West you are declarer in a contract of 3NT. North leads the ♠3 and dummy is placed on the table.
What is your plan to score nine triakcs?
Give it some thought before hclicking on the Show Answer button below.
|
| Show Answer |
Wow! We have only five top tricks... 1 x spade, 2 x hearts, 1 x diamond, 1 x club.
From where will we gather an additional four tricks?
This is a tough one...but let's start looking at the options.
Diamond suit: The diamond suit offers one top trick (♦ A) but with a possibility of a total of two tricks (an extra one coming from ♦ Q or ♦ J), or possibly 3 tricks, or even, in one very specific layout, four tricks! This last possibility has a success chance of only 1.21%. But more of the probabilities in a little while.
Heart Suit: Hearts offer two top tricks and a chance of a third. Not a great chance, but a chance if the suit breaks 3-3, or certain other laypouts, e.g. one defender holding a doubleton ♥ QJ, ♥ Q10, ♥ J10 or a singleton honour ♥ Q, ♥ J, ♥ 10. As I said, not a great chance...but a chance nonetheless.
Club suit: Perhaps the best chance for ONE extra trick lies with the club suit. All we need is for the missing club honours (♣ K and ♣ Q) to be split between the two defenders OR for North to hold both of these cards.
Spade suit: And lastly there is the hope that we can make an extra trick in the spade suit. This looks like a possible source of an extra trick but we may need to guess right!
So, what are the odds in each case?
Clubs: The club suit offers approx. a 76% chance of a second trick in addition to the ♣ A. This comes about from a repeated finesse with the probability of North holding one honour, e.g. ♣ K, at 50%. Also, where North does NOT hold, e.g. ♣ K, there is the additional probability (again 50%) that he will hold the other honour, i.e. ♣ Q. This amounts to a total probability of approx. 76% that North will hold either the ♣ K or ♣ Q or both. Good odds.
Diamonds: In this case we hope that the finesse works ...BUT NOT the finesse that most players would pursue, i.e. leading ♦ Q or ♦ J and hoping that North holds ♦ K. NO, rather we hope that South holds the ♦ K in which case we can make three tricks in the suit by leading TOWARDS the ♦ QJ73 in which casae we will score both ♦ Q and ♦ J in addition to the ♦ A. This line starts with aprobability of 50% (where South DOES hold the ♦ K and is then supplemented, in the other 50 cases in a 100 where North holds the ♦ K, when the diamonds break 3-3. In reality this gives a 72.04% probability of scoring three diamond tricks. Also, there is a highly unlikley, but not impossible 1.21% chance of scoring FOUR tricks in a very specific layout. Can you work out what that layout needs to be? See bottom of page.
Hearts: Chances for an extra trick in thus suit are not as good. Basically we can manufacture an extra trick (there is never a chance of four tricks in this suit) where the suit breaks 3-3 OR where South holds a doubleton ♥ QJ, or ♥ Q10, or ♥J10 or a singleton ♥ Q, or ♥ J, or ♥ 10. These odds come to 42.23%. Not as good as with the two minor suits but a possibility nonetheless. Also, these options are dependent on CORRECTLY deciding whether South holds the singleton or doubleton honour! Some good card-reading needed to arrive at the correct decision! Note that the scoring of the third trick comes via dummy's ♥ 9. Put the heart suit on the table and then play the various combinations where South holds either a singleton or doubleton honour and note how different plays are required to produce the third trick!
Spades: We have a guaranteed trick with ♠ A and good chances for a second trick. In fact there is also a chance(s) for THREE tricks in the suit. Can you spot the layouts which would deliver three tricks? If not check them out at bottom of the page. Basically we hope that we will make an extra trick with dummy's ♠ Q or ♠ 10 or even with the ♠ 8 (or ♠ 7) in hand. We will be very unfortunate if South holds the ♠ KJ9(xx). The spark of hope comes from North's lead of ♠ 3 suggesting a suit of three or more cards headed by an honour (or two). But we have to make a decision. If North holds both of the missing honours then it doesn't matter what we do because even if South produces the ♠ 9 at trick one we can win with ♠ A and will subsequently score a trick with dummy's ♠ Q as long as we play North to hold the ♠ K. Problems arise where North holds only one of the missing honours and where South has the other. Now we have to make the right decision as to which honour South holds. If in doubt, put the spade suit on the table as per the layout shown in the full hand displayed at bottom of this page. Now change South's spade honour and note the guess that we are faced with. Does South hold the ♠ K or the ♠ J which will determine whether we play the ♠ Q or ♠ 10 from dummy!
HOW TO PLAY THE HAND?
Clearly the odds suggest that we should play on diamonds and clubs for the extra tricks to make the contract We will assume that we will negotiate the spade suit for one extra trick thus leaving us to score three extra tricks from diamonds and clubs. Let's tackle diamonds first.
Win the opening lead (more of this anon!) and lead ♦ 2 to dummy's ♦ A and return the ♦ 3 towards our ♦ QJ7, playing the ♦ Q if South follows with a low diamond. If North wins with ♦ K and returns a spade (N.B. did you note the first and second spades played by North which suggest a five card suit?) rise with dummy's ♠ Q and if it wins then lead a diamond to ♦ J in hand. Note that it might be advantageous NOT to cash the fourth diamond at this point. More about this below.
NOW, you need only one extra trick whcih could come from either clubs or hearts. The odds outlined above CLEARLY show which option you should pursue. You start the club suit by leading ♣ J and finesse into South if North plays low. If South wins and returns a spade (unlikely given that North seems to have led from a five card suit) then North will cash two spades in addition to the defenders diamond and club winners. But this will leave you in good position to subsequently repeat the club finesse for a second trick in the suit and nine tricks in total. As it turns out, South cannot play a third spade and must either return a club (handing you your ninth tricks) or play on hearts.
If South switches to a heart and if you are confident that he doesn't have a third spade, you MIGHT be able to duck a heart as long as North cannot win the trick and cash his spade winners. This would be a big plus to your final plays of the hand. Why? Because if you can duck the heart switch then you can win the second heart with dummy's ♥ K and then play a heart to ♥ A in hand. If hearts have proved to be 3-3 then your ninth trick, ♥ 9 in dummy, is now established. Now you can cash your fourth diamond, and if hearts didn't break then you can discard dummy's losing heart and subsequently take the second club finesse.
This was not an easy hand to play. It required assessing in which suits the extra tricks could be established and then implementing a sequence of plays in the right order to give you the best chance of making the contract.
Defensive Note: North could have thrown a spanner in the works by ducking the second round of diamonds. Declarer would now face the decision as to how to proceeed. If South started with four diamonds then declarer neeeds to lead the third rond from dummy towards his ♦ J7. Obviously we can see that the diamonds are breaking 3-3 but declarer is not equipped with x-ray vision!
How to make FOUR diamond tricks:
To score FOUR tricks it is necessary for North to hold a singleton ♦ K in which case South holds ♦ 109654 and after North's ♦ K falls declarer can repeatedly finesse against South's holding to eventually score the ♦8 in addition to the ♦ A, ♦ Q and ♦ J. Four tricks. Note this does NOT work if South holds the singleton ♦ K. North will then always score the fourth trick in the suit.
Trick one: We have seen what might happen if we are forced to win the opening lead in hand and play a diamond to dummy's ♦ A and a second diamond to ♦ Q in hand... North can make life awkward if he ducks the second diamond. As outlined above, we don't know if diamonds ARE breaking 3-3 or if South holds four headed by ♦ K in which case we need to play a third diamond from dummy through South's ♦ Kx and towards our ♦ J7. To do that we need to get to dummy (♥ K) and then leads the third diamond. The problem with this line is that South could win the third diamond and continue hearts setting up tricks for the defense before clubs have been broached by declarer. One solution to this is to win the opening lead with dummy's ♠ Q (hoping that North has leed from ♠ K) and then play a small diamond towards dummy's ♦ QJ73. If ♦ Q wins then we can play a second diamond to dummy's ♦ A and a third round towards dummy's ♦ J7....and our heart honours are still intact!
How to make THREE spade tricks:
If North has led from ♠ J9xxx then South holds ♠ Kx. If he plays low on the opening lead declarer will win with ♠ 8 and South's ♠ K will drop on declarer's ♠ A on the second round of the suit thus leaving ♠ Q in dummy as declarer's third spade trick. Alternatively, if South plays ♠ K at trick one then declarer can win with ♠ A and subsequently finesse dummy's ♠ 10 on the second round of the suit, again scoring three spade tricks. Food for thought!
And the full hand:
|
|
|
|
|
|
|
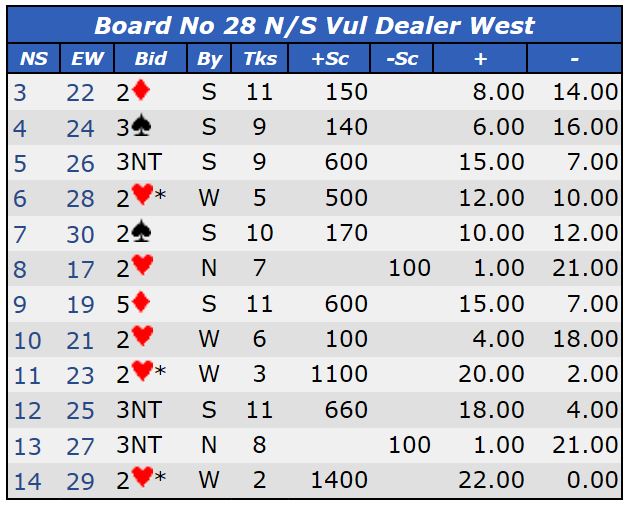
| Thursday, 5th September - Another useful gadget for your Bidding Armoury! |
Show Detail |
Board #28 on Thursday5th September offered an interesting dilemma for South...
Study the hand above and consider how you might bid after the bidding goes: 2♥ - Pass - Pass - ?
Click on the Show Answer button for an analysis.
|
| Show Answer |
You hold a strong hand but the problem is how do you bid it? If your hand was more balanced then you could make a takeout double, or with an additional heart stopper you could bid NT.
But your hand is not balanced and does not have a second heart stopper thus prohibiting an initial NT bid.
If you bid either of your long suits you risk the possibility of missing game OR of overbidding OR of missing the right game. If you DBL (for takeout) you face similar issues.
Lucky for you that you and your partner are playing Leaping Michaels... 
It is a strikingly easy convention to remember, so simple yet so useful:
Over an opening weak 2♠ or 2♥ by an opponent, the bid of 4♣ or 4♦ shows a two-suited hand with at least 5 cards in the OTHER major as well as 5+ cards in the bid minor:
Thus, over an opening 2♥ (weak) by either opponent:
4♣ = 5♠ and 5♣
4♦ = 5♠ and 5♦
Over an opening 2♠ (weak) by either opponent:
4♣ = 5♥ and 5♣
4♦ = 5♥ and 5♦
The big plus with this convention is its ability to show two five card suits (or longer) with one bid. Neat.
Clearly shape is one aspect that determines the use of the convention. Strength is another element that needs to be taken into account.
It is recommended that you limit your use of Leaping Michaels to hands where you have 4, or not more than 5 losers.
N.B.
Counting losers: Count one loser for each A, K or Q that you are missing in each suit. Note that you can only have one loser in a suit with a singleton if you don't hold the Ace; not more than two losers in a suit with a doubleton where you are misiing A or K, or both; not more than 3 losers in a suit with 3 cards or more where you are missing A, K, Q.
On this hand you have 4 losers (1 spade, 2 diamonds, 1 club).
So, playing Leaping Michaels, you can bid 4♦ promising 5+ spades and 5+ diamonds. West will PASS and North will raise to 5♦.
This was the full hand:

This was the Travelling Score sheet for the hand. 3 declarers played in 3NT...with differing results. Note that you must 'find' the ♦ Q to make nine tricks in 3NT if the opponents lead a club. On the other hand 5♦ can be made more easily.
Note that using Leaping Michaels does not interfere with any other defensive methods except bids at the 4 level. So, holding a long minor after the opponents open with a weak 2♠ or 2♥ means that you may have to simply bid your minor at the 3 or 5 level. Alternatively, if you have a suitable hand (a solid running minor in a hand with seven/eight tricks and stoppers in the other 2 suits) you can make a cue-bid in the opponents major suit asking partner to bid 3NT with an appropriate stopper (one should be sufficient) in the opponent's suit!
Some experts propose that in response to Leaping Michaels a cue-bid of the opponent's suit suggests interest in a Slam. And a direct response of 4NT should be Roman Key Card Blackwood with the known minor as the trump suit. But partnerships can come to their own agreements re the meaning of these bids.
So, if you're not already playing it, why not consider adding Leaping Michaels to your bidding armoury. |
|
|
|
|
|
|
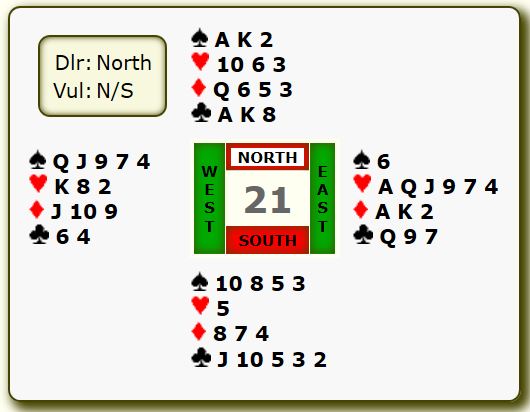
| Wednesday, 4th September - Sherlock Holmes visits Galway Bridge Centre... |
Show Detail |
Board#11 got Sherlock Holmes thinking...
Click the Answer button below to see what Sherlcok found interesting.
|
| Show Answer |
Sherlock Holmes and his companion and good friend, Dr. Watson, were visiting Galway for a short rest after their latest criminal investigation, which they brought to successful fruition after the usual thorough analysis and genius insight from the redoubtable Holmes. Galway was recommended to them by a friend as a restful place where they could recuperate from their latest endeavours and gather themselves in preparation for their next adventure in their ongoing battle with the criminal underworld.
They had begun the evening with dinner in a local hostelry noted for its superb seafood after which they departed for a game of bridge at the Galway Bridge Centre where Holmes hoped to test his prowess with the attendant members. Watson, although not as competent a bridge player as Holmes always enjoyed these occasions and the later discussion which invariably centred on some unusual aspect of the game that Holmes had spotted but which, initially at least, would have eluded Watson.
They enjoyed their game and finished with the customary high score leaving all opponents trailing in their wake.
‘Watson, my good friend' announcd Holmes, 'that was a most enjoyable evening. The locals were a cheerful lot and most welcoming to visitors and they played a good game too. But there was something about Board #11 that puzzled me for quite some time until eventually my reasoning and mental abilities helped me see the light.’
‘Sounds interesting, Holmes. Pray tell me more.’ said Watson who, as usual, had failed to notice anything unusual about Board #11 and who now prepared himself to be presented with a challenging mental test.
‘Look at this hand, Watson. Anything obvious strike you?’ enquired Holmes as he produced a printed copy of the hand records..
 Watson studied the hand and then made the obvious assessment. ‘Well, E/W seem to have the balance of points and should make game’ Watson meekly replied. Watson studied the hand and then made the obvious assessment. ‘Well, E/W seem to have the balance of points and should make game’ Watson meekly replied.
‘Elementary, Watson’ retorted Holmes. ‘Would you care to elaborate further’ he continued.
Watson gave the hand a further analysis and quickly concluded that a spade contract offered the best option for the maximum number of tricks, twelve in fact, whereas NT should only produce ten tricks.
‘Excellent, I’ll make a bridge player of you yet’ said Holmes.
‘Now this is where the mystery deepens’ announced Holmes as he produced a copy of the travelling score sheet for the hand. ‘Study this and see what strikes you as unusual’ said Holmes as he laid the score sheet on the table.
 ‘Oh my goodness’ exclaimed Watson as he noted several things that bounced up at him. ‘Well, Holmes, I can see that all E/W pairs scored positively. And it appears that three E/W pairs played in NT with the rest contracting in spades. Furthermore, all but one pair made twelve tricks. Ah, at last I see it…one pair bid and made a small slam in spades’ said Watson who now recalled the hand as he remembered the small slam they had bid. Watson was happy that he had, he thought, noted what he expected was the nub of Holmes’ focus. ‘Oh my goodness’ exclaimed Watson as he noted several things that bounced up at him. ‘Well, Holmes, I can see that all E/W pairs scored positively. And it appears that three E/W pairs played in NT with the rest contracting in spades. Furthermore, all but one pair made twelve tricks. Ah, at last I see it…one pair bid and made a small slam in spades’ said Watson who now recalled the hand as he remembered the small slam they had bid. Watson was happy that he had, he thought, noted what he expected was the nub of Holmes’ focus.
But Watson was quickly brought down to earth as Holmes pithily replied. ‘Oh my dear Watson…you disappoint me. Of course all E/W pairs recorded a positive score, and yes we reached the excellent small slam. And you did observe that three pairs played in NT and scored twelve tricks, which brings me to my next question. Why was declarer not held to ten tricks in NT as the hand record suggests?’
Watson studied the hand afresh, keenly feeling the stress brought on by Holmes probing questions. ‘I’ve got it Holmes…North discarded a diamond and West was able to claim five tricks in the suit’ he blurted out, happy that he had spotted this possible defensive slip.
‘Possible, Watson, but hardly probable, given that West will have opened the bidding with 1♦. And if North holds his five diamonds then declarer can make eleven trick via 4 spades, 1 heart, 4 diamonds and 2 clubs…but NOT twelve.’
Watson was beginning to feel the heat, and it wasn’t coming from the lovely log and coal fire that burned brightly and the warmth from which permeated the apartment. He studied the hand again and suddenly a happy smile creased his face. ‘Okay, Holmes…now I have it. The defenders failed to start with a heart lead at trick one which would then have enabled them to cash two heart winners when North gained the lead with ♠K.’
Watson, stood upright and in celebration of his perceived acute analysis, was about to pour himself and his good friend a glass of whiskey. But he was startled when he heard Holmes break the momentary silence with ‘Well done, my good man, you have mastered the minor mysteries but you have failed to spot a most interesting aspect of this hand. The clues are on the score sheet. I must say it tested my mental faculties until eventually I saw the light. So, I’m not surprised that you haven’t spotted it and there’s really no need to pursue it any further. I’ll explain it to you. Quite stunning. I wouldn’t have thought it possible unless I had seen it with my own eyes.’
Watson was relieved that he was absolved from further testing questions and was now keen to hear what he had missed and how his brilliant friend had solved the mystery.
‘Note the entries for the spade contracts on the score sheet’ began Holmes, his face bathed in a smug smile, the kind of look that befalls a declarer after they have executed a rare double-squeeze to steer home an otherwise un-makeable Grand Slam.
Watson studied the score sheet for what seemed to him like the umpteenth time. ‘I’m afraid that I must be missing something, Holmes. Apart from the fact that we, as I mentioned previously, bid and made the small slam, all other pairs bid game and, with one exception, scored twelve tricks’, Watson exclaimed with a slight note of exasperation in his voice.
Homes, by now beaming with a huge smile, coaxed one further effort from Watson as he remarked ‘Study the declarer column on the score sheet. West is recorded as declarer on three of the nine results whereas East is shown as declarer on the other six occasions’ Holmes declared with his uncontained excitement barely concealed.
‘Yes, I can see that’ said Watson ‘but I’m at a loss as to the significance of that fact. I mean it could simply be ascribed to an error on the part of the three Norths as they entered the result on the Bridgemate.’ retorted Watson, in as calm a voice as he could muster. He really began to wonder if Holmes had lost the plot on this one.
‘Unlikely, countered Holmes. Remember that the default option when entering E/W as declarer on the Bridgemate device is for East to be selected. North would have to consciously change the declarer option to select West. Highly improbable and certainly not a likely coincidence at three tables.
‘I suspect that the explanation is actually quite simple’ announced Holmes….’All three Easts committed the crime of responding 1♥ to West’s opening 1♦ . This enabled West to bid spades and thus become the declarer’ he continued with the smug satisfaction of a man quite happy with his analysis of the situation.
‘Crime?’ expostulated Watson. ‘Surely that’s a bit harsh’ he suggested as Holmes listened and mildly flinched at the way Watson had reacted to his exposure of the probable error that had befallen the three Wests.
‘Well, perhaps I was a bit harsh in referring to it as a ‘crime’. But all bridge players learn that when holding two touching suits of 5 cards or more you bid the HIGHER ranking first. In this example, if East responds 1♠ then he can bid 2♥ the next time thus showing four hearts (or more) and AT LEAST five spades. If, on the other hand, East responds 1♥ initially he cannot bid spades at the next turn because his hand could be too weak for what would be a Reverse and in any case he would only be promising 4 hearts and 4 spades. So, one should always bid the higher ranking of two touching suits of five cards or more at first opportunity thereby leaving yourself free to bid the second (lower ranking suit) on the next round of bidding thus offering partner a simple choice whilst also showing a 5/4 distribution.’
‘Okay Watson, that’s enough bridge for this evening. Now where’s that nice glass of whiskey you were about to produce a short while ago’ said Holmes with a wry smile on his face!
And for the benefit of fans of Arthur Conan Doyle hereunder are some famous quotes from serval of his publications:
1) “Education never ends, Watson. It is a series of lessons, with the greatest for the last.” ― Sir Arthur Conan Doyle, His Last Bow
2) “I am a brain, Watson. The rest of me is a mere appendix.” ― Arthur Conan Doyle, The Adventure of the Mazarin Stone
3) “Mediocrity knows nothing higher than itself; but talent instantly recognizes genius.” ― Arthur Conan Doyle, The Valley of Fear
4) “There is nothing more deceptive than an obvious fact.” ― Arthur Conan Doyle, The Boscombe Valley Mystery
Finally, I couldn’t resist including the following little gem:
Holmes and Watson are on a camping trip. In the middle of the night Holmes wakes up and gives Dr. Watson a nudge. "Watson" he says, "look up in the sky and tell me what you see."
"I see millions of stars, Holmes," says Watson.
"And what do you conclude from that, Watson?"
Watson thinks for a moment. "Well," he says, "astronomically, it tells me that there are millions of galaxies and potentially billions of planets. Astrologically, I observe that Saturn is in Leo. Horologically, I deduce that the time is approximately a quarter past three. Meterologically, I suspect that we will have a beautiful day tomorrow. Theologically, I see that God is all-powerful, and we are small and insignficant. Uh, what does it tell you, Holmes?"
"Watson, you idiot! Someone has stolen our tent!” ― Thomas Cathcart, Daniel Klein
|
|
|
|
|
|
|
| Tuesday, 3rd September - Did you make the most of your hand? |
Show Detail |
Board#8 on Tuesday, 2rd September offered an opportunity for E/W. If you played, did you grab it...or if you didn't play would you have grabbed it?
If you open 1♠ and partner responds 2♥ what do you re-bid?
Click on the Answer button for an analysis...and learn about the 'Backwad Finesse'
|
| Show Answer |
As West you open 1♠. North passes and partner bids 2♥. South passes and it is back to you...
What do you bid now?
This is surely straightforward...
2♠ is an underbid. There are several much weaker hands which would fit that bid. But this is not a weak hand. You hold a superb six card spade suit headed by the top five honours. And you have an outside ace. This calls for the natuiral jump re-bid of 3♠ which shows a six card suit and circa 16hcp and accurately describes your hand.
And then the spotlight will turn on partner who is holding the following hand:
Sometimes you must be able to use your imagination, in particular when you are trying to see through the backs of partner's cards!
You as East, hold a strong hand with 17hcp. But more than that you also have two card support for partmer's SIX card suit (you did listen to the bidding?). But partner's jump re-bid is not just showing a six card suit ...it also promises a good hand, usually circa 16hcp. That gives your partnership a combined holding of circa 33hcp which is the threshold for a small slam. But you also have a good five card heart suit headed by three of the top five honours.
Clearly a small slam is on the cards and it is just a case of deciding whether you should settle on spades or NT.
A starting point would be 4NT. This offers a huge plus for those playing Roman Key Card Blackwood because information about the ♠ K and ♠ Q can also be solicited from partner.
So, you bid 4NT. For those playing RKC, West will show 0 or 3 keycards (remember that the trump king is treated as a fifth ace!)
Ypou can now enquire about the ♠Q and when West indicates that he holds that card you can now count eleven tricks (barring a bad break in spades) as follows: 6 spades, 1 heart, 2 diamonds, 2 clubs.
If you are NOT playing RKC then 4NT will reveal that partner has two Aces. Clearly he has other high cards as well to backup his 3♠ bid but you are at a disadvantage compared to the RKC bidders who have additional information to assist them in the bidding. And of course you can verify that West holds a King but you can't be sure that it is ♠K.
And even if you are using RKC and can only count eleven tricks and you still need a twelfth trick for the small slam...
Clearly this might come from a successful finesse in hearts or clubs. But there is also the possibility of setting up a long heart in the East hand even opposite a singleton in partner's hand.
On that basis I would plump for 6♠ instead of 6NT. This may cost some matchpoints against those pairs who bid and make 6NT BUT it will win against those pairs that bid 6NT and fail to make the small slam when you're successful in 6♠.
It is important that you try and visualise partner's hand during the bidding process and then mentally combine the two hands in your head to reach the best contract. And try and count tricks before making your final bid.
Bidding a Grand Slam on this hand is not a wise idea. Note that even if partner holds ♥ K there is no guarantee of thirteen ricks, particularly in NT. A Grand Slam that is dependent on a finesse, let alone two finesses, is not a good proposition. The odds on two of two finesses being successful is approx. 25%...
This was the full hand:
At seven of ten tables the hand was played in spades of which two reached 6♠. 3 partnerships played in NT...3NT, 6NT and 7NT respectively.
Two declarers made 11 tricks, five made 12 tricks, and three made 13 tricks.
And interesting to note that declarer can actually make three club tricks! A little bit of magic known as a backward finesse!
Backward finesse??? Yes, try leading ♣J from the East hand and let it run unless South covers with ♣Q. If South does cover with ♣Q then win with ♣A and now lead small club towards East's ♣ A9 and finesse the ♣ 9 if North plays low! Not great odds on this working but itt is an intriguing play. I have memories of doing this, successsfully, in an Irish Open Trials when I was still in my teens! Is it ever a likely play to find at the table. Yes...if you have been able to count the defenders high card points and can be sure that the the finesse of the J will fail then by all means try for the backward finesse. In those circumstances it becomes a viable option.
|
|
|
|
|
|
|
| Tuesday, 3rd September - What do you bid? |
Show Detail |
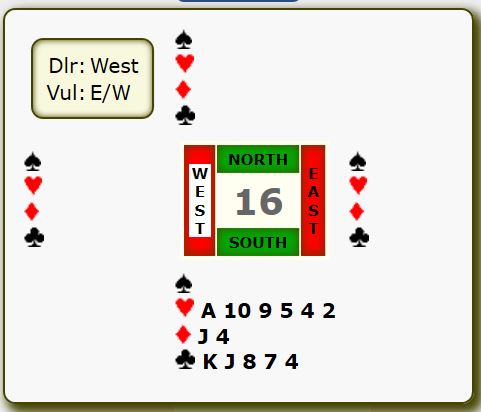
Have you a bidding gadget (convention) that allows you to show, with a single bid, two suits of 5+ cards each? It could have been useful on Board #16
What contract might (or did?) you reach on this hand?
West opens 1♦.
How would you proceed?
Click the Answer button below for an analysis.
|
| Show Answer |
What an interesting problem!
We have a powerhouse of ahand. Unfortunately West has opened the bidding. That's the bad news. The good news is that our hand is rich in length and strength in the other three suits.
But how to proceed.
I suspect that several, if not the majority, of players who held this hand on Tuesday commenced with a TAKEOUT DOUBLE and that the partnership subsequently ended up in a heart contract. The Trvelling Score Sheet shows that at 7 of 10 tables the final contract was with hearts as trumps with six pairs bidding 4♥ and one partnership staying out of game. At one table the E/W hands surrendered a penalty of 1100 in 5♦x. At two tables a contract was reached with clubs as trumps. One pair played in 5♣ and a solitary partnership reached 6♣.
All nine N/S declarers made thirteen tricks.
If North doubles South will likely bid hearts and the partnership will eventually reach game.
But is DOUBLE the best way for North to start the bidding process for his side? It doesn't adequately convey the SHAPE of his hand. Yes, he has support for the three unbid suits but the support is unevenly distributed across the three suits.
Some North's might take a different approach and simply start with an overcall of 1♠ intending to shows the club suit at a subsequent opportunity. Yes this risks the possibility of the hand being passed out before North gets an opportunity to shows his second suit but that is an unlikely outcome. Someone is likely to bid/support diamonds again.
And then there is the third option and this is my preference. As North I would like to be able to tell partner of my 5♠ /5♣ shape and to do it in a single bid! Fortunately there are conventions that make this possible. One popular convention is called Ghestem which can be used to show any two suits, promising at least 5/5 shape, after the opponents have opened the bidding at the one level.
A widely used version of Ghestem works as follows:
1) A Cue-bid of the opponents suit promises the lowest ranking and the highest ranking unbid suits, i.e. the 'Extreme Suits'
2) 2NT promises the two lowest ranking unbid suits
3) 3♣ promises the two highest ranking unbid suits.
Opener You
1♣ 2♣ = 5♦ / 5♠
2NT = 5♥ / 5♦
3♣ = 5♠ / 5♥
1♦ 2♦ = 5♣ / 5♠
2NT = 5♥ / 5♣
3♣ = 5♠ / 5♥
1♥ 2♥ = 5♠ / 5♣
2NT = 5♦ / 5♣
3♣ = 5♠ / 5♦
1♠ 2♠ = 5♥ / 5♣
2NT = 5♦ / 5♣
3♣ = 5♥ / 5♦
Wow...is that a lot of bids to remember?
NO...the secret is not to try and remember what each individual bid shows but rather remember the following three references:
1) Cue-bid = the highest and lowest ranking suits, i.e. TWO EXTREME suits, i.e the two suits furthest apart
2) 2NT = two lowest ranking unbid suits
3) 3♣ = two highest ranking suits
Having reached an age where my memory is easily oveloaded I find the above quick reference easy to work through when my partner uses Gehstem. Yes, sometimes I pause for a few seconds as I work through the possible combinations before reaching the right (most of the time!) conclusion. And of course I will have already 'Alerted' partner's 'Ghestem' bid and indicated the two suits shown by his bid...once I've worked it out in my head!
So, on this hand I would have bid 2♦ (cue-bid) over West's opening 1♦.
As you now know this promises at least 5♠ / 5♣. As you can see below this improves South's hand significantly.
A word about hand 'Strength' when using Ghestem.
The important element is to convery the Shape of the hand, i.e. showing the two suits. After that it is a case of finding the right level. In a nutshell Ghestem can be used with either a weak or strong hand and one should keep a keen eye on the vulnerability.
Vul v Non-Vul = Strong hand recommeneded
Non-Vul v Vul = Either Weak hand with a possible 'Save' in mind or a Strong hand with possible game in mind
Nil All or Game All = Proceed with caution particularly if Vul.
And what will South do after you bid?
Well not surpisingly it will probably depened on what bid you made!
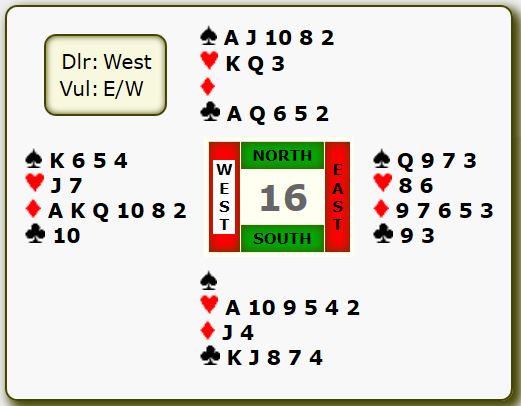
This is South's hand:
If North has Doubled then I would bid 4♥
If North has overcalled 1♠ I might bid 2♥
If North has used Ghestem, showing 5♠ /5♣, I will probably bid 5♣ and would not be surprised if North raised to 6♣. Note that if North uses Ghestem then South knows that there is at least a 5/5 club fit between the two hands. Also, North will have 3 hearts at most but could have less. But, with a 5/5 club fit between the two hands there is likely to be an opportunity to establish North's spade suit or South's heart suit.
This was the full hand:
|
|
|
|
|
|
|
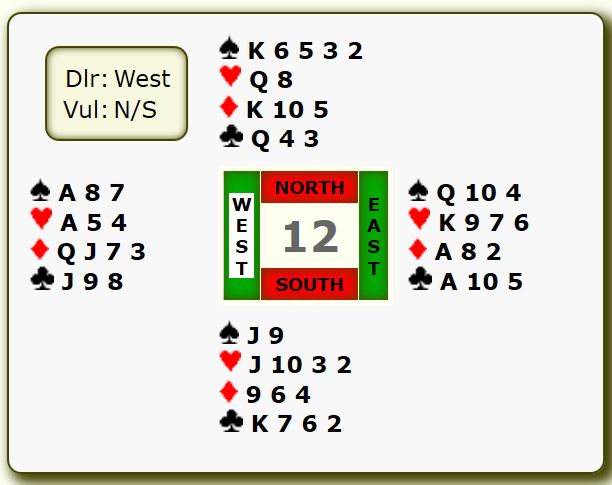
| Monday, 2nd September - Do you have 'Checkback' in your bidding armoury? |
Show Detail |
Board #3 was an interesting hand. One game makes and another doesn't. Did you get to the right game?
Look at the featured hand and answer the following question... would you prefer to be in 3NT or 4♠?
Click the Answer button below to view an analysis...
|
| Show Answer |
A common situation arises when a partnership is heading for game but is not sure whether the final contract should be 3NT or 4♥ or 4♠.
On this hand, if you are not playing Strong NT, West is likely to open 1♦ and East will respond 1♠, whcih at this stage only promises a 4 card suit.
West will re-bid 1NT showing 15-16/17 hcp.
East now knows that game is on but is unsure as to whether the final contract should be 3NT or 4♠.
[Note...Yes, 5♦ also makes but requires declarer to drop the ♠ J and even if the contract makes it is likely to score less than 3NT or 4♠]
Clearly East would like to know how many spades West holds....cue 'Checkback'
Checkback is a convention which can be used opposite opener's rebid of 1NT or 2NT where partner of the opening bidder has responded 1♥ or 1♠ bid. The use of Checkback guarantees at least five cards in responder's first bid major suit AND IS FORCING for at least one round of bidding.
Checkback uses an artificial bid of either 2♣ or 2♦. Partnerships need to agree whether to use 2♣ OR the UNBID minor which could be either 2♣ or 2♦, by the responding hand to request opener to clarify his major suit(s) holding(s).
Note that opener has already denied four card support for responder's major suit by re-bidding NT rather than raising partner's major.
In response to Checkback, opener will show three card support by bidding partner's major or show the other major, or else will bid 2♦ or 2NT
In this example the bidding could proceeed as follows:
West East
1♦ 1♠
1NT 2♣ (Checkback)
2♠ (showing 3 spades)
East can now bid 4♠ safe in the knowledge that opener has 3 card spade support.
That's a simple introduction to 'Checkback' ...but there is a little more to it and some aspects need partnership agreement.
1) Checkback can be used via either 2♣ or the 'unbid' minor. Agree which approach you wish to use.
2) Checkback always guarantees five cards in the first major suit bid by responder.
3) Opener will show three card support for responder's major before showing four cards in the other major.
4) Checkback is FORCING for at least one round of bidding and promises at least invitational values.
5) Opener should JUMP with a hand with maximum HCP and a fit (3 card) in responder's major.
NOTE: Where responder holds 4 hearts and 4 spades he will bid 1♥ in response to opener's 1♣ or 1♦. If opener now rebids NT (either 1NT or 2NT) then responder can now bid spades thereby promising only 4 cards in each major. Checkback can be used where responder holds 5 hearts and 4 spades or 5 spades and 4 hearts although in the latter case other sequences are available to show that particualr holding.
Note the following sequence:
West East
1♦ 1♥
1NT 2♣ (Checkback guaranteeing 5 hearts and MAY HAVE 4 spades)
Opener can now bid as follows:
2♦ = denies 3 hearts or 4 spades and shows minimum values for the NT re-bid
2♥ = 3 hearts and minimium values...may also have 4 spades
2♠ = 4 spades and minimium values AND DENIES 3 hearts
2NT = denies 3 hearts OR 4 spades and shows maximum values for the NT re-bid.
3♥ = 3 hearts and MAX values for NT re-bid
3♠ = 4 spades and MAX values and denies 3 hearts
Opener should always show three card support for responder's first bid major suit where he also hold 4 cards in the other major.
The use of Checkback frees up other sequences for specific holdings according to partnership agreement.
Note that some partnerships play variations of Checkback other than that outlined above. Agree your methods with each partner with whom you agree to play this convention. |
|
|
|
|
|
|
| Thursday, 29th August - An unusual suit play... |
Show Detail |
Board #10 offered an opportunity for an unusal play in the diamond suit to make three tricks.
Have a look and see can you identify the winning play before pressing the Answer button below.
|
| Show Answer |
Board #6 saw one E/W pair bid to 6♥. a good contract that only required a litle luck in the diamond suit.
The only problem that declarer faced was how to play the diamond suit for a single loser.
This was the holding that declarer had at his disposal:
Declarer Dummy
♦ Q842 ♦ A965
The obvious line is to lead a small diamonds from hand towards dummy's ♦ A965, winning the trick with the ♦ A and then leading a small card from dummy towards ♦ Q84 in hand.
Clearly if South plays the ♦ K on the second round then declarer's problem is solved. But the question is which card to play when South follows with ♦ J or ♦ 10.
South has two options:
1) Play ♦ Q and hope that South started with ♦ Kxx or ♦ KJx or ♦ K10x
2) Duck and hope that North started with ♦ Kx, ♦ KJ, ♦ K10
But on this occasion neither option works and so the contract must fail.
Note that even if declarer drew trumps, eliminated spades and clubs leaving him with one trump in hand and in dummy, a ruff and discard would still not be good enough because declarer would still have a 2nd losing diamond.
No, the diamond suit has to produce three tricks.
But how? Look at the actual layout:
North
♦ K107
Declarer Dummy
♦ Q842 ♦ A965
South
♦ J3
It seems impossible for declarer to limit losers to one trick...but it is perfectly feasible.
It is an unusual play, but fits the bill if you can determine the layout of the defenders holdings in the suit as outlined above.
Try the following:
1) Lead ♦ 5 from dummy and if South plays low the insert ♦ 8 from declarere's hand. When you regain the lead enter declarer's hand and lead ♦ Q and let it run unless North covers with ♦ K in which case you win the trick with dummy's ♦ A noting South's ♦ J falling. Dummy's ♦ 96 will win the last wo tricks.
Note that te ♦ J and ♦ 10, can be inter-changed between the North and South hands...but the play and result will be the same!
Also, it is important that South plays low from Kxx, KJx, K10x on the second round of the suit so as to give declarer the chance to go wrong. Rising with ♦ K on the second round cannot be right, particularly where declarer is known to hold 3+ diamonds.
And of course the play will NOT work if Noth holds KJ10
So, on a given hand can you determine that this is the actual layout, that fits this play as opposed to some of the other layouts where a different play will succeed? Not easy... |
|
|
|
|
|
|
| Tuesday, 27th August - Did you wrong-side 3NT as declarer OR block the spades as a defender? |
Show Detail |
Board #10 is a very interesting hand for the declaring side as well as the defending side.
The declaring side need to be sure that they 'right-side' the contract, in this case make West declare rather than East. Try playing 3NT as declarer with the East hand on a small spade lead.
Now try playing it from the West hand on a small spade lead from North. In this case the contract is 'right-sided'.
Playing it from the East hand the contract is 'wrong-sided'.
Check out the hand and see can you come up with a bidding sequence that 'right-sdes' the contract so the West is declarer.
Also, note that it is easy enough for N/S to 'block' the spade suit. Are you sure that you (as either North or South) would NOT cause a blockage that results in North being unable to cash the fifth spade.
Study the hand carefully before clicking on the Answer button below.
|
| Show Answer |
ANSWER
East will open the bidding with 1♣.
West will respond 1♦.
North may (or may not bid 1♠.
East can show his 5/4 shape by re-bidding 2♥ . This is a REVERSE and promsies 16+hcp and usually 5+ cards in the first suit and 4+ cards in the second suit.
Wes can re-bid his diamonds with 3♦ which also promises more than minimum values.
East now has a choice. He can opt to bid 3NT and take his chances or can make a forcing bid of 3♠ (the opponents suit) to see if partner has a spade stop. This 'right-sides' the contract so that West becomes declarer. 3NT by East leaves the contract 'wrong-sided', i.e. a spade lead by South through dummy's ♠ Qx kills dummy's honour as a second spade stop.
When played by West, a spade lead from tthe North hand, means declarer win the trick with the ♠ Q while still preserving the ♠ A with which to regain the lead after losing a trick to North's ♦ A.
That's the difference between 'right-siding' as oppose dto 'wrong-siding' the contract in the bidding.
HOWEVER...several East's got away with making 3NT and I can only presume that the defense 'blocked' the spade suit.
Note the sequence of plays withregard to the spade suit:
- South leads ♠ 5 (4th best)
- Declarer has to try ♠ Q from dummy.
- North covers with ♠ K and declarer will duck.
Now the spotlight turns on North. North should have noted South's lead (♠ 5). This should promisee four cards in the suit or perhaps three to an honour From three small cards the opening lead options are a) Top Of Nothing or b) Middle Up Down.
So, North should return a small spade at trick 2 which declarer will capture with ♠ A. North will regain the lead with ♦ A and now North and South must be careful not to block the spade suit.
At this point North holds ♠ J82 and South holds ♠ 107.
If North cashes ♠ J then South must be AWAKE and ALERT when East shows out. If South follows with ♠ 7 then he will win the fourth round of spades with ♠ 10 and thus have caused the blockage that will mean that North's fifth spade cannot be cashed.
So. South must UNBLOCK by playing ♠ 10 on North's ♠ J thus leaving South with ♠ 7 which can be played on North's ♠ 8 on the fourth round of the suit and thereby leaving North to cash the fifth spade and so defeat the contract.
BUT, it doesn't end there.
If North continues with a small spade after winning ♦ A, South must again be AWAKE and ALERT to win the third round with ♠ 10 and then continue with ♠ 7 so that North can with ♠ J or ♠ 8 and then cash the remaining spade tricks. Or, if South wins the third round with ♠ 7 then North must be sure to overtake South's ♠ 10 with hsi ♠ J on the fourth round of the suit.
Note that the spade layout become transparent for South when East fails to follow to the third round of spades...remember that dummy's holding is exposed when West tables his hand after the opening lead is made!
UNBLOCKING, a key part of the defenseive arsenal. Watch out for the occasions where it is necessary. |
|
|
|
|
|
|
| Monday, 26th August - So, you executed a 'Squeeze' but maybe didn't realise it! |
Show Detail |
Board #21 featured an opportunity for declarer to execute a 'Squeeze' for the 12th trick in 3NT.
Many bridge players are of the view that 'Squeezes' are for Master players and feel that they wouldn't recognise the opportunity or indeed be able to execute the play if the situation arose.
There are various types of Squeeze Plays in bridge, some more complicated than others, but the basic 'Simple Squeeze' is relatively easy to follow. In essence a simple squeeze occurs when a defender is forced to discard one of two controlling cards, in two different suits, which has the effect of promoting a lower card in one of the two suits held by declarer or dummy.
A necessary feature is that declarer/dummy can win all the remaining tricks bar one.
Declarer/Dummy must have a 'Squeeze' card, i.e. a card which forces the defender to discard one of his two controlling cards in two other suits thereby promoting a winner in declarer's or dummy's hand.
Declarer and / or dummy must have 'Threats', cards which can become winners if a defender is forced to discard one of his controlling cards.
This hand offers such an opportunity. Can you spot it?
Click the Answer button below for an analysis.
|
| Show Answer |
ANSWER
South (or North) will end up as declarer in 3NT after East will have bid spades.
South will likely receive the lead of the ♠ 9. When dummy (North) is tabled declarer will quickly realise that he is looking at 11 top tricks (3 spades, 2 hearts, 2 diamonds, 4 clubs) barring a bad break in clubs.
Declarer will win the opening lead and proceeed to play on clubs, forcing out East's ♣ A. The defense may persisit in atatcking clubs and declarer with win this trick.
Now declarer can cash his club winners and the third spade winner, reducing everyone to five cards and suddenly a Squeeze unfolds on poor West who is left trying to hold six cards - three hearts and three diamonds.
At this point it might be a good idea to grab a pack of cards and assign to West five cards, a combination of hearts and diamonds, where North will hold ♥ AK9 ♦ K9 and South holds ♥ 42 ♦ A43.
Note that East has only 2 hearts and 2 diamonds and that West cannot hold three hearts AND three diamonds. Which ever card he discards on declarer's fifth club promotes a winner in that suit for declarer/dummy.
If West discards a heart then declarer can score three hearts via the combination in dummy and declarer's hand. Similarly, If West reduces his hand to three hearts and two diamonds then declare will win three diamond tricks. West is squeezed because he is trying to guard the two suits.
In this example note the following:
a) the Squeeze card is the fifth club in declarer's hand
b) declarer / dummy have four winners of the last five tricks, i.e. ♥ AK and ♦ AK
c) Dummy possesses a heart threat (♥ 9) which will be promoted to a winner if West discards one of his three hearts on the fifth club. Also, declarer has a 'Threat' in hand (♦ 4) which will become a winner if West discards one of his remaining three diamonds.
d) Note that East is unable to provide assistance to his partner because he only holds two cards in both hearts and diamonds.
Try it...
Magic!
|
|
|
|
|
|
|
| Thursday, 22nd August - What a difference the opening lead makes! |
Show Detail |
What a hand!
Click the Answer button below for an analysis.
|
| Show Answer |
ANSWER
At our table West opened 3♦, North passed and East bids 4♠
At the vulnerability I was tempted to bid 4NT, showing the other two suits, but eventually passed.
And now everything hinges on the lead.
Like several other Souths, I suspect, I led my singleton ♦ J and declarer quickly wrapped up 12 tricks by discarding a club from hand on ♦ A and then ruffing a club in dummy and eventually conceding a trick to North's ♥ A. 12 tricks made.
However delarer can be held to 11 tricks if South leads a heart and North wins and switches to a trump. Now declarer is deprived of a club ruff in dummy but can access dummy via ♥ K and then discard one losing club on dummy's ♦ A but eventually losing a club. 11 tricks made.
But the winning defense is when South leads his singleton trump. Now declarer can be held to 10 tricks. Declarer wins in hand and is now deprived of the club ruff which would also give declarer access to dummy's ♦ A for one club discard. But it gets better, as long as North doesn't slip up in the later stages of the play. When East leads ♥ Q North MUST duck. This deprives declarer of access to dummy and declarer should eventully lose a heart and two clubs... limiting declarer to 10 tricks and a roaring top for the defense.
4 Easts bid and made 6♠, one E/W pair failed to reach game, and five declarers were held to 11 tricks.
Hindsight is a wonderful thing!
|
|
|
|
|
|
|
| Wednesday, 21st August - So, have you a choice? |
Show Detail |
Board #19...and you are sitting in the East seat with the hand shown above.
Your left hand opponent opens 1NT (12-14).
Your partner doubles.
North passes.
What do you do?
Give it some thought before clicking on the Answer button.
|
| Show Answer |
ANSWER
On Wednesday, 21st August this hand was played at eleven tables.
Five Easts passed and one declarer scored 5 tricks, three scored 6 tricks. One declarer scored 7 tricks and in the process +180 for N/S.
At the other six tables, one E/W played in 2NT making 7 tricks. At the other five tables, E/W played 3NT. Three declarers ended up with 10 tricks. The other two scored 8 tricks.
Clearly the three E/W pairs who ended up in 3NT and scored 10 tricks were the big winners.
What's the first thing you should note before the bidding commences on a board?
Okay, it's good to know who's dealer. BUT, it's also important to note the vulnerability.
In this case N/S are Non-Vul and E/W are vulnerable.
What should resonate with East is partner's Double which promises 16+ high card points. Okay maybe it could be 15+.
East should realise that he is holding 10 HCP and a five card club suit. This would be enough for a raise to 3NT if partner opened a strong NT.
So, East needs to assess the likely scores if:
a) he passes his partner's double
b) bids 3NT
If East bids and makes 3NT then E/W will score 600+
How many undertricks would South need to score to equal 600+? The answer to that question is that South must be restricted to THREE tricks in order for E/W to score 700. Restricting declarer to 3 tricks is difficult at the best of times and more so when the strong hand is hidden from view!
The odds favour E/W doing better by bidding game than defending 1NTx. East bidding 3NT should prove to be the winning action.
Note that if the vulnerability was NIL ALL then passing is the better option. Why? Because even if South makes 4 tricks he will still suffer a penalty of -500 (3 down). At that vulnerability bidding and making 3NT will produce 400+ and declarer would need to make all 13 tricks to score 520!
So, make sure that you know the vulnerability before making a decision as to whether you should DBL (or pass partner's DBL) or bid.
And now to the play:
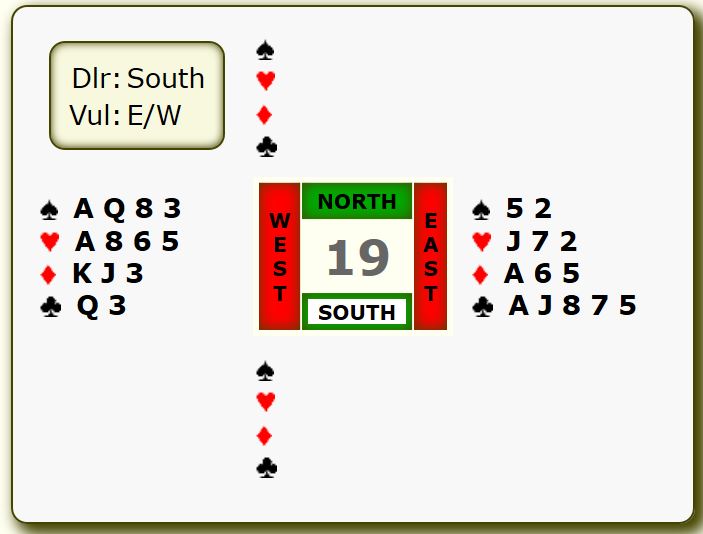
You, East, are declarer in 3NT after South opened 1NT (12-14hcp). North was silent throughout.
South leads ♥ K.
Over to you...
ANSWER ... revised after eagle-eyed James Ward spotted an eror in my original analysis. Well spoted James.
So you elected to bid 3NT rather than defend 1NTx. Now you need to make the bid pay!
We start with 5 top tricks and several options for a few more. Well, the club suit should be good for at least two extra tricks unless South has five clubs! And we also have a spade finesse that is favourite to succeed and also a possible trick from dummy's ♦ J.
So, what do we do at trick one. Let's try a duck and see what happens.
Win the trick with dummy's ♥ A
Now we lead ♣ Q and let it run into South who wins with ♣ K.
South should refrain from continuing hearts as that will establish the ♥ J in declarer's hand as a winner.
South might do best to switch to ♠ J.
It might be advantageous for declarer to duck...but South will continue with ♠ K.
We win with ♠ A and continue with a club and duck when North follows with a low card. This is a safety play in case North holds four clubs and could then gain the lead and return a heart through declarer's ♥ Jx. This is a paticular problem if South started with a holding of ♥ KQ109 where a heart continuation from North gives the defense 3 tricks
South wins with ♣ 9 and continues with a third spade.
Declarer wins in dummy, discarding a diamond from hand, and then plays a diamond, winning in hand with ♦ A.
Declarer now cashes three clubs tricks, ♣ AJ8.
Declarer then plays a diamond towards dummy's ♦ KJ and finesses against South's ♦ Q for nine tricks and +600.
NOTE: This line is not guaranteed. For instance, South may have four spades ♠ KJ109. But the spade switch by South is probably better than switching to diamonds. The ♠ 10 is a crucial card, particularly if North can gain the lead and return a heart through declarer's ♥ Jx.
And the clubs could be breaking 3-3 all along... But, once the opening lead is won by dummy's ♥ A then North becomes the danger hand as a heart through declarer's ♥ Jx could be fatal.
Also, 'tempo' is a factor. Ducking the first heart concedes a 'tempo' to N/S and enables them to switch to spades at trick two with a heart trick already in the bag.
How did others make 630? Maybe the hand was defended differently. Continuing a heart at trick 2 will gift declarer an extra trick.
The full hand:
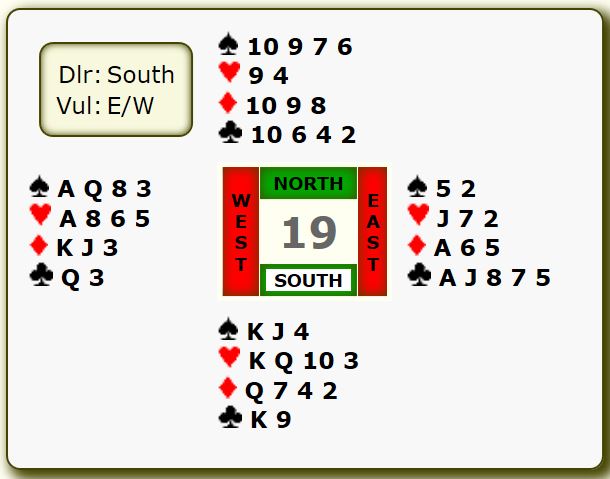
|
|
|
|
|
|
|
| Tuesday, 20th August - So, how would you play 1NT as North on the lead of a small club? |
Show Detail |
Board #20 was an interesting hand. Eight North's found themselves declaring a NT contract of which one was in 3NT and four others in 2NT. Two others were in 1NT.
The score sheet shows that 3 declarers made NINE tricks, 3 made eight tricks and 2 made seven tricks.
The hand record suggests that declarer can be held to seven tricks. And at that declarer will need to be careful!
So, your turn...East leads ♣ 5 to West's ♣ Q who returns ♣ 8 to East's ♣ K.
East cashes ♣ A as West discards a heart. West proceeds to cash two more clubs.
What do you discard from dummy and your own hand? How will you hope to make 1NT?
Work out your plan before clicking on the Answer button below.
|
| Show Answer |
ANSWER
The opponents have led clubs and duly cashed five tricks.
What two discards did you make from dummy and your own hand so to give yourself the best chance of making your contract?
Declarer's hand is SQUEEZED on the fifth club.
A heart can be discarded on the fourth club but what will you discard from hand on the fifth club?
If you discard a spade, baring your ♠ A, then East can play a spade at trick six and if West guesses to duck it establishes his ♠ K as a winner while still holding ♥ A.
You cannot afford to bare your ♥ K because then the opponents can cash at least two heart tricks.
And slowly it dawns on you that you must discard a diamond from hand whilst keeping ♠ A7 so that you can gain entry to dummy via a diamond and lead ♠ Q for a finesse against West's ♠ K. That will give you 2 spades, 1 heart, and 4 diamonds.
And if East leads a spade at trick 6 then you win, in dummy or in hand dependng on whether West covers dummy's ♠ Q, and play a heart to establish your 7th trick whilst still holding a spade stopper.
So, how did so many North's make 8 and 9 tricks? Without having been an observer at each table I cannot be sure BUT I suspect that in at least some cases East may have commenced with a top club and in so doing blocked three winners from their hand! Whenever you hold a suit with two top honours and NO OUTSIDE ENTRY, you should invariably lead a small card at trick one if defending a NT contract. This will retain communicationst with partner and will prove particularly effective when partner holds a small doubleton and declarer and dummy each hold 3 cards. It also unblocks the suit when partner holds Qx, as in this case.
And perhaps West made an overcall of 1 ♥ during the bidding. In this instance, East may have led ♥ 9. West should read the lead as a doubleton and not rise with ♥ A at trick one but cover with ♥ J if declarer plays ♥ 10 from dummy. Playing the ♥ A on the first round of the suit creates two winners for declarer.
Declarer will win the heart lead and can make 8 tricks by playing a diamond to dumm'y ♦ J and then finessing ♠ Q through West thus giving declarer 2 spades, 1 heart, and 5 diamonds. Note that if declarer wins thr first heart in hand and plays a diamond to dummy to lead a second heart West could rise with ♥ A and might then find the club switch to hold declarer to 7 tricks.
The full hand:
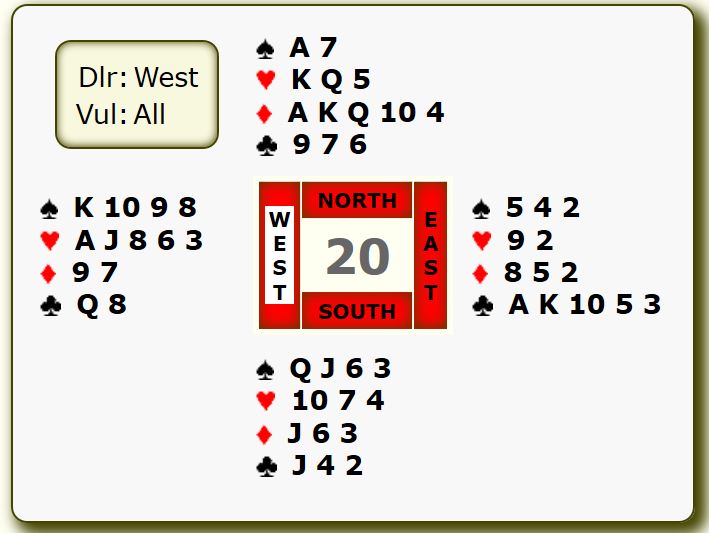
|
|
|
|
|
|
|
| Monday, 19th August - A no-hope contract...but did you give it your best shot? |
Show Detail |
Sometimes we find ourselves in what looks like a no-hope contract. But there may be a little glimmer of light and the hope for a defensive slip-up.
But...a) we need to spot it...and b) we need to try for it.
Can you see such an opportunity on this hand.
Try it out before clicking on the Answer button below.
|
| Show Answer |
ANSWER
From time to time you will find yourself declaring a no-hope contract such as this one. On the surface declarer would seem to be facing 4 losers: 2 clubs, 1 heart, and 1 diamond.
But is there a slight hope that you might steer this contract home...with a little help from an unsuspecting or sleepy defense.
Let's assume that you received a heart lead from North. Dummy is tabled and you sadly conclude that this contract looks hopeless. But you're a member of the 'never give-up' brigade and so you conceive a plan which just might give you a chance. Rememebr that opponents do not have X-ray vision.
All you need is the odds to work in your favour and the defense to make a slip.
So, what's the plan. Clearly we are facing the prospect of four losers...2 clubs, 1 diamond and 1 heart. Can we make one of them disappear.
If the club honours are divided then we can establish a club trick in dummy by leading twice towards dummy's ♣ QJx. And if we can establish a club winner it could be used to discard a loser from hand. It looks like the discard would have to be a diamond as the defenders have already established their heart winner. And yes, we know they should also come ot a diamond winner. But lets give it a try.
First, DO NOT PLAY EVEN ONE ROUND OF TRUMPS!
Insted, play a club towards dummy. North will probably play low and South will win and return a heart to our ♥ J and North's ♥ K.
First hurdle is now successfully negotiated. Now we are just a defensive slip away from making the unmakeable contact.
If North continues with a heart the contract will make as follows. We will ruff the third heart and continue with a club toward dummy's ♣ Jx. North will rise with the ♣ A and now we are home. North may belatedly switch to a diamond but we will win with ♦ A and then play ♠ K and a spade to dummy's ♠ A. And then we lead dummy's ♣ J and discard our losing diamond.
Note that we don't lose anything by taking this approach whereas there is much to be gained. To win the opening lead and draw trumps is simply adopting a defeatist approach and meekly conceding.
So, should declarer get away with this open larceny? Probably not. But how should either or both defenders know what's going on?
South is the first to know the situation about the heart suit. If the lead is a genuine fourth-best then South knows that West has only a doubleton heart. If South can also conclude that Noth has three clubs then he can deduce that declarer has only two and is therefore looking at a potential discard on dummy's winning third club. Upon winning the first club South should switch to a diamond honour. This will setup the fourth trick for the defenese before dummy's club is setup as a winner. But switching to a diamond whilst looking at ♦ J10xxx in dummy is not exactly appealing. And rememebr that north MAY have led a heart from athree-card holding , e.g. ♥ KJ4 or even ♥ Jx4 in which case returning a heart may be paramount.
Things become a little more difficult for North after he wins the second heart. He faces the dilemma of continuing with a third heart (losing play) or finding a switch...a winning play if he switches to a diamond; a losing play if he swirtches to a club).
Has North any clues to help him reach the right decision. YES...
North needs to have taken notice of what heart South played when returning the suit after winning the first club.
Ah, does North remember?
When South returns the ♥ 3 the play suggests either a doubleton heart (♥ Q3) or a four card holding ♥ (Q1063). Note the damage that the defense would do to their chances if South returned the ♥ 10 from the four card holding of ♥ (Q1063). North would be forced to win the trick with the ♥ K when declarer follows with ♥ J from hand and this would then establish dummy's ♥ 9 as a winner!!!
Anyway, North should now conclude that South's return is more likely to be from from ♥ Q1063 rather than ♥ Q3. Imagine, as North, what declarer's heart holding must be if South has ♥ Q3. Yes, declarer would have started with ♥ AJ106 and the opening lead has established three heart winners for declarer. In that case declarer would be swiftly drawing trumps and playing on hearts...
So, North should place South with four hearts and thus realise that playing a third round will see declarer ruffing in hand.
So, whats left? Why did declarer play on clubs at trick two instead of drawing trumps?
A good defender will eventually deduce what's going on...that declarer is angling to setup a club honour in dummy. But whay not draw trumps first and then setup the club winner in dummy.
And eventually it will dawn on a good defender what declarer is trying to do. He's setting up a club winner for a discard. And it can't be a heart discard because Norh has already cashed the ♥ K and knows that decalrer has no more hearts.
And so the cloud is lifted. Declarer is hoping to discard a diamond from his hand on dummy's winning club.
North must switch to a diamond while he still retains the ♣ A.
And when North switches to a small diamond South must be sure to play the correct card from his hand... In third position a player should play the lowest of touching honours. To play the ♦ K DENIES holding the ♦ Q.
So, that's that. An interesting contract that should not make against good defenders. But a hand that offers possibilities for a good declarer against defenders that are not on the ball!
But the big question is...did you give it a try or simply cash trumps and eventually concede defeat? Go on, be honest? |
|
|
|
|
|
|
| Thursday, 15th August - A flat board...Anyone for eleven (or even twelve!) tricks and a top? |
Show Detail |
Board #6 on Thursday, 15th August, is one of those rarities...a flat board. All contracts and results identical. 4♠ contracted at all seven tables...and all declarers (East) made exactly ten tricks!
But the hand records suggest that twelve tricks can be made. And indeed, on the lie of the cards that is so...But certainly there seems to be an easy route to eleven tricks which can be achieved via at least two different lines of play.
Perhaps those that did play the hand do not need any reminding as to how eleven tricks (let's not be greedy!) can be scored. But those that did not play the hand might like to give it a try. They might even spot how twelve tricks can be made.
Give it a try before clicking on the Answer button below. And the analysis is LENGTHY!
|
| Show Answer |
ANSWER
You're East, declaring a contract of 4♠ with no opposition bidding. You receive a small diamond lead although the actual lead shouldn't make much difference.
Plan A could be an attempt to ruff a heart (or two) in dummy whilst discarding a third losing heart on a top club.
Plan B could be to set-up the club suit. Note that you have six of the top eight clubs. You're only missing ♣ Q10. There are options as to how this suit can be played.
Plan A
Win the diamond lead in dummy with ♦ Q and lead ♥ 10. A defender will win and may continue with a seond diamond. Win in hand and ruff a heart with ♠ 3. At this point declarer has a couple of options. It might be wise to cash ♣ AK, discarding a heart from hand. A diamond to declarer's ♦ A followed by another heart ruff leaves you in dummy. Cash ♠ A and now lead a club.
Declarer can either ruff or discard the remaining losing heart from hand.
If declarer decides to ruff he has options. Note that at this point declarer has already scored 8 tricks (3 diamonds, 2 clubs, 2 heart ruffs in dummy, 1 spade) and at least ten are now guaranteed...South may overruff declarer but will then have to lead into declarer's remaining spade holding which will include a tenace of ♠ KJ9 or ♠ K96 or ♠ KJ6 depending on which trump declarer uses to ruff the tenth trick.
As it turns out the defense must score one trump trick. If declarere ruffs with ♠ 6 or ♠ 9 then South overruffs for the defence's second trick. If declarer ruffs with ♠ J then South will subsequently score ♠ 10. And so declarer scores eleven tricks.
Plan B
Instead of ruffing hearts in dummy declarer will try and establish dummy's club suit. There are two primary layouts to consider: 1) clubs break 3-3, and 2) clubs break 4-2 or 2-4.
Note that the only outstanding clubs of importance are ♣ Q and ♣ 10.
If clubs break 3-3 then a single ruff will establish the suit. If clubs are 4-2 or 2-4 then we may need to ruff twice, or in certain circumstances only once. The latter situation arises where the defender with a doubleton club is holding either of the missing honour as is the actual case on this hand.
But we also have to be careful about two scenarios that might arise: 1) running into overruffs. 2) losing several heart tricks.
Win the opening lead in hand. Play a trump to dummy's ♠ A and return a trump planning to finesse if North follows suit. As it turn out North produces the ♠ Q. Win with the ♠ K and do not draw the last trump. This leaves ♠ 8 in dummy which may act as a stop to heart leads by the defenders. We also have three remaining trumps in hand. It can reasonably be inferred that South holds the ♠ 10.
Now we turn our attention to the club suit. There are several lines available.
1) Run ♣ J if South does not cover. If this loses and the clubs are breaking 3-3 OR if the ♣ 10 is doubleton then we will lose a heart trick if the defense choose to take it otherwise declarer's hearts will disappear on dummy's clubs. If ♣ J wins then we are guaranteed eleven tricks by drawing South's trump, entering dummy with ♦ Q and running the clubs. If the clubs break 3-3 or ♣ 10 falls then we will make all thirteen tricks!
2) If ♠ J loses to North's ♣ Q then the defenders can either play on hearts or switch a heart to South who can then play his last trump denying us a heart ruff in dummy. BUT, we are still guaranteed 10 tricks (5 spades, 3 diamonds, 2 clubs) with the possibility of an eleventh trick if ♣ 10 falls on next two rounds of the suit.
3) Lead ♣ J and overtake with dummy's ♣ K. Cash ♣ A and then lead ♣ 9...and decide what to do if North follows with ♣ 6...
And this is where some thinking should take place....
What do we know about the club suit at this point? Both defenders have followed to the first and second round of the suit AND South has shown up with the ♣ 10, one of the two key missing cards. North has shown up with a third club leaving ♣ Q as the only outstanding (and most significant) club.held by the defenders. Either North has it or South has it.
If we DISCARD A HEART and South wins the trick with ♣ Q then we will lose a heart trick (if they take it) and still make 11 tricks
If we DISCARD A HEART and South ruffs then we will re-enter dummy with a diamond and ruff out North's ♣ Q and then gain entry to dummy via a heart ruff thus losing only two tricks and still scoring 11 tricks
If we DISCARD A HEART and South shows out and does not ruff then we continue with another club from dummy and ruff North's ♣ Q. If South refuses to overruff we can draw his trump and re-enter dummy with a diamond and then discard two more heart and now score twelve tricks. On the other hand, South might overruff and the defenders can then cash a heart trick and thus restrict declarer to eleven tricks.
On the other hand:
If we RUFF and South follows suit with ♣ Q then we will score twelve tricks by drawing South's last trump and entering dummy with ♦ Q to score the remaining clubs but eventually losing a heart trick
If we RUFF and South shows out and overruffs we will then lose a heart trick but still score eleven tricks
BUT, if we RUFF and South shows out and doesn't overruff then we are in trouble. We win the trick but what next? Yes, we can get to dummy with a diamond and ruff another club BUT if South again refuses to overruff we are now held to ten tricks. We can draw South's trump with ♠ K but must then lose three heart tricks because we can't get to dummy and the good clubs!
And if that last scenario actually unfolds you should turn to South and say: 'Well defended'! There are not too many defenders who can work out a defense that involves sacrificing a trump trick for the good of the totality of the defensive effort.
NOTE that establishing the club suit does really depend on North holding one or both missing club honours. If South has four clubs including ♣ Q10 the contract becomes awkward UNLESS we run ♣ J. But North holding 4 clubs including ♣ Q10 can also be a problem if North wins first club, puts South on lead with a heart who then smothers dummy's ♠ 8 by leading his ♠ 10. Yes we can win in hand but clubs are still not established and now only one entry to dummy (♦ Q) which will enable us to ruff out North's ♣ 10 and establish dummy's clubs as winners BUT with no way of getting at them...
And a final word...note the problem that arises if the finesse of the ♠ J was to lose to South's ♠ Q and South continued with a third spade. Now declarer could be held to nine trick!
An awkward hand in terms of deciding how to plan the play. Pursuing the club option gives possibilities of scoring twelve tricks but could led to scoring only ten or even nine. Seeking a heart ruff(s) looks likely to always produce ten and possibly eleven depending on the trump layout...
I think my inclination would be to try for a heart ruff. Indeed, if we can score two heart ruffs in dummy we will make ten tricks even if ♠ Q doesn't drop. We could lose two trumps and a heart. But here it generates eleven tricks with a possibility of making twelve depending on how the defense develops.
Yes we can see that on the actual layout of this hand that twelv ricks can be made. But remember that before you undertake a plan of play you may not have an appreciation of the layout of specific suits. Here the doubleton ♣ 105 only becomes known on the second round of the suit! Some players are good at producing double-dummy plays after the event! Normal players have to make decisions at the table! Knowing 'the odds' of probable suit distribution helps hugely.
Declarer play, like defence, is not an exact science. But it pays to investigate alternative options before deciding on a final plan. |
|
|
|
|
|
|
| Wednesday, 14th August - Making 11 tricks on Board #16 |
Show Detail |
Wednesday, 14th August saw only two declarers at the helm in a diamond contract on Board #16. Sadly both made less than eleven tricks whereas the hand record suggests that 11 tricks can be made with West as declarer. It also suggests that 12 tricks can be made if East is declarer. More of that anon.
So, why not have a look and see how you would make eleven tricks before clicking on the Answer button below.
|
| Show Answer |
ANSWER
West is declarer in a diamond contract. North will probably lead a top spade although a diamond lead is more effective and would hold declarer to 11 tricks. Note that South cannot lead a diamond without sacrificing his trump trick!
All roads lead to Rome...or in this case, 11 tricks. But there are two disticet approaches. And one line fails if the defenders lead a trump.
So, as soon as dummy hits the table declarer should start thinking how they will proceed with the play of the hand. That doesn't mean simply wondering about how to play to the first and second tricks. Good declarers work out a plan as to how to play the entire hand, or at least most of it. Yes, a revison may be forced on declarer as the play unfolds. But at least have a plan to start with!
Firstly, the hand can be played in the traditional way with West as declarer and the East hand as dummy. In this case declarer shoudl not draw any trumps! Declarer is holding an awful lot of poor spades which have to be disposed of. And there are losing clubs in the East hand.
One possible line is to cross-ruff the hand. Ruff the opening lead and then play a club to our ♣ A and ruff another spade with ♦ 10. Ruff a club in hand and ruff another spade with ♦ K. Cash ♥ AK (indeed they could have been cashed earlier). Now lead anpother club and ruff in hand. Then lead a fourth spade ruffing in dummy with ♦ A. Dummy now has no more trumps and declarer is still holding a losing spade. Lead dummy's last club and ruff in hand. Declarer still holds the losing ♠ J and ♦ J9 which will generate the 11th trick after South scores the ♦ Q.
Note that playing even one round of trumps will result in this line failing. And that's why it is so important to work out a comprehensive plan for the hand before playing from dummy at trick one.
Another approach is to play a Dummy Reversal, i.e. although West is the actual declarer we will play the hand as though East is the declaring hand. Why so? Because we are going to set up dummy's heart suit and we can also trump East's losing clubs in the West hand. This approach still works even if the defenders lead a trump.
We will hope to ruff at least one, although we might need to ruff two, of East's hearts. As it turns out we get an enormous bonus when we discover that the outstanding hearts break 3-3. Thus a single heart ruff sets up the remaining hearts as winners which can then effectively be used as if they were extra trumps!
So, ruff the opening spade lead and cash ♥ AK and then lead a third heart. When South follows with the ♥ Q we should ruff with ♦ 8 (or 9 or J) just in case South also hold ♥ J and North holds ♦ 7 and / or ♦ 6. When North follows to the third heart we now cash ♣ A and can return to the East hand with a trump to ♦ A. Now we led a club and ruff with a small diamond. Another diamond to East's ♦ K, noting that North shows out thereby leaving South with a winning ♦ Q. Now we use East's winning hearts as if they were trumps, i.e. lead hearts and continue until either South ruffs or we have no more hearts in which case we then lead a club intending to ruff in dummy. We then lead a spade and ruff in the East hand with our last trump, ♦ 10. South can over ruff but that will establish the last trump in the West hand as a winner.
For less experienced declarers the difficulty with this type of play lies in recognising the essence of a Dummy Reversal. It takes a bit of forced thinking to appreciate the opportunity because we have been taught and are accustomed to playing hands in the traditional declarer / dummy role, where the declaring hand is the master hand! Dummy Reversal means exactly as it says on the tin.... reverse the role of dummy's and declarer's hands.
TIP ...If you have difficulty in following this type of play then get out a pack of cards and lay the hands on the table. Now, simply switch the East and West hands (and also North and South) so that West is the declarer but holding the East hand. This should make the play of the hand seem more natural.
But remember, in the real world you need to be able to recognise the opportunity when a Dummy Reversal option is presented. Sometimes, as a declarer you may be holding what should be regarded as dummy! |
|
|
|
|
|
|
| Tuesday, 13th August - Can you show 5 spades and 4 hearts opposite partner's opening 2NT? |
Show Detail |
A common problem faced by some partnerships is how to show various suit combinations opposite an opening 2NT. Of particular interest is the ability to show various major suit combinations, e.g. 4♠ / 4♥, 5♠ / 4♥, 4♠ / 5♥
A hand that holds 4♠ / 4♥ can use Stayman or Baron to establish a major suit fit.
A hand that holds 4♠ / 5♥ can transfer to hearts and then bid spades thereby showinbg 5 hearts and 4 spades.
But how can you show a holding of 5♠ / 4♥?
Click the Answer buton below for an analysis.
|
| Show Answer |
ANSWER
One solution is quite simple. A bid of 3♠ opposite an opening 2NT promises precisely 5♠ / 4♥.
On this hand if North opens 2NT then South can bid 3♠ promising 5♠ / 4♥ and North will bid 4♥. Note that alternatively North can bid 3NT when holding 2♠ / 3♥ or else can bid 4♠ if holding 3♠.
Note that with 3♠ / 4♥ North has a choice. Some experienced players are of the view that the 4 / 4 fit offers a better playing capability than the 5 / 3 fit.
One disadvatage of this sytem is that with the 5♠ / 4♥ combination the good hand ends up as dummy if spades becomes the final denomination.
And, finally, some parnterships use the 3♠ bid as the start of a sequnce showing various minor suit(s) holding.
You pay your money and take your choice!
Note that on this hand the more tricks can be legitimately made in a heart contract rather than in NT or spades. Only two declarers (of eight) played the hand in hearts! |
|
|
|
|
|
|
| Monday, 12th August - An uppercut missed by the defense? |
Show Detail |
There is a defense for North/South to hold declarer to nine tricks in a spade contract. But it's not straightforward!
When Board #15 was played, all six declarers in a spade contract made ten tricks.
Holding declarer to nine tricks would have earned you a top on the board!
Click the Answer button below for an analysis
|
| Show Answer |
ANSWER
South should lead ♥ A or ♥ K according to your methods. At a simple level, North can follow with a second top heart. When North and East follow suit South knows that both players are out of hearts. The temptation might be to lead the ♥ 10 at trick three but this is a mistake. South, holding four trumps, wants North to ruff the third heart with his highest trump. South can achieve this by leading a small heart. North must not make the mistake of ruffing the third heart with ♠ 6 whcih declarer could overruff with ♠ 8. North must ruff with the ♠ 9 therby forcing declarer to overruff with ♠ J. This will have the effect of promotimg South's ♠ 10 as a winner. And North will subsequently score the ♣ A thereby giving the defenders four tricks and a top on the board!
HOWEVER, declarer can counter this defense by discariding his singleton club on the third round of hearts. Declarer then wins any continuation and draws trumps and ends up with five spade tricks and five diamond tricks. However, not all declarers are likely to find this counter and many will overruff the third round of hearts. Remember that it only costs a trick when the oustanding trumps break 4-2.
BUT, the defense can have the last word by switching to a club at trick two whereupon North must switch back to hearts at trick three and then South leads a third round of hearts and the defense proceeds as previoulsy described and will subsequently score a trump trick to add to the two hearts and a club.
Top marks if you find that defense...and good marks if you find the uppercut without first scoring the club winner at trick two. An uppercut resulting in a trump promotion is always a nice defense to find at the table.
|
|
|
|
|
|
|
| Thursday, 8th August - Did you miss the Safety Play? |
Show Detail |
Safety Plays are used by declarer to limit the losses in a particular suit. In some cases they can eliminate the loss of any trick in a specific suit. In other cases they can be used to limit the loss of tricks in a suit. There are many, perhaps too many for the average player to remember, but one should always be on the lookout for such situations.
Some, like the one on this hand, are relatively easy to spot...as long as you are looking for it. But many declarers may be taken unawares because of their inability to contstantly be on the look out for such situtations.
Based on a review of the results for this hand I suspect that this one was missed by five of the ten declarers.
So, review the hand and see can you identify the Safety Play that will ensure that you lose no heart trick. BUT, remember that the Safety Play must allow for either defender holding the outstanding hearts.
Click the Answer button below for an analysis.
|
| Show Answer |
ANSWER
This is one of the easiest, and most common, Safety Plays.
Note the following:
1) You hold between both hands a combined total of NINE hearts
2) Only FOUR hearts are outstanding, including the important ♥ J
3) Between your hand and dummy you hold the top three hearts, ♥ A, ♥ K, ♥ Q
4) You also hold, between the two hands, the ♥ 10, ♥ 9
The question is: How can you play the heart suit to ensure that either defender, holding ♥ J863, does NOT win a trick
Given that you hold nine hearts there is only a problem if one defender (either one) holds all four outstanding hearts. Clearly if the outstanding hearts are divided 3-1 or 2-2 then there is no problem. In those cases simply cash your top two or three hearts until the opponents have none left.
But, back to where either defender holds all four hearts. If we can SAFELY identify which player holds the four hearts then we can finesse against their ♥ J and thus prevent them from winning a heart trick.
BUT, how can we do this SAFELY.
The solution is to first cash a top honour from the hand that has two of the top three honours. In this case South holds ♥ KQ1072. So, we start the play of this suit by cashing the ♥ K or ♥ Q
If West shows out then we can catch East's ♥ J863 by playing a second heart to North's ♥ A and then play a third round and finesse South's ♥ 10 if East plays low.
Conversely, if West follows to the first trick with a small heart and East shows out then we can play a small heart towards North's ♥ A95, finessing the ♥ 9 if West plays low.
The key to making the play of the suit SAFE was in cashing one top honour from the hand (South) with two thereby retaining a finesse position against both defenders should eiher one show out on the first round of the suit.
In this case, all declarers who started the heart suit by playing the ♥ A on the first round were doomed to subsequently losing a trick to West's ♥ J
Although you might have difficulty in remembering many specific Safety Plays you will go a long way towards success if you always think of safety before playing certain suit combinations.
Here's another holding to get your mind thinking about safety... You find yourself in a slam (or game) which will succeed if you can limit your losses to one trick in the following suit combination:
Dummy
QJ32
Declarer
A9654
Clearly we are primarily concerned with one defender (either) holding the four oustanding cards K1087.
How can we play this combination (ample entries to either hand if necessary) to guarantee making four tricks and ensuring that we only lose one trick at most?
TIP...put the cards on a table and switch the four outstanding cards from one defender to the other. Eventually (if not sooner) you should work out the correct sequence of plays that will guarantee restricting your losses to a single trick in this suit.
I will upload the answer in a few days to give you a chance to solve it by yourself! |
|
|
|
|
|
|
| Wednesday, 7th August - So, how to make 12 tricks on this board? |
Show Detail |
Board 12 on Wednesday 7th August saw six of eight declarers in a heart contract make only eleven tricks.
The sheet shows that twelve tricks can be made. The question is from where does the elusive twelfth trick come?
Study the hand above. Clearly the only suit that can produce an extra trick is clubs. But how can declarer make four tricks in the suit? And is it a reasonable line of play?
If we examine the club suit in isolation it becomes obvious that there are a couple of ways in which the suit can be played.
BUT one option gives declarer a choice of lines of play at the penultimate moment in the play of the suit.
So, look at the club suit and identify at least two different sequences in how it can be played. And does one of the sequences offer you a choice of plays? What are the choices and why might you choose one as opposed to the other?
Click the Answer button below for an analysis.
|
| Show Answer |
ANSWER
Are you familiar with knowledge about the odds re distribution of outstanding cards in a suit? If not, you shoudl be. It is one of the cornerstones of suit play...knowing the odds.
For example, a simple finesse offers 50% odds of being successful.
And here's another example... the distribution of five outstanding cards in a suit is as follows:
3-2 or 2-3 = 67.8%
4-1 or 1-4 = 28.3%
5-0 or 0-5 = 3.9%
Which brings us to the club suit on this hand.
Most playsers will simply play out the top three cards and hope that the suit breaks 3-3. However a 3-3 break only occurs 35.5 times in a 100, i.e. 35.5%. Those who know their odds will be aware that a 4-2 or 2-4 break occurs 48.5% and a 5-1 or 1-5 break occurs 14.5% and the odds of a 6-0 or 0-6 division of oustanding cards is 1.5%.
So, watch what happens if we play the suit as follwos:
1) Cash ♣ A (or ♣ K) and then play a second club to dummy's ♣ Q. Note that West follows to the first two rounds with ♣ 7 and then ♣ 10. Interesting! And now declarer has a potential finesse posiiton of ♣ K9 sitting over East's possible ♣ J8.
Lead the last club from dummy and when East follows with ♣ 8 you are now faced with a choice....finesse the ♣ 9 or play ♣ K and hope the suit breaks 3-3.
So, if you know your odds, as many experienced players do, you might resonably elect to finesse and on this hand that will produce your twelfth trick!
So, really this issue revolves around whether you play West for a doubleton ♣ 107 or ♣ J107. A knowledge of the odds re suit distribution really helps.
Lastly, note that this option only arises where West holds a doubleton club which includes either ♣ J or ♣ 10.
Note also the sequence of plays is important, particularly if there is no outside entry to the South hand other than via the club suit. For exmple, if you play a club to ♣ Q first and then a second round to South's ♣ A or ♣ K you are now in the wrong hand to finesse the ♣ 9 on the third round. You have to return to the North hand to lead the third club and then decide if you want to finesse or play for the drop!
There are several books that devote all or some of the content to Bridge Odds or Suit Distribution. Players who are serious about improving their game should explore this topic.
One specialist book devoted to this tiopic is Bridge Odds for Practical Players (Hugh Kelsey & Michael Glauert). Currently available at Amazon.co.uk.
|
|
|
|
|
|
|
| Tuesday, 6th August - An interesting declarer play that arises from time to time |
Show Detail |
Board #21 on Tuesday, 5th August is an interesting curio! The sheet says 12 tricks can be made in a heart contract. Five declarers made 11 tricks and two made 10 tricks.
So, from where does the elusive 12th trick come?
This answer employs a recognised play which arises from time to time.
Give it a try before you click on the Answer button below...
|
| Show Answer |
ANSWER
As mentioned in the introduction...this is an interesting play that arises from time to time. The hand records clearly state that 12 tricks can be made. How can this be achieved?
One option is to play North to hold three diamonds, including the ♦ K, and any two or three hearts EXCLUDING the ♥ Q. Thus we may be able to ruff two losing diamonds in dummy. Proceed as follows: Win club lead and play a heart to hand winning with ♥ A (or ♥ K). Now lead ♦ Q intending to finesse if North plays low. If it wins then play a small diamond to dummy's ♦ A. Now play a spad to ♠ A in hand and lead a third diamond intending to ruff with ♥ 6. Now ruff a spade in hand and lead your fourth diamond and ruff with ♥ 8. This will work if North has three diamonds and doesn't have ♥ Q OR if North has four diamonds and DOES hold ♥ Q. Unfortunate;y that line doesn't work in this layout... South holds only three diamonds and does hold ♥ Q and can overruff the fourth diamond and then caash a winning club.
The solution is actually quite simple. Its called a Loser on Loser play!
Proceeed as above but instead of ruffing the fourth diamond simply discard dummy's ♣ 3. Win any return and lead the remaining club from hand and ruff in dummy. Twelve tricks...6 hearts, 1 spade, 2 diamonds and 1 diamond ruff, 1 club and 1 club ruff.
Note that this line also allows for the first option. It is only when North follows to the fourth diamond that we change horses and discard dummy's losing club.
There is slso a slight variation in the earlier plays which might see either opponent holding a doubleton ♠ KQ in which case dummy's ♠ J could be established as a winner. But that does not come to pass on this layout.
Watch out for Loser on Loser plays. They do come up from time to time! It's just a case of spotting the opportunity! |
|
|
|
|
|
|
| Monday, 5th August - Did you listen to the bidding? |
Show Detail |
Board #22 on Monday, 5th August is an interesting hand for N/S, whether declaring or defending!
It is likely that East will open the bidding. There are two likely outcomes:
1) N/S buy the contract, likely in 3NT
2) N/S become defenders against a likely 1NT, or perhaps 2♥, by East
How would you, as North, play the hand in 3NT on the lead of ♥ K?
Click the Answer button below for an analysis.
|
| Show Answer |
ANSWER
If North or South become declarer after East has opened the bidding, the hand becomes almost an open book. East is marked with virtually every outstanding high card. That kind of information becomes invaluable and should help declarer to plan the play.
If North is declarer East is likely to lead ♥ K (from KQJ or KQ10) at trick one.
East assuredly also holds virtually all of the outstanding high cards, especially both black kings.
So, how do we make nine tricks, or possibly more?
If we can safely finesse against East's presumed black kings then we should be able to score the following tricks:
2 spades, 2 hearts (♥ A and ♥ J), 2 diamonds, 3 or 4 clubs depending on how the suit breaks.
To successfully finesse against East's presumed black kings we need at least three entries to the North hand...two to finesse against East's ♣ K and one to finesse against East's ♠ K. BUT, North seems to have only two entries (the red aces). How can we manufacture a third one, so that we can finesse against East's ♠ K?
Why not take a minute to think about it before reading on...
Okay, maybe you spotted the possible third entry to the North hand...the ♣ 9. This will be possible if clubs break 3-2.. Finesse ♣ J, re-enter the North hand and finesse ♣ Q. When West follows to both clubs we know that East now has a singleton ♣ K which we can drop when we play ♣ A. Now North is left with ♣ 9 and South has ♣ 8. Easy!
We can now play the fourth round of clubs to North's ♣ 9 and then lead a spade and finesse the ♠ J when East plays low...
So, at this point declarer has accumulated 1 spade, 1 heart, 1 diamond and 4 clubs. We still hold ♠ A and ♦ K and we have the ♥ J8 sitting OVER East's ♥ Q10.
So, nine tricka are guaranteed and we still have the possibility of a tenth trick. East may have started with a doubleton spade in which case the ♠ K may drop under our ♠ A. Alternatively we may score a trick with ♥ J.
Note that if South is declarer then West can get the defence off to a good start by leading a heart. This will produce three hearts for the defending side. The lead of ♥ K from the East hand gives N/S an extra trick AS LONG AS decarer wins that trick with ♥ A. If declarer ducks then East can continue with a low heart which forces declarer to win with the ♥ A and sets up two winners for E/W.
Defending 1NT by East is not as easy...South cannot see North's hand, and vice-versa, but declarer should probably be restricted to 4/5 tricks. But defenders need to be careful not to gift tricks to declarer, particularly in the black suits!
Defence is the most difficult aspect of bridge and as with bidding you need 'systems' to exact the maximum number of tricks. Signals are an essential element of any defensive system. All cards played by a defender should mean something to partner!!! Sucessful defence demands a lot of work by budding, or even established partnerships! |
|
|
|
|
|
|
| Tuesday, 30th July - Planning ahead... |
Show Detail |
Sometimes we need to stop and take stock. A little thinking can go a long way! Board #14 on Tuesday, 30th July provided a fine example of this.
The sheet shows various contracts by N/S or E/W. What caught my eye was 4♠ by E/W. This contract was reached at two tables where seven tricks were made at one table and eight tricks at the other. The sheet suggests that 10 tricks are makeable.
Have a look at the hand and see can you work out the winning line before clicking on the Answer button below.
|
| Show Answer |
ANSWER
On the lead and continuation of a club, declarer can ruff the 2nd round and draw trumps, being careful to win the third round in hand with ♠ K. Declarer can now close their eyes, lead the ♦ Q, and when they open their eyes to discover that both opponents have followed with small diamonds, they then repeat the finesse and make ten tricks.
A trump lead permits declarer to draw trumps, again winning the third round in hand, and then drawing South's remaining trump before playing diamonds as before with the same overall result.
On a heart lead, ♥ K winning first round, and with a heart returned through West's ♥ J9, declarer can ruff in dummy. Declarer will now cash ♠ A, followed by ♠ Q...
And now the question is whether declarer has done some thinking! As can be seen, if declarer overtakes dummy's ♠ Q with the ♠ K in hand he quickly discovers that he now has a spade loser...South's ♠ 9 will eventually become a winner for the defenders.
Declarer can now lose four tricks. The heart at trick one, a trump, a club AND A SECOND HEART! Declarer can now only make the contract if the defenders mess up the defense. Let's assume that declarer plays a third spade, ♠ 10, and then a fourth spade to South's ♠ 9. At this point that the focus switches to South. If South cashes the ♣ A then the contract can no longer be defeated because North cannot gain the lead to cash his ♥ A. A second club will be ruffed and declarer will then cash five diamond tricks with the aid of the finesse against North's ♦K.
BUT, if South underleads his ♣ A then North will win and cash the ♥ A which becomes the fourth, and setting trick, for the defense.
But declarer can avoid that scenario... Let's go back to trick four when declarer leads the ♠ Q from dummy. Now, if declarer plays low from hand he discover the 4-1 trump break, and mentally pats himself on the back! Declarer then plays a club from dummy and subsequently gains access to his hand via a club ruff to draw South's outstanding trumps. The diamonds are then played for five tricks. Note also that if South wins the club trick with the ♣ A then declarer will make eleven tricks becasues declarer's third (losing) heart will disappear on dummy's fifth diamond...North cannot gain the lead to cash the setting trick with ♥ A. But I don't like relying on defensive errors to make contracts!!!
So, should declarer play for a 4-1 spade break? When I was learning bridge from my parents, my father once said to me... 'if there's a singleton in one hand it is likely that there is a singleton in another hand'. Note the symmetry of this hand...each player has a singleton!
A priori, five outstanding cards will break as follows:
3-2/2-3 : 67.8%
4-1/1-4 : 28.3%
5-0/0-5 : 3.9%
So, in normal circumstances the odds heavily favour a 3-2/2-3 break. But that changes when there are unbalanced hands around. And I like my dad's thinking...his words have proved wise in that respect on many previous occasions!
Note that declarer must assume that the diamond finesse works.
Also, note that where hearts have not been led and continued thereby forcing declarer to ruff in dummy with ♠ J, declarer must cash the ♠ A before the ♠ QJ otherwise he may find himself locked on the table and unable to draw a fourth round of trumps where the suit breaks 4-1/1-4.
And of course a heart lead from North (♥ A) followed by a heart to South's ♥ K doesn't give declarer the same problems. Declarer ruffs in dummy, as before, with ♠ J, and continues with four rounds of spades losing the last one to South's ♠ 9. BUT, the difference now is that declarer holds the master heart (♥ J) and South has no trumps left. shold he put North on lead with a club.
Gosh, there's a lot to think about when playing some hands! Ah yes, thinking...the secret to successful declarer play and defense! |
|
|
|
|
|
|
| Tuesday, 30th July - What a beauty...a trump promotion. |
Show Detail |
Board #3 on Tuesday, 30th July features a most usual defensive play...a ruff and discard that becomes a trump promotion for the defenders adn the only way to hold declarer to nine tricks!
All declarers made ten or more tricks despite the hand records showing that declarere can be held to nine tricks. The layout of the heart suit makes it most unlikely that the defeders will find this devastating defense. The necessary opening lead and continuation is almost impossible to find.
Can you spot the winning defense.
Cick the Answer button below for an analysis.
|
| Show Answer |
ANSWER
This is a simple hand to analyse. West must lead ♥ A and continue with aheart to East's ♥ Q (lowest of touching honours in third position).
East now cashes ♥ K and then continues with a fourth heart resulting in a trump promotion for partners ♠ J adn the fourth trick for the defense.
Needless to say the killing defense was not found at the table.
BUT, the interesting point is that it puts paid to the mantra that you should never offer declarer a ruff and discard. Yes, there are times when it is appropriate. Jusrt be awake for such opportunities.
|
|
|
|
|
|
|
| Monday, 29th July - What a beautifully simple play...if only declarer could see it! |
Show Detail |
Board #8 on Monday 29th July, is a very interesting and instructive hand.
As West you declare 4♠. North leads three top clubs.
All but one scored ten tricks. The other declarer scored eleven, exactly matching what the hand records suggested was makeable.
So, how did most declarers fail to make the maximum number of tricks?
Have a look at the hand before clicking on the Answer button bwlow. In fact have a double look!
|
| Show Answer |
ANSWER
As West you declare 4♠. North leads three top clubs. How do you proceed?
This is simple once you cut yourself free from the chains of blinkered vision which is always the main limitation with this type of play problem!
This is a classic example of a 'Dummy-reversal' play. In other words you have to visualise your hand as dummy and dummy's hand as declarer.
The play, in this instance is quite simple. Ruff the third club and play a spade to dummy's ♠ J. Once South follows we know that the spades will break no worse than 3-1/1-3. Now play ♥ A and then ruff ♥ 6 with a small trump. Now play a small trump to dummy's ♠ Q and ruff dummy's last club with ♠ K.
Proceed to cash ♦ A and then ruff a dimond in dummy, cash dummy's ♠ A, drawing North's last trump...and dummy is left with two winning hearts!
Eleevn tricks without breaking a sweat!
As mentioned in the introduction, the biggest problem is to spot the opportunity for a 'Dummy-reversal' It requires declarer to look at the two hands in an unusual and non-traditional way.
I suspect that in this instance most West's set about ruffing diamonds in dummy and in the process set-up North's ♠ 10 as a third defensieve trick.
Why not deal this hand out on the kitchen table with you holding the West cards as declarer and then switch the N/S and E/W hands. Now the correct play may seem more obvious to you. But, you should try to develop the ability to look at hands in dummy-reversal mode to identify opportunities like this one. |
|
|
|
|
|
|
| Thursday, 25th July - A couple of hurdles for declarer to clear. Did you get caught? |
Show Detail |
Thursday, 25th July...Board #6 features a number of hurdles for declarer to clear.
Have a look at the hand and see can you spot how to make eleven tricks without falling over the couple of hurdles in your way.
Check it out before clicking on the Answer button below.
|
| Show Answer |
ANSWER
Eight declarers found themselves at the helm in 3NT on this hand. The other three declarers played in a diamond contract. Of those in 3NT only three made eleven tricks. The hand records suggest that elcven tricks can be made.
So, what happened...or what didn't happen?
Let's say that South leads a club. As soon as dummy hits the table, declarer, East, should be mentally planning the play.
First let's count our top tricks: 2 clubs, 1 heart, 4 diamonds with the likelihood of a fifth diamond as long as North does not hold all four missing diamonds. Extra tricks might accrue as follows: at least one extra heart and possibly two if the fiensse works...and we might even score a spade trick!
So, we need to be able to take the heart finesse at leat once.
But a big problem could arise if we are not careful how we manage the diamond suit. Firstly we need to identify if we can score four or five diamonds. BUT we also need to be sure that we do not BLOCK the diamond suit. Lay the suit out on a table and distribute the outstanding diamonds as shown in the diagram. Now play the top two diamonds from dummy and follow with the lowest two diamonds from your hand. See what happens... You are left with ♦ Q75 in dummy and ♦ 109 in your hand. You can win the next two diamond rticks but the fifth diamond is stranded in dummy!
So, we need to be aware of the possibility of having to UNBLCOK the diamonds. So, play a small diamond from hand to dummy's ♦ A. If both opponents follow suit then the diamonds are 3-1/1-3 or 2-2. No problem. Cash the remaining two top diamonds from hand and be sure to follow with ♦ 109 from hand. Thus, when you lead the ♦ 7 from dummy you can follow with the ♦ 6 from hand thereby leaving you in dummy to lead the fifth diamond.
So, why not unblock on the first two rounds by playing the ♦ 109 from hand? Because if South has four diamonds he will now be holding ♦ J8 under dummy's ♦ Q75 and thus will score one diamond. Playing a small diamond fom hand initially identifies immediately if either defender has all four missing diamonds. If north holds all four diamonds then we should duck the second (or third) round whilst ensuring that we score four diamond tricks..as long as we do not block the suit.
Things are better if South holds all four missing diamonds because now we can trap his ♦ J and ensure that we make all five diamonds. How do we do this? Easy. As outlined before, lead a small diamond from hand on the first round. When North shows out get back to hand (take a heart finesse) and then lead ♦ 10 from hand. If South covers with ♦ J then win in dummy and return a small diamond to the ♦ 9 in hand. If South ducks when ♦ 10 is led then continue with ♦ 9 and proceed to play the suit until dummy's five diamonds have been cashed.
In addition we need to keep an eye on the other trick taking opportunities. yes, we could simply lead the ♥ J adn let it run if North follows with a small heart. But how do we combine thte heart options with a chance to play towards the ♠ K in hand!
Best is to use the diamond entries to dummy to:
a) finesse in hearts and
b) lead towards dummy's ♠ K.
The latter should only be done whilst we still hold the ♥ A, and ideally whilst we still retain one of our two club honours, one probably having been used on the opening lead.
So, have we planned the play without playing from dummy to the first trick? Well done.
Proceed as follows.
Win opening lead. No need to duck.
Lead small diamond to dummy's ♦ A . Note that diamonds are NOT 4-0 or 0-4.
Lead a heart to ♥ 10 in hand
Lead ♦ 10 to dummy's ♦ K
Led a heart to ♥ Q in hand. DO NOT CASH THE ♥ A
Play another diamond to dummy and cash dummy's fifth diamond throwing a club from hand.
Lead a spade toward the ♠ K. If North rises with ♠ A then win the heart return and cash the ♠ K for a total of eleven tricks.
Note that you should NOT cash all five diaomonds at first opportunity. You need to use the diamond entries to dummy to take repeated finesses in hearts and also to ensure that ou are in dummy when leading towards your ♠ K.
Finally, even if South leads a spade you should still be able to score eleven tricks as outlined above. |
|
|
|
|
|
|
| Wednesday, 24th July - Count to twelve... and two ways to do it! |
Show Detail |
Board #1 seemed to cause some declarers a problem. At seven tables of the ten tables, spades was the final contract. Four scoed 12 tricks. 3 scored less than 12. At two tables N/S were allowed to play in clubs, at the 5 and 3 level respectively. And one E/W played in a part-score in diamonds.
This is a relatively striaghtforwrad hand and should not have posed any problems in the bidding, E/W should reach 4 ♠ adn at the very least should double 5♣ if E/W bid on although 5♠, and even 6♠, are makeable contracts.
Against 5♠ North will surely lead ♣ K.
Play on before hitting the Answer button below.
|
| Show Answer |
ANSWER
As always, when dummy is tabled, delarer should take stock. Cout top tricks, identify possible losers...and prepare a plan.
In this instance, declarer can count winners as follwos: 6 spades, 2 hearts, 1 diamond, a club ruff on the opening lead. And extra tricks from either (or both) of two sources: 1) setup dummy's diamonds as winners, 2) ruff clubs in dummy...one already in the bag so only two more to ruff.
But declare need to be careful. If trumps are drawn before clubs have been ruffed or diummy's diamond suit setup as winners then the opponents may be able to cash a club trick when they gain the lead with the ♦ K.
As with many hands, timing of plays is of paramount importance. That's why you should ALWAYS pause before playing from dummy to the first trick. Many contracts fail because decalrer played to quickly. Good declarers will always mentally go through the first couple of tricks at least before playing a card from dummy.
So, how shoudl we proceed?
Plan A - ruff the three clubs in dummy.
This plan will require that we use thre of dummy's four trumps to ruff our three losing club. Care is needed.
Ruff the opening lead
Play a heart to ♥ A adn ruff a second club.
Play a diamond to our ♦ A and ruff our last club in dummy.
Note that dummy now has a singleton trump ♠ K.
There are two ways to proceed. Lead dummy's last trump and overtake with ♠ A in hand and hope that both defenders follow suit. If so, then cash ♠ Q drawing the last outstanding trump. We will lose a diamond at the end.
BUT, this plan has one possible flaw. If either opponent holds all three outstanding trumps then we will lose a trick to ♠ J
So, is there an alternative option?. Yes, cash dummy's ♠ K, playing low from our hand. If both opponents follows suit then one defender is now holding asingleton trump. Cash dummy's ♥ K and then ruff dummy's last heart with ♠ A or ♠ Q and then draw the outstanding trump. Why ruff the third heart with ♠ A or ♠ Q...Becasue it's safe to do so and guarantees that tou cannot be overfuffd if North started with only two hearts and ♠ Jx.
Plan B - setup dummy's diamonds. Important to note that between declarer and dummy we hold five of the top seven diamonds, missing only ♦ KJ
In this instance we need to find the outstanding diamonds breaking 3-2/2-3 or 4-1/1-4. And we need to be caeful re outstanding trumps. Probabbly best to play a round of trumps at trick 2 winning in hand with ♠ A. When both follow we can breathe a sigh of relief that we don't have to cope with the additional possible complication of a 3-0/0-3 trump break.
Additionally we now know that we still have three entries to dummy...♠ K10 and ♥ K. Play a trump to dummy's ♠ K. Now lead a diamond to ♦ A in hand and continue with a small diamond towards dummy intending to play ♦ Q or ♦ 10 depending on what North does. In this instance North will play ♦ K and when South follows with a small diamond then we know dummy's remaining diamonds are winners once we cash the ♦ Q which snares South's ♦ J.
Note also that dummy still has ♠ 10 in case North plays a club after winning ♦ K.That was why it was important to have at least one trump in dummy BEFORE tackling the diamond sit. Crucial!!!
And so you might counter...what happens if North only has a singleton small diamond. Okay, this is a scenario that we should have comtemplated before tacking the diamond suit. So what could happen if either defender holds ♦ KJxx
a) If North holds ♦ KJxx then when we play a second diamond towards dummy North will need to rise with the ♦ K and South will show out. North will continue with a club to remove the last trump (or a heart to remove the ♥ K entry). In either case we are home for twelve tricks. We win whatever North retuns, cash dummy's ♦ Q and ruff a diamond in hand which brings down Norths's ♦ J. The remaining entry in dummy, ♠ 10 or ♥ K, gives us access to dummy's winning diamonds.
b) If North shows out on the second diamond we play either ♦ Q or ♦ 10 from dummy. South will win and return either a club or a heart. We win in dummy and lead dummy's top diamond, ♦ Q or ♦ 10. If South covers with his reamining top diamond, ♦ K or ♦ J, then we ruff and gain entry to dummy and cash the remaining diamond winners.
So, really a relatively eay way to 12 tricks, whichever route you take.
But once again...note the absolute importance of plannng the play of the hand BEFORE playing from dummy at trick one!
|
|
|
|
|
|
|
| Tuesday, 23rd July - Do you know how to play unusual suit combinations? |
Show Detail |
Board #17 presented difficulties in bidding and play for N/S. Four pairs arrived in 3NT, making 6, 7, 8, 11 tricks respectivly. The hand records suggest declarer should make 10 tricks! Two other declarers ended up in 4 ♥ on a 4-3 fit, both making 9 tricks with 11 tricks makeable.
But this hand is not an easy one to play. And knowing how to play certain suit combinations is beneficial.
Have a look at the N/S hands below and see how you might fare in either contract. North is declarer and the lead is ♣ 6.
Click on the Answer button below when ready to review the analysis
|
| Show Answer |
ANSWER
Playing 3NT
In 3NT there is really only one way to play the hand. We have only two club stops and the opponents have already forced us to use one! We must therefore be able to create sufficient winners to make the contract by the time our second club stop is played.
Clearly there is only one route to take to make 3NT...diamonds have to be established by the time that we lose the lead to E/W who will contiue with a second round of clubs!
The obvious question is how to play the diamond suit with a likelihood of setting up the suit by the time we lose the lead.
What are the options?
1) Cash ♦ A and then play a second round hoping that ♦ K and ♦ Q will fall on these two rounds of the suit OR that one will fall on ♦ A and then the other can be forced out while we still hold ♥ A as an entry to the winning diamonds...
Is it possible? Yes. Is it likely? No.
We hold a total of eight cards in the suit leaving the opponents with five cards including ♦ KQ. It pays to know the odds on distribution of outstanding cards. Five outstanding cards will break as follows:
3-2/2-3 = 67.8%
4-1/1-4 = 28.3%
5-0/0-5 = 3.9%
In other words, there is a high probability that the suit will break 2-3/3-2 rather than 4-1/1-4 or 5-0/0-5
So, if the suit breaks 3-2 or 2-3, what layout of the opponents cards will enable us to establish the diamond suit for only a single loser?
Hopefuilly you worked this out before hitting the Answer button!
2) Clearly we need East to hold at least one of the two missing honurs as a singleton or doubleton, i.e. ♦ K or ♦ Kx or ♦ Q or ♦ Qx
OR for East to hold both missing honours, i.e. ♦ KQ or ♦ KQx
So, at trick two lead the singleton ♦ 6 from hand and when East plays low then finesse dummy's ♦ J. West will win with ♦ Q. Win any return and enter dummy with a heart. Now cash the ♦ A and note that East's ♦ K drops...
Observe that this play also works when East holds a singleton ♦ K or ♦ Q or ♦ KQ or ♦ KQx but NOT if East holds ♦ KQxx and plays low on the first round of the suit.
Note also that the play fails when West has a doubleton honour and East has a three card holding with one of the honours. In this situation West wins the first diamond trick but East's honour will not fall when the Ace is subsequently played...
The important issue here is to be aware of the best play that is likely to produce the desired outcome. Sometimes it will work, sometimes it will not. But at least you can ty it...as long as you know it!
Playing 4♥
On the other hand a contract of 4♥ requires a different approach and much luck.
In this contract we need to play on spades and establish winners in the suit as well as the ♠ K.
Win the club and play a heart to dummy's ♥ A. Now continue by leading dummy's singleton spade. West will rise with the ♠ A. Win any return and play a club to hand. Now cash ♠ K and then ruff a spade in dummy. Note that despite the odds, the spades actually break 3-3.
Play dummy's last trump to ♥ K in hand. Cash ♥ Q and note that East shows out leaving West with a single trump, ♥ J. But you're in control. Now lead winning spades eventually forcing West to ruff while you still hold ♥ 6 and winning spade(s). All you lose is ♠ A and a trump.
That was a lucky 3-3 spade break. The odds of a 3-3 break are only 35.5%. A 4-2/2-4 break is 48.5%. In case you didn't already know, an odd number of missing cards is more likely to break favourably whereas an even number of outstanding cards is more likely to break unfavourably.
The full hand was:
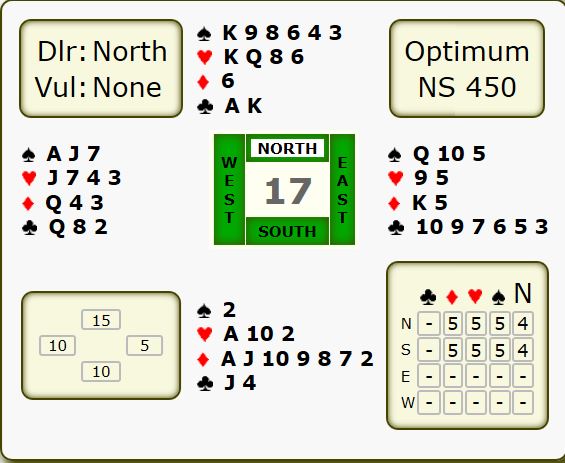
|
|
|
|
|
|
|
| Monday, 22nd July - A time to duck...and a time to rise! |
Show Detail |
Board #3 on Monday, 22nd July offers declarer a chance to display his card-playing prowess!
Can you recognize the pitfalls and how to overcome them.
Contract is 3NT by South. Opening lead ♠ K.
Study the two hands and plan your play before clicking the Answer button below.
|
| Show Answer |
ANSWER
So, you find yourself at the helm, as South, in 3NT. West has led the ♠ K.
Did you plan the play?
How do you proceed? The first hurdle is presneetd by the opening lead. You must duck this trick. If you win the trick with your ♠ A and East subsequently gains the lead, a spade through your ♠ J will be fatal. The defenders will cash four, maybe more spades. Ducking the opening lead leaves you in control...for the moment. Clearly if West continues a spade it creates a second spade trick for you.
Okay, so you duck the opening lead. West will shift to a small club. You now face hurdle #2.
If you play low from dummy East will win with ♣ K and then switch back to spades through your ♠ Jx. West will win and continue spades knocking out your ♠ A.
And you still have to taken the diamond finesse into West who will win and cash spade winners and so defeat the contract.
So, what can be done?
Recognise the hurdles. Ducking the opening lead thwarts West who cannot continue spades without conceding a trick to your ♠ J.
BUT, when he switches to a club (or a heart) you must refuse the finesse by rising with ♣ A (or ♥ A).
Now you are still in control. You still have ♠ AJ in your hand but you are now positioned to take the diamond finesse into West! If it loses to West's ♦ K he cannot lead a spade into your ♠ AJ so he plays a club to East's ♣ K who then reverts to spades though your ♠ AJ.
But now you have surmounted the two hurdles and are galloping towards the finish line. Rise with ♠ A and cash your diamond, club, and heart winners. You have amassed ten tricks: 1 spade, 2 hearts, 4 diamonds, 3 clubs..
Now go back and replay the hand twice, as follows:
1) winning the opening lead with ♠ A
2) ducking the opning lead but finessing in clubs when West finds the club switch
In both instances you will note that the contract fails, the defenders cash five or more winners.
Watch out for hurdles and learn how to negotiate them safely!
This was the full deal:

|
|
|
|
|
|
|
| Thursday, 18th July - What card do you play at trick one? |
Show Detail |
An interesting problem faced by East on Board #19 on Thursday, 18th July.
South opens 1NT (12-14 hcp) and eventually becomes declarer in 6NT.
West leads ♠ 5.
You are East. What do you play when declarer plays low from dummy? And what is your reasoning?
Do your thinking before hitting the Answer button below.
|
| Show Answer |
ANSWER
As East you are defending against 6NT.
Your partner, playing standard 4th best leads, makes the opening lead of ♠ 5.
Declarer plays ♠ 2 from dummy.
Over to you...
Clearly this is a case of playing either ♠ J or ♠ 8.
What do we know that might hep us to decide which card to play.
1) Declarer opened 1NT (12-14). Counting the high card points in dummy (18hcp) and adding our own (7hcp) we come to 25hcp. Declarer is known to hold 12-14 and hence partner has 1-3hcp.
Partner cannot hold ♠ AQ. Declarer has at least one of those cards.
BUT, how do we know that declarer does not hold both of the missing spade honours and that partner must hold ♠ Q?
This is the kind of simple detective work that is regularly done by good defenders.
The lead was ♠ 5. Using the Rule of Eleven we can determine that declarer has only one card higher than the ♠ 5. We know from the HCP distribution that partner cannot hold ♠ A (too many hcp!) and therefore partner holds ♠ Q. So, declarer holds ♠ A.
Note also that the Rule of Eleven has already confirmed that declarer has only one card higher than ♠ 5 and cannot therefore also hold ♠ 9.
So, we play ♠ 8 which declarer is forced to win with ♠ A.
Note that if we played the ♠ J at trick one declarer, upon winning with ♠ A will now hold a finesse posiiton against partners ♠ Qxxx and can therefore make 3 spade tricks. That could prove to be the vital twelfth trick for declarer.
Think first before playing snd use the defensieve tools that are avaialble to asisst you in coming to the right decision when it's your turn to play.
The full hand:
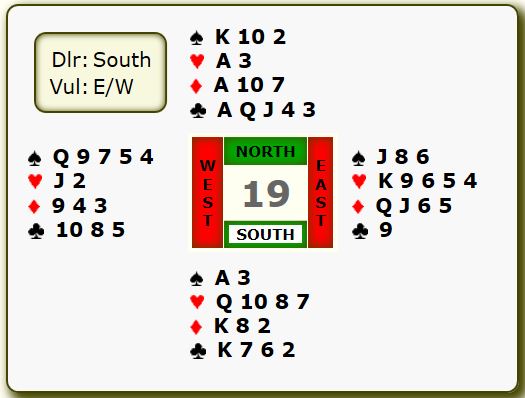
And, by the way, the hand records suggest that declarer can always make twelve tricks.
How so?
Declarer starts with ten top tricks and needs two more.
Tell me what you, as East, will discard on the run of North's clubs and then I will tell you how I make twelve tricks...
Essentially, East will be squeezed in diamonds and hearts. Yes, East can afford to discard a spade and a diamond but then has difficulty in making two further discards. And note that East has to discard before declarer.
If East discards a diamond then declarer can make three diamond tricks and can also play a heart towards his ♥ Q.
If East discards two hearts then declarer can make three heart tricks by playing ♥ A and following with the remaining heart from dummy and guessing to rise with ♥ Q which snags West's ♥ J. Another round of hearts drops East's ♥ K thus establishing declarer's ♥ 10 as a winner..
And it's easier for declarer if East discards three small hearts.
This kind of play may prove a little awkward for less experienceed players who prefer to see winners clearly established rather than have to do some card-reading based on discards made by defenders! |
|
|
|
|
|
|
| Wednesday, 17th July - Planning ahead is really important... |
Show Detail |
Board #10 on Wednesday, 17th July is a classic example of the importance of planning ahead.
The hand records suggest that all THIRTENN tricks can be made by declarer in a contract of 7♥.
Three declarers made 11 tricks. Another three made 12 tricks and only four declarers made all 13 tricks!
So, what happened?
Can you make all thirteen tricks and can you identify why others may have conceded a trick(s)?
Have a look at the hand before clicking on the Answer butotn below.
|
| Show Answer |
ANSWER
How could you fail to make twelve tricks, let alone thirteen?
I wonder if it was a case of lack of forward planning.
Let's assume South leads a small spade.
As we repeatedly suggest in this column...think first before playing from dummy at trick one!
There are several lines of play open to declarer on this hand. And clearly we need some luck to score thirteen tricks including successful finesses in hearts and clubs!
So, how might we approach the play of this hand?
Two clearly defined lines suggest themselves:
1) Ruff two diamonds in dummy and subequently hope to take successful finesses in hearts and clubs. Note that ruffing two diamonds in dummy also requires the hearts to break 2-2 or South to hold a singleton ♥ K.
2) Play for a dummy reeversal, i.e. setup the clubs in dummy as winners. This has the benfit of using dummy's hearts to draw the opponents trumps and thereby leaving us with trumps in hand to ruff dummy's losing clubs.
It also means that we have less communication issues and should not find ourself in the wrong hand when needing to take a club finesse.
Note also that we could take two finesses in the club suit, first finessing the ♣ 10 and then the ♣ Q. This line offers only odds of 25% that BOTh finesses will be successful.
I think I prefer the line of finessing the ♣ Q and then trying to set up the rest of dummy's clubs. The single finesse is 50% to succeed. And the outstanding clubs should beak 4-2/2-4 (48.5%) or 3-3 (35.5%) giving a total of 84% for a break of no worse than 4-2. After finessing the ♣ Q we should be home by subsequently ruffing two clubs in hand. That means that we can afford to find the trumps breaking 3-1/1-3 and still be able to ruff two clubs in hand.
So, win the opening lead in hand with ♠ A. Now let's start with a trump finesse by leading ♥ Q from our hand towards dummy's ♥ AJ103. If South plays a small heart then unblock the ♥ J or ♥ 10 from hand. We preserve the ♥ 3 in dummy so that we can use it to get back to our hand. Also, leading the ♥ Q means that if South doesn't cover then we can repeat the finesse by playing another small heart towards dummy's ♥ AJ3. And if the first heart lead produces small cards from both defenders then we can repeat the finesse knowing that trumps are breaking no worse than 3-1/1-3. If North shows out on the first heart then we follow with ♥ 9 from hand and pat ourself on the back for having the foresight to unblock the ♥ J from dummy on the first round. This time we can follow low with ♥ 3 from dummy if South plays low leaving us in hand for the third play of the trump suit and about to finesse against South's ♥ Kx. Nice foresighted play of unblockng the ♥ J on round one of the heart suit!. Just in case South held all four hearts!
However, straightaway we get the first bit of good news when South's singleton ♥ K pops up. Win with dummy's ♥ A and cash ♥ J and then lead a heart to ♥ 8 in hand. We have now exhausted the defenders of their trumps. AND we are in the right hand to lead a club towards dummy. We finesse the ♣ Q when South plays low. When it wins we cash the ♣ A and then ruff a club in hand. And this produces our second bit of good fortune as the clubs break 3-3. BUT, even if the clubs broke 4-2/2-4 we could play a spade to dummy and ruff the fourth club in hand, thereby establishing the last club in dummy as a winner.
In fact dummy is now 'high', meaning all the remaining cards in dummy are winners and thus we score all 13 tricks.
Without having been an onlooker at each table I can only hazard a guess as to how declarers ended up with less than 13 tricks....I suspect that some found themselves in dummy when having to play clubs for the first time and thus lost a trick to South's ♣ K or ♣ J and with the club suit still not established may have lost control and in the process lost a second club or a diamond.
It is so important to explore the communications between declarer's hand and dummy (and vice-versa) when plannng the play of a hand, in particular by idntifying which hand one needs to be in when playing a spcific suit combination.
Note also, that after playing a heart from hand and where South's ♥ K pops up we would also be able to ruff two diamonds in dummy but will need to be careful about North's three card heart holding. If we draw three rounds of trumps then we can only ruff one diamond in dummy. If we only draw two rounds of trumps then we need to be able to get to hand to draw North's oustanding trump. I think this means that we need to also finesse the ♣ Q early in the play so that we can ruff the third round in hand and then draw North's third trump.
This is a prime example of the need for planning the play...and not just throiugh the first two tricks!
The full hand:
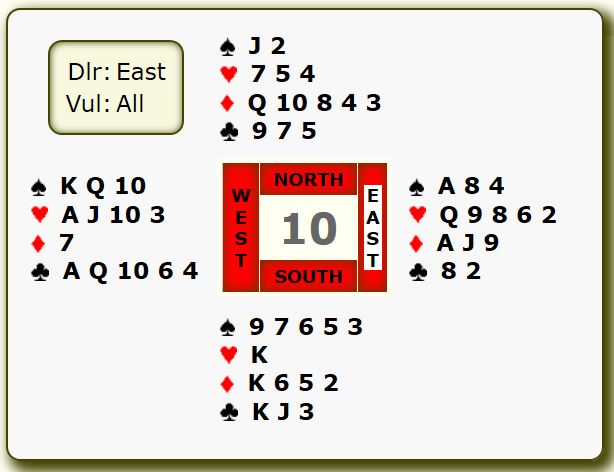
|
|
|
|
|
|
|
| Tuesday, 16th July - Making nine tricks in spades... |
Show Detail |
Board #10 on Tuesday, 16th July offered declarer an interesting route to nine tricks..but not many declarers got there!
Have a try before hitting the Answer button below
|
| Show Answer |
ANSWER
All roads might lead to Rome but on this hand some lines lead to nine tricks! In fact the hand records sheet suggest that nine tricks can be made on any lead!
So, how to proceed?
Basically there are two clear lines.
1) Set up a winning club in dummy...but will you have an entry to enjoy the established winner(s)? In reality it doesn't matter as long as the clubs break 3-3 and you can establish a club for a discard of a diamond from hand. This line will not work if the opponents lead diamonds at trick one or before you have established the club winner in dummy.
Note that a major issue with setting up a third round club winner in dummy is that you will have to guess correctly when you lead the second club from your hand toward dummy ♣ Q1096.
2) Discard a diamond on the third heart and then plan to ruff a third round of diamonds in dummy. This line has the advantage that you can discard a losing diamond from dummy, even if the defense attacks diamonds early in the play of the hand and then trump the loser as long as you have a trump left in dummy with which to ruff. This puts the defense in a dilemma... If they attack trumps then you can set up the club winner in dummy for a discard of a losing diamond from hand. And if they attack diamonds then you can ruff the third diamond in dummy.
So, how might the play proceed?
On a diamond lead, win the ♦ K at first opportunity and then play three rounds of hearts discarding a diamond from dummy. Now lead a diamond towards dummy's ♦ Kx. Rise with ♦ K if east plays low and contiue with asecond rond of the suit. Enter hand with ♠ A or ♣ A if opponents play a club after winning the first or second diamond. Ruff your lsoing diamond and play a trump, followed by a second trump at first opportunity. You will score: 3 spades, 3 hearts 1 diamond and 1 diamond ruff, 1 club.
On a club lead, win the opening trick, with a bonus if you guessed correctly to play ♣ 10 or ♣ 9 from dummy. Continue with three rounds of hearts dicarding a diamond from dummy on the third heart. Now lead a diamond towards ♦ Kx in dummy. If East rises with ♦ A then win the club, diamond or trump retunn. Ruff your last diamond in dummy and continue with a trump.
On a heart lead, win and continue with two more top hearts discarding a diamond from dummy. Then lead a diamond towards dummy's ♦ Kx. Gain entry to hand and ruff your losing diamond and then play a trump. And at first opportunity play another trump.
On a trump lead you might be able to negotiate a diamond ruff in dummy as long as you guess the trump layout by winning the second round of trumps and if you are are also lucky that East rises with the ♦ A on first round of diamonds. HOWEVER, E/W can foil your plan if East plays low on the first round of diamonds and West rises with ♦ Q on the second round of the suit. West can thencash his trump winner, gobbling dummy's last trump in the process. The defense can now cash a third diamond and so hold declarer to eight tricks as long as neither defender leads a club after the third round of diamonds.
On a trump lead, the winning line, which the defense cannot foil, is to play on clubs, correctly guesing to play West for the ♣ K and East to hold ♣ J. Now you can discard a losing diamond from hand on the play of the winning club from dummy.
|
|
|
|
|
|
|
| Thursday, 11th July - A simple 3NT? Not quite.... |
Show Detail |
Board #20 featured some decision-making moments for declarer. Not every declarer rose to the occasion!
For better or worse, as West, you end up as declarer in 3NT. North leads ♥ 5. South wins the first trick with ♥ A and continues as follows:
a) ♥ 3
b) ♥ 10
In each case, how would you play the hand?
Give some thought to your planning before hitting the Answer button below.
|
| Show Answer |
ANSWER
For better or worse you, West, end up as declarer in 3NT. North leads ♥ 5. South wins the first trick and continues as follows:
a) ♥ 3
Cover South's ♥ 3 with the ♥ 7 from your hand. North will win but cannot return a heart without giving you a trick with your ♥ J. Win any return and play the ♦ K from your hand. If it wins then continue with ♦ J from hand and overtake with ♦ Q in dummy and if necessary, continue with another top diamond from dummy.
if you subsequently take sthe spade finesse you will make ten tricks, lsoing two hearts and ♦ A
NOTE that you are establishing diamond winners while still holding club entries to dummy to get at them.
Cashing the club winners BEFORE establsihing diamond winners will see the diamonds isolated in dummy when the defenders duck the first rounf of the suit!
b) ♥ 10
This is a different scenario. Cover with ♥ J. North will win with ♥ Q and will continue with a third a heart.
To give yourself the best chance of making the contract you should duck the third heart. Win the fourth heart and proceed by playing diamonds as outlined above. Note that you need at least one diamond trick, even if the spade finesse works, to get you to the nine tricks require for your contract.
Observe what happens if you win the second or third heart. South will win with ♦ A and continue with a heart through your ♥ Jx and so the dffenders will take four hearts and ♦ A. One down!
Note that if South has ♥ Q then your ♥ J will win when you cover South's ♥ 10. The switch to the ♥ 10 probably suggests that North has the ♥ Q. But you need to duck the suit until South has no more hearts and you can safely play diamonds.
And what happens if North has ♦ A...well in that case you could have won the second heart with ♥ K and played on diamonds. If North has ♦ A then he cannot continue hearts into your ♥ Jx.
But then declarers don't have X-Ray eyes.
And note that the standard return of partner's suit usually calls for a small card from an original four card holding and highest from an original holding of three cards.
Full hand:
Note that ♦ 6 and 6 ♣ are both makeable contracts! |
|
|
|
|
|
|
| Tuesday, 2nd July - Anyone for 13 tricks in 6S? |
Show Detail |
As West you find yourself at the helm in 6♠.
West leads ♣ 7 and South follows with an encouraging club as you win with ♣ A in dummy.
What is your plan and how do you proceed?
Think about the play before clicking on the Answer button below.
|
| Show Answer |
ASWER
Win the first trick with dummy's ♣ A discarding a small diamond from hand.
First look seems to suggest that we start with eleven top tricks: 5 spades, 4 hearts, 1 diamond, 1 club.
And we have good opportunities for developing one or even two more tricks via diamond ruffs in dummy.
So, at trick two we play a diamond from dummy and to our surprise South plays ♦ K.
Now it's a simple case of playing SAFELY.
Win with ♦ A and DO NOT try and cash ♦ Q (if you do it will be ruffed by South)
Lead the remaining small diamond from hand and ruff with dummy's ♠ J.
Now lead ♠ 10 from dummy and continue with dummy's remaining small spade to the ♠ A (or ♠ K or ♠ Q or ♠ 9 - all equal value) in hand and draw the remaining trump.
Now cash dummy's three top hearts and then ruff a club in hand and claim.
Note that it was not necesasry, and would have been a coslty mistake, to attempt to cash the ♦ Q at trick three. It can be played AFTER trumps have been drawn.
Also, where it does not cost, always ruff with a trump that cannot be overruffed, particularly on hands where wild distributions abound!
Note here that any declarer who tried to ruff a club at trick two with a low trump from hand would have been overruffed by North!
If North leads ♦ J then play as before, i.e. win with ♦ Q and ruff a small diamond in dummy with ♠ J. Draw trumps as before and then play a heart to dummy. Cash ♣ A and discard your remaining small diamond from hand. cash dummy's remainign hearts adn ruff a club in hand and claim.
Two easy and SAFE routes to all 13 tricks.
As always, taking time to plan the play pays off!
The full hand:
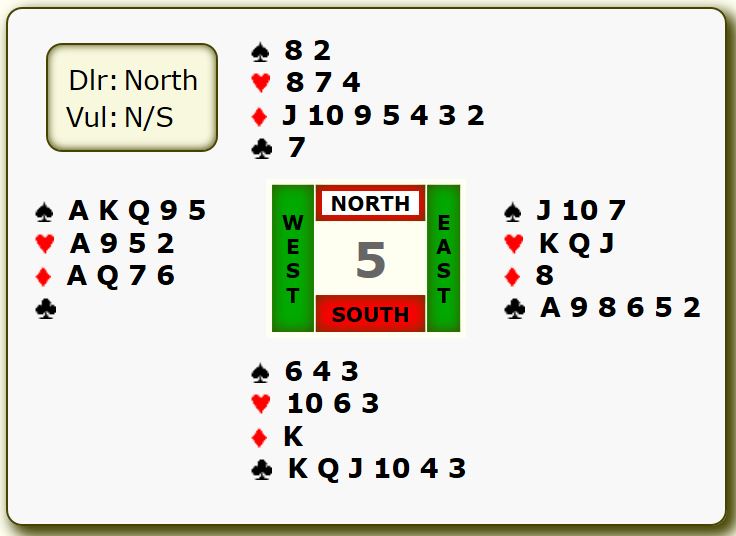
|
|
|
|
|
|
|
| Monday, 1st July - Are you happy to play 2S or do you prefer to make a game try? |
Show Detail |
Are you happy to settle for a part-score...or would you make a game try?
Study the North hand and decide what you would do if partner raises your 1♠ opening to 2♠ with opponents silent.
Give it some thought before clicking on the Answer button below
|
| Show Answer |
ANSWER
Board #3 on Monday, 1st July presented an interesting hand with bidding opportunities for N/S and a play problem for declarer.
First a word about the bididng.
North opens 1♠ and South will respond with a raise to 2♠.
4 of the eight North's had enough and passed. 1 declarer made 11 tricks, 1 made ten, and 2 made 9 tricks.
2 ended up in 4♠ with mixed fortunes. One made 10 tricks the other only 9 tricks.
2 pairs ended up in 3♠, both making 9 tricks.
I think I would like to be in game BUT only after I know that South has good club support. How to find out?
After South raises to 2♠ North should appreciate that he has a better than minimum opening....16 hcp, a good trump suit, a secondary 4 card suit headed by ♣ A10xx, and 3 aces.
I would bid 3♣ , a GAME TRY, and then South has to decide whether his hand offers good support for North in 4♠. I suspect that a panel of experts would offer differing views as to whether to move forward or not...
Okay, so you bid the spade game.
Now to the play...
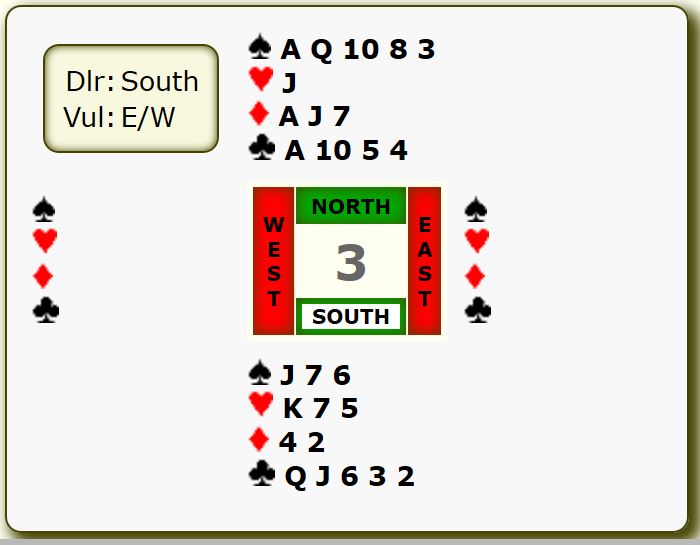
East may start with the ♦ 6 (second highest from four cards below the 10...although some include the 10)
Dummy hits the table and North assesses his chances.
Losers first...and there seems to be four potential losers...one in each suit.
On the other hand, there are possibilities that we may be able to reduce the deficit with potential finesses in both black suits.
So, how to proceed. We need a plan.
Basically it comes down to whether we opt for one of the two black suit finesses although there is a line that would allow us to try both finesses...but it is fraught with danger!
If we duck the first diamond we can win the second round of the suit and enter dummy with a diamond ruff and then decide what to do next, i.e. finesse in clubs first and if that wins then finesse in spades. Or simply finesse in spades and be prepared to lose a club.
So, we duck the opening lead. West wins with ♦ Q (the lower of touching honours...playing the ♦ K in this situation would deny the ♦ Q!)
West now switches to the ♣ 7 and we face a decisive point in the play of the hand. We could play low from hand and hope that the finesse succeeds. BUT this switch is an ominous development...West might have a singleton and if we finesse East will win with ♣ K and give his partner a ruff. The ♥ A is then cashed and suddenly we are looking at a possible two trick defeat...
Can we counter? Yes...rise with ♣ A...ruff a diamond in dummy and lead ♠ J and finesse into East. We are relieved when East follows with a low trump. Repeat the finesse, draw the remaining trump and play on clubs for ten tricks and a well earned top!
By the way, if you study the hand records you will note that 4♠ makes when played by North but there are only nine tricks when played by South. Of course that is an umlikely scenario in this instance given the layout of the spade suit but it is a regular feature on many hands that the number of makeable tricks depends on which player of the contracting side is declarer.
Can you identify why there are only nine tricks available if South is declaring 4♠?
Yes...if West leads his singleton club then the defenders can negotiate a club ruff for West before South can draw trumps!
The full hand:
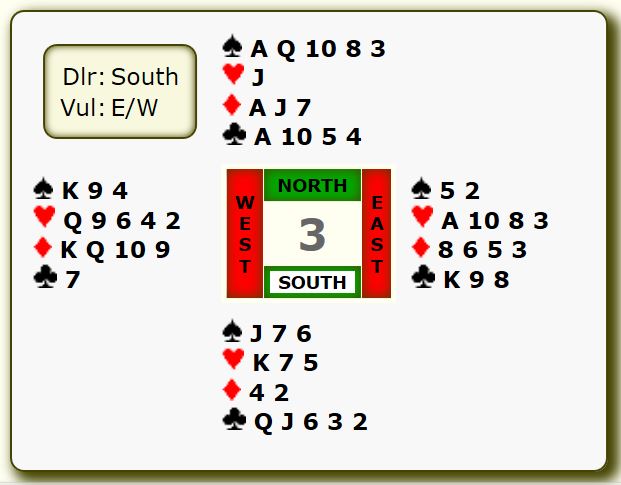
|
|
|
|
|
|
|
|
|
|
|