KHATIB KIBITZER
Tax Time
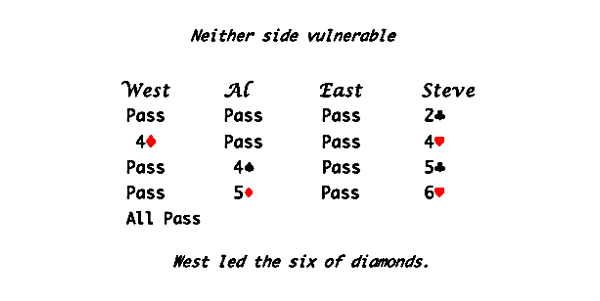
Six years ago, playing with my Bridge pal Steve Conrad and I played the New York Regional and reached six hearts in a pairs game after a competitive auction. For the moment that hand is presented as a "single dummy" problem, with the East-West cards concealed. If you rather, you can scroll down at any time to see the complete hand.
Steve managed to bring six hearts home against less-than-perfect defense. In our later discussions, we realized the hand was a real "gem" - excellent material to challenge an intermediate or advanced player.
Not long after, we contacted Mr. Phillip Alder, Bridge Bulletin Columnist, whose writings had regularly appeared in the New York Times. He was always looking for hands of interest, and asked to feature this one. We agreed, and his own article and amusing narrative was featured in the Times.
So pause for a moment. What should Al's hand play at trick 1?
Hints
( If you want them )
The first hint is actually a warning. This hand contains multiple traps! Consider it a challenge.
The second hint is Steve's admission that he made a nearly fatal mistake very early in the play. We were lucky the opposing defense thereafter was less than perfect.
The third hint is to tell you that while developing this article, I mailed my tax return for 2020, and that doing so provided inspiration for this column.
Your initial count of winners and losers suggests that if clubs and hearts divide reasonaly well, the contract should be cold. And while the chance of a 6-0 division of hearts is remote, dealing with a poor division of clubs should be part of your plan.
The complete hand follows.
Double Dummy

Trap #1 is to prematurely play the Ace of Diamonds, because declarer simply cannot tell at this point what to discard from the south hand. Best to try the Jack on the first diamond lead (just in case!), intending to ruff in hand. Trump can then be pulled.
What follows is a bit of declarer magic called the Morton's Fork (more on the name later). To execute this, South leads a low spade away from his Queen, and West is forced to choose between two losing options. He can rise with the Ace, leaving South with two cashable spade tricks, six hearts, a belated diamond ace and at least three clubs - not less than 12 tricks in all. Or West can duck the first spade, allowing South to then discard the Spade Queen on a carefully preserved Ace of Diamonds, thereby avoiding the loss of a spade.
Assuming West ducks and South next discards the Spade Queen, South now only needs to guard against losing more than 1 club trick. Clubs must be played carefully, starting with a low one from dummy, with South inserting the 7 or 8 if East plays low. This ensures the contract. An initial lead of the Club Queen would, on the lie of the cards, be fatal.
There was one other potential trap on this hand - did you notice? In order to make what later turned out to be an essential safety play, all 3 of dummy's clubs are needed for the end game. A sloppy club discard on a trump lead would have cost the contract.
More on Morton's Fork
South's critical play in spades - the forced toxic choice it represented to West - was named for Cardinal John Morton of England. To paraphrase Phillip Alder's comments from 2015:
"Henry VII made Cardinal John Morton archbishop of Centerbury in 1486 and lord chancellor of England in 1487. Cardinal Morton applied an interesting "either-or" policy to collecting the king's taxes. If someone lived a lavish lifestyle, he clearly had money to spare for paying taxes. And if he lived frugally, he undoubtedly was hording money, and could afford to give the king his due."
Now you know why this column has its name, and how this hand was tax time for West.
♠ ♥ ♦ ♣