| Lessons |
If you wish to have Bridge lessons then please ask Des Walsh.
|
|
| Last updated : 24th Oct 2018 09:19 GMT |
|
|
|
| Peters' Presentation handouts |
|
| Last updated : 24th Aug 2020 23:04 BST |
|
|
|
| John Green's Handouts |
|
| Last updated : 20th Mar 2019 14:08 GMT |
|
|
|
| Answers to xmas quiz |
Please use the link below to see the answers to Peters xmas quiz at the Red Lion.
QuizAnwers.pdf
|
|
| Last updated : 13th Dec 2018 22:43 GMT |
|
|
|
| Peter's Presentation 16th October |
|
| Last updated : 23rd Oct 2018 15:37 GMT |
|
|
|
| Hand 15 from Red Lion |
|
| Last updated : 15th Oct 2018 14:28 GMT |
|
|
|
| Peter reviews the barrier |
The Barrier
During our play at the Henley Bridge Club this week, one player had 5 spades and 4 clubs with 14 points. She opened the bidding with 1 S, intending to rebid clubs as her second suit. Her partner, with 5 diamonds and 11 points, responded 2 D.
The Opener did well to remember “the barrier”. The barrier is set at one level above your opening bid, in this case 2 S. If Opener had bid 3 C, this would have been beyond the barrier and would send a message to her partner that she had at least 16 points. Instead, she correctly rebid her opening suit at the barrier level of 2 S.
It is worth remembering as responder that a rebid of the same suit at one level higher may not mean Opener has 6 cards, but 5 cards because Opener has less than 16 points and is restricted by the barrier from bidding higher.
At the time, I was not sure whether the barrier would apply if it is your partner’s response bid that led you to want to bid higher than one level above your first bid. After looking this up, I found out that the barrier does still apply.
I’ll not name the player to embarrass her, but well done for remembering that the barrier did apply.
For a clear explanation and examples of the barrier, here is a link to a note on the No Fear website:
https://www.nofearbridge.co.uk/acol/Openers%20Rebid%20Above%20the%20Barrier.pdf
Best regards,
Peter Dyer
|
|
| Last updated : 28th Sep 2018 11:53 GMT |
|
|
|
| Peter reviews interesting board played on 4th September |
|
| Last updated : 28th Sep 2018 11:38 GMT |
|
|
|
| Peters Presentation 18th September |
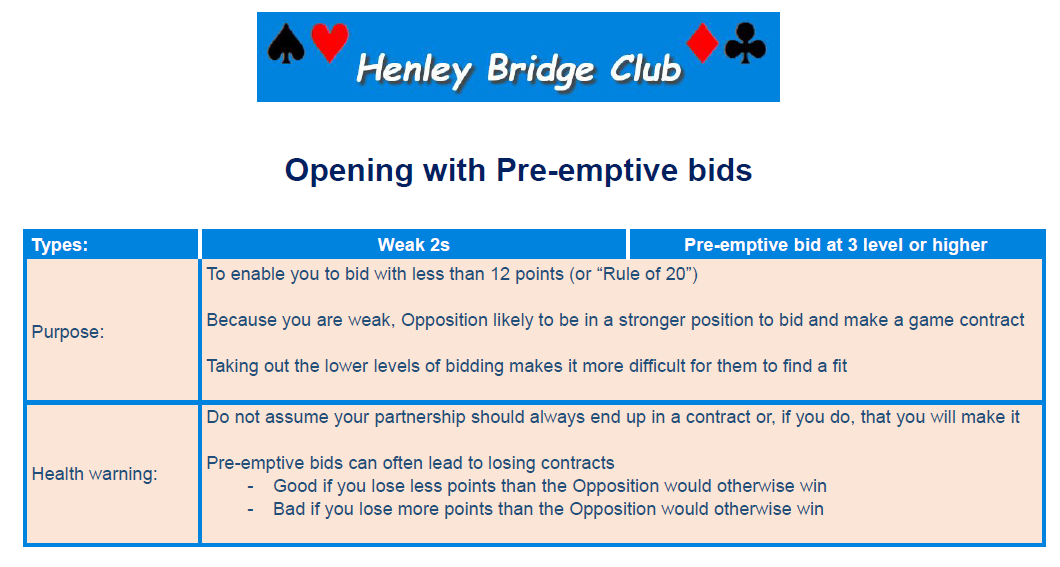
Do not bid weak 2 if you are vulnerable and the opposition are not vulnerable.


|
|
| Last updated : 28th Sep 2018 11:34 GMT |
|
|
|
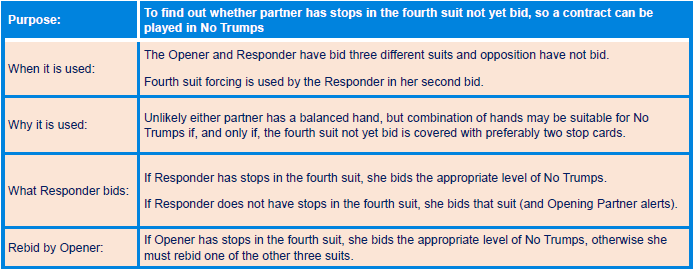
| Peter's presentation 21st August |
Fourth Suit Forcing
|
|
| Last updated : 28th Aug 2018 16:13 GMT |
|
|
|
| Notes on Peter's presentation 24th July |
Losing Tricks Count
During our workshop at Henley Bridge Club on Tuesday, 24 July, we used “Losing Tricks Count” to help us decide the level of bid for a trump contract. It helped us to bid 4 Spades, which was the optimum contract that could be won if Declarer made no errors.
This note is intended to explain more about the “Losing Tricks Count” method of evaluating the strength of a hand. I have divided it into three sections:
- The purpose of Losing Tricks Count and when to apply it;
- Calculating the Losing Tricks Count in your hand; and
- Applying the Losing Tricks Count to help decide the level of trump bid.
- The purpose of Losing Tricks Count and when to apply it
We are familiar with counting the High Card Points (HCPs) in a hand and we use this initially to decide if we have a strong enough hand to open the bidding (usually 12+ points or using “Rule of 20”).
If you have a balanced hand (no more than one doubleton and no singletons), using HCP is a very good measure of the strength of your hand. You need to be careful that, between you and your partner, you have stops in all the suits, but combined points of 25+ for a game and 33+ for a slam works quite well.
However, using just HCP for an unbalanced hand is less effective. Having two or three of the top cards in a suit (not just in trumps but in other suits as well) is very useful for trump games and so is only having one or two or, better still, no cards in a suit because this provides an opportunity for “ruffing” (which is the term often used for trumping).
An approximate, but better than nothing, way of evaluating the strength of an unbalanced hand is to start with the HCP and then add points for shortages in suits, e.g. add 5 for a void, 3 for a singleton and 1 for a doubleton. A better measure is the Losing Tricks Count (LTC).
Using LTC is not full-proof and it should not be used mechanically as a substitute for judgement. It is just an aid. It is less effective if your hand is balanced but you are considering a trump contract with you partner. It is also a lot less accurate at the slam level (6 of any of the suits) than it is for determining whether to bid a game contract (4 ♠/♥ or 5 ♦/♣).
- Calculating the Losing Tricks Count in your hand
This is the boring bit. You can just learn how to calculate the LTC, but I think it is better to first have a broad understanding of why it does reflect the strength of a hand for playing in a trump contract.
In trump contracts, there are unlikely to be more than two rounds of a suit before one of the players has run out of that suit and someone ruffs (trumps). For a suit to circulate three times before someone ruffs, the cards in that suit need to be distributed 3,3,3,4 among the four players, which can occur but is rare. An Ace will usually be a winning card, as will a King if you have another card with it and sometimes a Queen will win, usually if the Ace and King are played in the first round. Any card in a non-trump suit with a value less than a Queen is unlikely to win.
Conversely, having a void in a suit, a singleton, or even a doubleton of a non-trump suit in your hand can provide you with opportunities to ruff while the other players still hold cards in the suit.
For non-trump suits, we need a measure that reflects how many Aces, Kings and Queens are most likely to be winners and shortages of cards that will provide the opportunity for ruffing.
For the trump suit, we measure the strength in the same way, except for a small difference relating to Queens described below. We do not need our measure of strength to take additional account of cards in the trump suit that are below the Queen level, because these will mainly be used to take advantage of the shortages in other suits by ruffing.
The LTC measure reflects both aspects – high cards in all suits and shortages in the non-trump suits. It is expressed as the likely losers rather than winners in your hand. The strength of the hand is shown by how few losers you have.
Start calculating the likely losers (LTC) by only considering the first three top cards you have in each of the four suits. Add up the number of these cards that are not either an Ace, King or Queen.
There are just a couple of refinements:
- The sequence Ace, Jack, Ten in the same suit counts as one loser rather than two
- If you have a Queen in a suit without either the Ace or King, count this as a loser if it is not in the trump suit
Examples
In all cases, ♥ s are trumps
|
|
|
|
|
|
|
|
|
LTC
|
|
♠
|
A
|
2
|
|
|
|
♥
|
K
|
10
|
5
|
4
|
♦
|
10
|
7
|
5
|
|
♣
|
A
|
Q
|
9
|
8
|
7
|
|
♠
|
A
|
K
|
Q
|
8
|
|
♥
|
K
|
2
|
|
|
♦
|
A
|
J
|
10
|
2
|
♣
|
7
|
4
|
3
|
|
5
|
|
♠
|
10
|
6
|
3
|
|
|
♥
|
8
|
3
|
|
|
♦
|
K
|
J
|
9
|
6
|
♣
|
K
|
J
|
10
|
6
|
9
|
|
♠
|
K
|
J
|
8
|
6
|
4
|
♥
|
Q
|
4
|
3
|
2
|
♦
|
|
|
|
|
♣
|
A
|
10
|
7
|
5
|
6
|
|
♠
|
A
|
Q
|
7
|
2
|
|
♥
|
10
|
|
|
|
♦
|
Q
|
J
|
9
|
5
|
♣
|
K
|
Q
|
9
|
2
|
6
|
|
♠
|
A
|
10
|
8
|
4
|
|
♥
|
K
|
10
|
6
|
4
|
♦
|
K
|
9
|
6
|
2
|
♣
|
Q
|
|
|
|
?
|
|
♠
|
K
|
Q
|
7
|
6
|
|
♥
|
A
|
J
|
8
|
5
|
♦
|
7
|
4
|
3
|
|
♣
|
A
|
5
|
|
|
?
|
|
♠
|
A
|
10
|
8
|
4
|
|
♥
|
Q
|
10
|
6
|
4
|
♦
|
Q
|
9
|
6
|
|
♣
|
K
|
2
|
|
|
?
|
|
♠
|
K
|
Q
|
7
|
6
|
|
♥
|
A
|
J
|
10
|
7
|
♦
|
5
|
4
|
|
|
♣
|
A
|
5
|
2
|
|
?
|
The answers for the last four hands above are at the end of this note.
- Applying the Losing Tricks Count to help decide the level of trump bid
Finally, we get to the more interesting part – how to use Losing Tricks Count (LTC) in practice.
The general advice is not to calculate the LTC until you are ready to agree a suit for trumps with your partner in the bidding. There is nothing to stop you calculating it earlier, but your initial priority is deciding whether you have enough HCP to enter the bidding as the opening bidder, over-caller, or responder. There is also the practical consideration that a Queen in your hand without an Ace or King in the same suit may count as a loser or not, depending which suit is being considered for trumps.
The time to use LTC is when
- You want to bid the same suit in support of your partner’s bid; or
- Your partner has supported your suit and it is your turn to bid again.
- You want to bid the same suit in support of your partner’s bid
You will not know your partner’s LTC, so you assume as follows:
- If your partner has opened the bidding, assume she has an LTC of 7
- If your partner’s first bid was an overcall, assume she has an LTC of 8
- If your partner’s bid was a response to your opening bid, but in a different suit to the one you bid, assume an LTC of 9
You have calculated the LTC for your own hand. Add your LTC to the assumed LTC for your partner and subtract the total from 18. For example, if your partner opens 1 ♥ and you have four or more ♥s and an LTC of 8, you can bid 3 ♥ (7 + 8 = 15; 18 – 15 = 3).
- Your partner has supported your suit and it is your turn to bid again
If you and your partner have agreed to use LTC, you will know that your partner assumed an LTC for your hand, based on whether your bid was an opening bid (7), an overcall (8), or a response (9) – as described in the last section.
However, you have calculated the LTC of your hand. If your actual LTC is one less than the level your partner assumed you have when they last bid, you can raise the bidding to the next level (still in the same suit). If your LTC is 2 higher than your partner will have assumed, you can raise two levels - but see cautionary note in the next paragraph. For example, if you opened the bidding with 1 ♥, your partner responded 3 ♥, and your calculated LTC is 6, you can bid 4 ♥. (Your partner will have assumed you have an LTC of 7, but you have 6. Bidding can be raised a level.)
To repeat the restrictions stated earlier in this note, using LTC is still relevant but you should put less dependency on it if your hand is balanced and you are investigating a trump contract. It is also less reliable for Slams than it is for Games, so be wary about taking the bidding beyond game level just based on using LTC. (You could use controlled bidding and / or asking for information on Aces to find out more.)
I’m sorry this may seem a little complicated if you are not already familiar with using LTC. It does come more naturally the more you use it and it is a method that enables experienced players to make better bids. I am not at the stage yet where using LTC comes naturally, but I am trying to use it for bidding trump contracts and it does work.

Answers to the remaining four hands in Section 2:
|
|
| Last updated : 29th Jul 2018 12:33 GMT |
|
|
|
| Notes on Peter's Presentation 10th July |
Suit overcalls
There are two measures to guide us on when it is appropriate to overcall a suit bid:
The two measures are:
- the number of points in your hand; and
- the “suit quality” of the suit you intend to use (which would almost certainly be your longest).
To overcall at the 1 level, you need at least 8 points and a suit quality of 7.
To overcall at the 2 level, you need at least 10 points and a suit quality of 8.
Suit quality is derived as the number of cards in your suit plus the number of honours in that same suit. Honours for this purpose are Aces, Kings, Queens, Jacks and 10s.
For example, if you have K 10 8 5 2, this would count as a suit quality of 7.
Most partnerships overcall at the lowest level in the above situations, using a “jump” overcall to signal that they are weak (6-9 points) with 6+ cards in the suit (and would have opened a “Weak 2” subject to vulnerability).
Responding to an opening bid by partner in a different suit
Before covering when you can respond in a different suit, I think it is worth mentioning first when you should respond in the same suit. In all cases, a response of some form should be made if you have more than 5 points.
Your priority as the partner of someone opening the bidding with a major suit bid at the 1 level is to support that suit if you can. (Some experts advise you to support with only 3 cards in the opening suit but John, my regular partner, and I do not initially support unless we have 4 cards to avoid giving too strong a message.)
The level of your initial response in the same major suit should be determined by the points in your hand (and not if you have more than 4 cards): 2 level for 6-9 points, 3 level for 10-12 and 4 level for 13+ points (unless you use a convention called Jacoby).
If your partner has bid 1 Heart, you should respond with a 1 Spade bid if you cannot support Hearts but have 4+ Spades. However, if your partner has opened 1 Spade and you wish to bid Hearts, you need 5+ Hearts to bid 2 Hearts.
If your partner opens with a minor bid, you should not initially support this suit, even if it is your longest, if you have 4+ cards in a major suit - sometimes expressed as “Do not deny a 4 card major”.
If you do wish to respond with a different suit at the 2 level, either as 2 Hearts in response to 1 Spade or 2 Clubs in response to 2 Diamonds, or in one of the minor suits because you cannot support your partner’s major bid, I was taught that you can only bid a different suit if:
You have 5+ cards in the suit; and
you have 9+ points in your hand.
Andrew Robson suggests a “Rule of 14” to cover this situation where you can respond with a different suit to the one opened by your partner if:
The number of points in all of your hand plus the number of cards in the suit you want to bid equals at least 14.
Robson’s rule is very similar to what I was taught but gives an added flexibility, for example if you have 8 points and a 6 card suit.
Most partnerships have the understanding that a response in a different suit should be at the lowest level you can bid unless you have 16+ points when a jump bid in a different suit shows this strength.
For completeness, if you have more than 5 points and cannot respond with a bid in any suit, bid 1 NT if you have 6-9 points. You can use 2 NT if you cannot bid a suit and have 10-12 points unless you are using 2 NT for the Jacoby convention.
|
|
| Last updated : 29th Jul 2018 12:33 GMT |
|
|
|
| 31st January Richard's lesson on Bidding |
This evenings lesson on Bidding will feature Overcalling and the suit quality test.
After the opponents open the bidding, the options are: Pass, Overcall or Double.
The first thing to consider is whether you have a hand with Playing or Defensive strength.
We looked at three examples.
a b c
K Q J T 9 8 A 7 4 K Q 9 7
7 6 4 A 6 2 A J 7 5 3
Q 6 5 A J 7 5 ---
6 6 4 3 K 9 8 2
Hand a) has good PS but little DS so should O/C 1s - or 2s if playing weak jump O/Cs.
Hand b) has little PS (three tricks) and good DS so should pass - even with thirteen points.
Hand c) has both PS & DS so pass if RHO opens a major, otherwise Double (see below).
With a balanced hand 15/17 points & with a stop you should overcall 1nt.
Partner should then continue with Stayman or Transfers as with an opening 1nt.
Requirements for the Suit Overcall.
At the one level. You should have a good 5+ suit & 8-15 points.
At the two level. Slightly more. As above with 10-15 points.
To determine the strength of your suit use the Suit Quality Test.
Honours + length = the number of tricks you may bid.
So A J T 7 4 2 = three honours + six cards means you could bit this suit to the 3 level
(assuming you have 10+ points).
Responding to Partner's Overcall.
With 8+ points raise partner's suit (with 3 or more) or introduce a new suit; 8-11 points.
A jump raise in partner's suit is 12-15 points.
With a Stop in Openers suit bid 1nt with 9-12; 2nt with 13-14 & 3nt with 15+.
A jump shift is forcing to game eg - (1h) - 1s - (p) - 3d (from you).
The Negative Double. (X)
Firstly a X of their opening 1nt is always for penalties.
But if the opps open a suit, then X shows:
An opening hand with shortage in their suit (no more than two).
and support for the other three suits (always four in an unbid major).
Use this take out X up to & including 2s.
Finally, note that partner must bid after the X - even with no points!
|
|
| Last updated : 29th Jul 2018 12:18 GMT |
|
|
|
| 14th February Richard's lesson on Defence |
This evenings lesson on defence will feature Opening Leads: dos and don'ts.
Active or Passive? Get this decision wrong and it can cost your side a trick.
To get to the answer the defender must tune into the bidding.
If the opps have made a brief, confident auction; 1s - p - 2h - p - 4h
then it may pay to make an active lead, taking a risk to defeat the contract.
If the opps have made a slow laborious auction say 1nt - 2c - 2h - 3h - 4h
then it is best to lead safe and not give a trick away.
Leads against NTs.
Lead ptrs suit or lead your longest suit (either top of a sequence or near sequence -
Q J 9 4 3) or lead 4th highest from say K Q 8 7 4. (But lead the K in a suit contract.
Avoid leading a suit bid by the opps.
Leads against Suit Contracts.
As above, also a singleton lead may work if you can tell from the bidding and
you hand that ptr has some strength. Avoid underleading an ace - x from Axx or
leading an unsupported ace - Axx. Prefer not to lead a singleton trump or a trump from four.
Rule of 11.
After the fourth highest card has been led, ptr of the leader subtracts the card led from 11.
The result is the number of cards left higher than that led in the other three hands.
For example.
K 5 2 The 7 is led (fourth highest). 7 from 11 = 4.
Q J 8 7 A T 9 3 So there are 4 cards higher than 7 in the other 3 hands.
6 4 The defender can see all 4 cards - K in dummy, and A T 9,
& realises that declarer can't beat the 7! The defender
can afford to play low and leave ptr on lead to continue the suit.
|
|
| Last updated : 29th Jul 2018 12:18 GMT |
|
|
|
| 21st February Richard's lesson on Declarers Play |
This evenings lesson on declarer play will feature Planning the play in No Trumps.
Trick 1.
When you have a choice of where to win the first trick, decide which suit
you plan to play on first. If setting up a suit in dummy (usually the weaker hand)
be careful to preserve your entry. For example.
A 5 The contract is 3nt by south & the lead is Qs.
8 7 4 How should south plan the play?
Q T 9 6 5 First count your winners: 2s, 2h, 1c & 4ds -
5 4 2 once the Ad has been flushed out.
As the suit to establish is Ds, preserve the As,
K 6 2 in dummy & win in hand with the King.
A K 5 Now lead the Kd. If the opps do not take it
K J 7 continue with the Jack, then the 7.
A J 9 8 Later cross to dummy with the carefully preserved
As to cash the rest of the Ds.
Had the first trick been won with the ace, and the opps
correctly held up the Ad twice, declarer would not have
an entry to play the winning Ds.
The Hold Up play.
This is a common technique used to exhaust one opponent of a danger suit,
so that if that player gains the lead, they are unable to return it.
6 5 The contract is 3nt by south & the lead is Ks.
A 5 4 Declarer can see 9 winners or 10 if the Kd is 'onside'.
A Q J T 9 If declarer wins the Ks and plays a D to the Q, east will
6 5 4 win and return a S, and declarer will lose 4s & 1d
K Q J T 9 4 3 2 and the contract will be 1 down.
T 8 7 J 9 6 3 Declarer must consider how the spade suit is dividing.
6 2 K 8 7 If 4/4 there is no danger, as there are only 3 losers.
K 7 3 J T 9 However if spades divide 5/3 it is vital that declarer
A 8 7 HOLDS UP the ace twice, winning the third one.
K Q 2 Now when the losing D finesse is taken, east will not
5 4 3 have a spade to return, and the contract will be made.
A Q 8 2 Declarer does not know how the spades will divide but
can afford to take the precaution of holding up just in case.
|
|
| Last updated : 29th Jul 2018 12:17 GMT |
|
|
|
| 7th March Richard's lesson on Defence |
This evenings lesson on defence will feature strategy for defending.
An accepted principle is that a defender should play a low card in second seat.
The reason for this is that we want our high cards to capture the opps honours
where possible, and so in second seat our partner has yet to play to the trick,
and may capture an honour with their card.
There are exceptions to this guideline. The two examples below show where
it is an error to play low, and after where it correct to do so.
Dummy If declarer leads a low card from hand
Q 5 towards dummy's queen, West should play the King,
West otherwise the king will not make a trick if declarer
K 6 has underled the ace.
Dummy Declarer leads low towards the King. Unless you think
K 7 5 4 declarer has led a singleton (by reference to the bidding
West or previous play), you should play low and let the King win.
A 9 2 This saves your ace for capturing something worthwhile
such as declarer's Queen. If this is the situation
Declarer and you unnecessarily play the ace, declarer will make
Q 8 3 both the King & Queen instead of just the King.
|
|
| Last updated : 29th Jul 2018 12:16 GMT |
|
|
|
| 14th March Extra lesson from Richard onTake out Double |
Richard will be giving a lesson on the Take out Double.
Firstly we must note when a Double is for Penalties.
1) After the opener has bid 1nt OR
2) It is a Double at the three-level or higher.
Requirements for the Take-Out Double are:
1) Minimum strength of an opening bid
2) Shape - shortage in their suit
3) No five card+ suit to overcall with.
Quite often you will find that you have the strength to
overcall but not the shape (no handy five card suit).
The rule is that a double is for take-out if it is a double of
a suit bid by the opps at the one or two level. Look on the double
as an overcall showing the unbid suits. So if you double their
opening suit bid you are showing shortage in that suit
(no more than two) and support for the other three suits.
Examples below are given to show when to double (X) and when not to.
North opens 1 club. What action should East take on these hands?
K 8 4 3 A J 8 7 A Q 8 7
Q J 4 2 Q 9 4 3 6
A Q 7 2 A T 7 4 3 A Q T 4 3 2
5 --- 6 2
X shows the X to show the majors bid 1D then if ptr bids 1H
other suits. - better than 1D. you can bid 1S.
Responding to Partners take out X.
You MUST bid after the X no matter how weak your hand is -
UNLESS there is an intervening bid by the opps, Then you can pass.
0-5 points : Bid a suit at the cheapest possible level.
6-9 points : As above or bid 1NT with a stop in their suit.
10-12 points : Make a jump bid in a new suit or bid 2NT.
13+ POINTS : Bid a game.
|
|
| Last updated : 29th Jul 2018 12:16 GMT |
|
|
|
| 28th March Richard's lesson on Bidding |
This evenings lesson on bidding will feature resolving a choice of responces.
Partner opens 1C, 1D, 1H or 1S.
With 0-5 points you should pass, unless you are maximum with your
points in the same suit; for example AJxx or KQxx.
Then bid this suit at the one level only.
With 6-9 points bid only at the one level or raise partner's suit.
Your choices with these weak hands are:
Raise ptr to the 2 level, bid a new suit or bid 1NT.
What to do if your hand fits two or more responses?
Your first priority is to check for a major suit fit.
If ptr opens 1S or 1H then:
1. Raise ptr's major.
2. Bid 1S over 1H if unable to support Hs.
3. Respond 1NT
If ptr opened with a minor suit then:
1. Bid a major at the 1-level.
2. Bid 1NT.
3 Raise opener's minor.
|
|
| Last updated : 29th Jul 2018 12:15 GMT |
|
|
|
| 4th April Richard's lesson on Declarer Play |
This evenings lesson will feature Declarer play in Suit contracts.
In lesson one we looked briefly at this topic.
The best way to learn is by repetition, so I make no apology
for going over the same ground from time to time.
As always Plan the Play after the opening lead appears.
This means counting your winners and losers and seeing
where the extra tricks might come from. Your next consideration
is whether to draw trumps immediately. This is normally done
because we do not want the opps small trumps to trump our winners.
The two sources of additional tricks can come from ruffing
losers in dummy, or by setting up a side suit.
K 8 7 South plays in 4S. Fortunately a heart is not led.
8 3 2 How would you play after a club lead?
A 6 First count your winners: 5S, 3D & 1C.
A J 7 6 3 Now your losers: 3H & 1C. So an extra trick needs to be found.
Should you draw trumps right away?
A Q J T 3 The answer is no because you must trump a heart first.
6 5 4 But you have an equal number of hearts in hand & dummy!
K Q 5 However there is a way to create a shortage. Can you see?
4 2 If you play 3 rounds of Ds you can throw a losing heart from dummy.
Now you play a heart and win any return (say a trump). Win and play
a second heart. You have now created a heart void in dummy.
Win the expected trump return and trump your third heart in dummy.
Now and only now do you draw the outstanding trump(s).
So you made 5S, 3D, 1C plus a heart trumped in dummy - ten tricks.
No doubt a challenging hand to play. First create the heart shortage. Then later trump a heart.
This was one of four prepared hands played at the Club last evening.
Congratulations to Thelma who was able to make 4S, by playing as described.
|
|
| Last updated : 29th Jul 2018 12:15 GMT |
|
|
|
| 11th April Richards lesson on Defence |
This evenings lesson on defence will feature signals and discards.
If partner leads a suit and you are not trying to win the trick,
you can signal your count. Play high/low to show an even number,
and low/high to show an odd number.
Q 8 3
6 led J 9 4
Partner leads the 6, dummy plays the Q. You play the 4,
to show an odd number.
Giving count should be your primary method of signalling.
When on lead and in possession of AK or KQ you can
agree that leading the ACE asks for attitude (high to encourage)
while leading the KING asks for count (high even number).
When discarding - unable to follow suit - give an attitude signal.
Throw a high card to encourage in that suit or low to discourage.
One final method not previously discussed is the suit preference signal.
When partner leads an A, or K from AK in a suit contract,
and dummy has a singleton, a switch to a new suit will usually be required.
For example spades are trumps and partner leads Ace of clubs
7
A Q 9 6 2 (you)
Play the 2 to ask for a switch to the lower of the two remaining suits (outside trumps),
and the 9 for the higher. So here the 2 asks for a diamond while the 9 asks for a
switch to hearts.
|
|
| Last updated : 29th Jul 2018 12:15 GMT |
|
|
|
| 25th April Richard's lesson on bidding |
Richard will be giving a lesson on Pre-emptive three bids.
Pre-empts force the opposition into guessing, and when they have to guess, sometimes
they will guess wrong. Therein lies the profit from the pre-empt.
Pre-empts can also be constructive in getting your side to the right level.
A pre-empt skips two or more levels of bidding. A p-e of 3D skips 1D & 2d.
Likewise 1C - 3D is a p-e. Normal strength is 6-10 points & a good 7+ suit.
Count every card after the third card as one playing trick.
An ace or king in the first three cards of the suit count as one PT each.
Count a queen as one trick if there is a second honour, eg KQx=2 tricks, QJx=1 trick.
With 6 playing tricks open 3 if Non Vulnerable, pass if Vulnerable. With 7 PTs open 4 if NV, 3 if V.
With 8 PTs: NV open 4 if your suit is a major & 5 if your suit is a minor. If V open 4.
By deducting three tricks if NV and two if V, partner of the pre-emptor can accurately
assess the pairs options; pass 4,5,6 or maybe 7 of the suit!
Add to your evaluation of partners hand, your own 'quick' tricks.
Count A K Q in the trump suit as one trick each.
In other suits count A K as two tricks, A Q as one & half.
Examples. Partner opens 3H. What do you respond (i) NV, (ii) V?
A K 5 4 3 A K J 8 7 2 A Q J
- - - 5 5 4 3
J 8 7 4 3 A Q J Q J T 6
9 7 6 J 3 2 K Q T
(i) no bid - do not 3S - new suit is 3NT - you have a dble stop
rescue a pre-empt forcing in each suit outside hearts.
(ii) no bid - you need as above 3NT - you may have 4
3+ winners opposite losers in a heart game.
a V pre-empt to bid
game.
|
|
| Last updated : 29th Jul 2018 12:13 GMT |
|
|
|
| 16th May Richard's Lesson on Declarer Play |
This evenings Lesson on declarer play will feature the power of the Tenace.
When you have winners in both hand and dummy, the order in
which you cash your winners may be important. If you have a highish
card say 9, 10 or Jack, plus a winning card in the same suit, for example
A J x x or K T x x these are potential finesse positions. A tenace is a
split-honour holding where an opp has the missing high card(s).
Dummy
A J 6 4 2
Q T 9
K 8 7 5 3
Dummy's A J is the tenace. Play first the winner from the hand that does
not hold the tenace. Here you are missing Q T 9. So start with the King,
and if East shows out, play towards the Jack. Had West been void, nothing
could have been done to prevent a loser.
Whenever you have winners in both hands, check which hand contains
a card nearest to winning rank. Treat that as your tenace and first cash
the winners from the other hand.
K T 5 3
J 8 7 4 9
A Q 6 2
Here the ten is the highish card, not quite a winner, but next to a winner.
Play the A Q first, retaining the K T tenace. If the suit splits 3-2 your
precaution was unnecessary. However if West began with J x x x cashing
the A Q first saves a trick. (If East began with J x x x a loser is unavoidable).
Here is an example where the highish card is more than one step away
from the honour card, with your combination missing the J & T
K Q 5 3
10 J 8 7 4
A 9 6 2
The 9 is the nearest to a winning card, so treat this as the tenace and cash
the K Q first. If the suit splits 3-2 there are no losers. However if the cards
split 4-1 the correct approach also avoids a loser whenever West started
with the single Ten or Jack. On the king West's honour falls, on the queen
West shows out, and with the A-9 tenace retained, you are able to take
the marked finesse against East's remaining honour.
|
|
| Last updated : 29th Jul 2018 12:13 GMT |
|
|
|
| 30th May Richard's Lesson on Defence |
This evenings Lesson on Defence will feature when to cover an honour with an honour.
As a defender, when to cover an honour with an honour can seem straightforward,
but in fact can often be a tricky situation to resolve. The purpose of covering an
honour is to promote a card in your hand or partner's.
Q 8 4 The queen is led from dummy. You should cover with the
T 6 5 K 7 2 king in order to promote partner's ten. You have to hope
A J 9 3 partner has the jack or ten. If partner has neither then declarer
always has four tricks. If you do not cover declarer makes them all.
A situation when we do not want to cover is when dummy has two touching honours.
Here it is usually best to cover the second of touching honours.
J T 5 To best grasp this example, write down or set out with cards.
Q 8 6 K 9 4 The jack is led from dummy. If east covers with the king, the
A 7 3 2 defenders make one trick. If the defender correctly withholds
the king until the ten is played, the defence gains two tricks
Q J 9 Here covering the queen with the king exposes the ten to a
T 8 6 K 5 4 subsequent finesse, as the J 9 sits over the ten. Delay until
A 7 3 2 the jack is played and the ten is promoted to a winner.
A T 9 8 Here partner has shortage & probably the queen -
K 6 5 3 2 ? if declarer had the queen it would likely be led to
J? encourage west to cover. So west should play low.
a) to avoid colliding with partner's queen &
b) because you have length your king cannot be captured.
A final example.
Q The queen is led from dummy. Should you cover with the king?
432 K 7 5 Answer: No - whether a suit contract or no trumps. In NTs you
A J T 9 8 6 have a certain trick by not covering, also if this is the trump suit.
In both the last two examples, if your honour can't be captured do not cover.
|
|
| Last updated : 29th Jul 2018 12:13 GMT |
|
|
|
| 6th June Lesson from Richard on Bidding |
This evenings lesson from Richard is on Bidding with weak responding hands.
Partner opens one of suit -
0-5 points.
Pass. But as well as High Card points
count one point if a suit has five cards. So 5 HCPs plus
a five card suit = 6 points.
6-9 points.
Bid only at the one level - or raise ptrs suit.
Respond 1NT with no support, no 4 card suit except
ptrs club suit. With 4-3-3-3- shape bid 1NT over ptrs 1C.
So your options with 6-9 points are:
Raise opener, bid a new suit, bid 1NT.
Note. You should have 10+ points (or 9+ a 5 card suit)
to respond at the 2 level.
When you have a fit with ptr count ruffing points.
Shortage in the other suits is an asset.
Count 5 pts for a void, 3 for a single, 1 for a dble.
With a choice of responses bid your longest.
With 2 five card suits bid the higher ranking.
With 2 four card suits bid the cheapest -
note cheapest = first available, not lowest ranking.
|
|
| Last updated : 29th Jul 2018 12:10 GMT |
|
|
|
| 13th June Lesson fronm Richard on Declarer play |
This evenings lesson from Richard will feature playing towards high cards.
It is important to protect your Court cards from falling unnecessarily
to higher cards. For example -
west K Q J 2 : 6 4 3 east
Here, assuming entries to the weak hand, you should play towards
the honours 2 or 3 times, if the Ace has not appeared. This guards
against South having A T x x or North having a single Ace. In both
these situations you will lose two tricks instead of one by starting
with the King.
A J 9 : 7 5 2
The finesse against the 10 must be taken first. If the 9 falls to the
king or queen, a finesse develops against the other Court card.
But the order cannot be reversed by playing the Jack first. The
second finesse does not exist until the first has succeeded.
In the next example declarer needs three tricks from this suit
to make the contract.
K 4 3 2
A 9 J T 8
Q 7 6 5
Although prospects appear doubtful, declarer can succeed by
guessing or using any clues from the bidding or play to figure
where the Ace is. Then the idea is to play through the Ace -
here towards the King. Having won, a low card is played
from both hands hoping that the Ace drops doubleton.
|
|
| Last updated : 29th Jul 2018 12:10 GMT |
|
|
|
| 11th July Richards lesson on Defence |
Richards lesson on defence will feature Attack on Suit Contracts
Sometimes when defending, the prospects for defeating the contract seem unlikely.
From the opening few cards, and having counted declarer's points and viewed dummy,
declarer appears to have enough to make the contract. Take a look at this example.
N You are East and South plays in 2 hearts.
K x x Partner leads the AD, followed by the K & Q.
xx West then plays the thirteenth diamond.
xxx It is usually poor bridge to allow declarer to
K Q J xx trump in one hand while discarding in the other -
E known as a 'ruff & discard.' So what can partner's
Q T x x motive be? The most likely answer is that partner
Q x has a potentially useful trump holding, and wants
x x x you, as East to FORCE a trump honour from declarer.
A x x x So trump - with the Queen. If declarer overruffs with
say the ace, your side is likely to benefit.
Let us look at some of the trump holdings partner could have. Let's say K T 8
or A T 8 or J T 2. With the first two combinations, by you trumping with the QH,
partner will now make three tricks. With J T 2 partner will make two tricks.
T 8 3 2 will also yield two tricks. Even an apparently useless trump holding
like 9 4 3 2 will now produce one trick. Had you not played the Q of trumps
on that fourth diamond, your side would have made one trick less each time.
By driving out the ace (or king) you PROMOTED - raised by one grade -
every trump in partners hand. So look out for opportunities to promote
trumps in partner's hand, by you trumping HIGH - a small trump has no benefit.
|
|
| Last updated : 29th Jul 2018 12:09 GMT |
|
|
|
| 25th July Richard's lesson on weak jump rises |
This evening Richard will feature weak jump raises .
|
|
| Last updated : 29th Jul 2018 12:09 GMT |
|
|
|
| 24th January Richard's Lesson on Declarer Play |
Planning the Play in a Suit Contract.
After dummy appears declarer should count winners,
and then look to see where additional tricks might come from.
You also have to decide whether to draw trumps immediately.
There are two main sources of making extra tricks.
These are: Trumping losers in dummy.
Setting up a long suit outside trumps
Usually it is advisable to play trumps first so that the opponents
do not trump your winners.
However, both options above require that you delay playing trumps
while you trump losers or establish a second suit.
|
|
| Last updated : 29th Jul 2018 12:06 GMT |
|
|
|